How to Use the Zoom App on an iPhone & iPad
How does Zoom work? How do I download the Zoom app and join a Zoom meeting or make a call? Here are the answers to these questions and more!


Zoom is a web and app-based service that offers the ability to chat, make a phone call, host a webinar, create a virtual conference room, and host or join online audio and video meetings with people around the world. You can use Zoom on your iPhone and iPad to audio or video chat between two people or with a group of up to one hundred. Zoom works for both Android and iPhone, PC, and Mac, so all your contacts can communicate.
Related: FaceTime Guide for iPhone & iPad: Making Group Calls, Using Audio or Video & More
We've written a Zoom troubleshooting guide for audio, a Zoom troubleshooting guide for video and freezing, and a guide for looking good in Zoom calls. For more great Zoom tutorials, check out our free Tip of the Day. Now, let's get started learning how to use Zoom, including how to download, create a Zoom account, log in, participate in meetings, use a Zoom background, and all the Zoom features and settings you need to know to navigate the platform successfully.
Zoom System Requirements: iPhone, iPad, iPod Touch
If your iPhone, iPad, or iPod Touch includes the following features and software, you can use it with Zoom.
Hardware
iPhone 3GS with no front-facing camera, iPhone 4 and later, iPod Touch 4th generation and later, iPad 2 or later, iPad Pro, iPad mini
Software
iPhone, iPod Touch, or iPad running iOS 8 or later.
iPad running iPadOS 13 or later.
Browser
Safari 5+ or Chrome
Processor
1 GHz or greater single-core processor (non-Intel)
Bandwidth
Zoom can automatically adjust for Wi-Fi or 3G. If you're connecting via Wi-Fi, you'll need:
- 600kbps for one-to-one calls with high video quality and 1.2 Mbps for HD calls.
- 600kbps or 1.2Mbps for group calls with high video quality. 1.5Mbps to use gallery view in group calls.
If you're not sure if your internet speed is adequate, there are lots of different speed tests available online. Some popular options include Fast and Ookla.
How to Download & Install Zoom & Create a Zoom Account on an iPhone & iPad
If you want to install and use Zoom on your iPhone or iPad, visit the App Store and download Zoom Cloud Meetings (Free). If you're new to this, check out our tip on how to download apps. Once you've downloaded and opened the Zoom app, it's time to create an account.
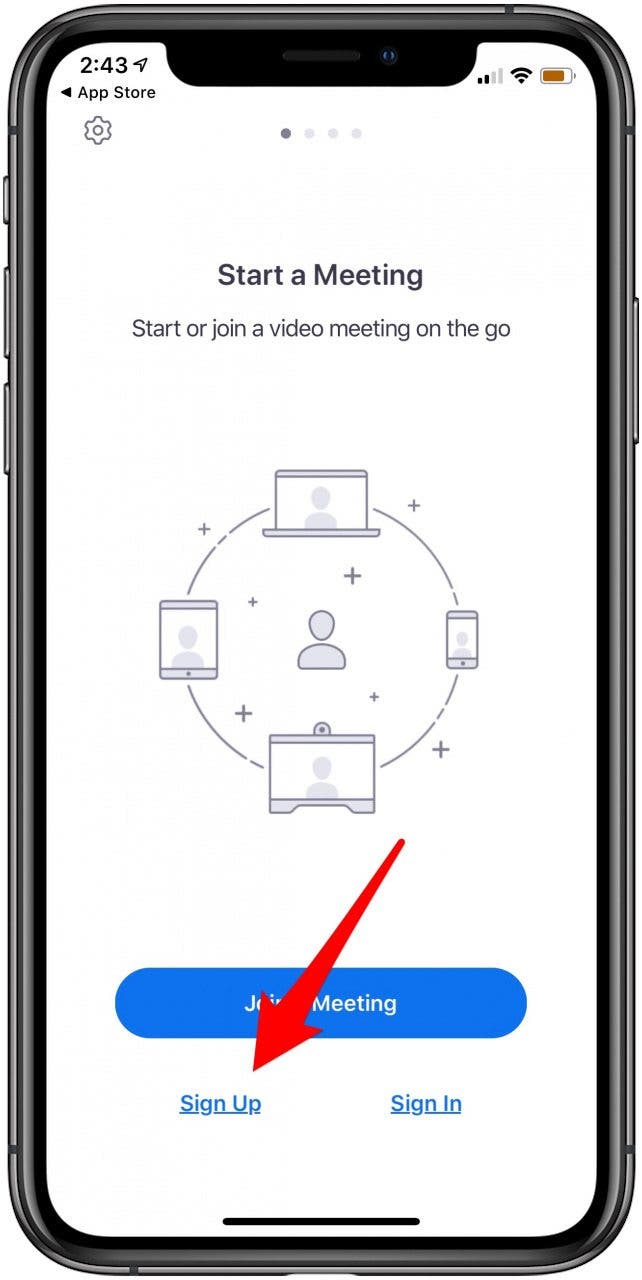
- When you open the Zoom app, you'll see three options; tap Sign Up.
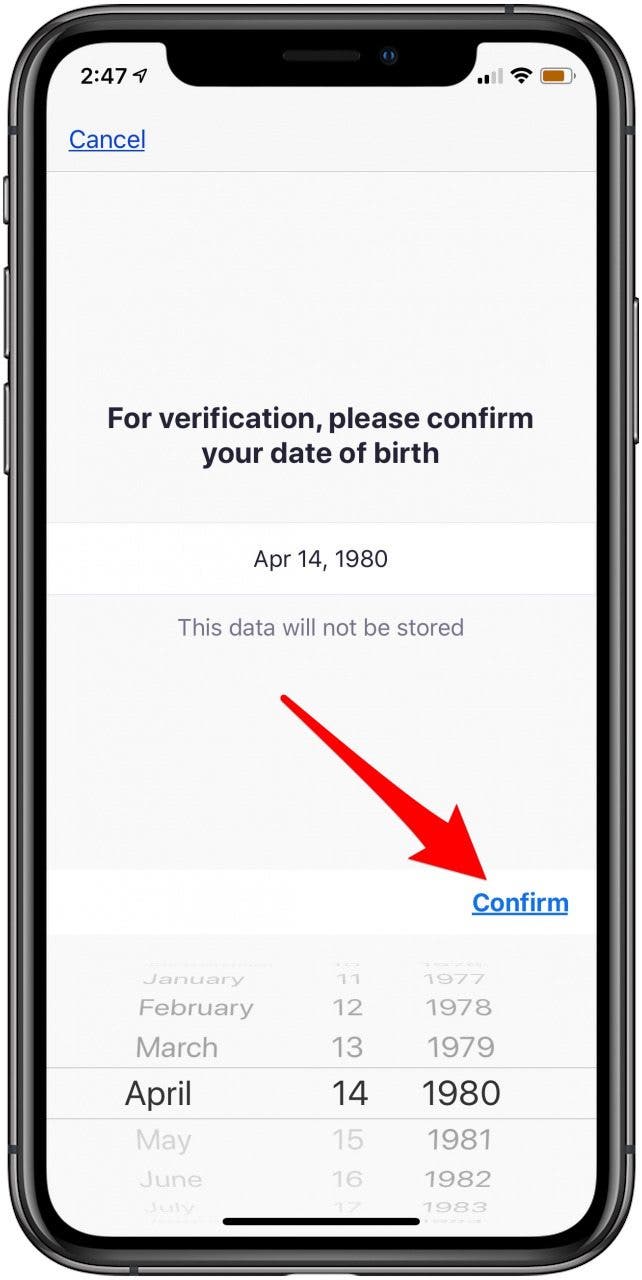
- Enter your birth date and tap Confirm.
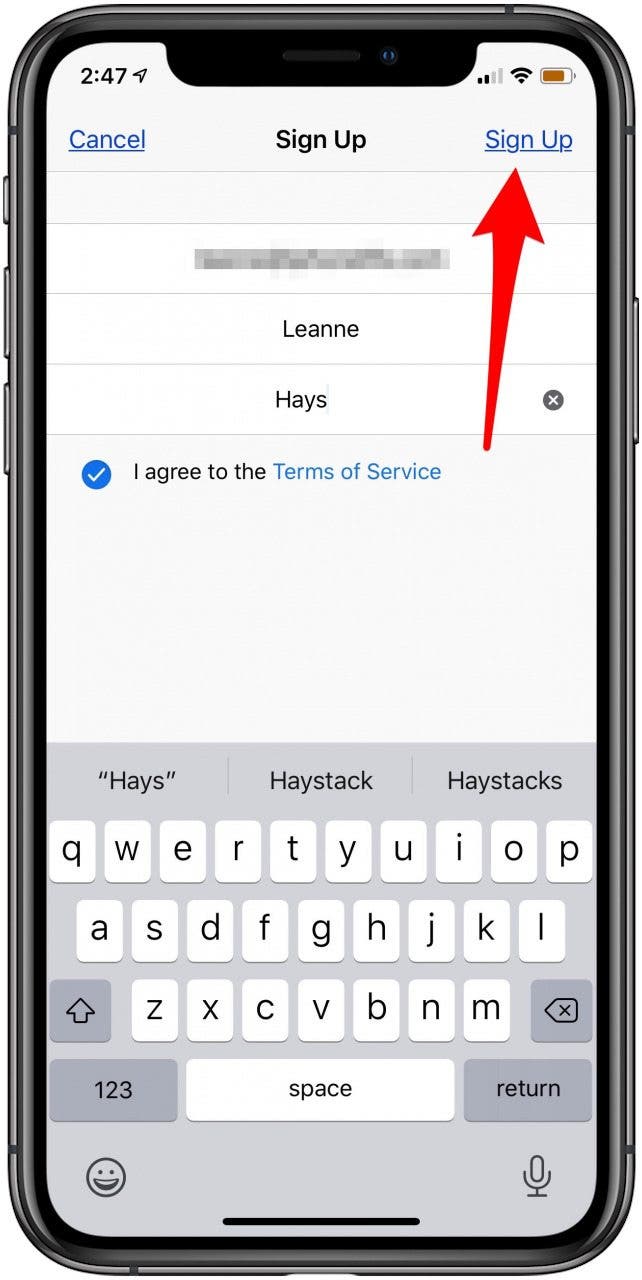
- Enter your name and email address, agree to the Terms of Service, and tap Sign Up.
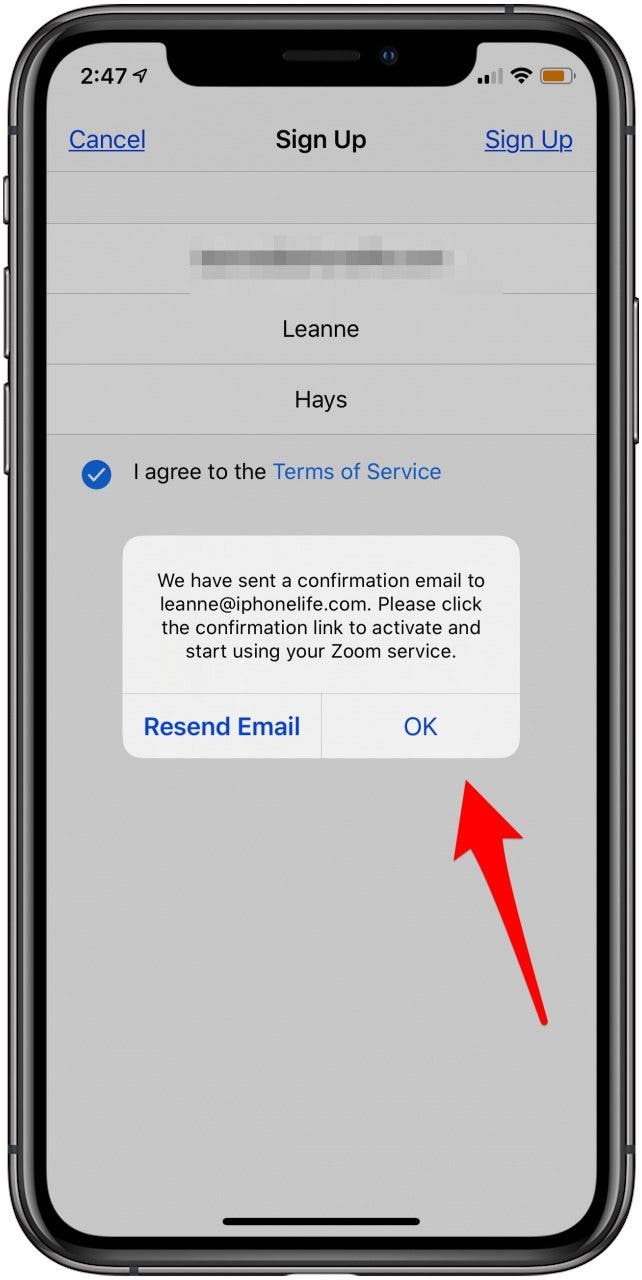
- Tap OK, then go to the inbox associated with the email address you entered, and click the link to activate your Zoom service.
You'll set up a password, which you can save to your iCloud Keychain. If you need to enable your iCloud Keychain, we have a tip on how to do that.
The Zoom app will ask if it can send notifications and access your calendar, to help you schedule and remember your meetings. You'll also have the option to enable Zoom to use Siri, so you can use Siri to start your Zoom calls. If your device has Touch ID or Face ID enabled, you'll have the option to sign in with these features.
How to Join a Zoom Meeting
If someone else has set up a Zoom meeting, there's more than one way to join, since there is more than one way to be invited. If you've received an invitation via email or text message, click the Zoom link included, and follow the prompts. You need to enter a password if one was included. If you don't have a link, but have the Meeting ID, follow the steps below.
- Open the Zoom app and tap Join.

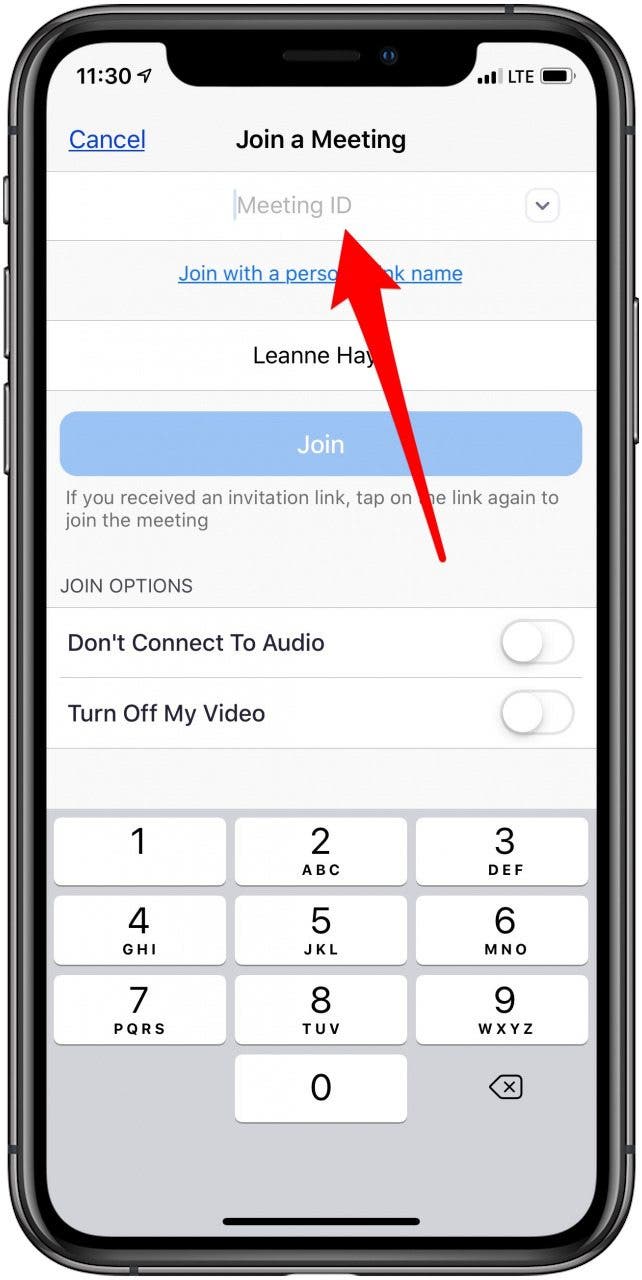
- Enter the Meeting ID if you're joining a meeting for the first time.
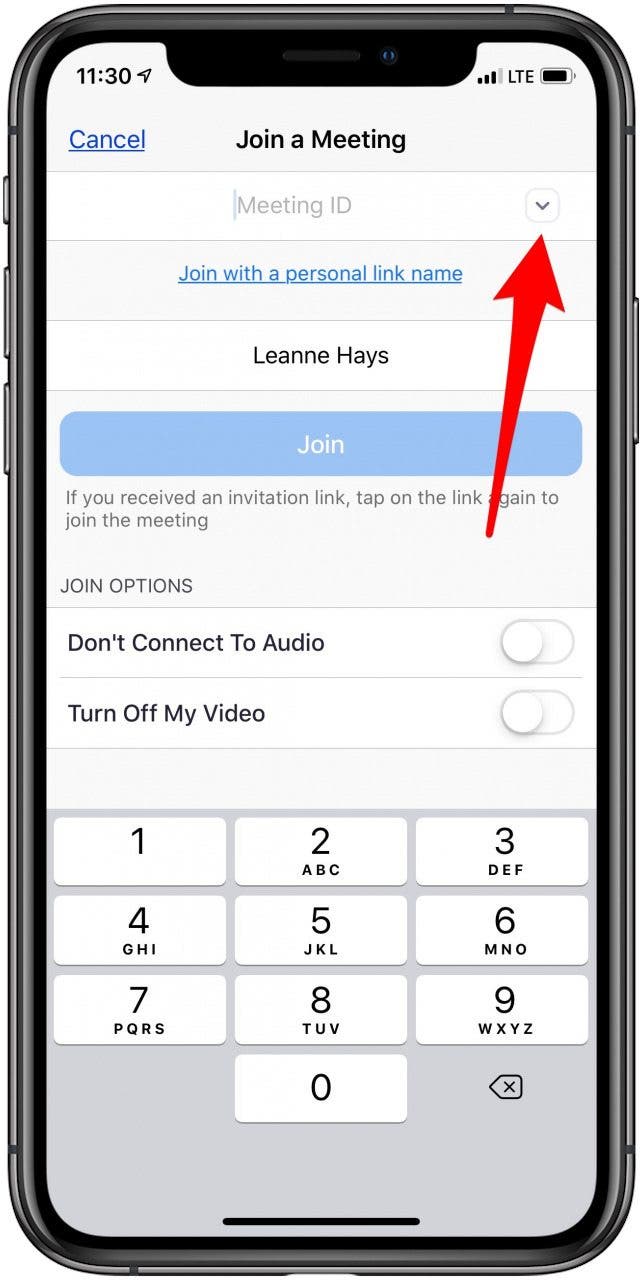
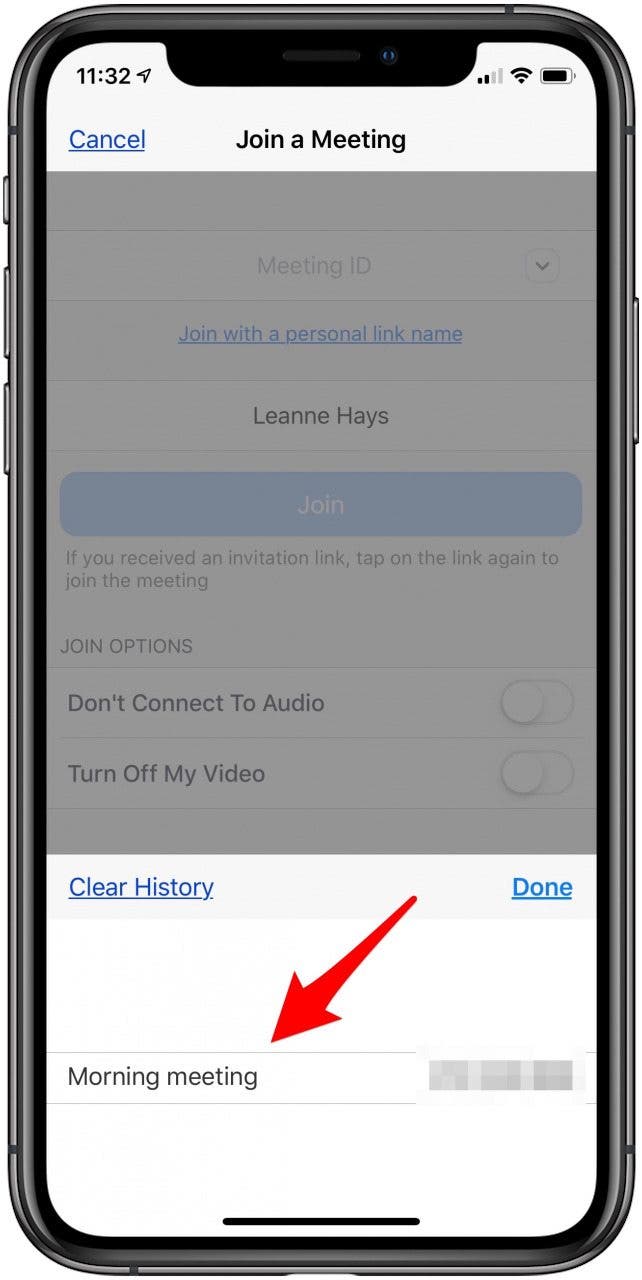
- If this is a meeting you've joined before, tap the small arrow to show all your previously joined meetings.
- Tap the meeting you want, then tap Done.
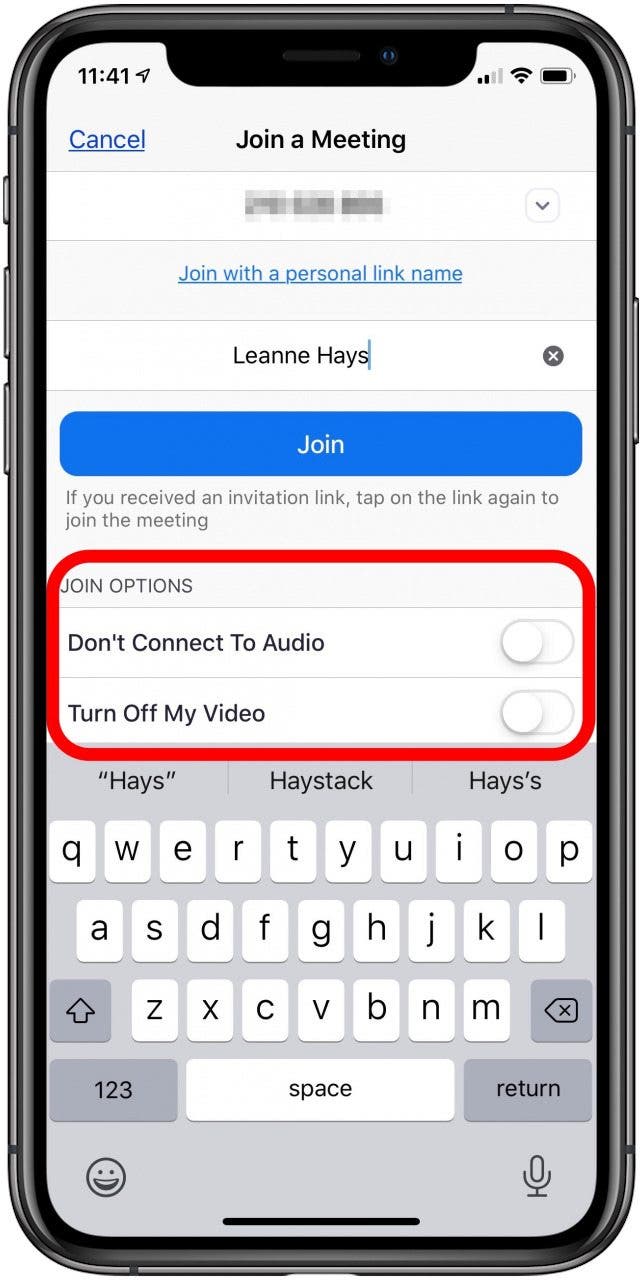
- You have the options not to use your audio, video, or both.
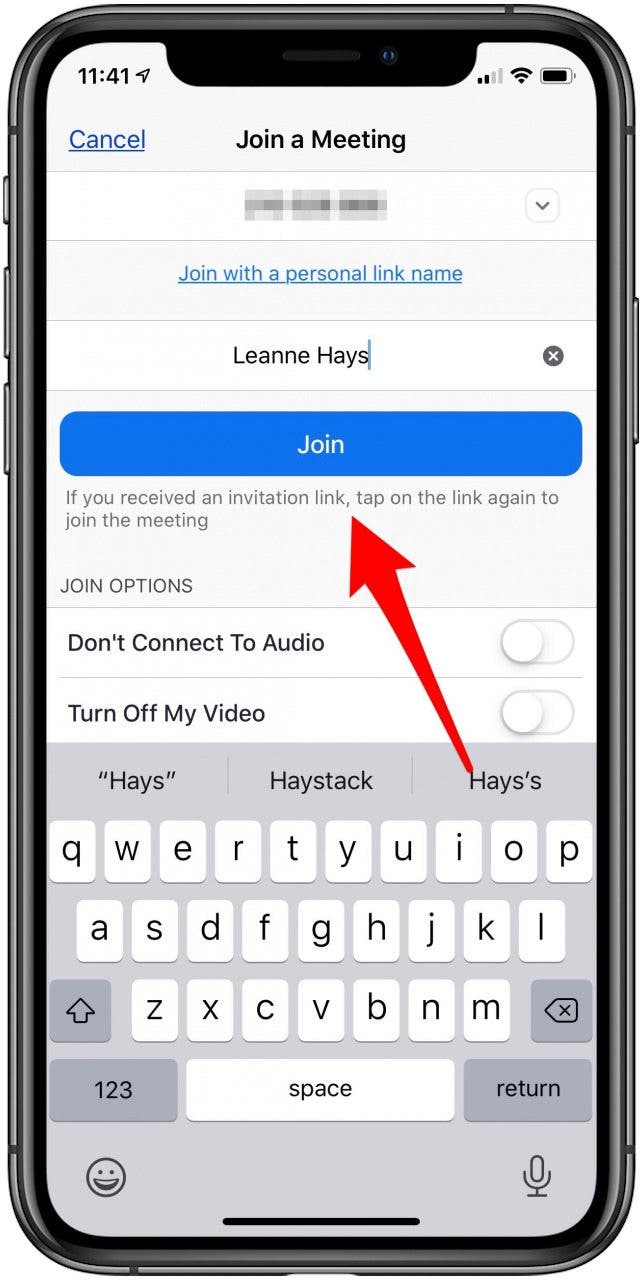
- Tap Join.
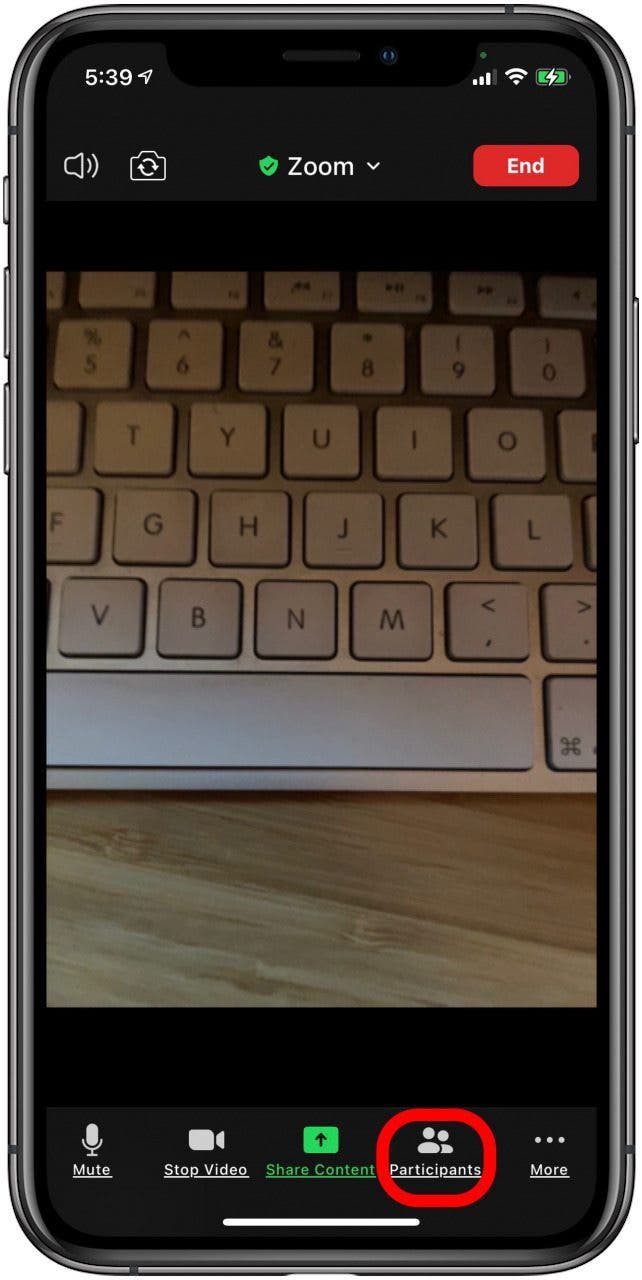
*Note: Many people get confused during Zoom calls because icons disappear from your display if you haven't touched it in a while. Just tap your screen once, and all the controls will reappear. *
How to Create a Personal Meeting ID (PMI) to Set Up Scheduled or Instant Zoom Meetings
Zoom offers two types of meetings, Scheduled or Instant. If you need to host either type of Zoom meeting, set up a Personal Meeting ID (PMI). Using a PMI sets up a virtual meeting room that's always available at that address (PMI). This virtual meeting room will always be accessible using its link and PMI, so people you share this login information with can join meetings in this Personal Meeting room at any time. Personal Meeting IDs are also handy because you can customize audio, video, recording, and security settings as needed for each of your PMIs, and not have to start from scratch before each meeting.
If you have several different types of meetings to conduct, such as one for friends and another for family, or one for your clients and another for the executive team, you'll want to set up a separate virtual meeting room with its own PMI for each one. Also, be sure to only share the link and PMI with people who need to join that particular meeting.
Don't use a PMI that you want to use for personal or work meetings for a public event where you share the Zoom link on, say, social media. Anyone who saves that link can enter your meeting room at any time after that, and share it with others, who can crash your meeting as well. You'll find instructions below for how to password protect your Zoom meeting rooms, but even so, if someone you invited shares the link and password with people you didn't invite, things can quickly get out of hand.
Here are instructions for setting a meeting room with a Personal Meeting ID.
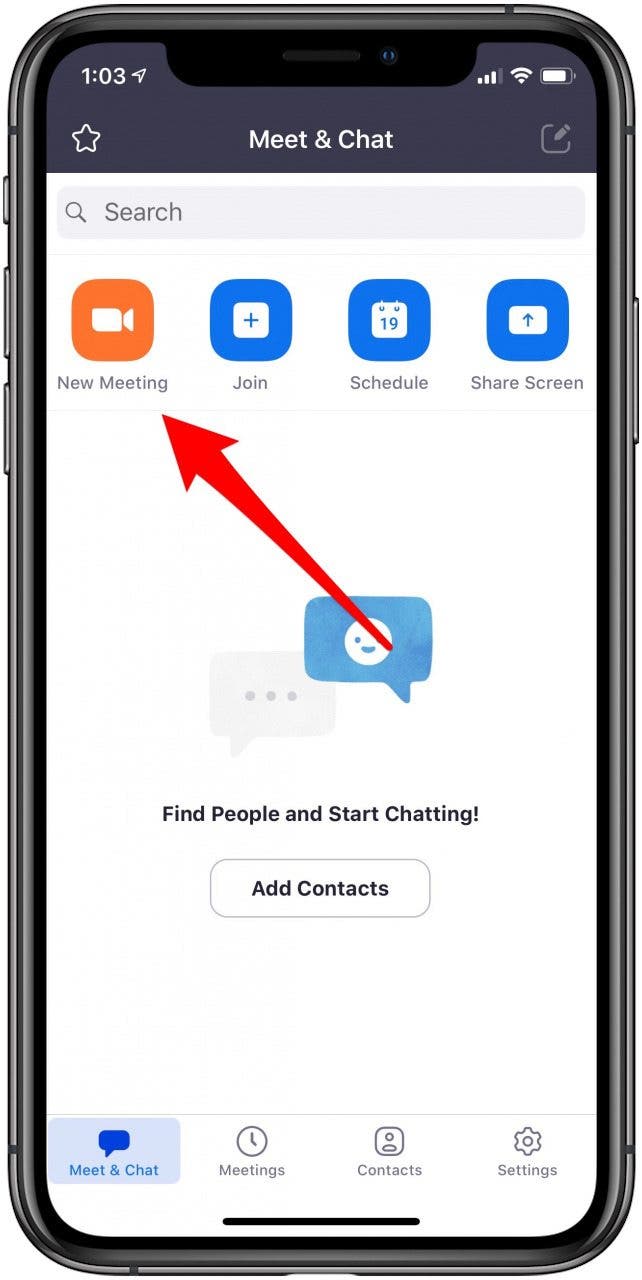
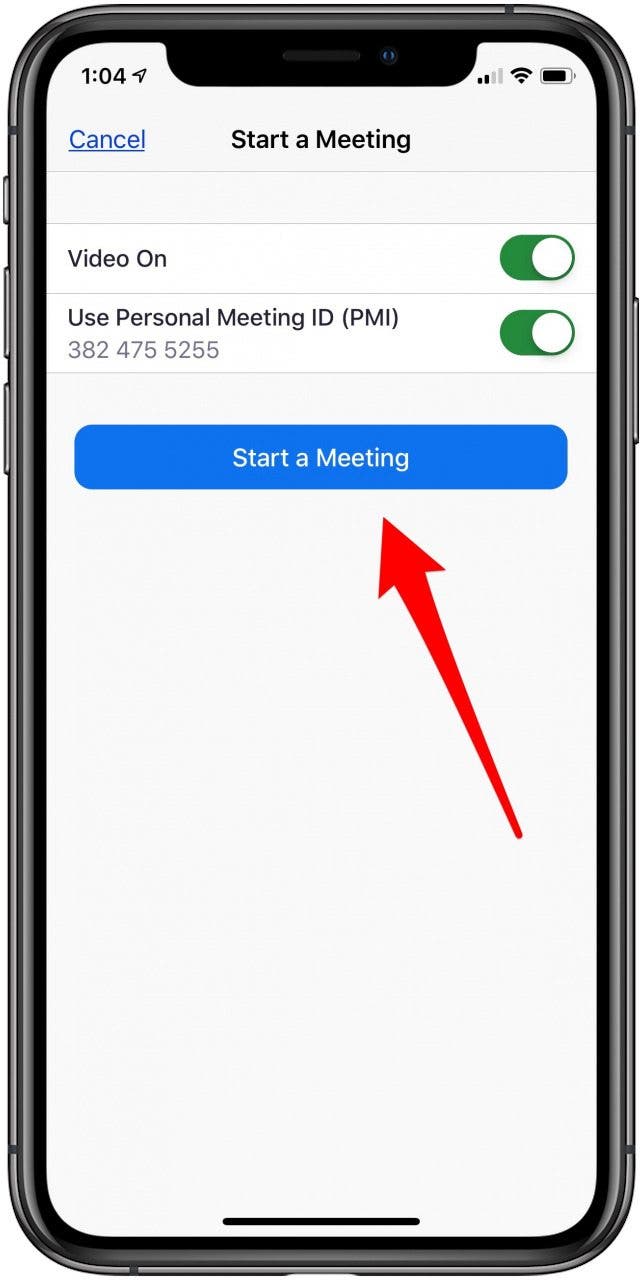
- Open the Zoom app and tap New Meeting.
- Toggle on Use Personal Meeting ID.

- Tap Start a Meeting.
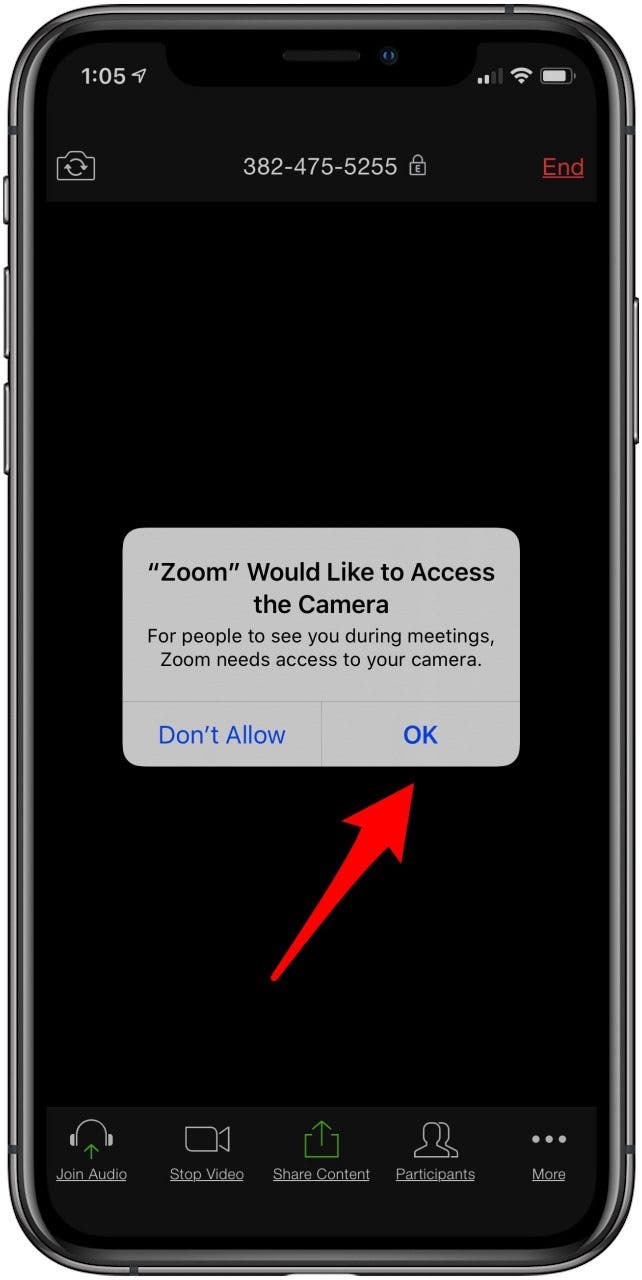
- If you want video, tap OK when the app asks for camera access.
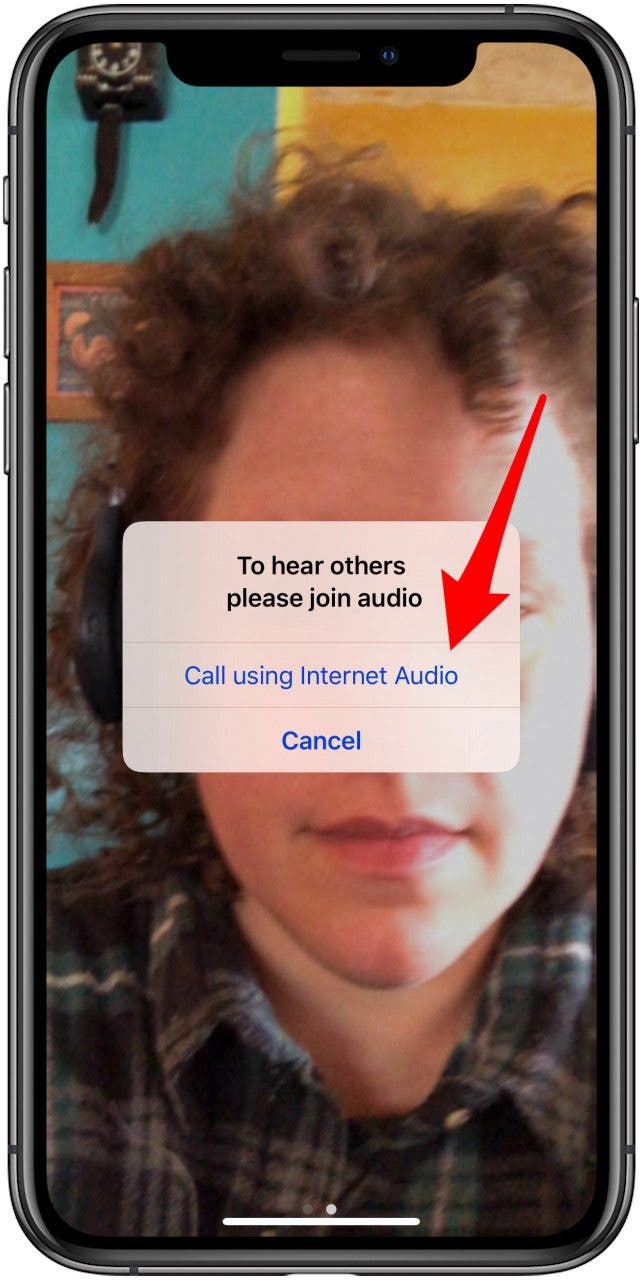
- Tap Call using Internet Audio to enable sound.
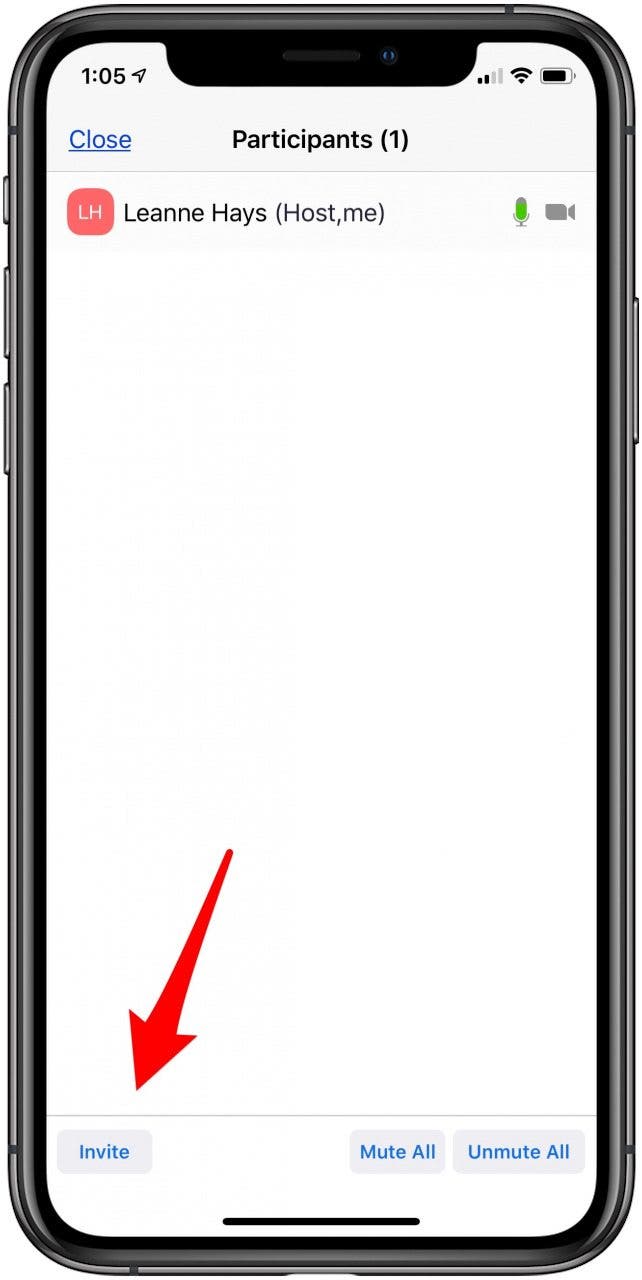
- Tap the screen to reveal the controls at the bottom, then tap Participants.
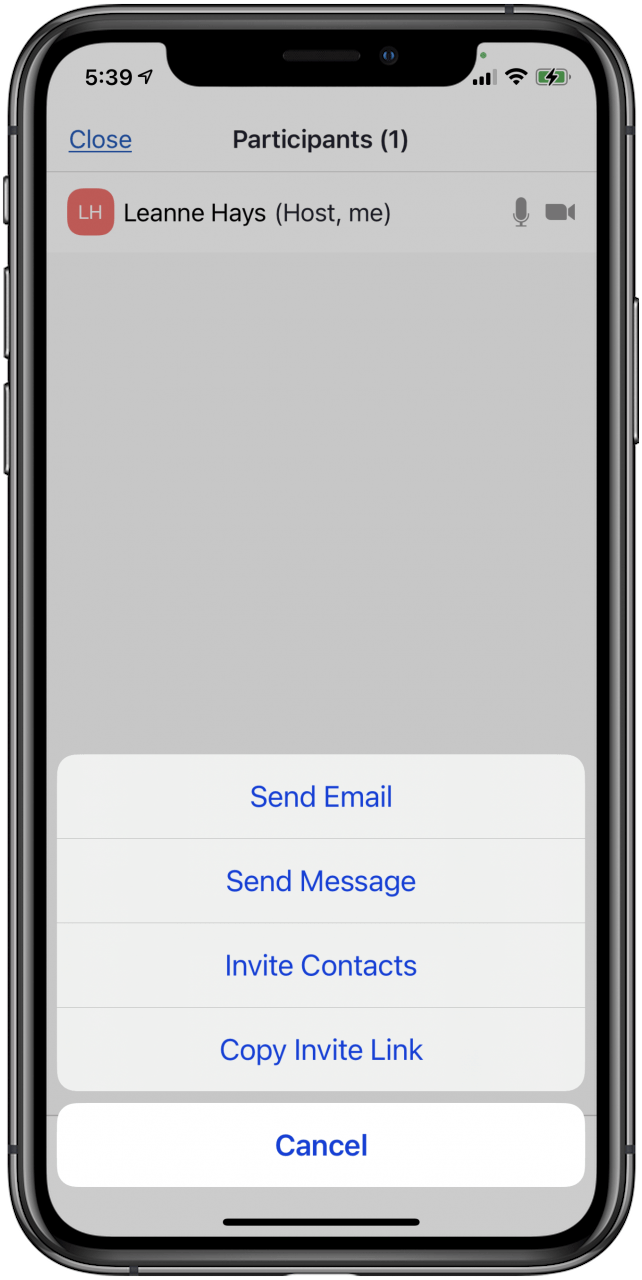
- Tap Invite to send people a link to your meeting.
- Methods include Send Email, Send Message, Invite Contacts, or Copy Invite Link.
You can now use this PMI for future meetings, whether scheduled or instant. You can invite more people later, set a meeting password, and change multiple other audio, video, and security settings as needed.
How to Host a Scheduled Zoom Meeting
You can start a scheduled meeting with a Personal Meeting ID (PMI) you previously created, or without one. To do this:
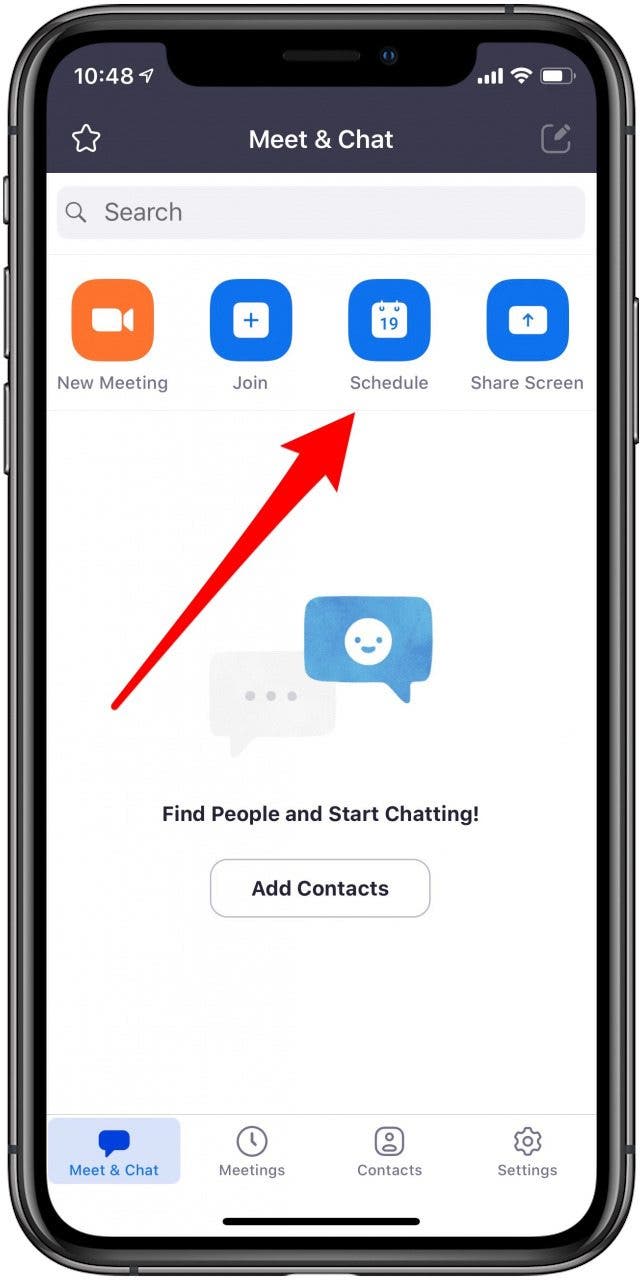
- Tap the Schedule tab on the Zoom app Home screen.
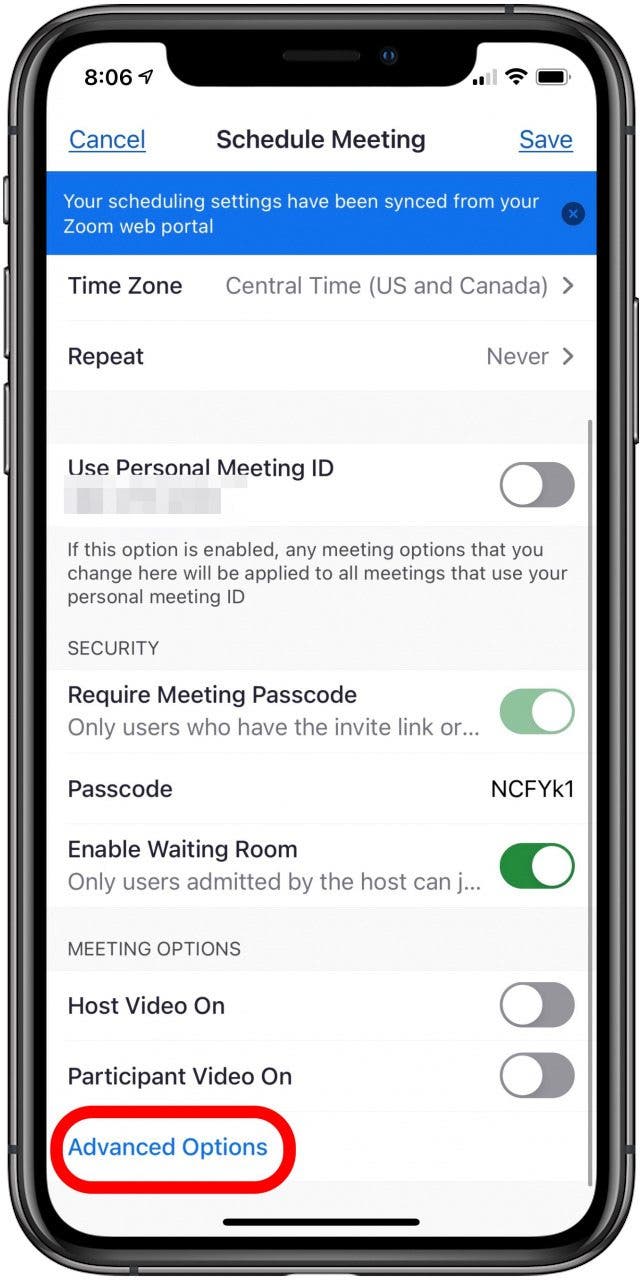
- Fill in the meeting name, choose start time and duration, decide whether or not to use a PMI, set your passcode, enable a waiting room, and other meeting options.
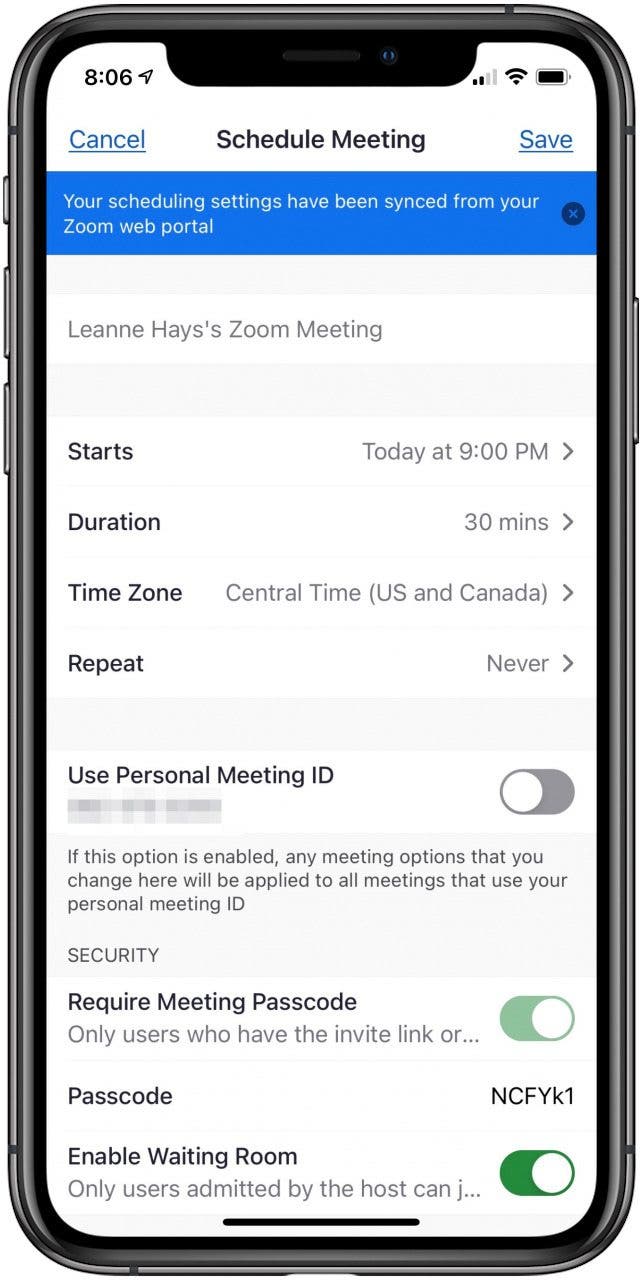
- Tap Advanced Options if you'd like to allow meeting members to join before you, or automatically record your meeting. Tap Save when finished.
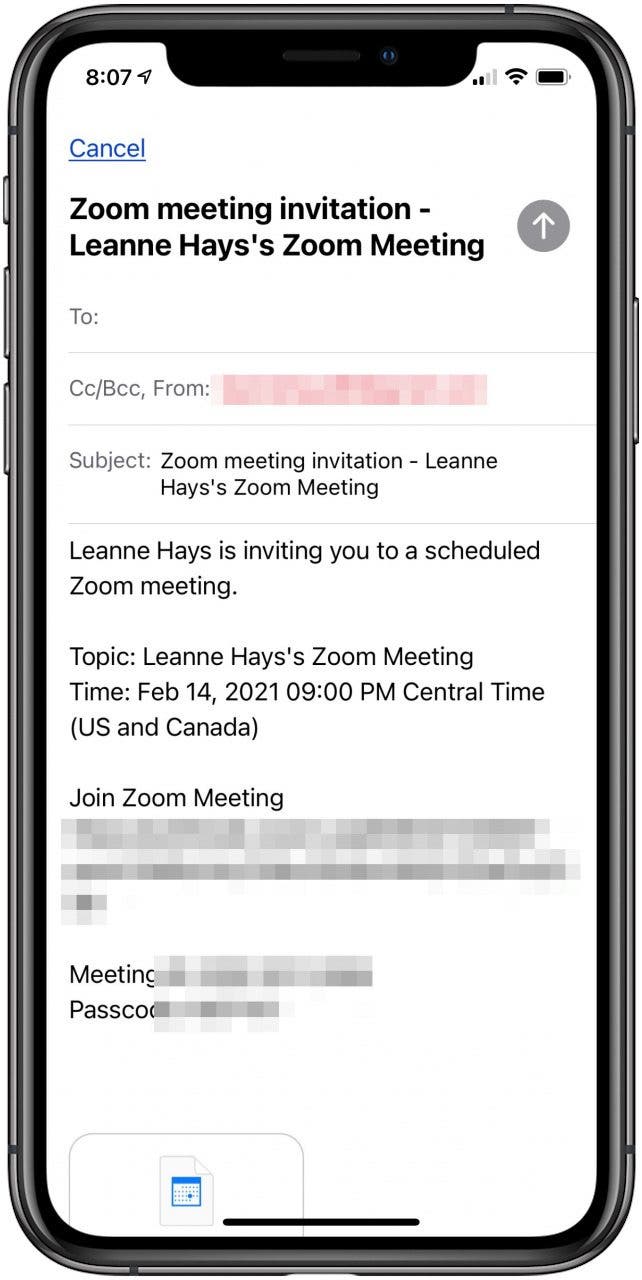
- A Zoom link and invitation will be generated; enter recipients in the To: field, then tap the send icon.
- When it's time for your meeting to begin, tap Start next to its Meeting ID on your Zoom Home screen.
How to Edit Personal Meeting Room Settings
To edit your meeting settings before the meeting starts:
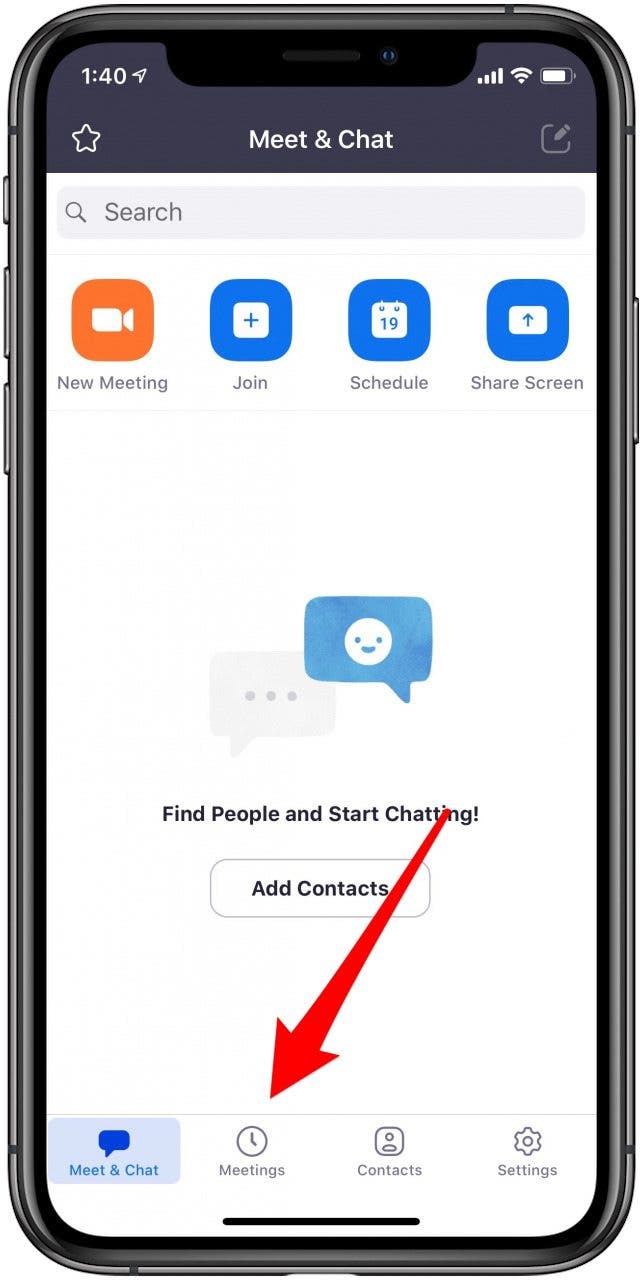
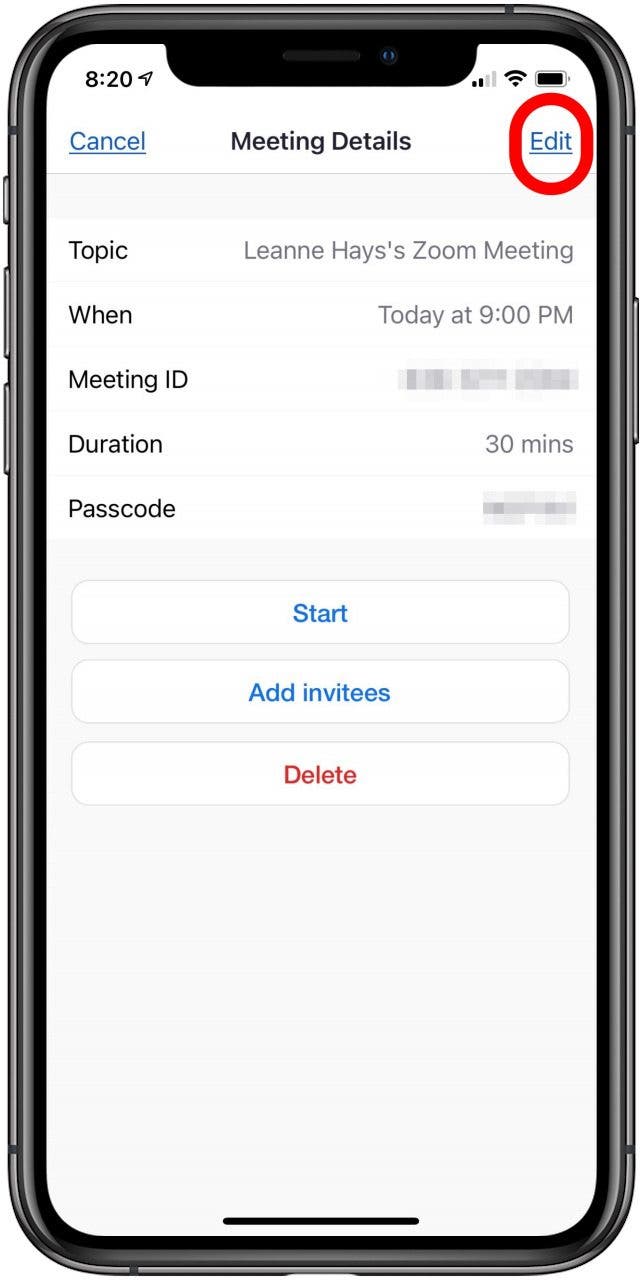
- Tap Meetings on the Zoom app home screen.
- Tap the Personal Meeting ID, then tap Edit.
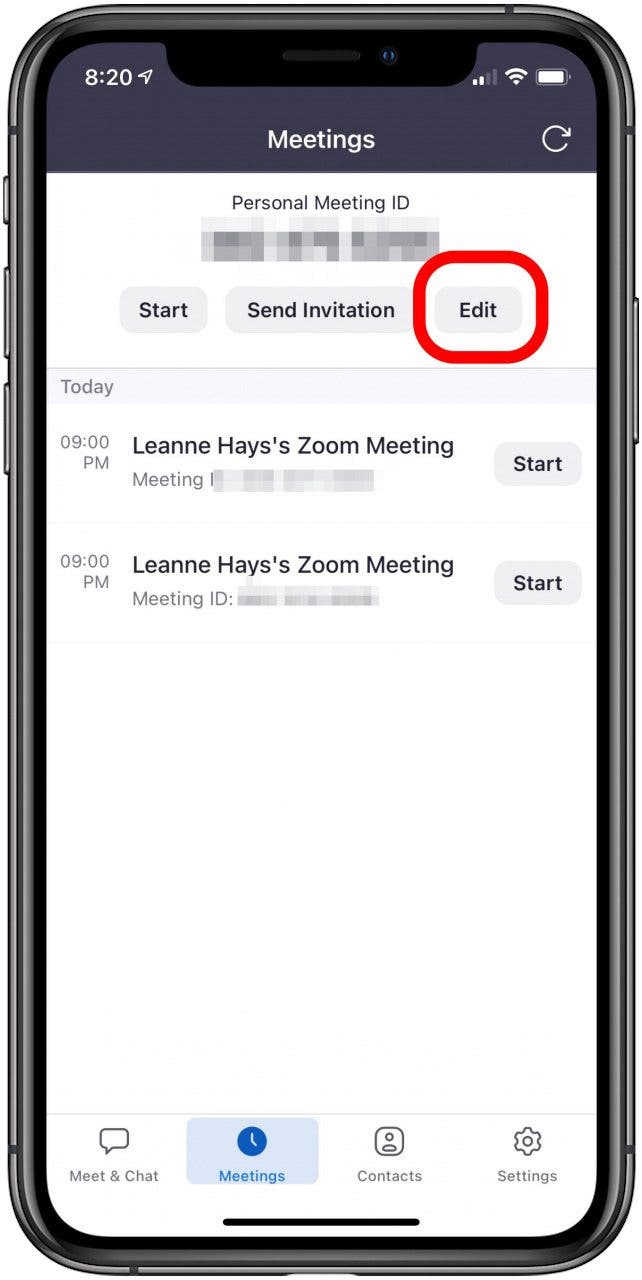
- From here, you can start the meeting early, add invitees, or delete the meeting. Tap Edit again to change more settings.
- Here you can change when the meeting starts, its duration, the time zone, whether it repeats, the options to require a meeting password, enable a waiting room, allow participants to join before the host, and automatically record the meeting.
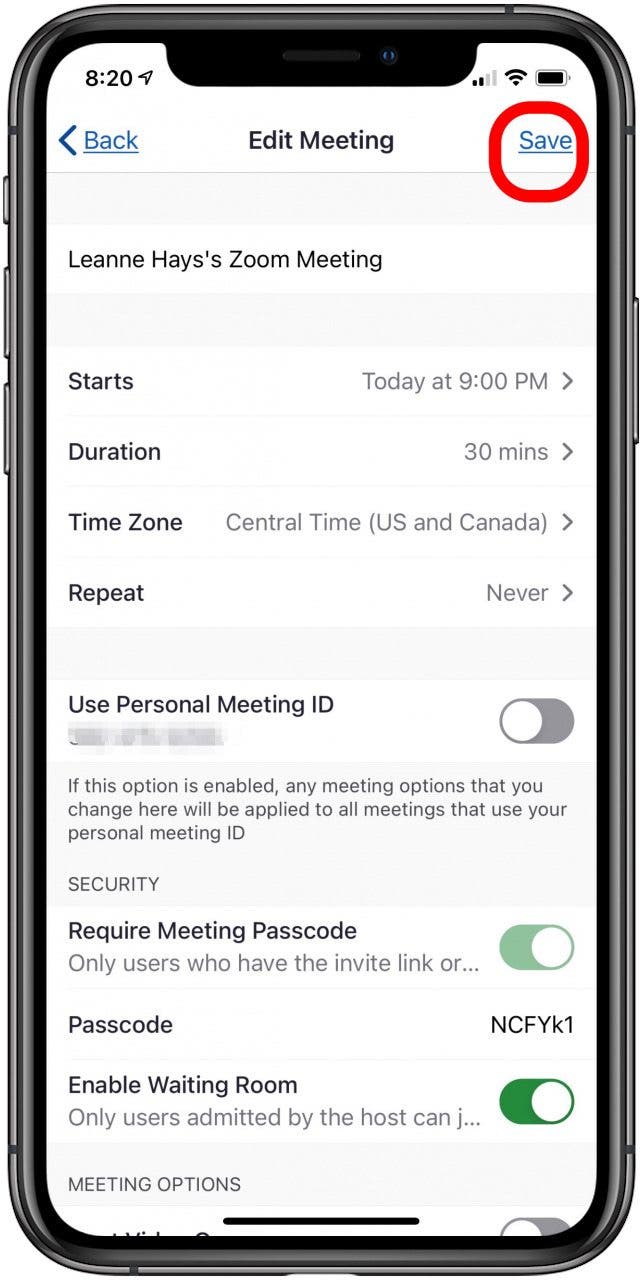
When you toggle on Require Meeting Password, a field will appear where you can enter a password every meeting member will need to enter before entering the virtual meeting room.
Toggle on Enable Waiting Room, and Zoom creates a page where participants wait until you, the moderator, approves them to join.
Allow Join Before Host enables meeting invitees to enter the virtual meeting room before the host does.
Automatically Record Meeting allows the host to choose the location where a copy of the Zoom meeting will be stored.
Extra Zoom Settings & Features
*Note: Many people get confused during Zoom calls because icons disappear from your display if you haven't touched it in a while. Just tap your screen once, and all the controls will reappear. *
How to Share Your Screen on Zoom
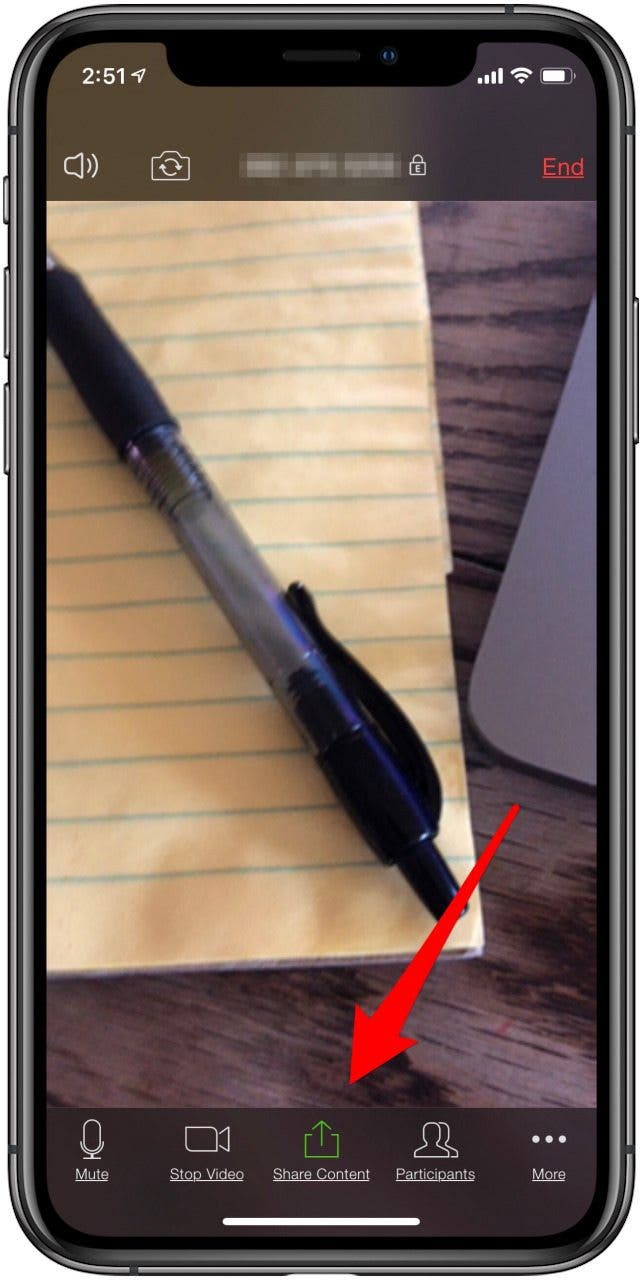
You can screen share your iPhone or iPad display during a Zoom meeting to another iPhone, iPad, or Mac. Follow the steps above for starting a Zoom meeting, then invite participants and share invitations as usual. From here:
- Tap the Share Content icon at the bottom of your screen.
- Tap Screen.
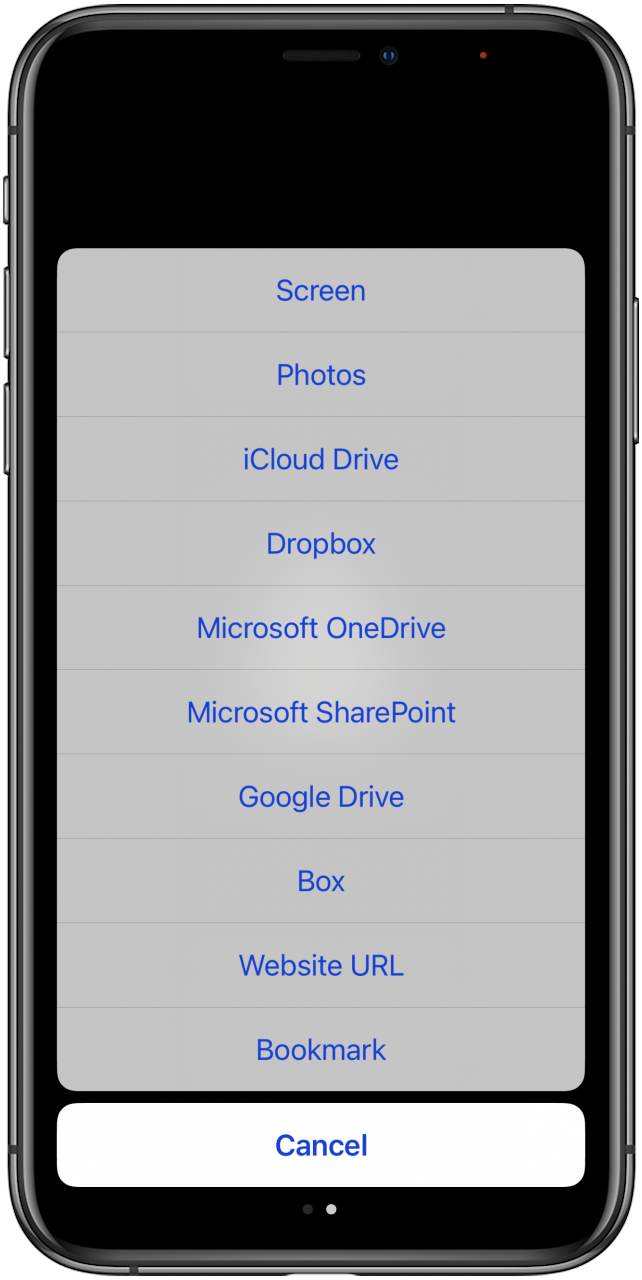
As you can see from the second screenshot, you can do far more with this Share icon than just screen share. Use this feature to share photos, content from your iCloud Drive, Dropbox, Google Drive, and more.
For more detailed steps and screenshots, check out our comprehensive screen sharing guide, which includes a step-by-step Zoom tutorial.
How to Chat During a Meeting
Another useful and fun Zoom feature is the chat option. To access this feature:
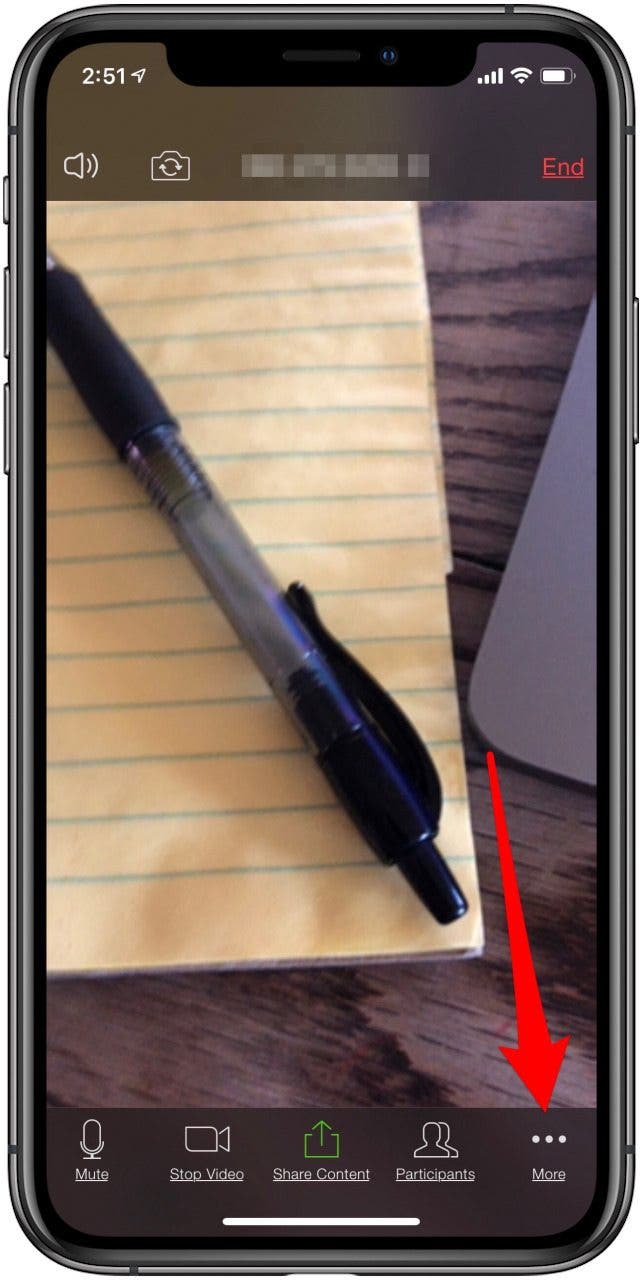
- Tap the More icon at the bottom of the screen.
- Tap Chat.
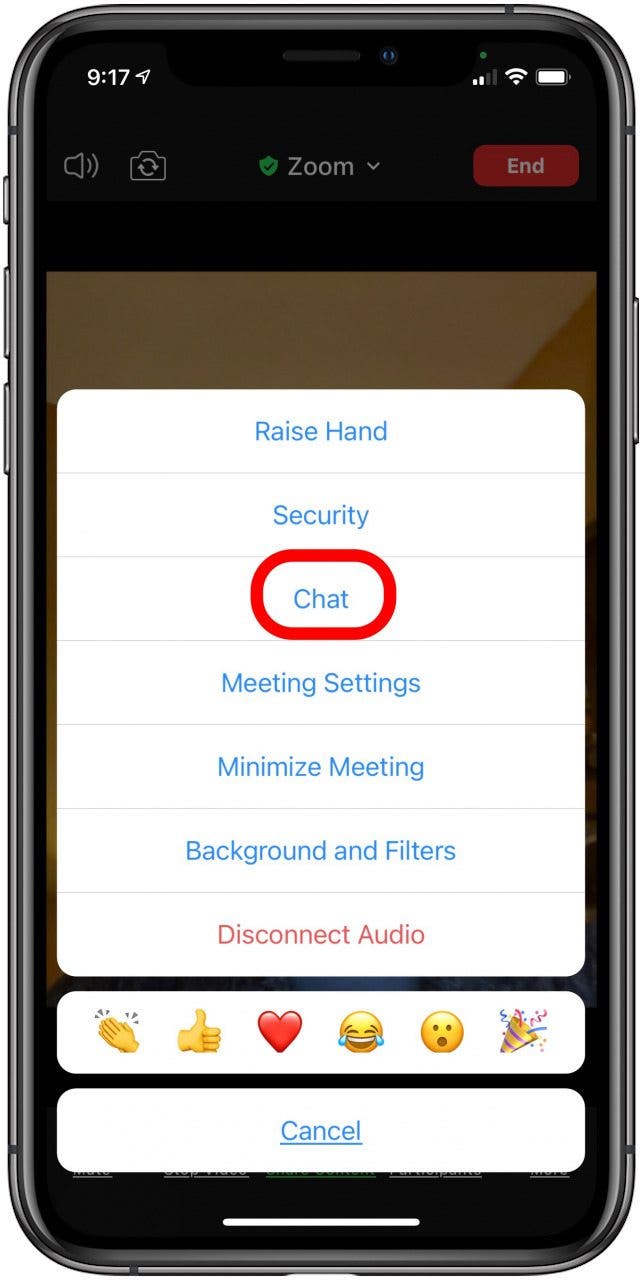
As with the Share icon, the More icon leads to many other meeting options.
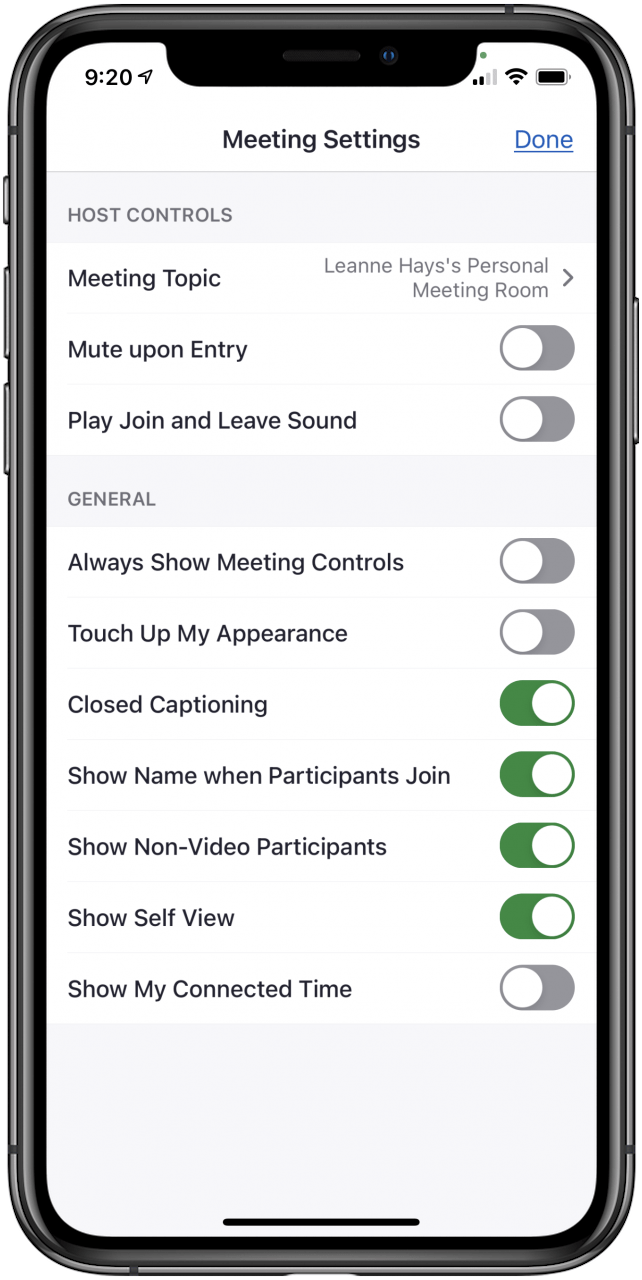
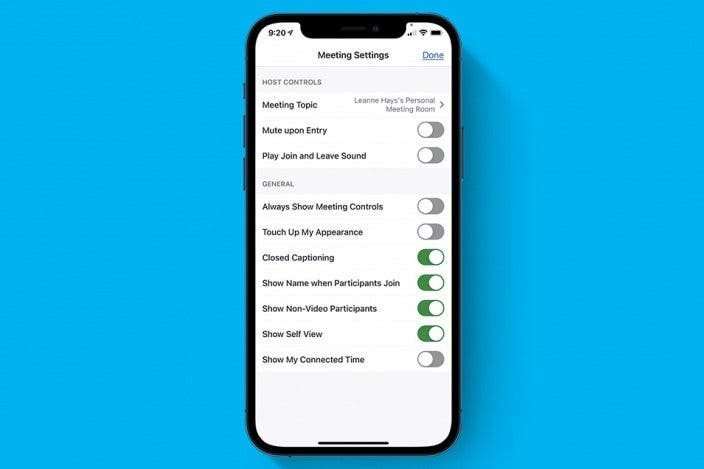
- Tap Meeting Settings to Mute upon Entry, Always Show Meeting Controls, and more.
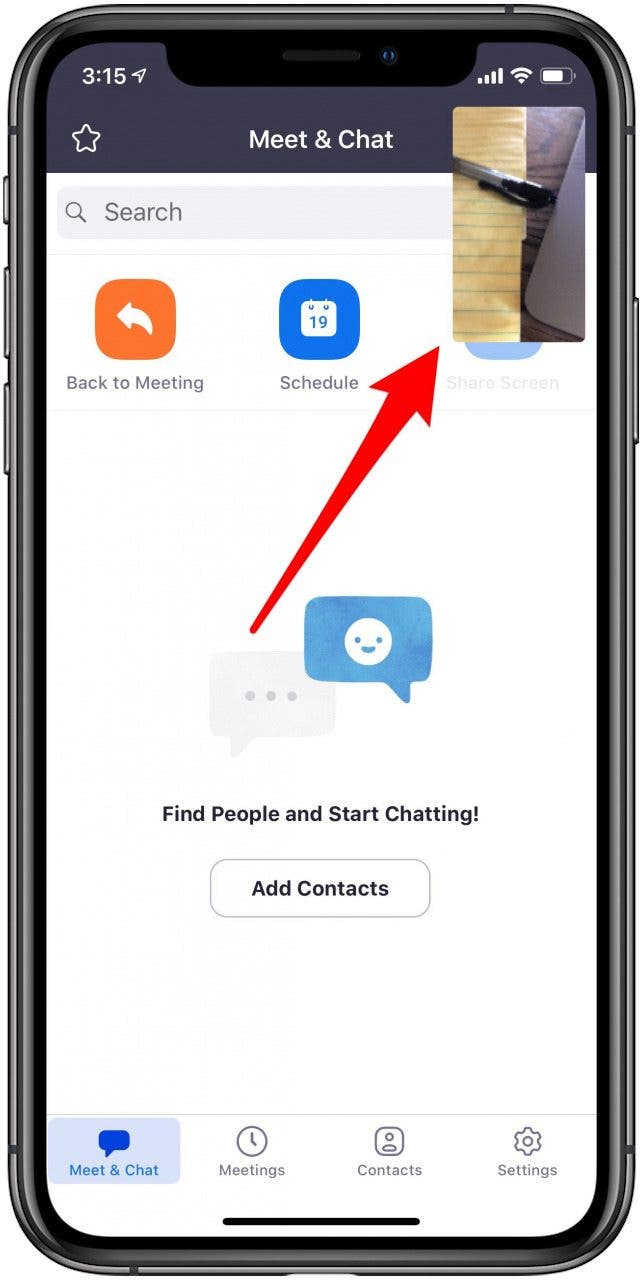
- Tap Minimize Meeting to shrink your meeting display to a small portion of your screen.
- Tap Background and Filters use a background from Zoom, create your own, or add a filter. We also have a full guide to adding preset and custom Zoom backgrounds and filters.
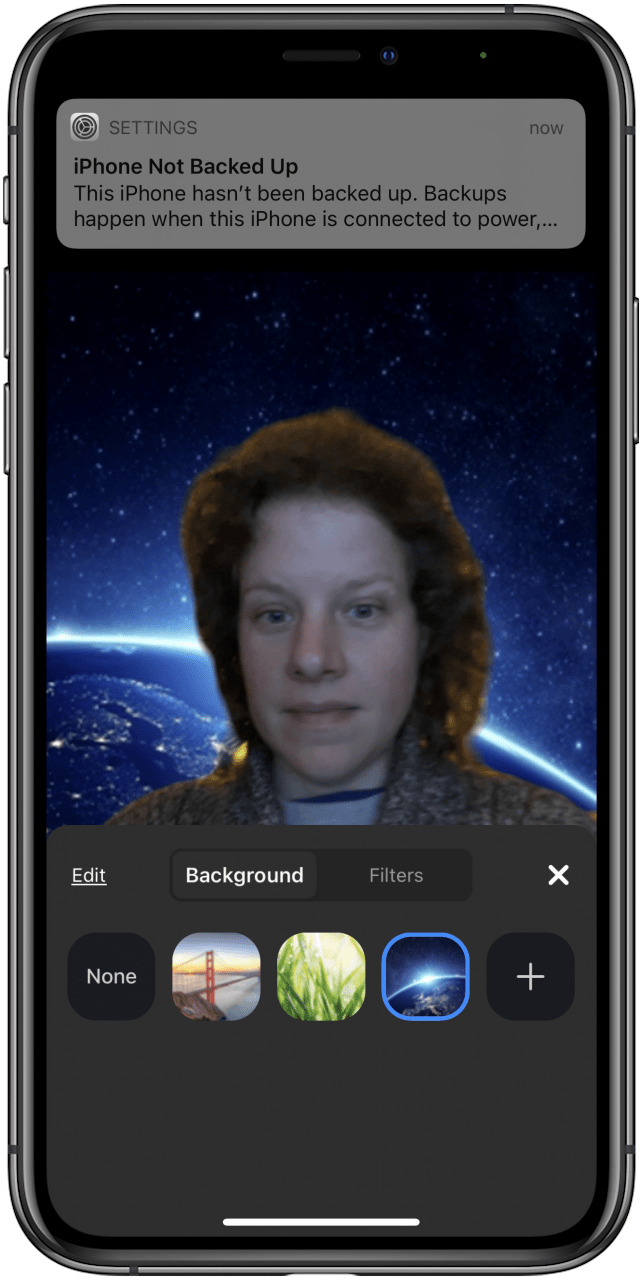
In addition to using backgrounds, you can also get fancy with filters. Learn how to look good on Zoom using the Touch Up My Appearance feature.
Siri Shortcuts & Zoom
Siri and Zoom go great together; you can set up shortcuts to view your meetings that day, join your next scheduled meeting, or start a personal meeting. For this to work, you'll need to have Hey Siri enabled on your iPhone or iPad. To set up a Siri Shortcut on your device:
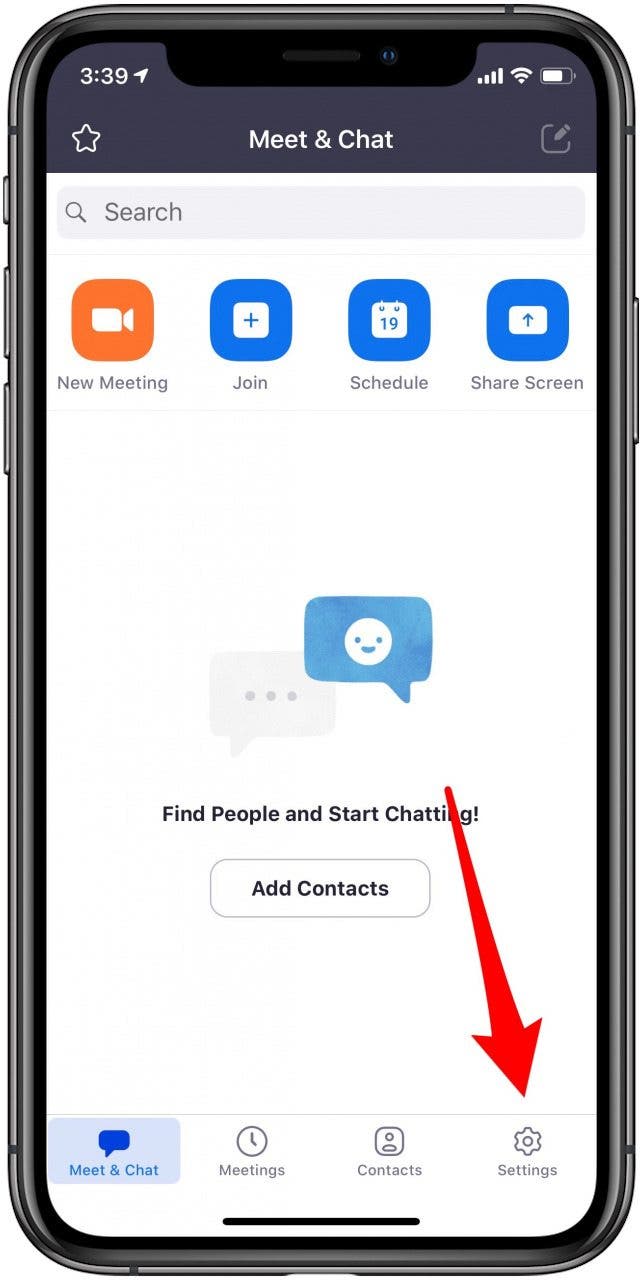
- Tap Settings at the bottom of the Zoom app Home screen.
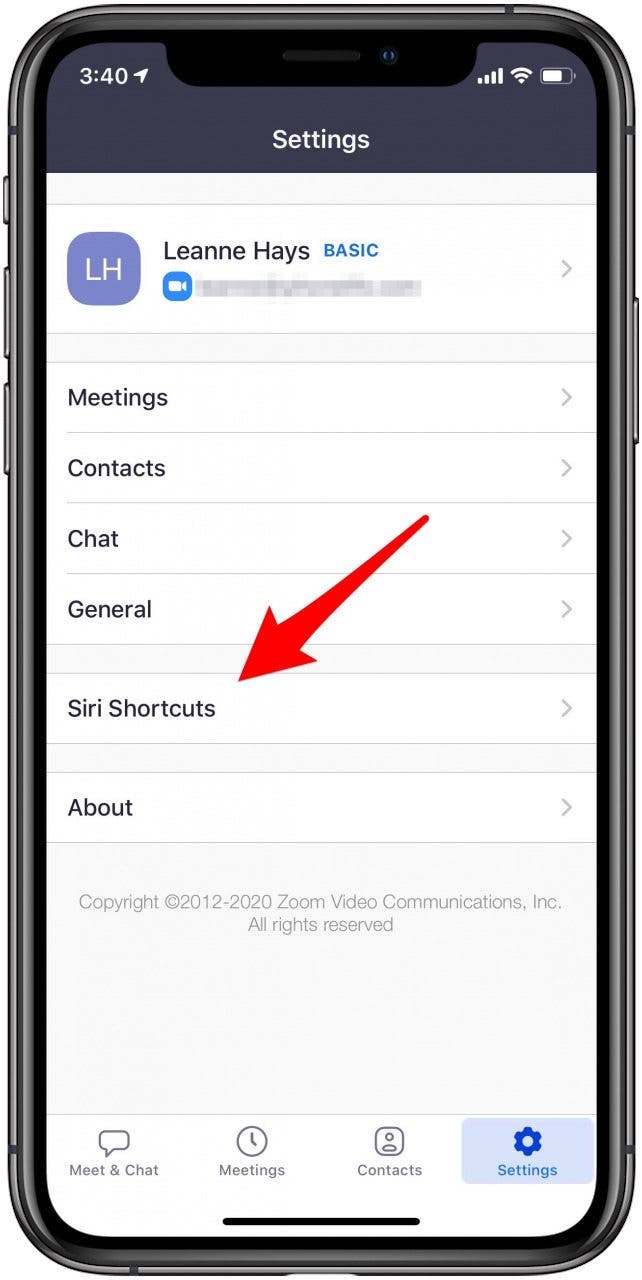
- Tap Siri Shortcuts.
- Tap the phrase you'd like to add to Siri's repertoire.
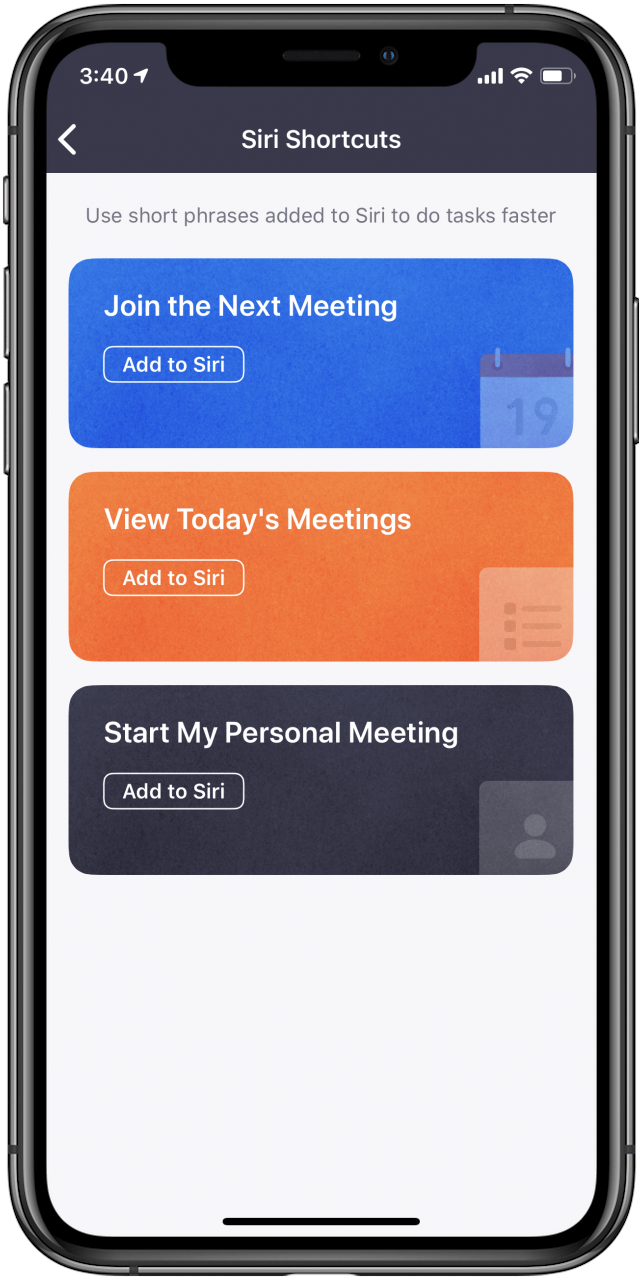
- Tap Add to Siri, then tap the red button and record the phrase for the shortcut.
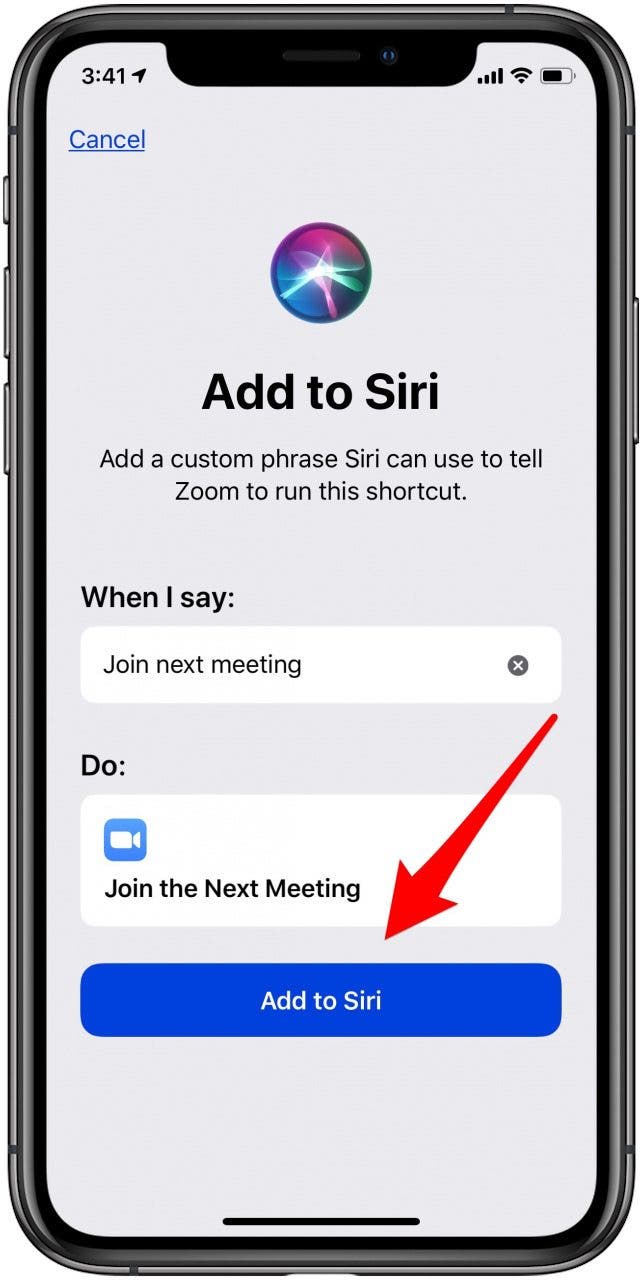
To use your shortcut, just say, "Hey, Siri", then use the phrase you recorded for the Siri Shortcut you chose.
How's It Going with Zoom so Far?
I hope this guide has helped you get started with Zoom, and increase your comfort level with the app. Let me know if I missed anything (to do with the iPhone or iPad), and I'll see how I can help.

Leanne Hays
Leanne Hays has over a dozen years of experience writing for online publications. As a Feature Writer for iPhone Life, she has authored hundreds of how-to, Apple news, and gear review articles, as well as a comprehensive Photos App guide. Leanne holds degrees in education and science and loves troubleshooting and repair. This combination makes her a perfect fit as manager of our Ask an Expert service, which helps iPhone Life Insiders with Apple hardware and software issues.
In off-work hours, Leanne is a mother of two, homesteader, audiobook fanatic, musician, and learning enthusiast.

 Rachel Needell
 Leanne Hays
 Rhett Intriago

 Olena Kagui

 David Averbach
 Amy Spitzfaden Both


 Kenya Smith