How to Set Up Out of Office Auto Reply for Outlook, Gmail, iCloud & More


When you go on vacation, setting up an out of office (or OOO for short) message reply for incoming emails is an easy way to avoid your inbox without leaving people in the dark as to why you haven’t responded. We wanted to cover setting up an out of office automatic reply on iPhone across all the popular platforms from Outlook to Gmail. Most email providers require that out of office email replies be set up on your computer. However, Gmail out of office reply allows you to set up a vacation reply with the Gmail app on iPhone or iPad. If you have Verizon, you can even set up an out of office text message while you’re gone too. You don't have to disappear from email to take a vacation. Here’s how to create an out of office automatic reply email message for Outlook, iCloud, Gmail, and more.
Related: How To Temporarily Disable an Email Account on Your iPhone
How to Set an Out of Office Automatic Reply Email Message for Outlook, iCloud, Gmail & More
There’s a good reason most providers don’t allow you to set up out of office reply in the apps on your iPhone or iPad. The vaction reply change is usually done at the server level so that your email doesn’t get stuck in an infinite loop. For example, if you and a friend both set up an automated reply by creating a rule in your desktop email programs, you could end up sending thousands of emails to each other, with each person's computer responding to the repeated out-of-office replies with its own out-of-office replies.
As I stated, however, Gmail out of office reply is the one exception to this. Our walkthrough for setting up an out of office message for Gmail accounts will include both how to do so in the Gmail app on your iPhone and via the web on your computer.
If you need to set up an out of office email but don’t have access to an computer, you can use the Safari browser on your iPhone to visit your email provider. Just make sure you use the desktop version of the website by tapping the share icon and selecting Request Desktop Site. I also noticed while testing this that sometimes the screen was cut off, preventing me from completing my out of office reply. But if you're without a computer, this is the best mobile option.
If you use the iPhone and Mac Mail app to connect all of your accounts, you can set up an out of office email directly within the OS X Mail app instead of having to set up vacation auto reply emails for all of your separate email accounts.
We’ll cover how to turn off out of office reply for each mail provider as well. Let’s get to it.
Related Video: Create Separate Email Signatures for Different Accounts
The above video is a preview of an iPhone Life Insider Daily Video Tip
Table of Contents
How to Set Up Email Auto Reply for iCloud Mail
-
Log-in to icloud.com.

-
Select Mail.

-
Tap the Settings icon that looks like a gear in the bottom left corner.
-
Select Preferences.

-
Choose the Vacation tab at the top.
-
Check the box that says, “Automatically reply to messages when they are received.”
-
Type your auto reply email message in the box below.
-
Click Done.

When your vacation is over and you’ve returned, turn off out of office reply for iCloud by unchecking the “Automatically reply to messages…” box.
How to Set Up Out of Office Automatic Reply for Gmail
In the Gmail App:
Gmail makes it particularly easy to setup your out of office reply. Simply,
-
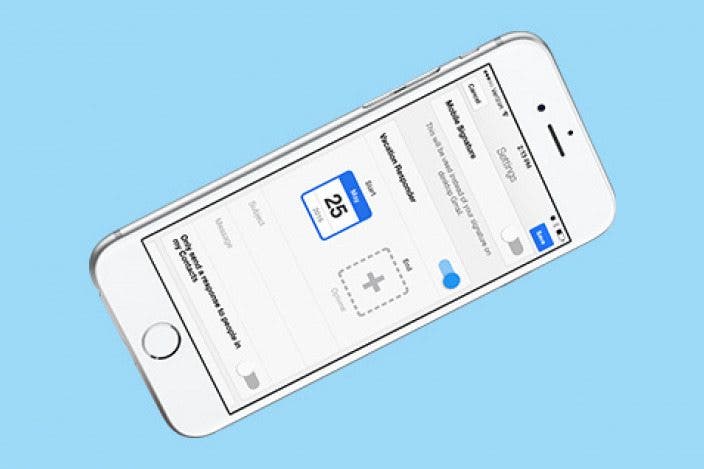
Open the Gmail app on your iPhone.
-
Tap the three horizontal bars in the top left corner.
-
Select the Settings icon that looks like a gear.
-
Toggle On Vacation Responder.
-
Select your start and end date.
-
Then type your auto email’s subject and message.
-
You can also choose to toggle on, “only send a response to people in my Contacts,” if preferred.
-
Tap Save at the top and you’re done!
If you set an End date, the out of office reply will automatically turn off. If not, visit Settings in the Gmail app and toggle off Vacation Responder, then tap Save.
On Gmail.com:
-
Log-in to Gmail.com.
-
Tap the Settings icon that looks like a gear in the upper right corner.
-
Choose Settings.

-
Scroll down until you see Vacation Responder.
-
Check the box Vacation responder on.
-
Choose your start and (optional) end date.
-
Enter your auto reply email’s subject line and the message.
-
There’s an optional box you can check for sending the auto-reply email to only people in your contacts, if preferred.
-
Click Save Changes.

If you set an end date, your out of office reply will automatically turn off. If not, you can follow the same steps to settings and check the box, “Vacation Responder off.” Then save the changes.
How to Set Up Out of Office Auto Reply Email Message for Outlook
-
Sign in to Outlook.com.
-
Tap the Settings icon that looks like a gear in the top right corner.
-
Choose Automatic Replies.

-
Check the box Send Automatic Replies.
-
Choose the start and end date, then check the box Send replies only during this time period.
-
Below that is a blank body of text. Enter the message you want people to receive as your out of office reply.
-
You can check the box for sending Ooo replies to everyone or just to your contacts.
-
Click Ok at the top when you’re done.

If you set a start and end time and check the box, “Send replies only during this time period,” your out of office reply will automatically turn off. If not, you can easily turn off by revisiting settings, clicking Automatic Replies, and checking the box, “Don’t send automatic replies.”
How to Set Up Out of Office Response Email for Yahoo
-
Log-in to Yahoo.com.
-
Click the Settings icon that looks like a gear in the top right corner.
-
Select Settings.

-
Choose Vacation Response.
-
Check Enable during these dates.
-
Set your dates.
-
Below that, enter your auto reply email message.
-
You can also send yourself a sample copy and set different responses for emails coming from specific domains.
-
When you’re done, click Save.
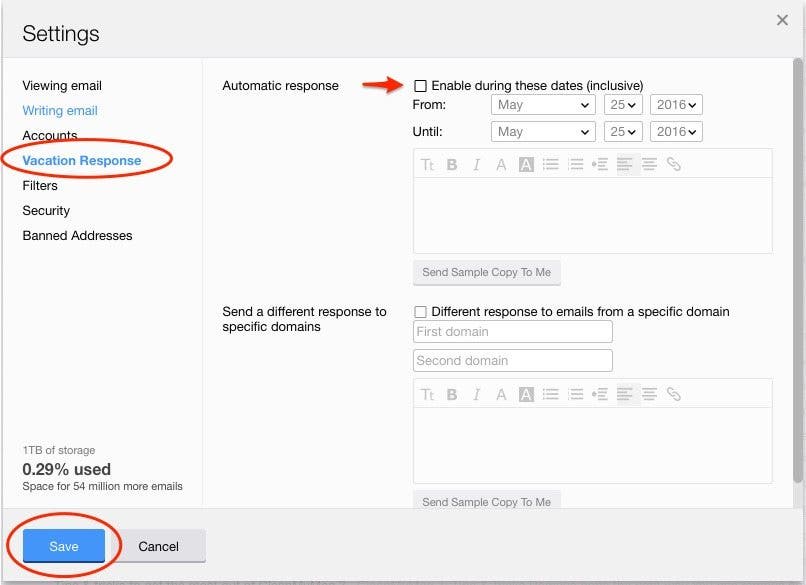
Your out of office vacation response should turn off automatically after the end date. But you can also revisit this place in Settings to turn it off manually by unchecking the box, “Enable during these dates,” and clicking Save.
How to Set Up Automatic Email Reply for OS X Mail App
If you manage all your accounts from the Mail app on iPhone and Mac, then you can create a “rule” that will work as your out of office automatic email response. It’s not as straight-forward as going direct to the email provider, but it will do the job all the same and save you from having to set up multiple out of office replies for each of your email accounts. Here’s how:
-
Open the Mail app on your Mac.
-
Click Mail on the top menu bar and select Preferences.

-
Choose Rules.
-
Select Add Rule.

-
Give it a description such as Out of Office Response.
-
Where the default is Any Recipient, click and choose Every Message.
-
Below that, change Move Message to Reply to Message.
-
Click Reply Message text…

-
Enter the email response you want people to see when they receive your Out of Office reply. Click Ok.

-
Click Ok again to finish creating the rule.
-
This is where it gets tricky:
-
It will ask if you want to apply your rules to messages in selected inboxes. Choose Don’t Apply. I repeat, choose Don’t Apply. (If you choose Apply, every person in your inbox will receive your out of office reply. By choosing Don’t Apply, only new messages will receive the out of office response.)

To send out of office replies to specific emails only:
-
Follow the directions above until you come Every Message. Instead of Every Message, choose To.
-
In the next box, choose “is equal to” and enter your email address for the account you want to send out of office replies to.
-
If you need to set it up for more than one email address, click the plus sign and repeat.

-
Then continue as per the directions above.
To turn off this out of office reply, you’ll need to open Preference up again, select Rules, and uncheck your Out of Office Response rule.
You May Also Like: How to Free Up Storage on Your iPhone Without Deleting Anything
How to Set Up Automatic Responses for Text Messages
Currently, this only works if your carrier is Verizon. To do this,
-
Open the App Store on your iPhone.
-
Download Verizon Messages+
-
Upon opening the app, you’ll have to enter your number. You’ll then receive a confirmation code to enter. This will log you in.
-
Tap the three horizontal bars in top left corner.
-
Select Auto Reply.
-
Choose Add a new message and write the automatic text response you want to send.
-
Toggle Auto Reply On at the top.
-
Set a date at the bottom under Until. The auto reply will turn off on the day you select.
-
Tap Done.


Jim Karpen
Jim Karpen holds a Ph.D. in literature and writing, and has a love of gizmos. His doctoral dissertation focused on the revolutionary consequences of digital technologies and anticipated some of the developments taking place in the industry today. Jim has been writing about the Internet and technology since 1994 and has been using Apple's visionary products for decades.


 Olena Kagui
 Leanne Hays
 Amy Spitzfaden Both


 Rachel Needell


 Kenya Smith
 Rhett Intriago