25 All-Time Favorite iPhone Tips


We’ve collected our 25 favorite iPhone tips from our popular and free Tip of the Day email newsletter. Our readers are finding that these tips help them enjoy their iPhone more and use it more effectively. The headline for each tip links back to a more version of the tip, replete with screenshots.
Related: Top Siri Tips: 21 Amazing Things You Didn't Know Siri Can Do
1. How to Use Google Maps to Avoid Toll Roads
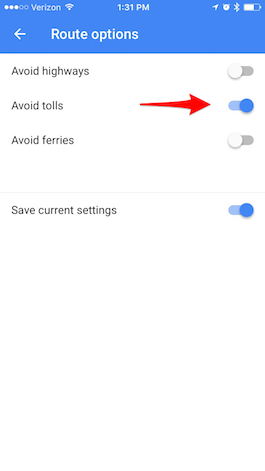
You can save money by avoiding toll roads when getting directions in Google Maps. Once you’ve indicated your destination in the app and the location appears on the map, click the car icon at the bottom right of the map. Then tap the three vertical dots to the right of your starting destination, choose Route Options, and turn on “Avoid tolls.” Then go back to the navigation screen and if it indicates “Avoid tolls” is on, then tap Start Navigation.
2. How to Search Conversations in Messages
You can easily search the messages you’ve received in the Messages app by dragging down on the list of messages to reveal a search bar. Tap the search bar and enter the phrase you want to search for. Then when you tap a search result, it will take you to the phrase in that particular message.

3. How to Change the Credit Card Associated with iTunes
To change or update your credit card associated with iTunes and the App Store, go to Settings > iTunes & App Store. Tap on your Apple ID at the top, then on View Apple ID. Then enter your password to log in. On the screen that comes up, tap Payment Information. In the screen that comes up, you’ll be able to update or change your credit card information.
4. How to Use (& Turn Off) Split Screen on iPhone 6 & 6s Plus
Apple takes advantage of the extra display space on the iPhone 6 Plus and 6s Plus by giving the devices a split-screen feature in Mail, Calendar, Messages, Stocks, Reminders, Voice Memos, Contacts, and Clock. In Mail, for example, in landscape mode you'll see the list of messages on the left and the text of a selected message in the space on the right. Turning your iPhone on its side automatically activates landscape mode. If you’d rather turn this split view feature off, it’s easy to do. Keep in mind, though, that you’ll also lose other features like the landscape-oriented Home screen and the extra buttons on your keyboards. To turn off split screen, go to Settings > Display & Brightness > View > Zoomed > Set. Then confirm Use Zoomed. The message will inform you that changing the display will restart your iPhone.
5. How to Block Calls from Unknown Numbers
Although there is no one-step solution to blocking calls from unknown numbers on your iPhone, you can block calls from unknown numbers by using the Do Not Disturb feature. Set Do Not Disturb to a 24-hour schedule and allow calls only from your contacts. Go to Settings > Do Not Disturb. Select Allow Calls From and choose All Contacts under Groups. Return to the previous menu and toggle on Scheduled. Set the schedule to a 24-hour period. Now, your Do Not Disturb function will automatically stay on and only calls from your contacts will make a sound. Every other phone number will be silenced. This does not block text messages.
6. How to Send a Call to Voicemail
If your phone is on and you receive a call, you can send it to voicemail by simply tapping the red button. But if your iPhone is off (locked) and you receive a call, the red button won’t be available. You’ll only see the option of unlocking your phone via the slider or Touch ID. However, if your phone is off you can still immediately send that call to voicemail by double clicking the Sleep/Wake button. You can also tap the Sleep/Wake button once to silence your ringtone.
7. How to Create Customized Vibration Patterns
It’s easy to create customized vibration patterns for your iPhone. Go to Settings > Sounds > Ringtone > Vibration. Under Custom, select Create New Vibration. Then tap a new rhythm on your screen and press Stop when you’re finished. Replay and record again until you've got the rhythm just right. Then tap Save. You can set your new custom vibration as your text tone, reminder alert, etc. or follow the steps above to create custom vibrations for any of your iPhone's different sounds.
8. How To Redial a Phone Number on Your iPhone
When you need to redial a number or call the person you previously talked to, there’s a quick way to redial from the Phone app. Instead of going to your Recents or searching through your contacts, if you’re calling the previous person you spoke to, you can do it with two quick taps. In the Phone app, tap on Keypad at the bottom of the menu. Tap the green call button and the previous number with contact name will fill-in at the top. Tap the green call button again to make the call.
9. How to Assign Different Ringtones to Specific People on Your iPhone
You may find it useful to assign different ringtones to specific people so that you know who’s calling even without looking at your phone. Open the Contacts app and find the person you want to assign a ringtone to and tap Edit. Scroll down and select Ringtone, then choose the song you want assign to that person. Then tap Done.
10. How to Forward Calls from Your iPhone
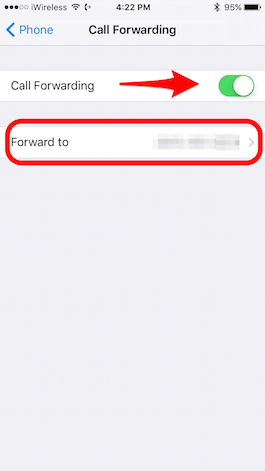
If you have a need to forward all incoming calls to a different number, you easily can set this up. Go to Settings > Phone > Call Forwarding, and turn it on. Then Tap Forward To and enter the number you want to direct calls to. Note: If you’re a Verizon user, you’ll have to enable call forwarding by dialing *72 followed by the number to forward to. Dial *73 to disable call forwarding with Verizon.
11. How to Answer a Call with a Text Message
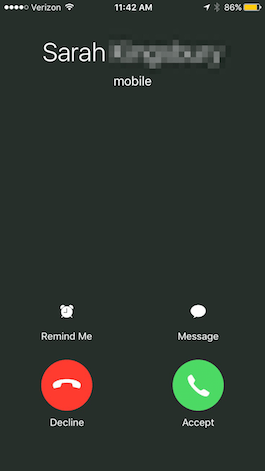
You can easily respond to an incoming call with a text message, which would be a good option if you’re in a meeting and can't take the time to type a reply. When a call comes in, simply tap the word Message that appears above Slide to Answer. You’ll get a menu of responses: “Can I call you later?” “Sorry, I can't talk right now,” and “I'm on my way.” Tap the one you want, and your iPhone will automatically send a text message for you. You also have the option of tapping Custom for sending the person a customized message.
12. How to Save or Share Voicemails
If you’ve received a voicemail that you want to save or share, iOS 9 made that easy to do. Open the Phone app and select the Voicemail tab. Tap the voicemail you want to save and then select the share icon. You can then save the voicemail to Notes or Voice Memos, send it as a message, add it to an email, and more.
13. How to Mute Siri Using Your iPhone Ring Switch
Sometimes you’re in situations when you need your phone to be quiet. It’s easy to make sure your iPhone doesn’t ring by setting the Ring Switch to silent, but if you use Siri, she’ll still be noisily talking back to you. However, you can set Siri so that it only replies in text whenever you’ve turned the ringer off. Go to Settings > General > Siri Voice Feedback, and select Control with Ring Switch. Note, though, that you’ll continue to hear Siri beep and provide voice feedback when using “Hey Siri,” or when connected to a Bluetooth device, headphones, or CarPlay.
14. How to Selectively Clear Your Browsing History in Safari
If you’d like to keep parts of your web browsing history private, you can do that by selectively clearing your browsing history. Open Safari and tap the Bookmarks icon, then select History. Here’ll you’ll have two options. To Clear to erase your history from a certain time period by choosing from the menu of options: the last hour, today, today and yesterday, or all time. Or you can clear individual items in your history by swiping left on the item and tapping Delete. Tap Done when you’ve finished your selective deleting.
15. How to Delete Most Frequently Visited Sites on iPhone
If you would prefer others not know what websites you regularly visit on your iPhone, you can remove the list of Frequently Visited websites that automatically appears when you open a new tab. In Safari, tap the double square icon at bottom right and then the plus sign at the bottom middle of the screen that appears. To delete a website from the list of Frequently Visited sites that appears below your list of favorites, tap and hold the icon until it expands, then lift your finger. Then tap the Delete option that appears. To turn off this feature completely, go to Settings > Safari > Frequently Visited Sites, and toggle it off.
16. How to Browse the Web Privately
If you’d like to browse the web privately, you can turn on Private Browsing. Open Safari and tap the tabbed browsing icon (two overlapping rectangles) in the lower, right corner on an iPhone. Select Private and then tap the plus sign to open a new tab and browse privately. The interface changes to a black border instead of white. Turn Private Browsing off in the same way: tap the tabbed browsing icon and deselect Private. Note that when you’re in Private Browsing, Safari won’t have access to your stored passwords.
17. How to Cancel Recurring In-App Subscriptions
It’s easy to sign up for subscriptions on your iPhone, such as Apple Music, but sometimes less than evident how to cancel recurring subscriptions. To cancel a subscription, go to Settings > iTunes & App Store. Tap your Apple ID ad tap View Apple ID. Enter your password. Then under Subscriptions, tap Manage. If you have multiple subscriptions, select the one you want to cancel. If you only have one, it will automatically pop up. Then under Renewal Options, toggle off Automatic Renewal.
18. How to Merge Duplicate Contacts
If you have two or more different contact entries for the same person, it’s easy to merge them into one. Open your Phone app and tap Contacts at the bottom of the screen. Locate the duplicate contact and tap Edit in the upper right corner. Scroll down to the very bottom and select Link Contacts. Your contacts will pop up; locate the duplicate you want to merge into a single contact and open it. Tap Link in the upper right corner. If you have more duplicate entries, select Link Contacts and repeat. Tap Done once you have linked all duplicate contacts. To unlink contacts, simply tap the red minus sign next to the contact you wish to unlink.
19. How to Quickly Add Photos to Your Contacts Via Facebook
One of the nice features of the iPhone and iPad is the ability to see a photo of your contacts, such as when a call is coming in. You can manually add a photo to a contact by tapping Edit and then tapping Add Photo. But a faster way is to add photos and usernames of all your Facebook friends to your contacts. You first need to have the Facebook app installed. Go to Settings > Facebook and toggle Contacts to the on position. Then tap Update All Contacts. This temporarily provides Facebook with the email address and phone numbers for all your contacts so that Facebook can then update the photos on your iPhone for all matching contacts. If you have the Twitter app installed, you can also add photos from your Twitter contacts.
20. How to Set a Live Photo as Your Lock Screen
The iPhone 6s and 6s Plus come with a selection of Live Photo wallpaper images, but you can also use your own Live Photo instead if you have a 6s or later. To set one of your Live Photos as your Lock screen, go Settings > Wallpaper > Choose a New Wallpaper, and then select the Live Photo you’d like for your lock screen. Firmly press your Lock Screen whenever you want to bring the image to life.
21. How to Save Stills from Live Photos
With the release of iOS 9.3, Apple made it possible to save a still photo while keeping the Live Photo intact. In your Photos app select the Live Photo you want to create a still of. Tap the Share icon and then select Duplicate. Then tap Duplicate as Still Photo. The newly created still photo will appear in your Camera Roll as the most recent photo.
22. How to Search Settings on Your iPhone
Because the number of settings options available to you on your iPhone were starting to be overwhelming, in iOS 9 Apple added a search bar in the Settings app. Open Settings, scroll all the way to the top, and you’ll see a search bar labeled Settings. Type in what you’re looking for. Let’s say you’re looking to change your Facebook post sound setting. If you type in Facebook, you’ll receive a few different options with the pathways telling you how to get there. Choose one to see if it’s what you’re looking for. If the result isn’t what you're looking for, go back to the Settings home and it will automatically bring your Search options back up.
23. How to Troubleshoot Unresponsive Apps
If an app stops working properly or isn’t responding, there are two things you can try. The first is simply to quit the app and open it again. Press the Home button two times quickly to open the multitasking view, a carousel of small images of your most recently used apps. Drag the image of the upwards until it disappears, thereby quitting the app. Press the Home button again to return to your Home screen. Find the app and open it again to see if it’s responding better. If the app still isn’t working, you may need to delete it and reinstall. You may lose any data saved, such as levels completed in a game, in some apps. With other apps, such as Facebook, you’ll just need to log in again. To delete an app, touch and hold the app icon until it jiggles. Tap the x on the app to delete. Then go to the App Store app and download the app again. Tap on the cloud-shaped download icon to put the app back on your iPhone. If you paid for the app you won’t have to pay again as long as you’re using the same App Store account.
24. How to Fix an iPhone That Keeps Freezing or Crashing
If your phone keeps freezing or crashing, or if apps aren’t behaving properly, the first thing to try is to reboot your iPhone, just as one would with a desktop computer. Hold down the Sleep/Wake button until a screen appears with the option: Slide to Power Off. Slide right and your device will power down. To restart your phone, press and briefly hold the Sleep/Wake button again. A white screen will appear signaling that it’s powering on.
25. How to Reset iPhone Network Settings
If you’re having issues connecting to the internet even though you know your Wi-Fi router is working and your Wi-Fi is turned on, the first thing to try is rebooting your iPhone, as described above. If that doesn’t work, you’ll need to reset your iPhones network settings. This will entail clearing your WiFi passwords, so you may want to first write them down. It will also reset your cellular settings. To reset your network settings, go to Settings > General > Reset > Reset Network Settings, and then enter your iPhone’s passcode.
Top image credit: Twin Design / Shutterstock.com

Jim Karpen
Jim Karpen holds a Ph.D. in literature and writing, and has a love of gizmos. His doctoral dissertation focused on the revolutionary consequences of digital technologies and anticipated some of the developments taking place in the industry today. Jim has been writing about the Internet and technology since 1994 and has been using Apple's visionary products for decades.


 Rhett Intriago
 Amy Spitzfaden Both

 Hal Goldstein
 Olena Kagui


 Leanne Hays
 Rachel Needell
