Every Option in the New Control Gallery Explained


What to Know
- The Control Gallery contains a list of features that can be used to customize the Control Center, Lock Screen, and Action Button.
- There are many useful Accessibility controls that can now be launched with a single tap.
- The Control Gallery is available on iPhones running iOS 18 and later.
iOS 18 introduced the Control Gallery, which houses a long searchable list of various iPhone controls and features that you can launch with the tap of a button. You can access the Control Gallery when customizing the Control Center, Lock Screen, and Action Button. Discover what all the controls do and how they can improve your iPhone experience.
How to Access the Control Gallery
You can access the Control Gallery when customizing the Control Center, Lock Screen, and Action Button. Keep in mind that not every control can be used in all three locations. The Control Center has the most options, followed by the Action Button, while the Lock Screen only has a handful of these customization options.
Access the Control Gallery from the Control Center
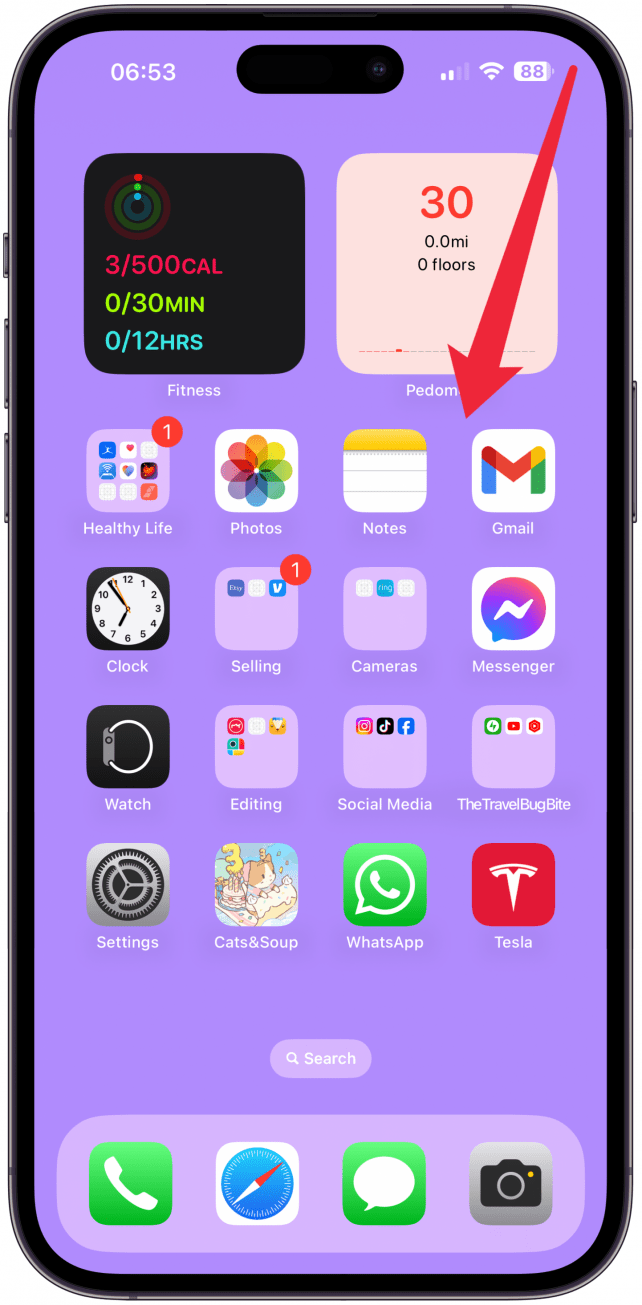
- Open the Control Center by swiping down from the top right corner of your screen.
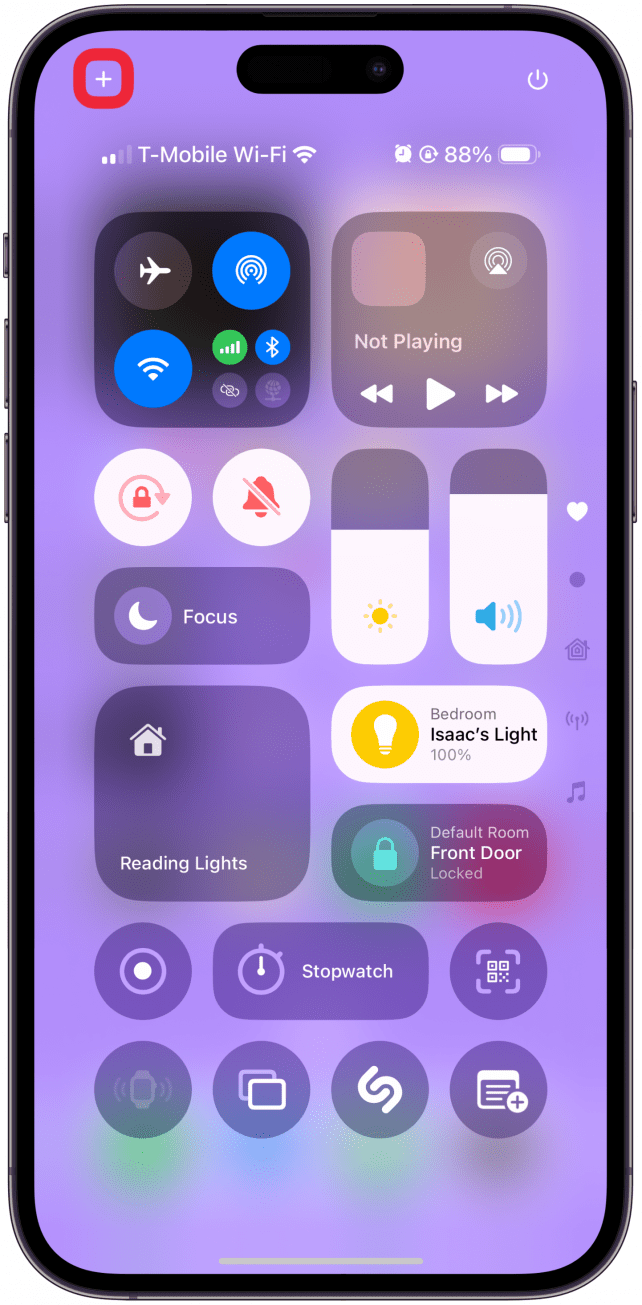
- Tap the plus icon in the top left corner.
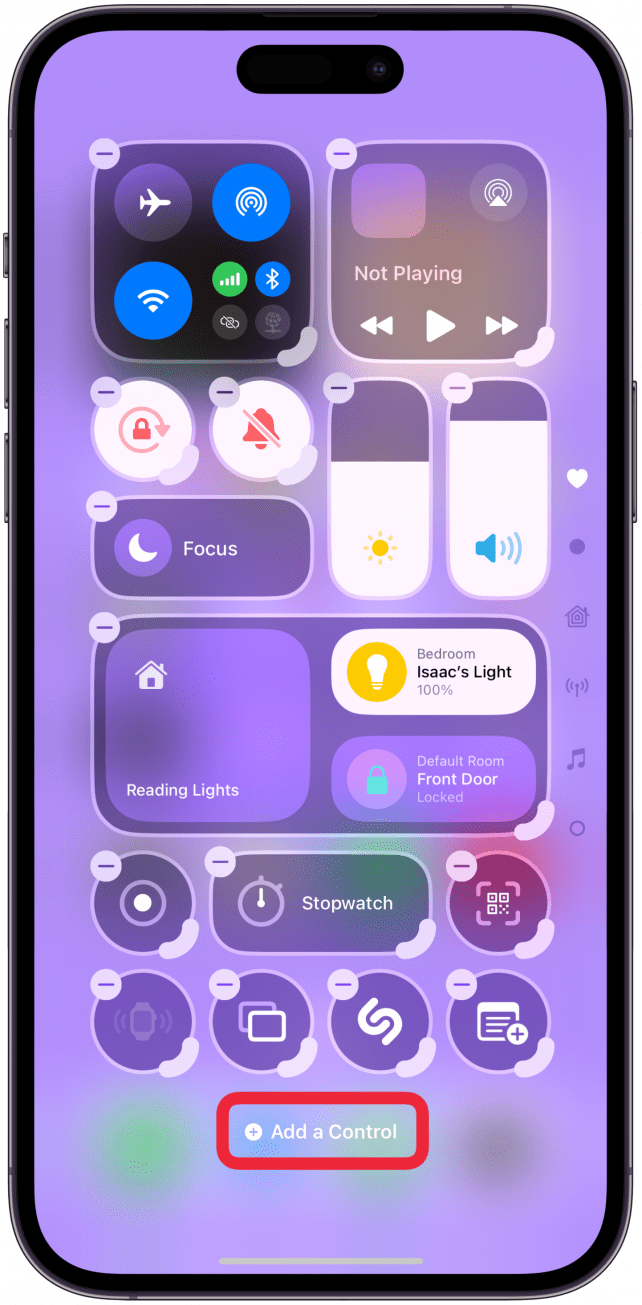
- Tap a Add a Control.
- You will see all the Control Gallery options for the Control Center.
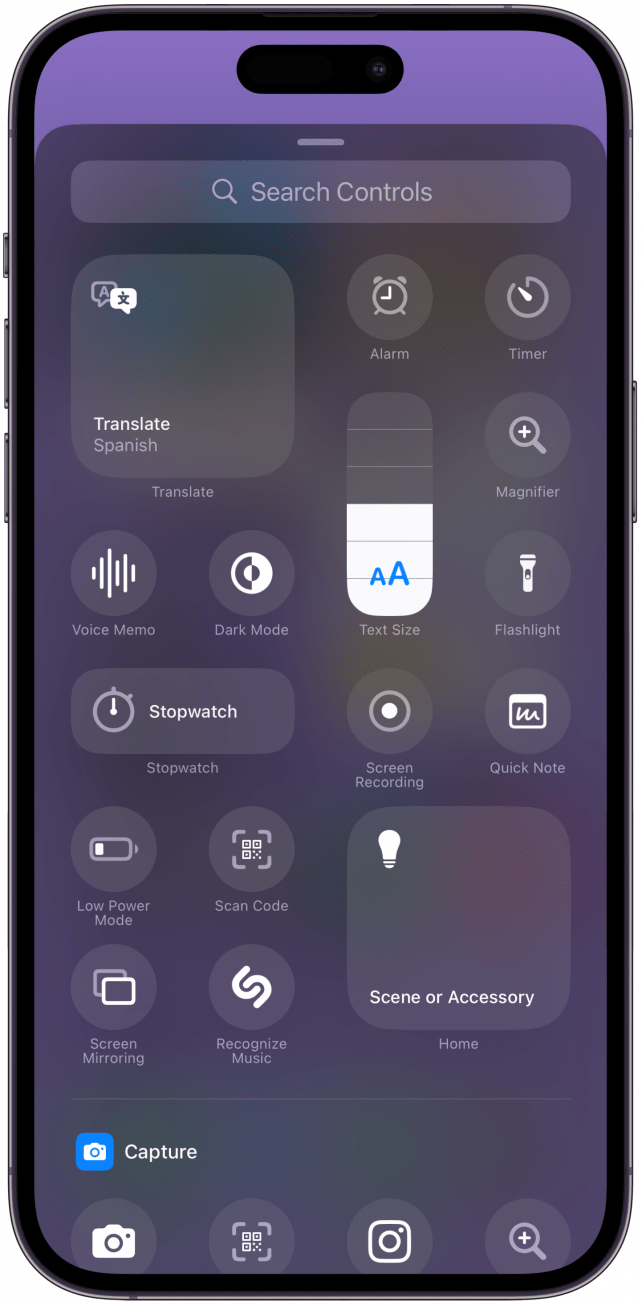
Access the Control Gallery from Lock Screen Customization Menu
- Long-press your Lock Screen.
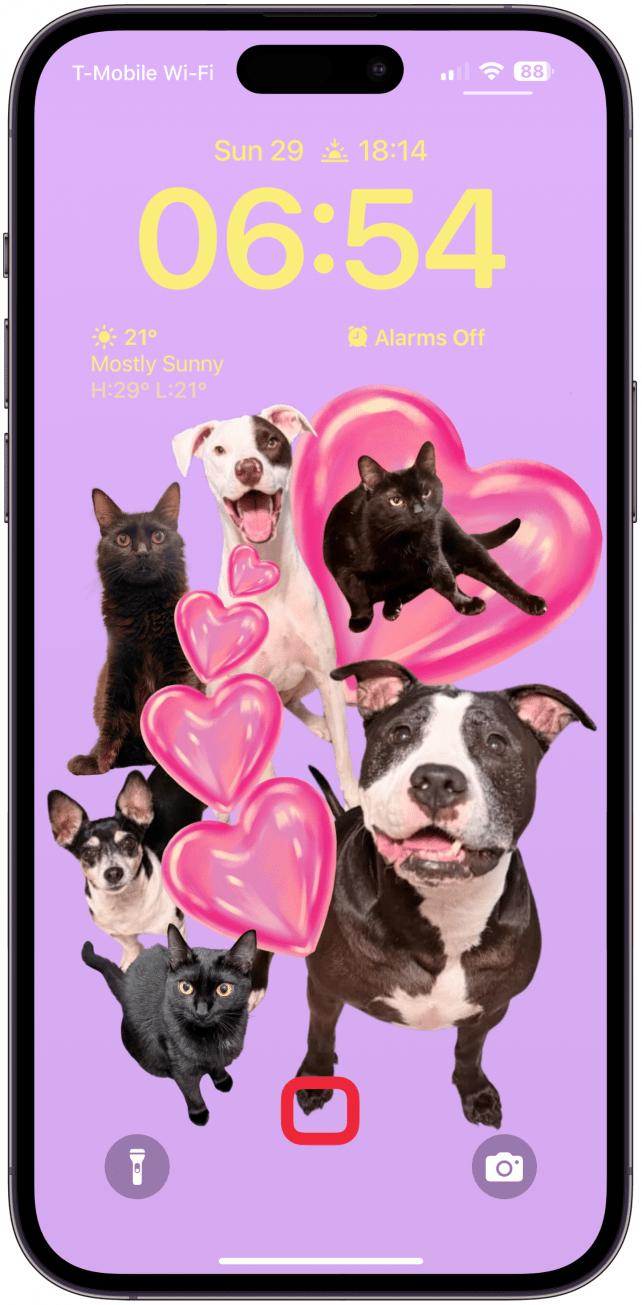
- Tap Customize.
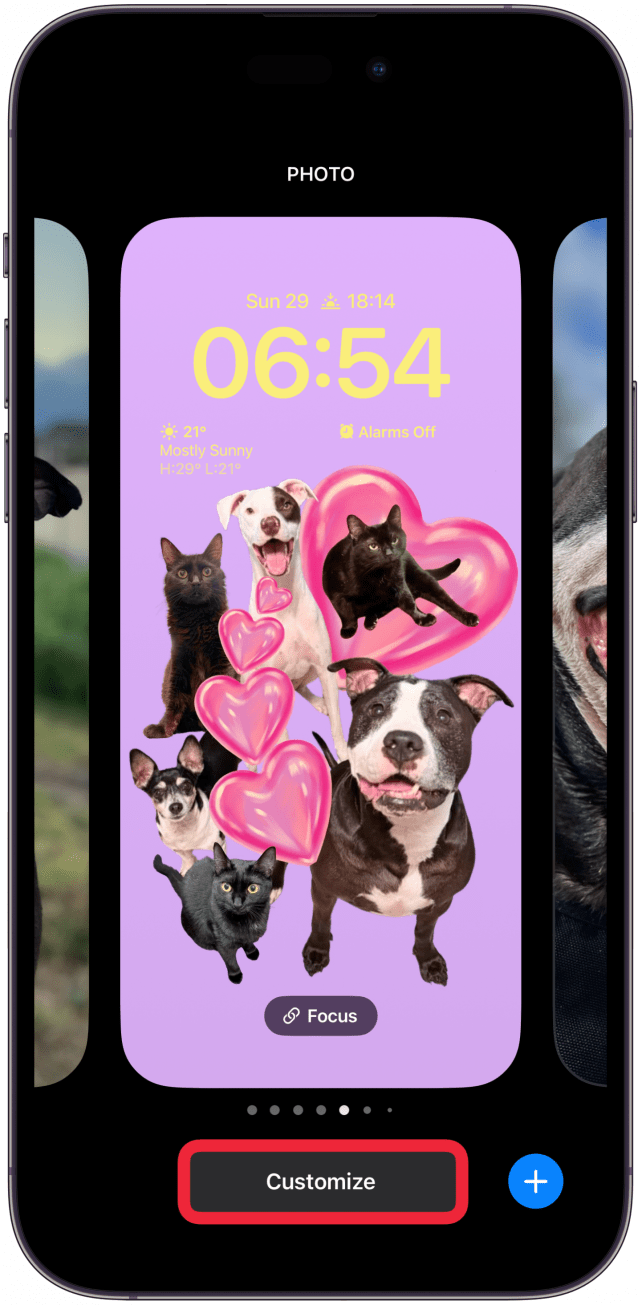
- Select the Lock Screen.
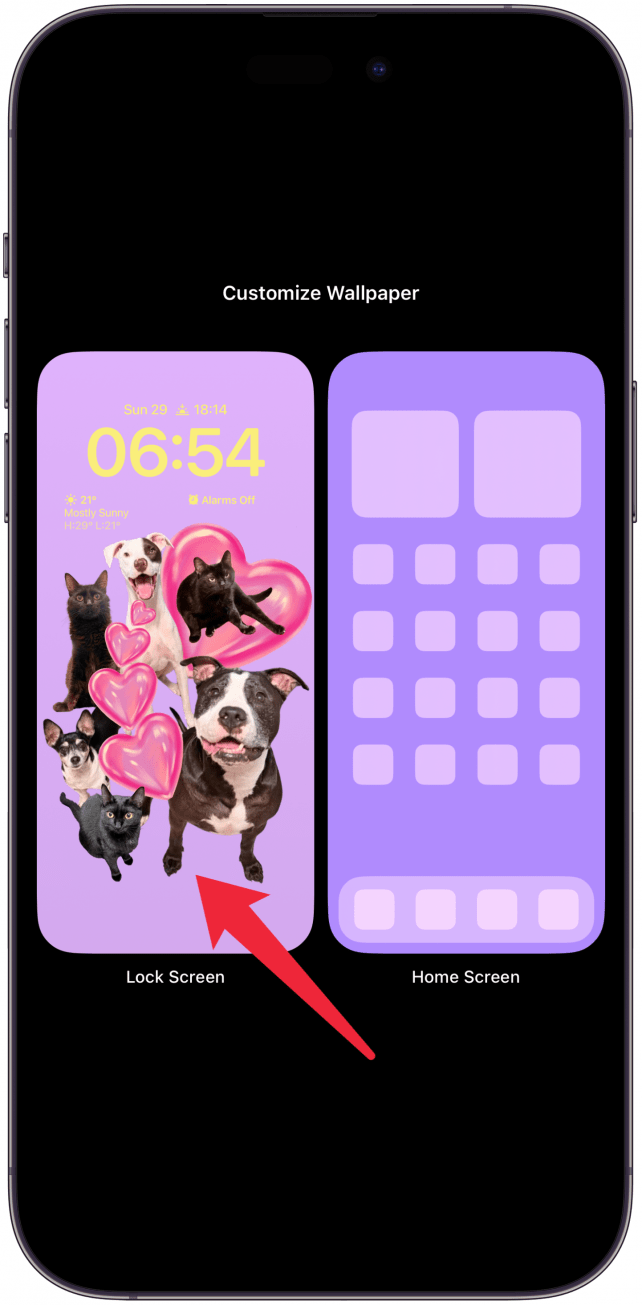
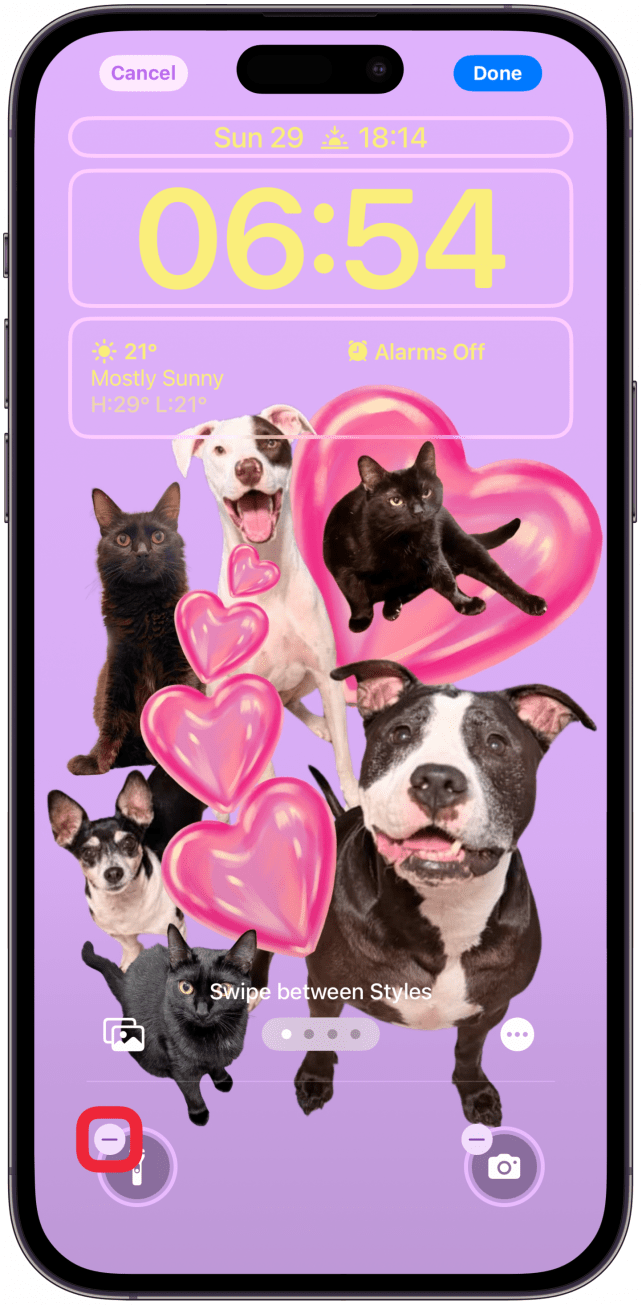
- First, you’ll have to tap the minus icon on one of the controls at the bottom of your screen. By default, these will be the flashlight and camera.
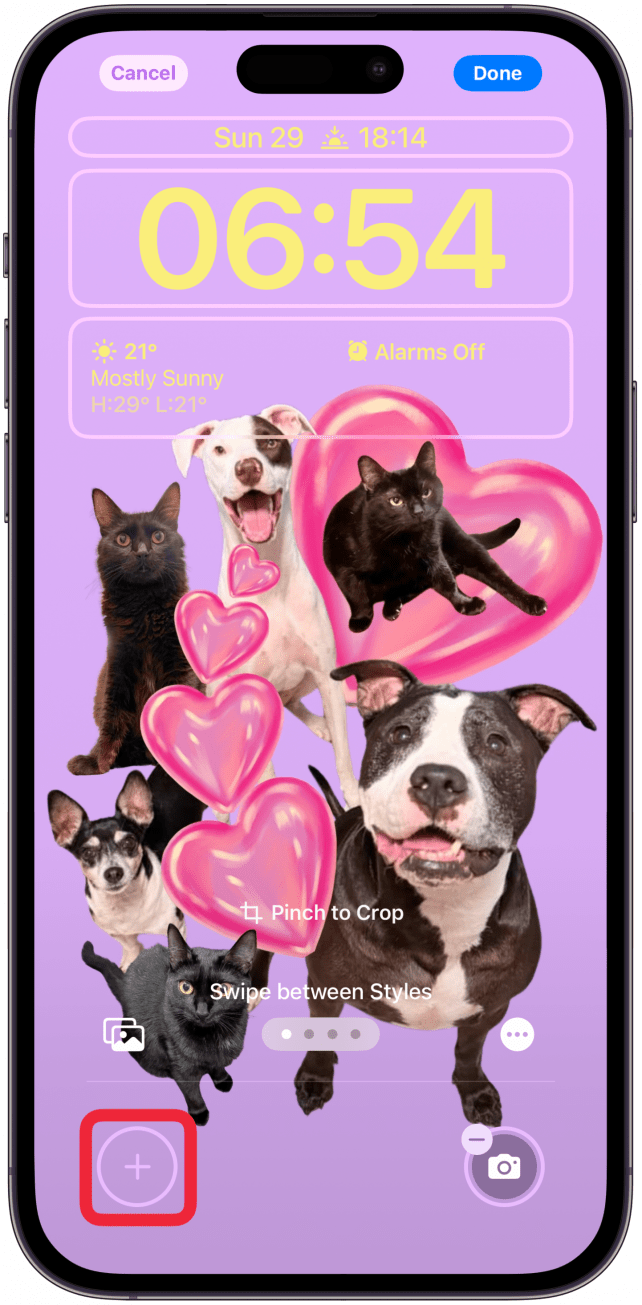
- Now tap the plus icon that replaced the control.
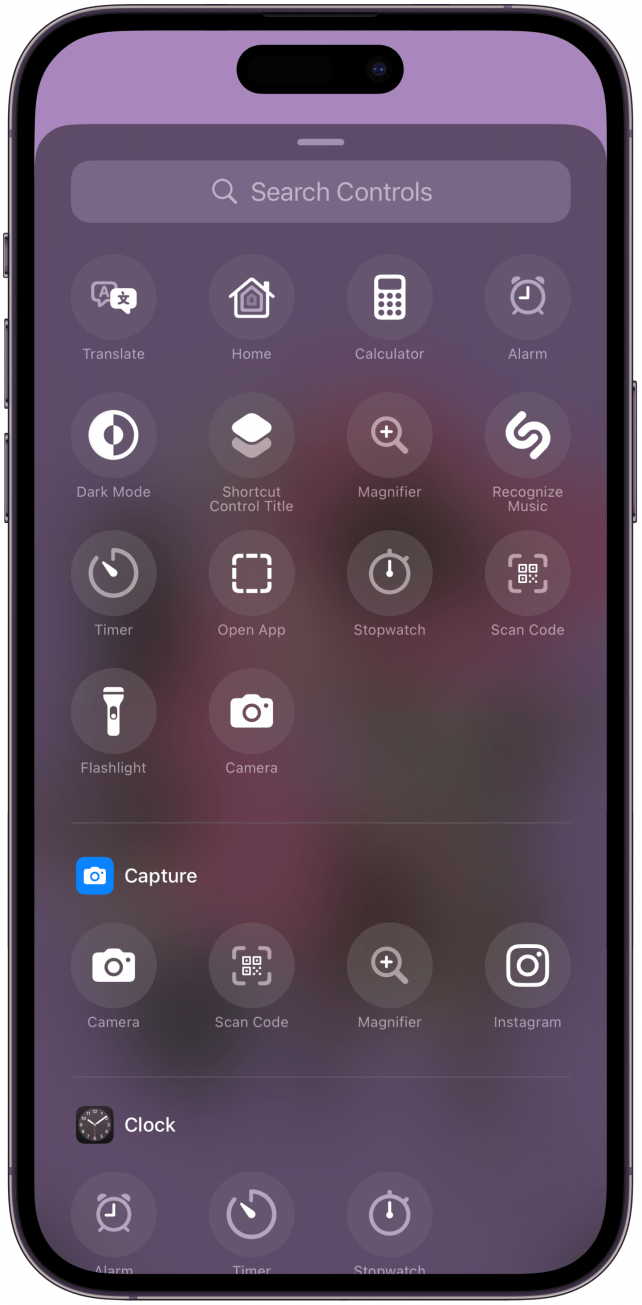
- You can see the Control Gallery options for the Lock Screen.
Access the Control Gallery from Action Button Customization Settings
- Open Settings.
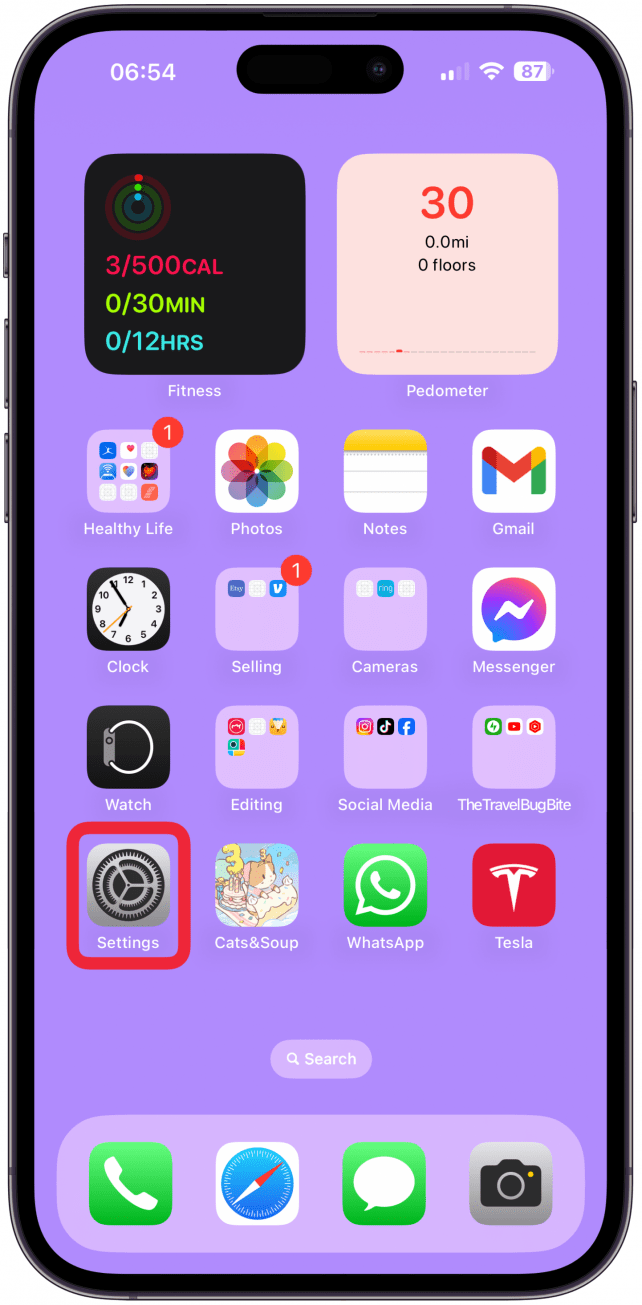
- Tap Action Button.
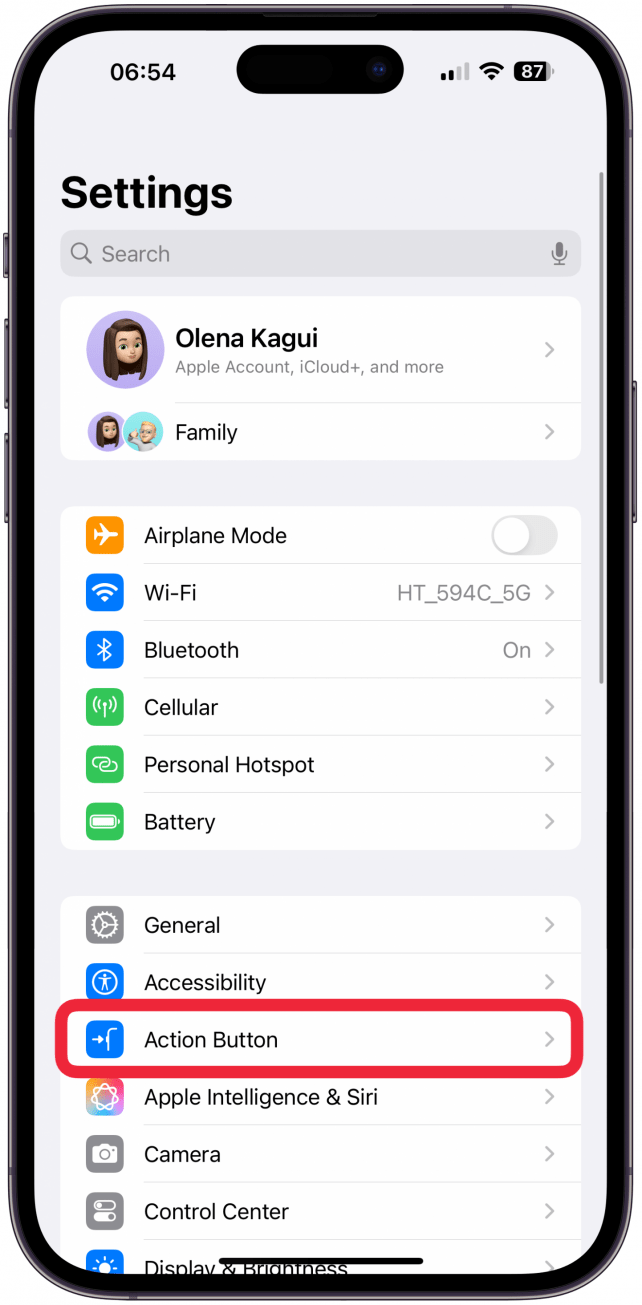
- Swipe left or right until you see Controls. Tap Choose a Control.
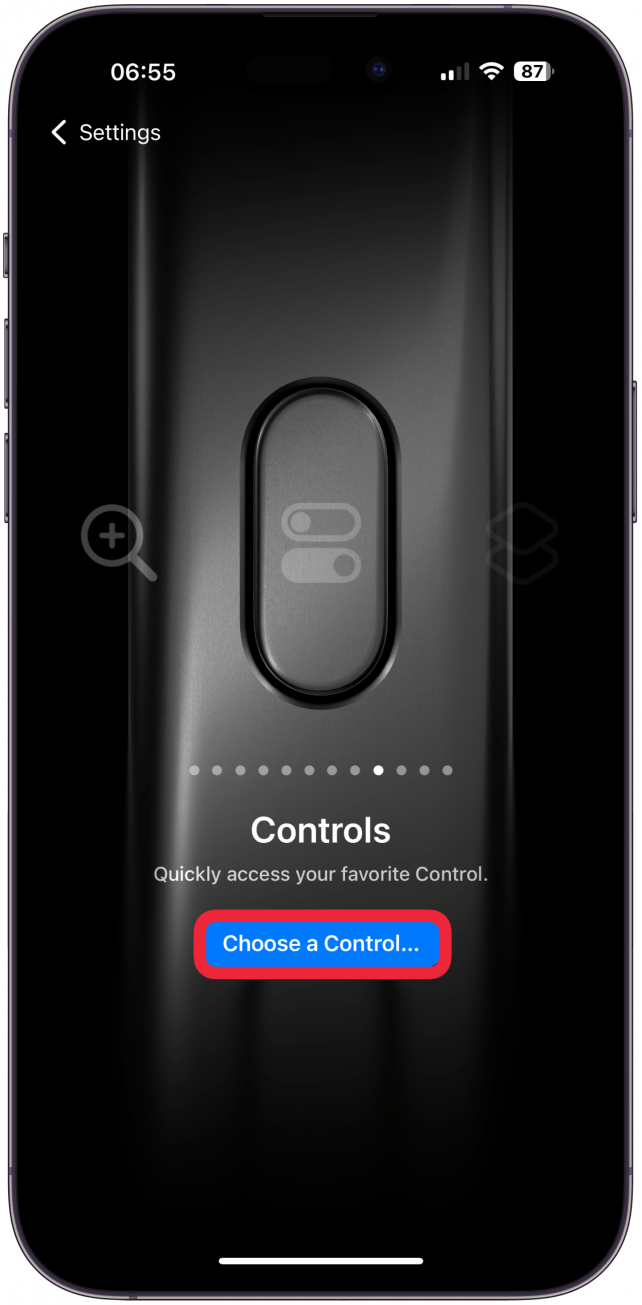
- You can see the Control Gallery options for the Action Button.
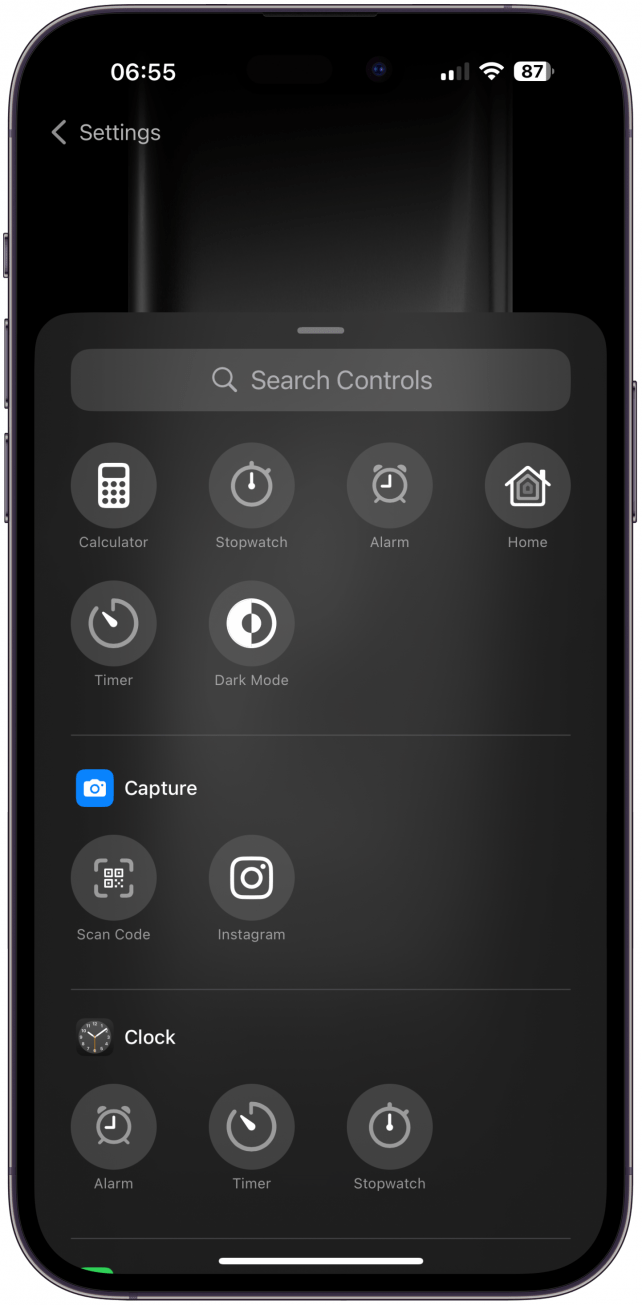
Now you know how to access the Control Gallery to customize your iPhone! Next, let’s learn what each control actually does. Check out our free Tip of the Day newsletter to discover more iPhone tips and features.
Every Feature in the iPhone Control Gallery Explained
The Control Gallery has a vast collection of controls that are searchable using the Search tab at the very top, or by scrolling through section by section. Each control in the gallery has its name directly underneath its icon. Here’s a list of all the controls available in the Control Gallery and a bit of information about what they do:
- Tap to Cash: Opens the iOS 18 Tap to Cash feature that lets you make quick Apple Cash payments with other Apple users without exchanging contact information.
- Print Center: Opens your Print Order page to show any documents that are still in the process to finish printing.
- Music Haptics: Turns music haptics on or off in compatible apps such as the Music app. If you haven’t enabled Music Haptics yet, tapping this will take you to this Accessibility setting. This feature will make your phone vibrate to the rhythm of the music.
- Vehicle Motion Cues: Opens your Vehicle Motion Cues settings that let you decide if you wish to turn them on, off, or to turn on automatically only when you are in a vehicle, which is my preferred option.
- Translate: Opens the Translate app on your iPhone with your most recently used “to” and “from” languages, ready to translate using text or voice. If you don’t see the Translate option in your Control Gallery, make sure the Translate app is downloaded on your iPhone. If you’re like me and haven’t used it for a long time, it may be automatically offloaded and will need to be re-downloaded.
- Open App: Opens whatever app you set it up to open. When you initially add this to the Control Center, you will get to select an app for it to open. You can have an entire page in your Control Center dedicated to opening your most used apps if you want. I prefer to use Spotlight Search to open apps quickly, so I don’t find this particularly useful.
- Assistive Access: As long as you have set up Assistive Access, tapping this will open Assistive Access mode. You will have to enter your Assistive Access password to switch to this mode that makes it possible to navigate your phone in a more visual way with only custom-selected apps. To exit Assistive Access, just triple-click the Side or Home button, then enter your passcode.
- Live Speech: If you don’t have Live Speech set up, tapping this will take you to your Live Speech settings. Once you do, you’ll be able to type text for your iPhone to “speak” for you directly from the Control Center.
- Background Sounds: Turns the Background Sounds feature on or off. Long-press it to pick the sound you wish played and the volume. You can also tap Background Sounds Settings… to make more changes, like have your phone stop playing the sound when locked and allow the background sound to be heard while you play media. Whatever settings you pick will play when you turn Background Sounds on in your Control Center.
- Left-Right Stereo Balance: Turns your stereo balance on to make the sound in either your left or right ear louder. You’ll have to make adjustments in the Left-Right Stereo Balance Settings, otherwise enabling it will keep the sound the same on both sides.
- Live Captions: Will turn Live Captions on and pull up the respective menu on screen until you tap the icon again to turn it off. You can pick between your Microphone or iPhone Audio listening and captioning what it hears. You can also pause or resume listening from the menu.
- Headphone Levels: Lets you control the sound levels on connected headphones.
- Live Listen: Lets you use your AirPods as a makeshift hearing aid. Your AirPods have to be connected to your iPhone for the Live Listen option to be available.
- Headphone Accommodation - Turns your Headphone Accommodations on or off when you’re connected to headphones. You can enable Headphone Accommodations in the Settings, and tap on Custom Audio Setup to set everything up in a way that works for you.
- Home (Bundle): This adjustable bundle contains a collection of your smart devices and scenes. It gives you access to quickly turn your accessory or scene on or off. Your most used options will show up here and whatever is currently on will move to the top of the list.
- Switch Control: Enables Switch Control. You’ll have to set it up in your Settings to make it work the way you want it to.
- Voice Control: Turns Voice Control on or off, allowing you to control your phone with your voice. You don’t need to activate Siri or say anything extra, just use the Voice Control commands when the feature is activated.
- Full Keyboard Access: Turns on Full Keyboard Access, an accessibility feature that lets a keyboard connected to your iPhone to control it using various unique keyboard commands, like using the tab key to move forward.
- AssistiveTouch: Turns on AssistiveTouch, an accessibility feature that gives you easy access to Siri, the Control Center, Notification Center, and can even be customized. AssistiveTouch is also the feature that lets you turn your phone off without using the power button.
- Apple Watch Mirroring: Lets you control your Apple Watch from your iPhone screen, which can be easier than tapping your Apple Watch’s tiny screen. It also lets you see whatever you do on your Apple watch on your iPhone, which can be useful if you are trying to teach someone else how to do something on their watch.
- Control Nearby Devices: Lets you control nearby Apple devices from your iPhone such as your iPad. This accessibility feature can help those with mobility issues.
- Feedback Assistant: Opens the Feedback Assistant app that lets you send Apple suggestions or report any issues with your device.
- Classic Invert: Inverts all the colors of everything on your iPhone which can make it easier for some users to read text or enjoy certain apps on their phone.
- Color Filters: Removes all the colors to give you a grayscale display for a unique way to experience your iPhone.
- Live Recognition: Opens the Magnifier app to the Live Recognition feature that will show you a magnified view of what your iPhone camera sees with a simple written and audio description.
- Increase Contrast: Increases the contrast of everything you see on your iPhone.
- Reduce Motion: Turns on the Reduce Motion accessibility feature that minimizes the animations on your iPhone. It also makes screen transitions smoother.
- Reduce Transparency: Turns on the Reduce Transparency feature that helps with legibility by turning off or reducing semi-transparent backgrounds on your iPhone, for example, in the Control Center.
- Reduce White Point: Reduces all the bright colors on your screen to make them less straining to look at, but leaves all the darker colors the way they are. This is gentler on your eyes without making the screen too dark by lowering brightness or using Dark Mode. This feature is commonly recommended for users who get headaches or strain their eyes too much when they use their iPhones.
- Smart Invert: Inverts the colors on your iPhone display but doesn’t change the color on media files including images and select apps that have darker color schemes.
- VoiceOver: Turns on the VoiceOver feature that makes your iPhone read the text on the screen whenever you press the Side button three times. In addition to reading text it will also give you information about what is on your screen, like telling you what landmark is in an image.
- Zoom: Turns on the Zoom accessibility feature that lets you magnify portions of the screen or the entire screen.
- Speak Screen - Turns on the Speak Screen accessibility feature that reads everything that is on your screen from top to bottom.
- Dim Flashing Lights: Turns on the Dim Flashing Lights accessibility feature that dims your iPhone’s display whenever flashing or strobing lights are detected on whatever media you are viewing. This can be beneficial to all users but is especially helpful to those with photosensitive epilepsy.
- Hover Text: Turns on the Hover Text accessibility feature that requires you to connect your iPhone to a Bluetooth device with a cursor, like a mouse or trackpad. Once turned on, it lets you see magnified text in a new “window” when you hover over it.
- Hover Typing: Turns on the Hover Typing accessibility feature that shows you whatever you are typing in a new inverted “window” that shows the text in a way that’s easier to see.
- Shortcut: Opens the Shortcuts app to the Shortcuts tab so that you can view and quickly select all your shortcuts. You can rearrange the order so that your most user shortcuts are at the top for easier access.
- Eye Tracking: Turns on the Eye Tracking feature that lets you navigate your iPhone with the movements of your eyes. The first time you use it you will be asked to calibrate it to match your eye movements.
- Ping My Watch: Make your Apple Watch produce a pinging sound to help you locate it. This only works if your Apple Watch is within Bluetooth range of up to 330 feet.
- Guided Access: As long as you set Guided Access up, navigate to an app you wish to focus on and tap the Guided Access icon in the Control Center. Once you run this feature you can enter a passcode and circle areas on your screen that you cannot tap or control. To exit Assistive Access, just triple-click the Side or Home button, then enter your passcode.
- Connectivity (Bundle): Gives you quick access to Airplane Mode, AirDrop, Wi-Fi, Cellular Data, Bluetooth, Personal Hotspot, VPN, and Satellite. You can quickly tap on them to enable/disable and/or connect/disconnect each respective setting.
- Flashlight: Turns on your Flashlight. With iOS 18 you can use the Dynamic Island to control your flashlight. Swipe up and down to control the intensity and swipe left and right to change the beam width.
- Screen Recording: Starts a three-second countdown before starting a screen recording. If you long-press the icon in your Control Center you can make changes to the settings, like turning the microphone on to record your voice along with your screen.
- Stopwatch: Opens your Clock app to the Stopwatch tab. It will not automatically start your stopwatch, which I find frustrating, so you will still need to manually tap Start.
- Scene or Accessory: Will let you pick a Scene or Accessory set up via the Home app. That way you can turn any accessory or multiple accessories (known as a Scene) on or off or with a single tap. In iOS 17 I had a bunch of these for each of my favorite accessories, but now I use the new Home bundle option to automatically feature my most used scenes and accessories.
- Alarm: Opens your Clock app to the Alarms tab for quick access.
- Timer: Opens your Clock app to the Timers tab. It will not automatically start a timer, you will still need to select a time then press Start. You can also label your timer and pick a timer tone directly from this tab.
- Text Size: Opens a Text Size slider that lets you swipe up to increase text or swipe down to decrease text. If you add it to the Control Center, you can either have it be a small icon that you need to tap to access the controls, or an extended icon that lets you increase/decrease text directly from the Control Center. If you tap the small version of the icon or tap and hold the larger version of the icon, you’ll be able to decide if your text size will change in All Apps or your Home Screen Only.
- Dark Mode: Turns Dark Mode on or off manually.
- Quick Note: Opens Quick Notes, the Notes app feature that lets you open/edit your notes from any iPhone app. Once you are with your note, you’ll be able to return to the app you were previously using by tapping the name of the app above the Back icon in the top left corner.
- Low Power Mode: Turns Low Power Mode on/off. Low Power Mode limits iPhone features and slows down app updates in order to maximize battery life.
- Scan Code: Opens the Camera app with the sole purpose of scanning a QR code, no options to take photos or switch between photo modes or use other typical Camera app features except for the Flashlight (if you need to scan a QR code in low light). Scanning a code using this control rather than your Camera app will also automatically open whatever QR code you scan without making you tap the link that appears under the scanned code.
- Recognize Music: Tapping this will make your phone immediately start listening to whatever is playing so that it can tell you the name of the song quickly without forcing you to open an app.
- Accessibility Shortcuts: Opens any accessibility shortcuts you have enabled or set up on your iPhone. If you haven’t enabled any, you might not see anything here. You have to tap to open the shortcuts and then tap whichever you want to select to run it.
- Camera: Opens the Camera app either to the default Photos mode, or to your most recently used settings, if you toggled on Preserve Settings. While I usually don’t recommend preserving settings in the Camera app, it can be useful if you only like using certain modes, like video, and don’t want to miss a moment. It can save valuable settings to open the camera app directly from your Control Center no matter what app you are using. If you long-press the Camera icon, you will get the option of opening your Camera app directly to Selfie, Video, Portrait, or Portrait Selfie mode.
- Airplane Mode: Turns Airplane Mode on and off.
- Cellular Data: Turns your cellular data on and off. If you have multiple SIM (or eSIM) cards, iOS 18 lets you long-press this icon to switch between phone numbers.
- Personal Hotspot: Makes your personal hotspot discoverable or not discoverable. To edit your hotspot settings and password, tap on Personal Hotspot in your iPhone’s Setting.
- Brightness: Swipe up and down to change the level of brightness on your display. If you long-press it, you can see more options: turn Dark Mode on/off, turn Night Shift on/off, and turn True Tone on/off.
- Orientation Lock: Turns the orientation lock on or off. When it is red, the orientation lock is on. But when it is gray, it is off, meaning that compatible apps and content (such as videos in the Photos app) will change view depending on if you hold your iPhone horizontally or vertically for better viewing.
- Focus: Opens up a menu with all your Focus modes that you can quickly tap to turn on or off. If you scroll to the very bottom and tap the plus icon, you can create a new custom Focus mode.
- Hearing: Gives you quick access to your Speaker, Background Sounds, and Live Listen settings.
- Sound Recognition: Turns the Sound Recognition feature on or off. You can long-press it to make changes to your settings and select which sounds you wish to receive alerts about. This feature is meant to help those who are hard of hearing of deaf if certain sounds are happening within hearing distance of the phone’s microphone.
- Home (Shortcut): Opens whatever accessory or scene that you selected to appear in your Control Center. Once you add the Home icon, you’ll have to long-press on it in the Control Center and select your chosen smart accessory or scene. If you don’t select anything, the icon will just take you to the Home app.
- Notes: Opens a brand new note in the Notes app.
- Now Playing (Bundle): Shows whatever media is playing on your iPhone and other Apple devices. You can tap on it to get more information and see more controls, plus see what other Apple devices are playing. You can pause the media, change the volume, skip forward, etc.
- Remote: Opens a virtual remote that you can use to control your Apple TV.
- Volume: Lets you swipe up or down to control your iPhone’s volume.
- Silent Mode: Mutes or unmutes your iPhone in just a tap. It works similarly to the switch above the volume up button that iPhone models 14 and earlier have.
- Calculator: Opens the Calculator app. It also shows you your most recent calculation, which is great if you forget and need to check again without having to recalculate.
- Announce Notifications: Will turn on the Announce Notifications feature that has Siri read out any incoming notifications when you are connected to AirPods or other earbuds or headphones.
- Magnifier: Turns on the Magnifier feature that lets you easily zoom in on your iPhone screen.
- Wallet: Opens your Wallet app so that you can make quick payments or access any tickets or cards in your virtual wallet.
- Screen Mirroring: Turns on the screen mirroring feature that lets you see what’s on your iPhone’s screen on another Apple device, like your iPad or even your Apple TV.
- Voice Memos: Starts recording a Voice Memo as soon as you tap the icon.
Third-Party apps are also able to create icons for the Control Gallery. We can expect more apps to add this feature as more users update to iOS 18. If you don’t see any of these in your list, it’s possible that they are associated with an Apple app that was either offloaded or deleted off your iPhone. You can easily re-download it from the App store.
FAQ
- How do I block access to Control Center from the Lock Screen? Open Settings, tap Face ID & Passcode, then scroll down and toggle off Control Center.
- How do I access the Control Center on Apple Watch? To open your Apple Watch Control Center, tap the Side button to pull it up.
- How do I change the icons on my Lock Screen? You can change the icons on your Lock Screen and add widgets, just open Settings and tap Wallpaper, then you can select and customize your chosen Lock Screen wallpaper.

Olena Kagui
Olena Kagui is a Feature Writer at iPhone Life. In the last 10 years, she has been published in dozens of publications internationally and won an excellence award. Since joining iPhone Life in 2020, she has written how-to articles as well as complex guides about Apple products, software, and apps. Olena grew up using Macs and exploring all the latest tech. Her Maui home is the epitome of an Apple ecosystem, full of compatible smart gear to boot. Olena’s favorite device is the Apple Watch Ultra because it can survive all her adventures and travels, and even her furbabies.
 Leanne Hays
 Rhett Intriago
 Amy Spitzfaden Both
 Linda Ruth
 Rachel Needell

 Olena Kagui

 Hal Goldstein


