How to Customize iPhone Contact Cards for Safe Sharing


What to Know
- Get clarity on what information people can actually see when they look at your Contact Poster and Contact Card.
- Customize what details you share when using the new iOS 17 iPhone contact-sharing features such as NameDrop.
- Learn how to use iPhone Contact Cards as business cards without sharing every private detail.
iOS 17 came up with a cool new way to share your contact information with other iPhone users. Simply hold two unlocked iPhones together, and you can exchange contact information! But what exactly is shared when you tap a stranger's phone? We'll teach you everything you need to know about Contact Cards and Contact Poster customization and privacy.
What Information Does an iPhone Contact Card Contain?
If you allow your contacts to see your Contact Card, they will see what's on that Contact Card (we'll teach you how to customize that information below). Contacts can access this information if you've given them the correct permissions or shared your Contact Card with them via text or NameDrop. As long as you share it with them, they can access your Contact Card in the Contacts, Messages, FaceTime, and Phone apps. For example, when you call them, they can tap the i icon and see the information that you provided. The only time they'll see more information or something you didn't explicitly provide is if they manually customize your Contact Card.
Your iPhone contains an incredible amount of information about you, so it is important to understand what your Contact Card contains before you share it. Any time you text someone with information about your address, birthday, family members, etc., your iPhone will store this information. My Contact Card was filled with suggestions about my personal life that I don't want to share with strangers. Luckily, you can pick and choose what information you share with whom and when.
How to Customize Your iPhone Contact Card for Better Privacy
You have full control over what others see and know about you. Here’s how to view and customize your information:
- Open Contacts on your iPhone.
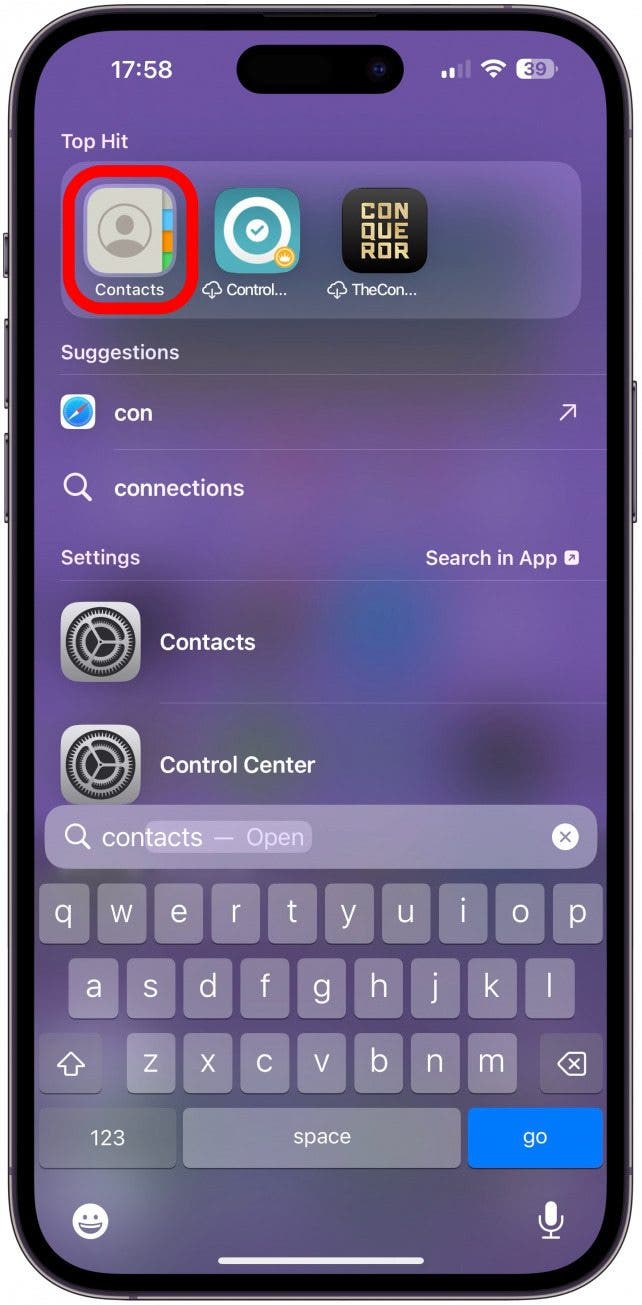
- Scroll to the very top if you are not already there. Tap My Card.
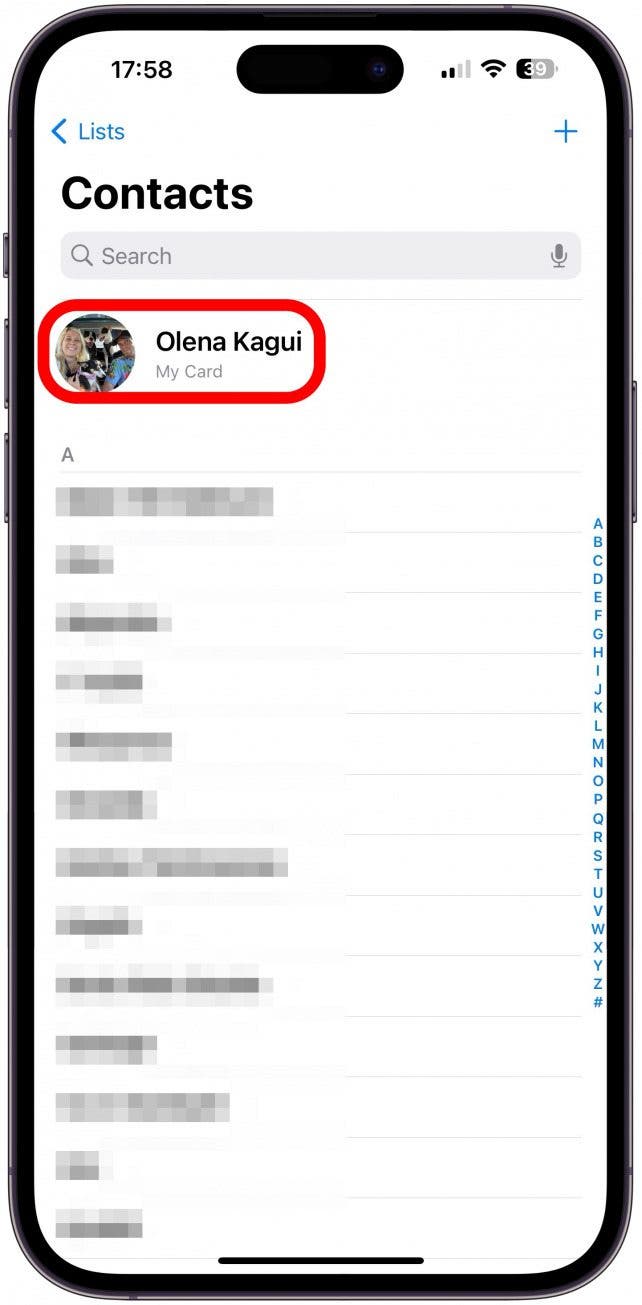
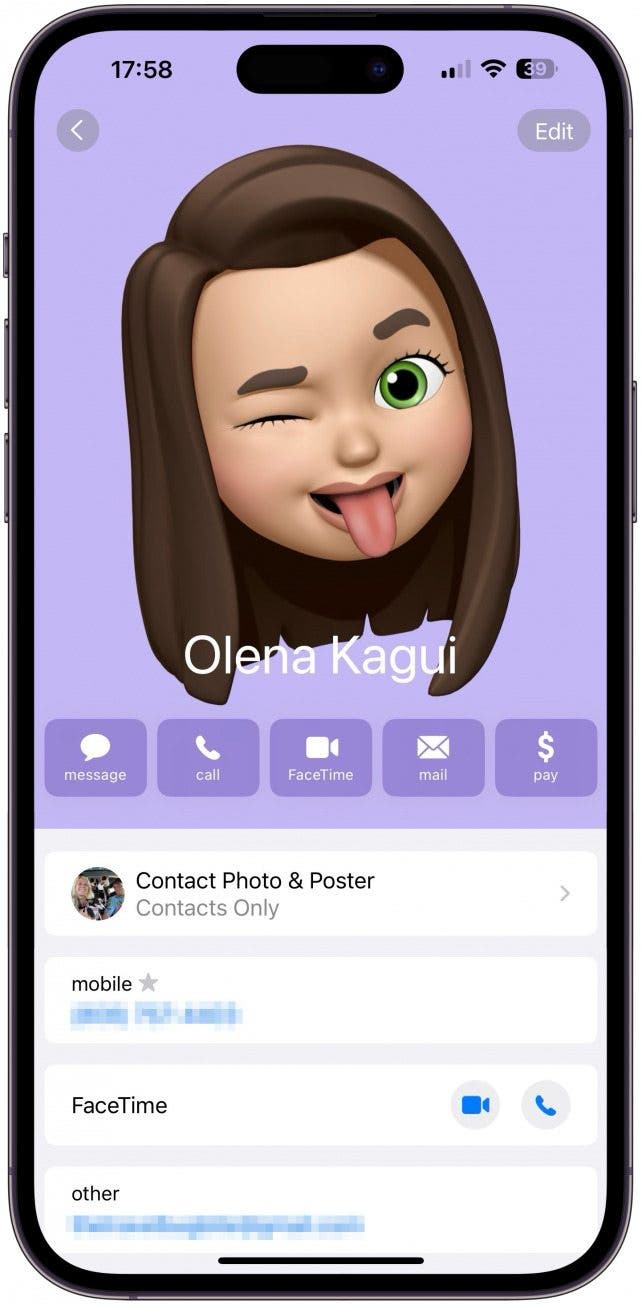
- Here, you can see your Contact Card.
- If you scroll down, you will see which information you have saved about yourself. You may see Siri suggestions that are gray and marked as "Siri found in (app name)." These suggestions can include your address, alternative email addresses and phone numbers, your birthday, etc.
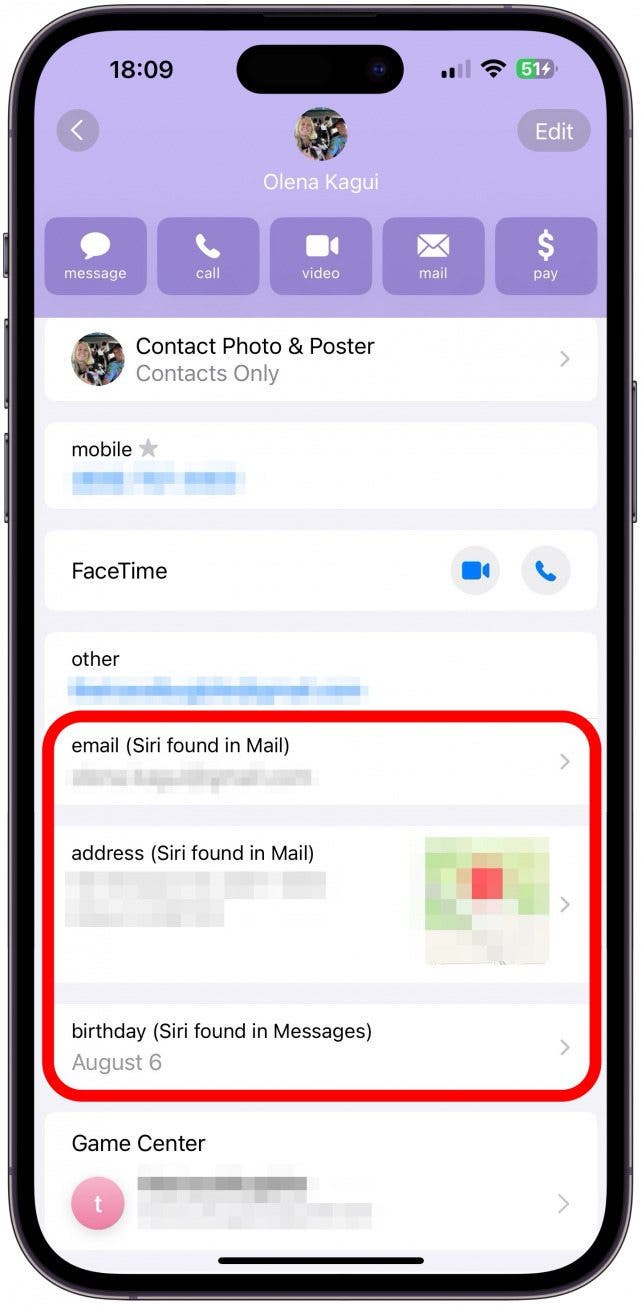
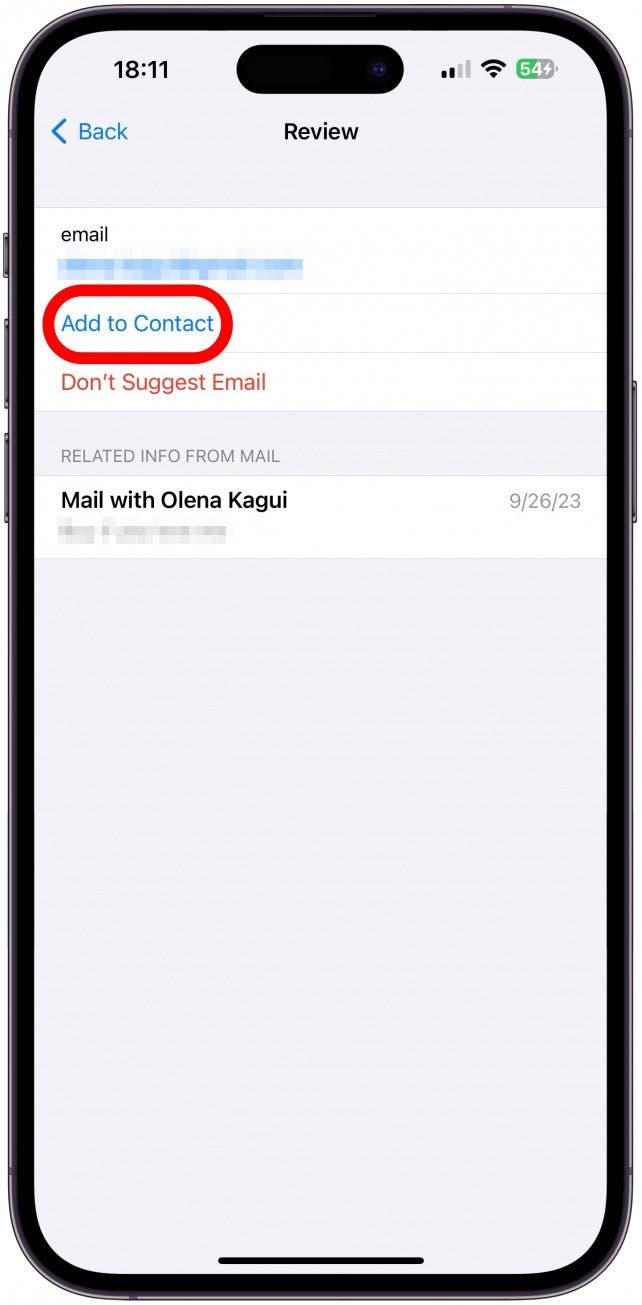
- If you tap on the Siri suggestions, you can see the option to Add to Contact if you wish to include it in your Contact Card.
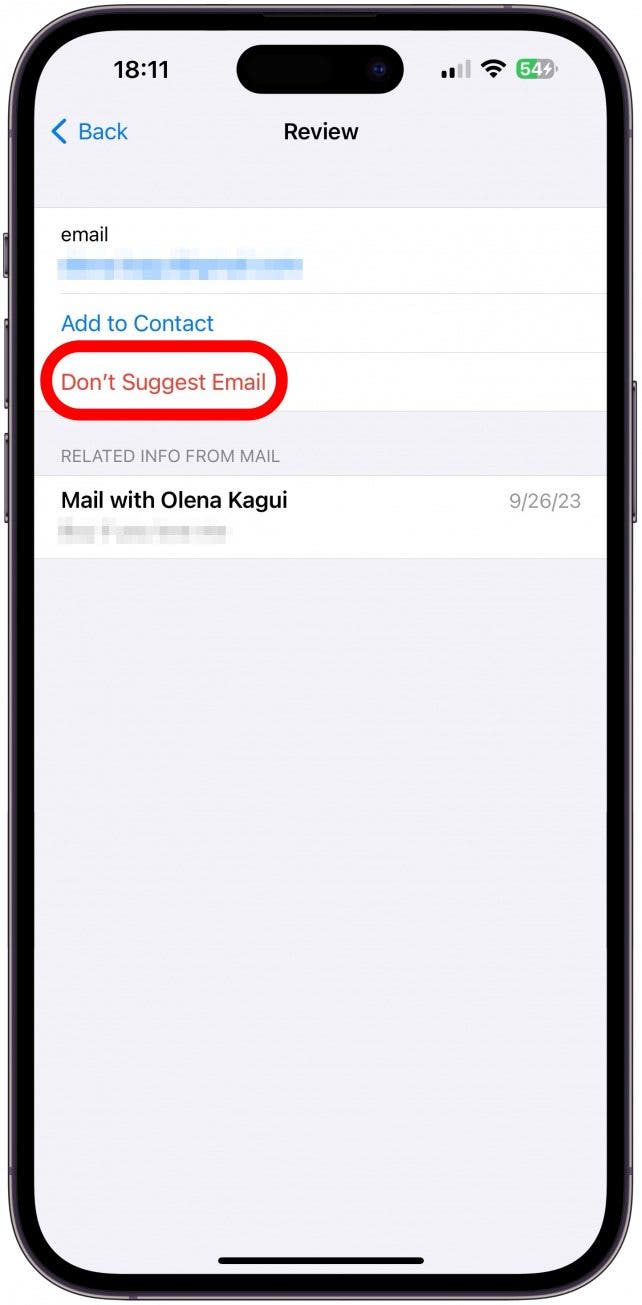
- Or you can tap Don’t Suggest (type of data) if Siri’s assumption is incorrect or you simply don’t wish to have it on record.
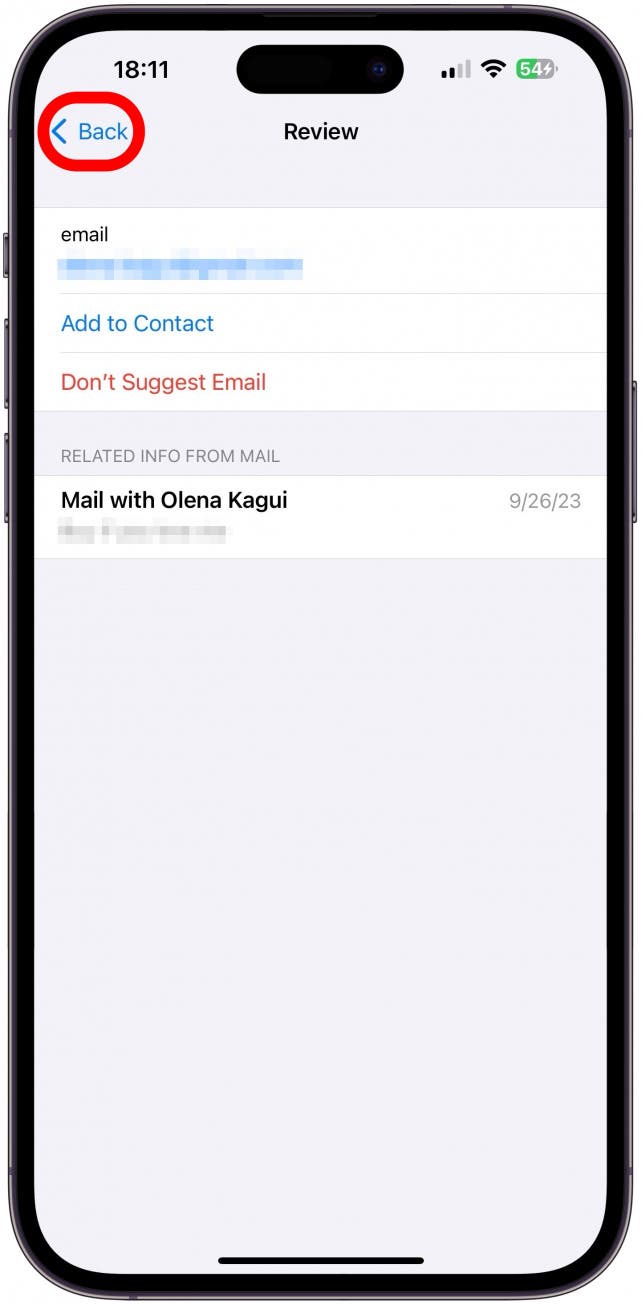
- If you tap Back without making any selections, the suggestion will remain, but it will not show up if you share your Contact Card.
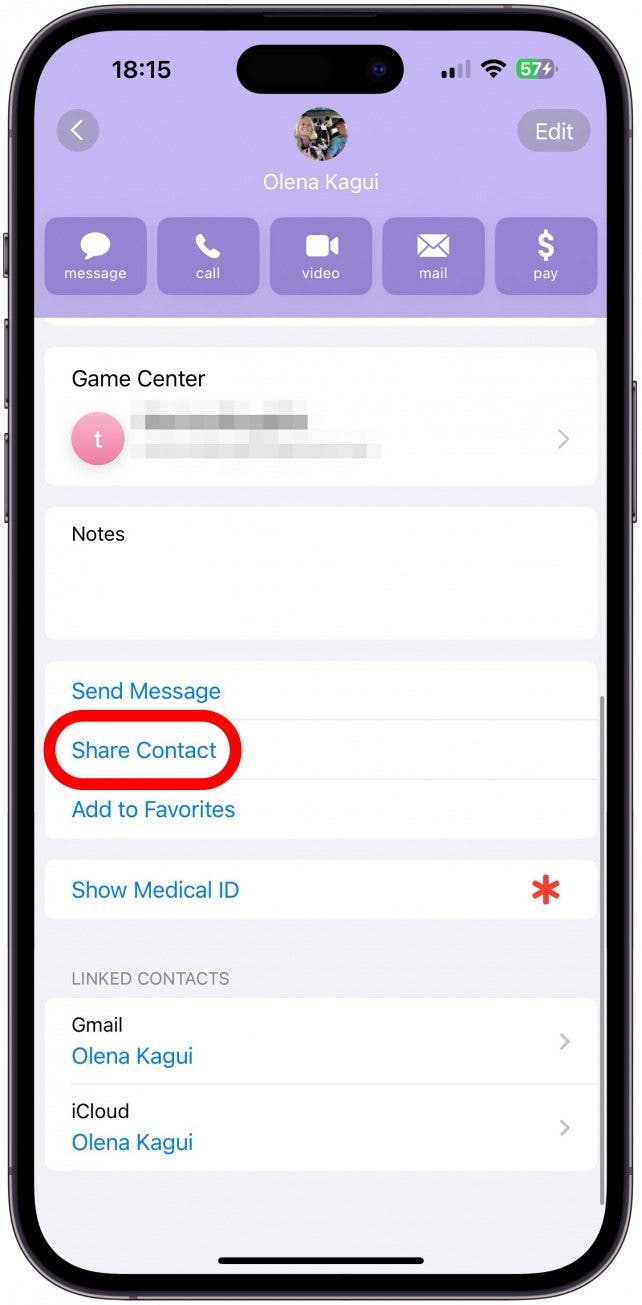
- If you scroll further down, you will see the option to Share Contact. Tapping this lets you select what information you want to share, then it will open up a share sheet and let you share your Contact Card the same way you share an image or other iPhone files.
- If you tap Edit in the top right corner, you’ll be able to see various fields that you can change, add, or remove.
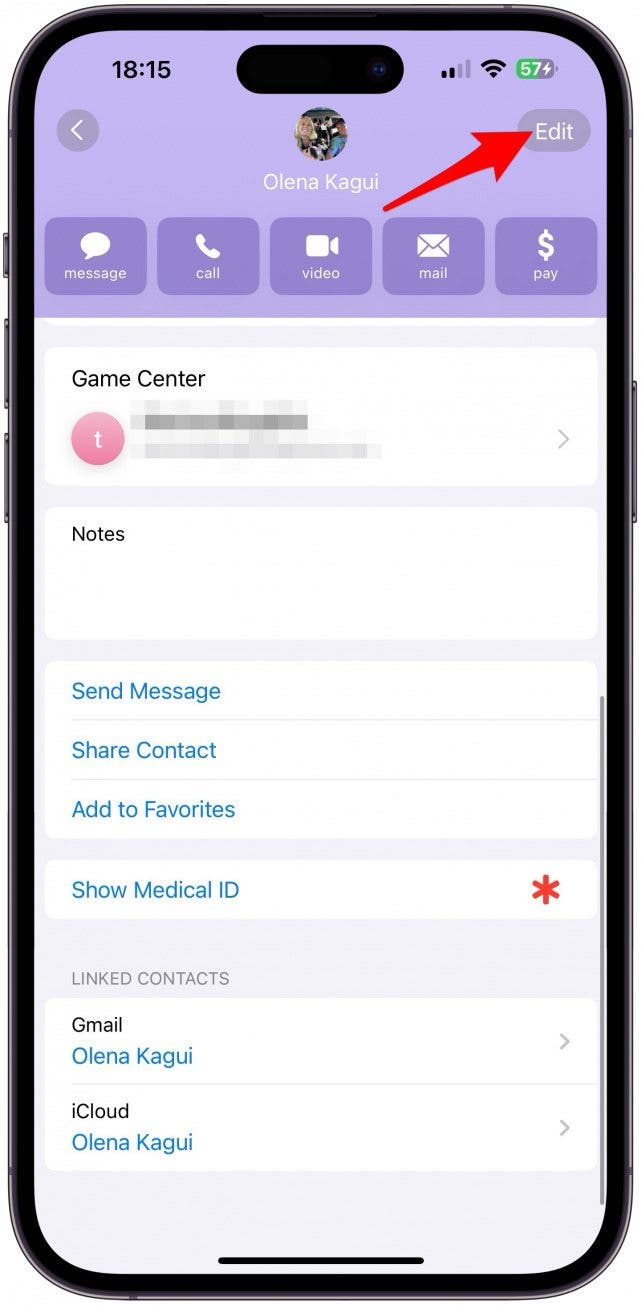
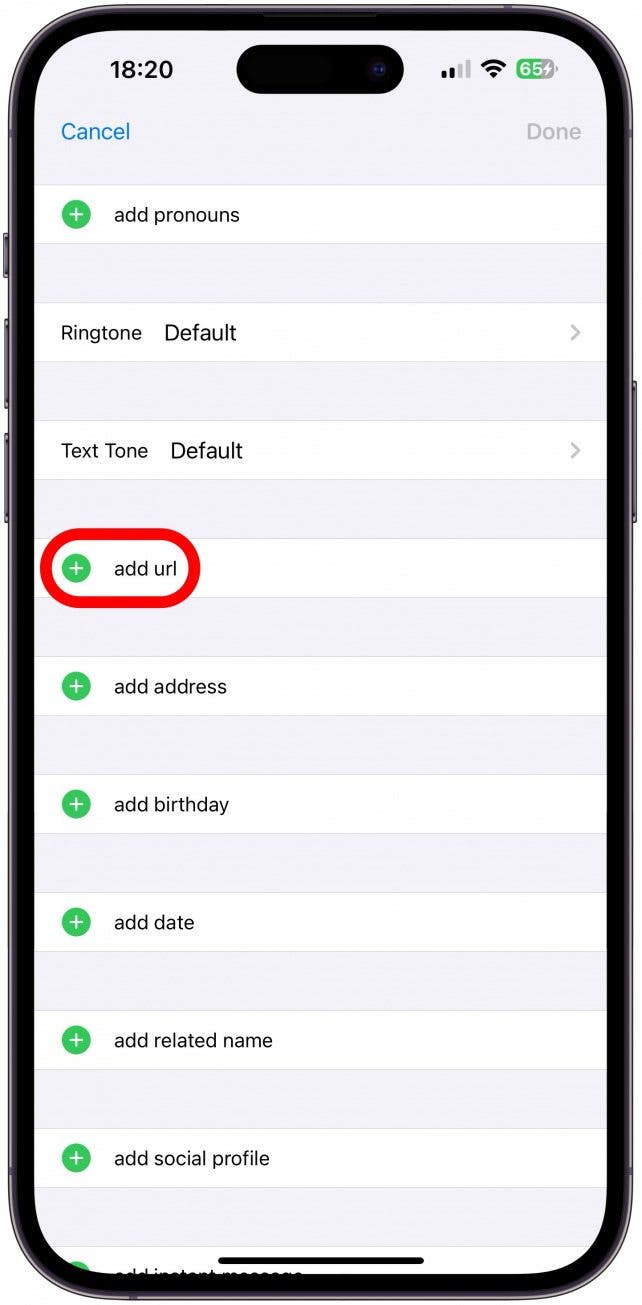
- Tap the green plus to add information to a field. I will add the URL for my online store because I want everyone, even complete strangers I've just met, to have access to it.
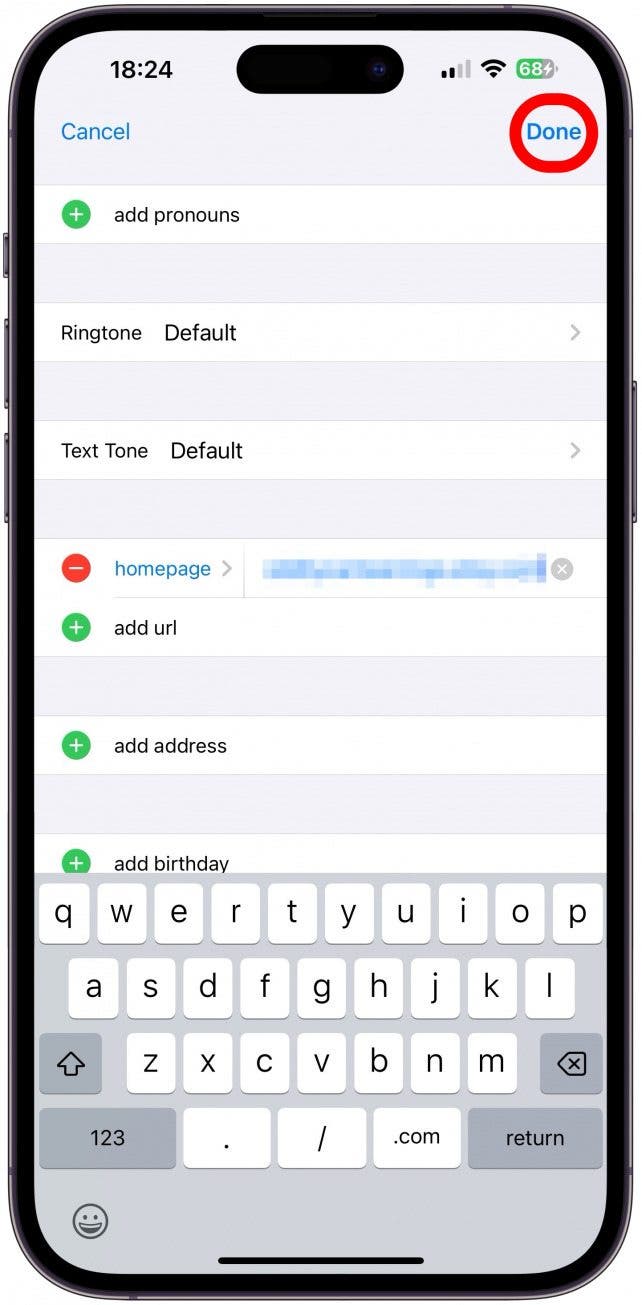
- Enter the appropriate data in the field, then tap Done.
- Next, tap Edit to customize your Contact Poster and Contact Photo.
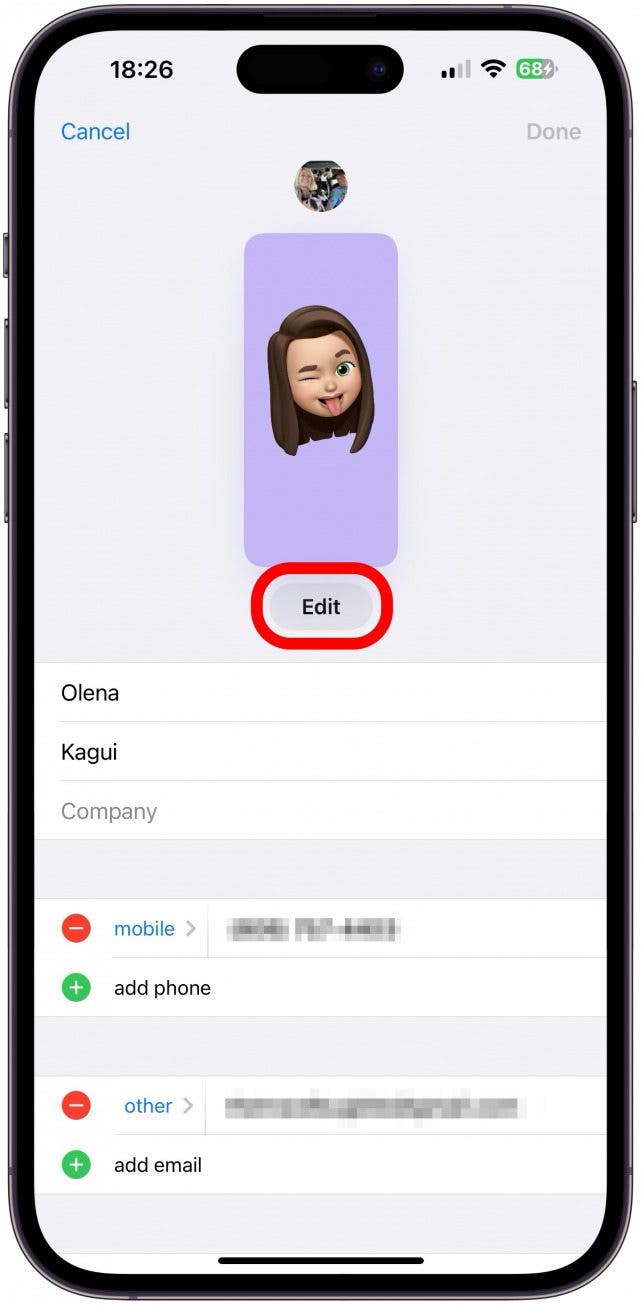
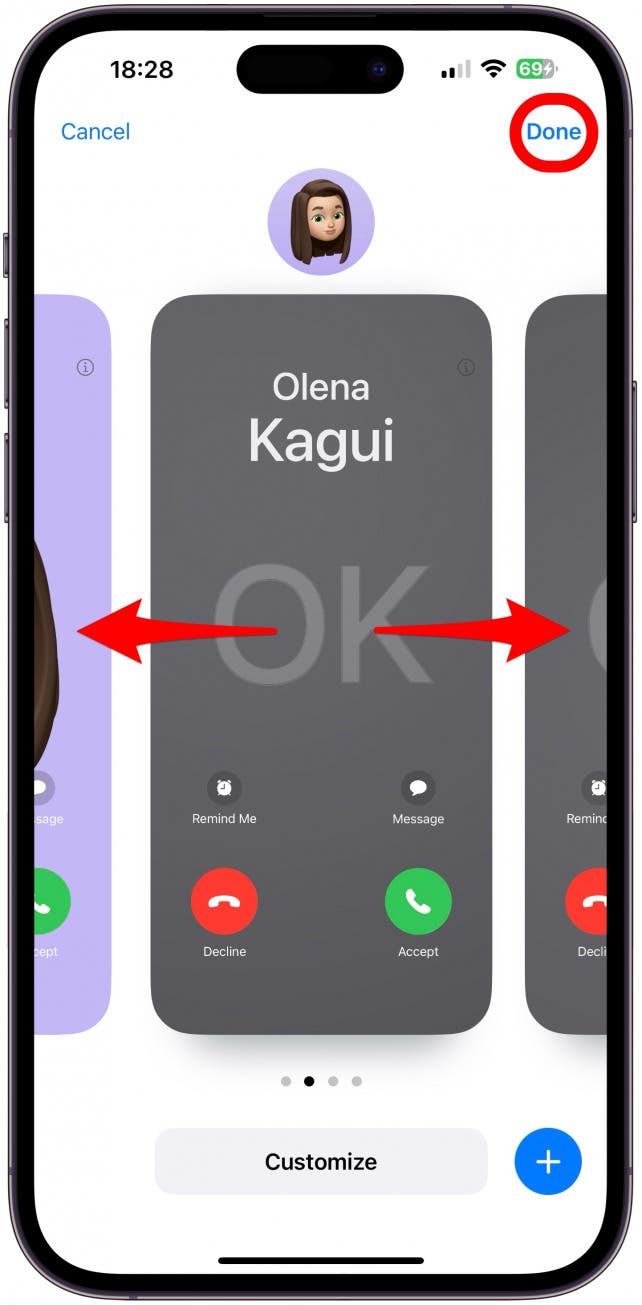
- Here, you will see what people will see when you call them or share your contact with them. The image in the circle on top of the screen is your Contact Photo, while the rectangular image is the Contact Poster. You can swipe to see the pre-existing options. If you like one, tap Done.
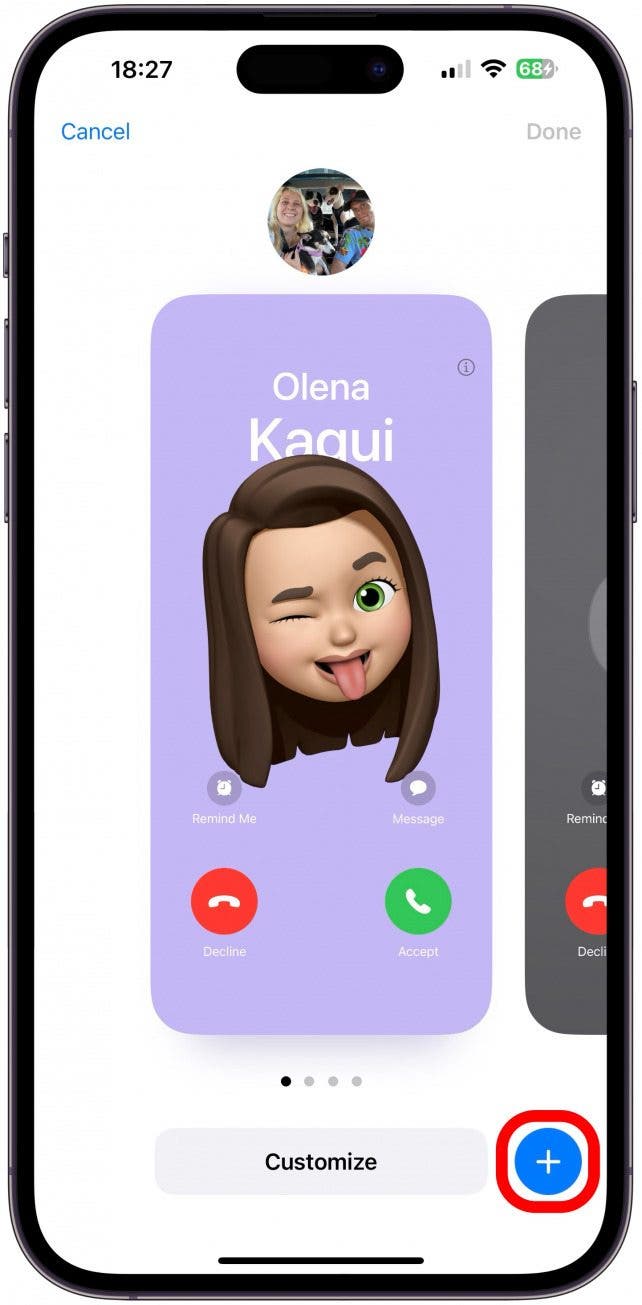
- You can also build one from scratch by tapping the blue plus icon.
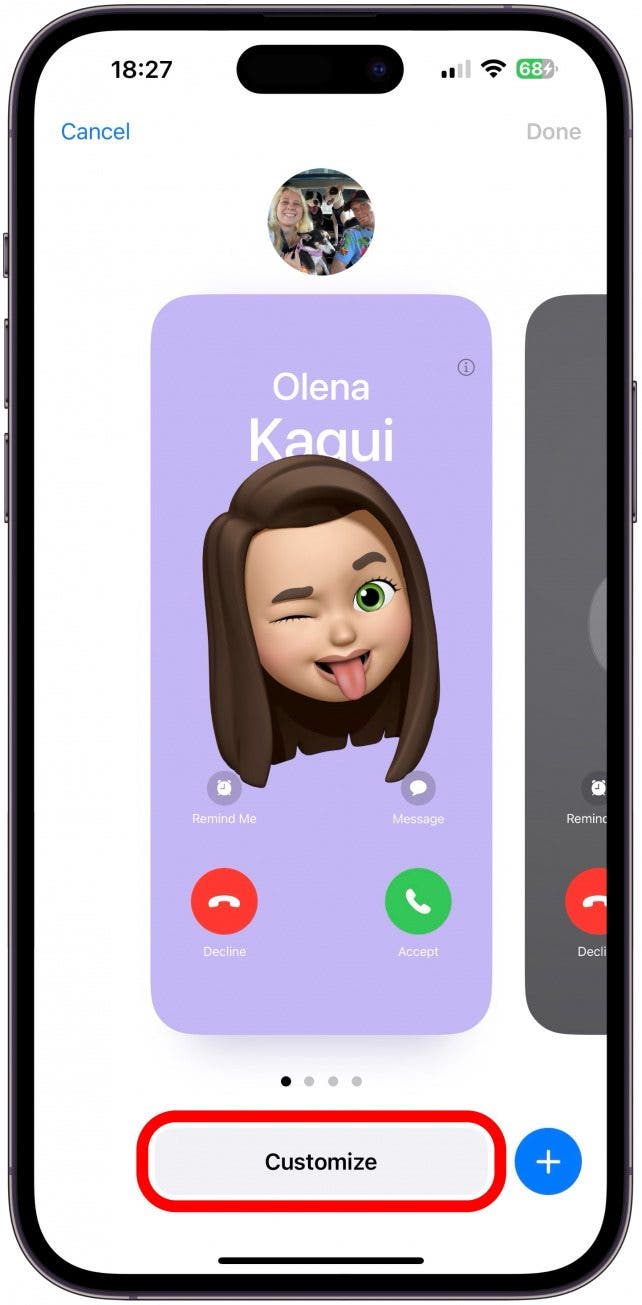
- Finally, you can customize the selected Contact Poster. Tap Customize. Here, you can pick from a wide variety of Contact Photo and Poster styles. These can be real photos, Memojis, emojis, monograms, etc. The best way to familiarize yourself with them is to explore all the options. You can even create a bunch of different options and switch between them as you wish.
- If you return to step 3, you can now tap Contact Photo & Poster to select who sees what.
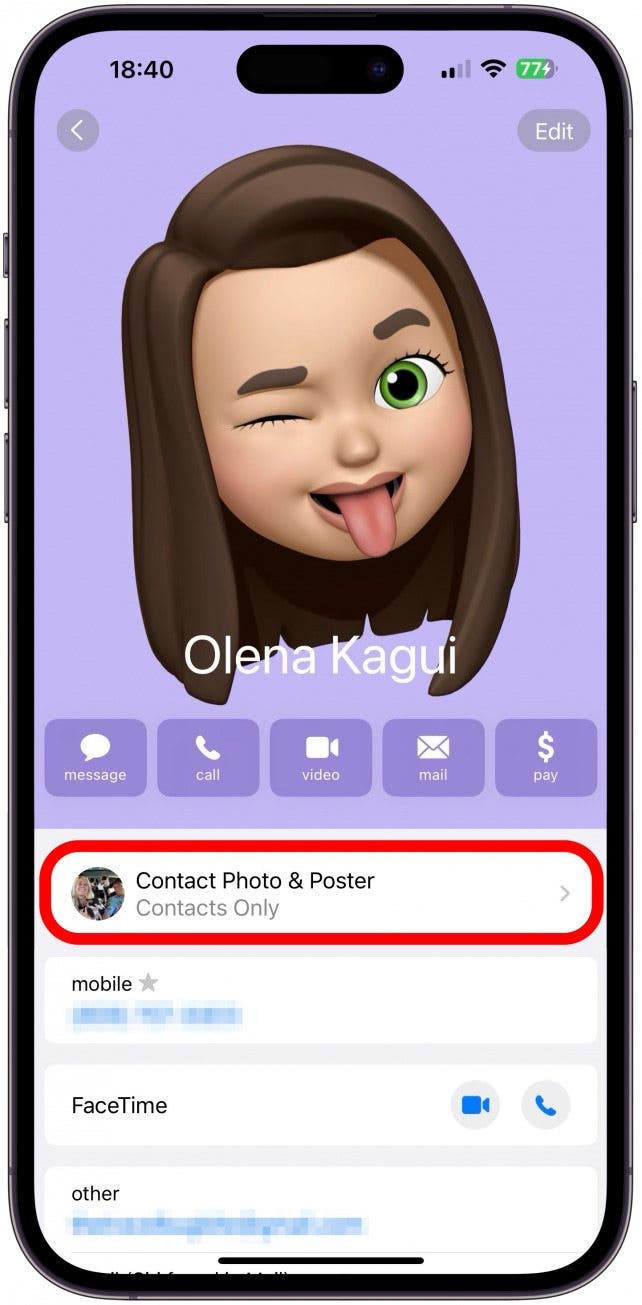
- You can change your name by tapping your name, and make changes to your Contact Photo & Poster by tapping Edit.
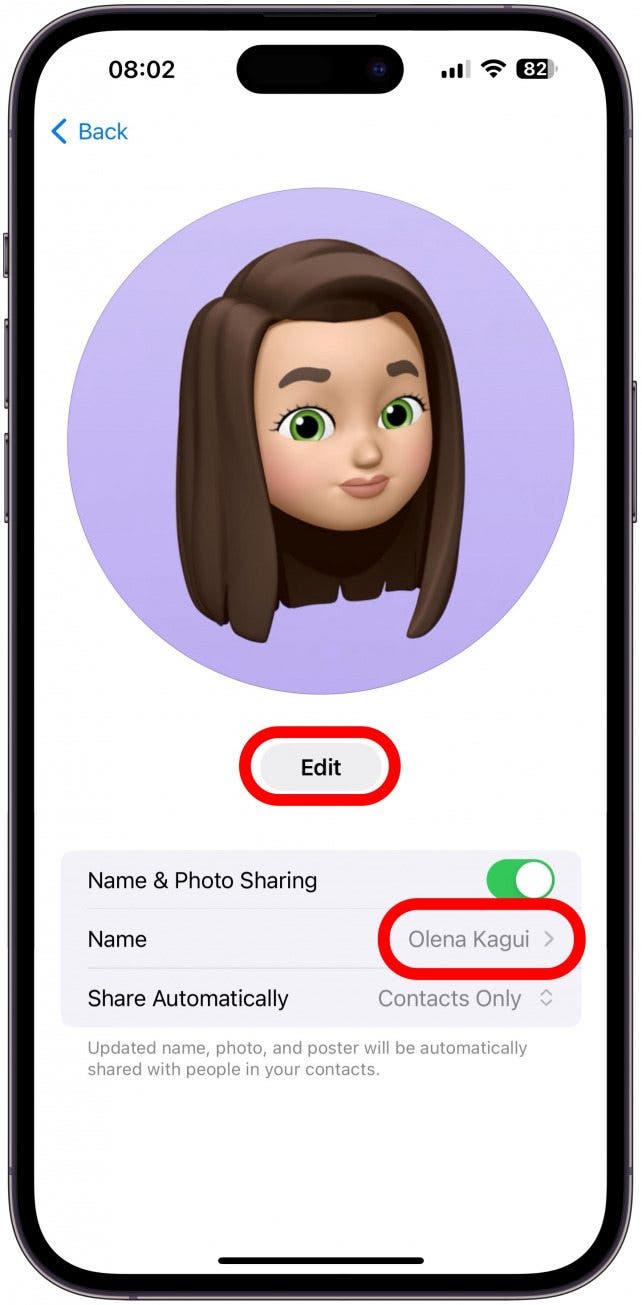
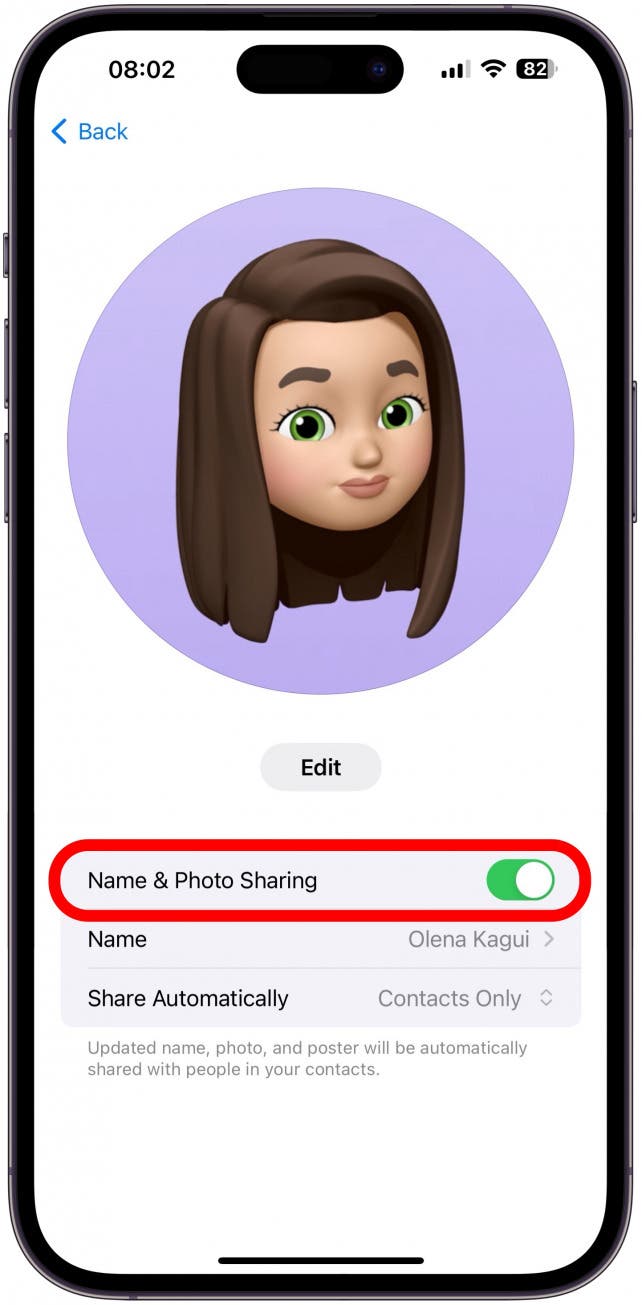
- Next, you can toggle Name & Photo Sharing off for the most privacy, but then no one will see the Contact Poster or Photo that you set up.
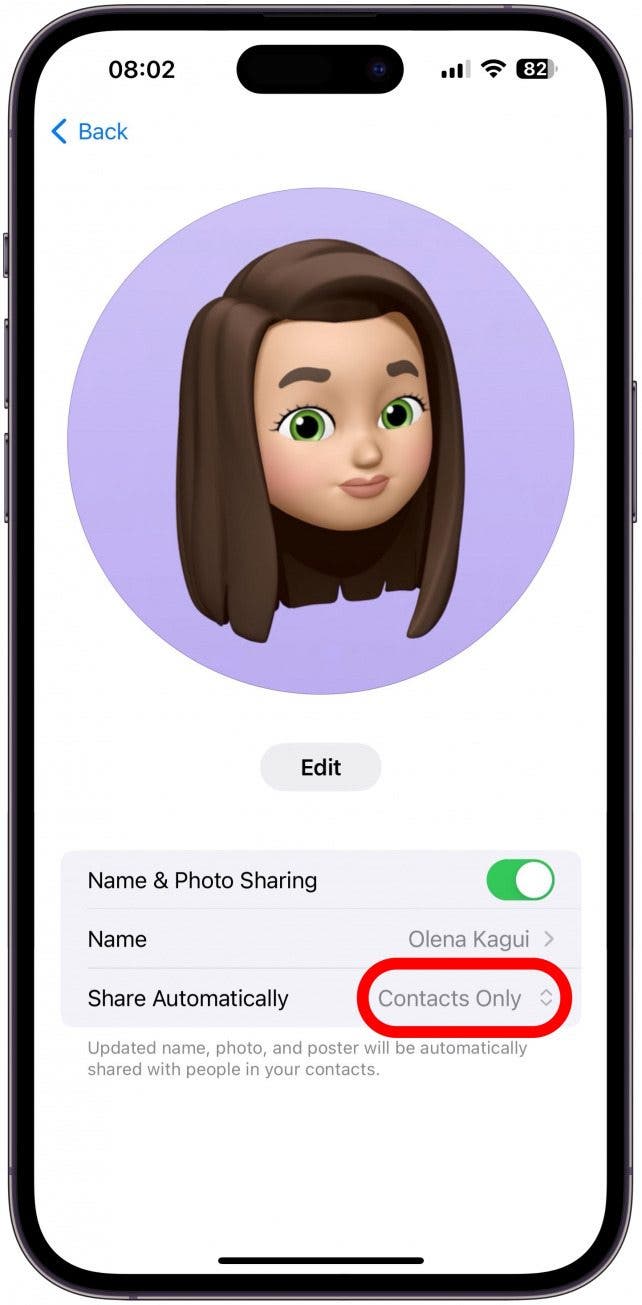
- The second most private option is to tap Contacts Only.
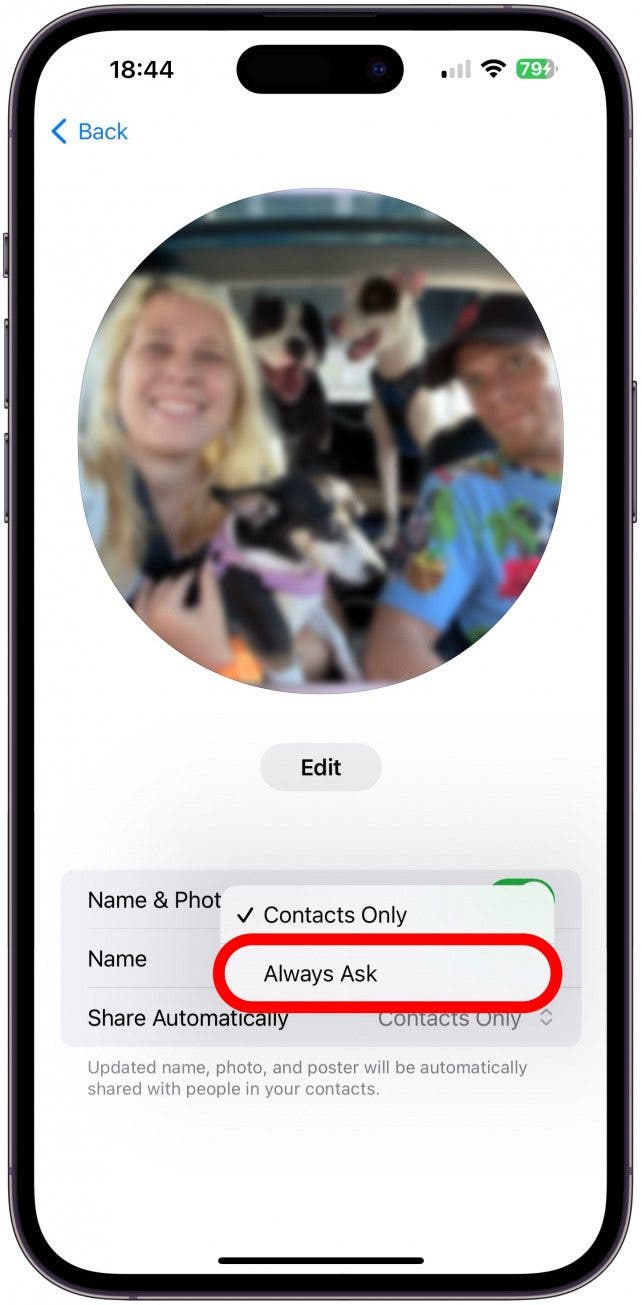
- You can change it to Always Ask, so that you always have the choice of sharing your name, photo, and poster with your contacts, and you can opt to keep them private if you wish.
- Now, if you open a Messages thread with other iPhone users, you will see a pop-up asking you if you wish to share your name and photo with the contacts in that specific thread. Tap Share to share the changes you make, or tap the x or ignore the notification to not share the update.
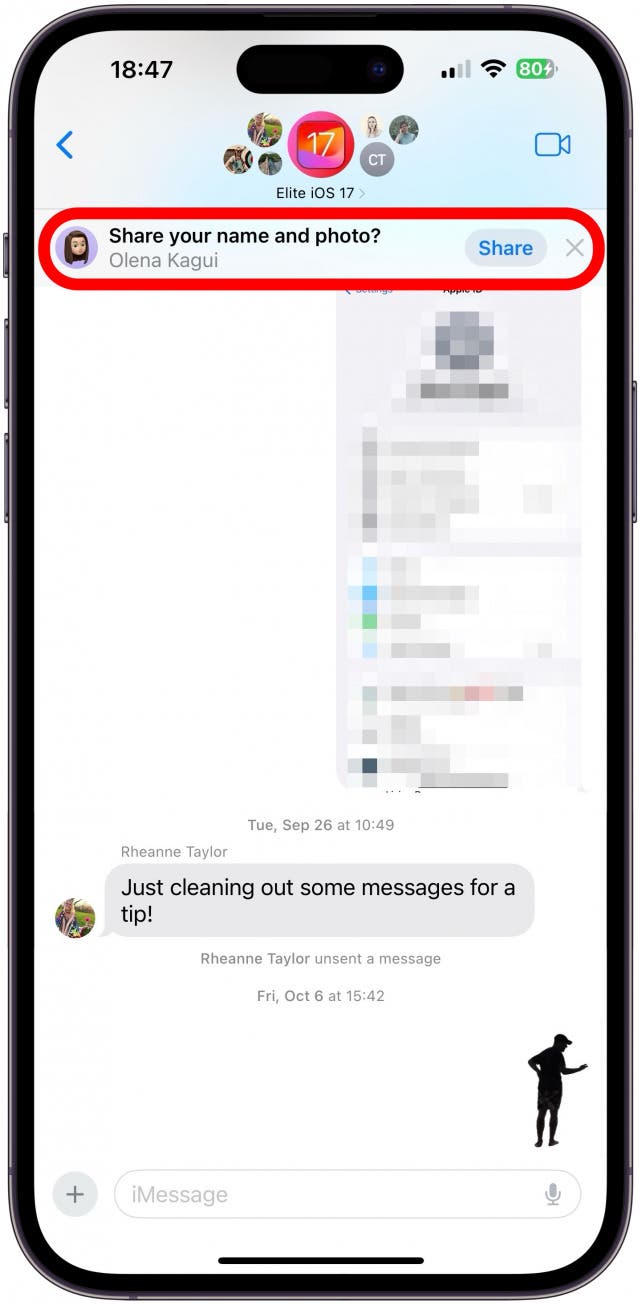
Now you know how to edit your personal information and how it is shared with others!
Now you know how to customize your Contact Poster (also known as a call photo), Contact Card, and Contact Photo. Any time you make changes, you can share them with your contacts, unless you prefer to keep them private by setting them to Always Ask. Don't forget that anyone can customize your card for their personal use by adding, removing, or changing the information in your Contact Card. Next, learn more ways to customize your Contact Poster in iOS 17 or how to send your contact details using NameDrop.
FAQ
- How to change phone name? Your Contact Card is not the same as your phone name. You can see and change your phone name in Settings under General, just tap About and select the Name. This is how others see you on AirDrop, for example.
- Why won't my Contact Posters update? If you've updated your Contact Poster, but you still see the old one, don't panic! There are several ways to manually update your Contact Poster if it doesn’t happen automatically.

Olena Kagui
Olena Kagui is a Feature Writer at iPhone Life. In the last 10 years, she has been published in dozens of publications internationally and won an excellence award. Since joining iPhone Life in 2020, she has written how-to articles as well as complex guides about Apple products, software, and apps. Olena grew up using Macs and exploring all the latest tech. Her Maui home is the epitome of an Apple ecosystem, full of compatible smart gear to boot. Olena’s favorite device is the Apple Watch Ultra because it can survive all her adventures and travels, and even her furbabies.

 Rhett Intriago
 Rachel Needell

 Susan Misuraca

 Hal Goldstein
 Olena Kagui


 August Garry
 Brian Peters
 Leanne Hays
 Amy Spitzfaden Both