Features such as Slide Over, Split View, Drag & Drop, and Picture in Picture are excellent tried and true iPad multitasking interfaces. However, iPadOS 16’s new feature called Stage Manager will help you take your productivity to new heights! To make use of Split View, you need an iPad Pro, iPad (5th generation or later), iPad Air 2 or later, or iPad mini 4 and later. For Slide Over, you will need an iPad Pro, iPad (5th generation or later), iPad Air 2 or later, or iPad mini 4 or later. And for Stage Manager, it is only available on M1 iPads: the 5th generation iPad Pro and the 5th generation iPad Air.
Split View
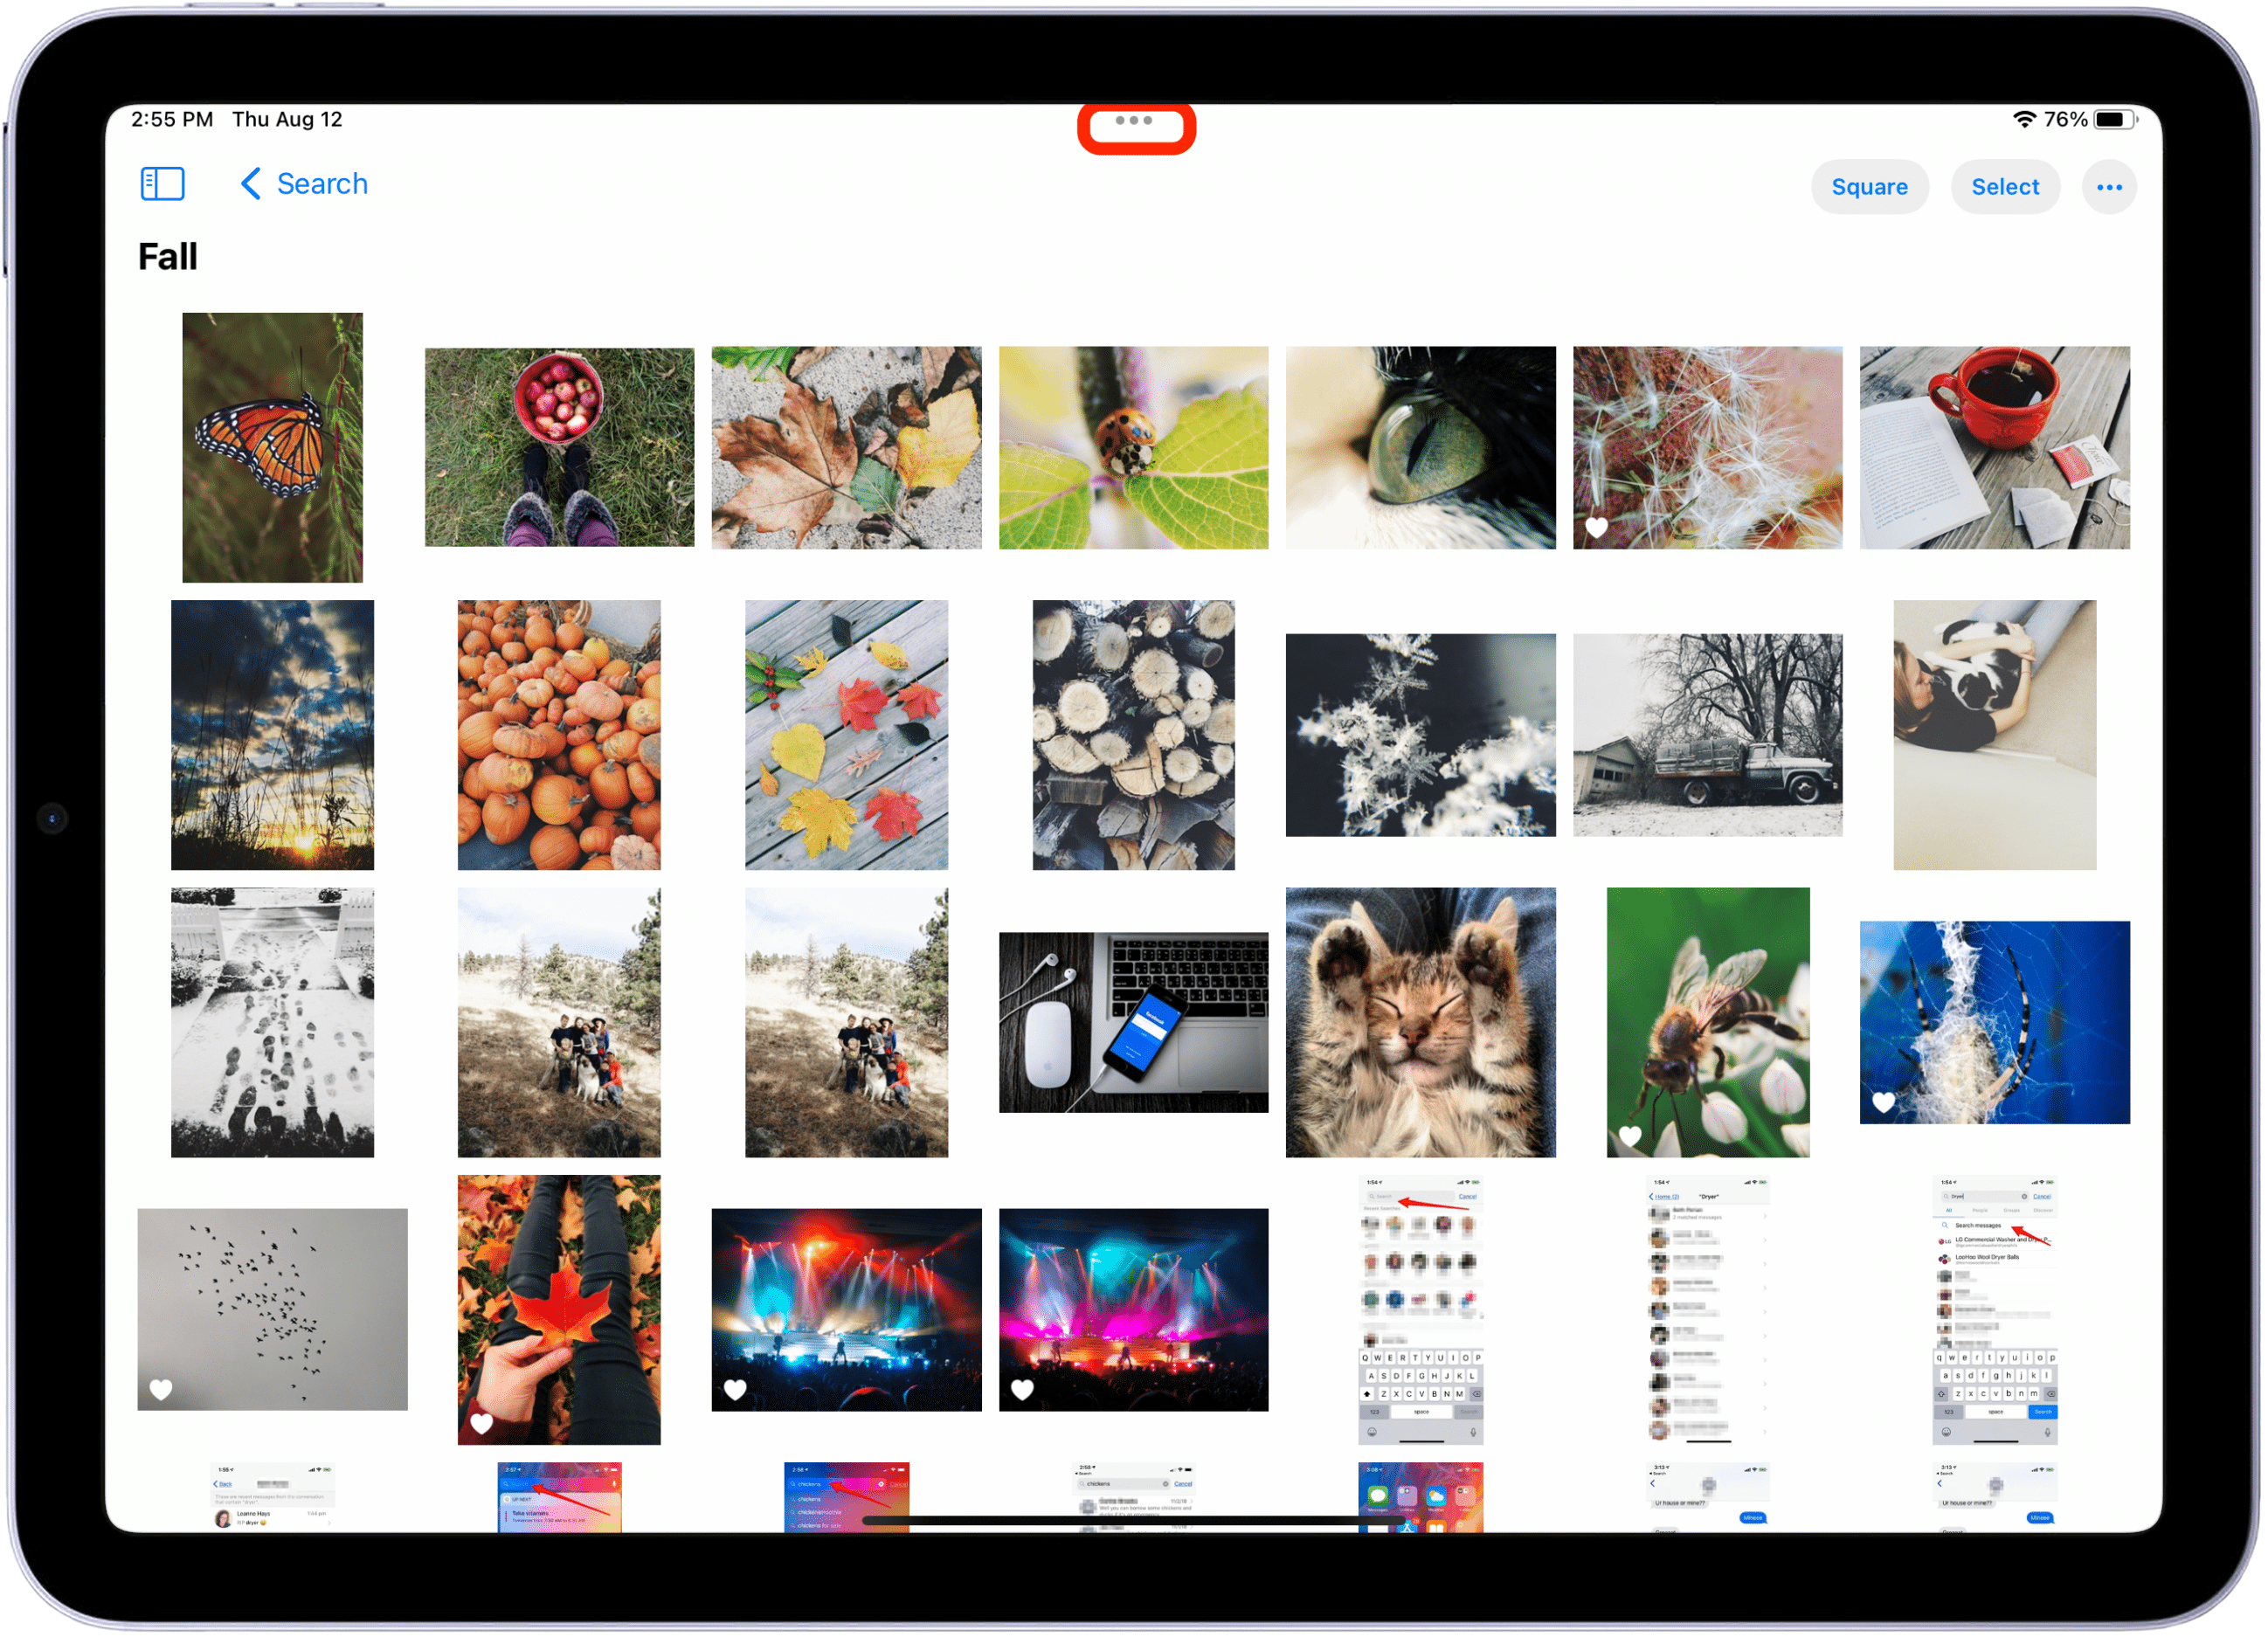
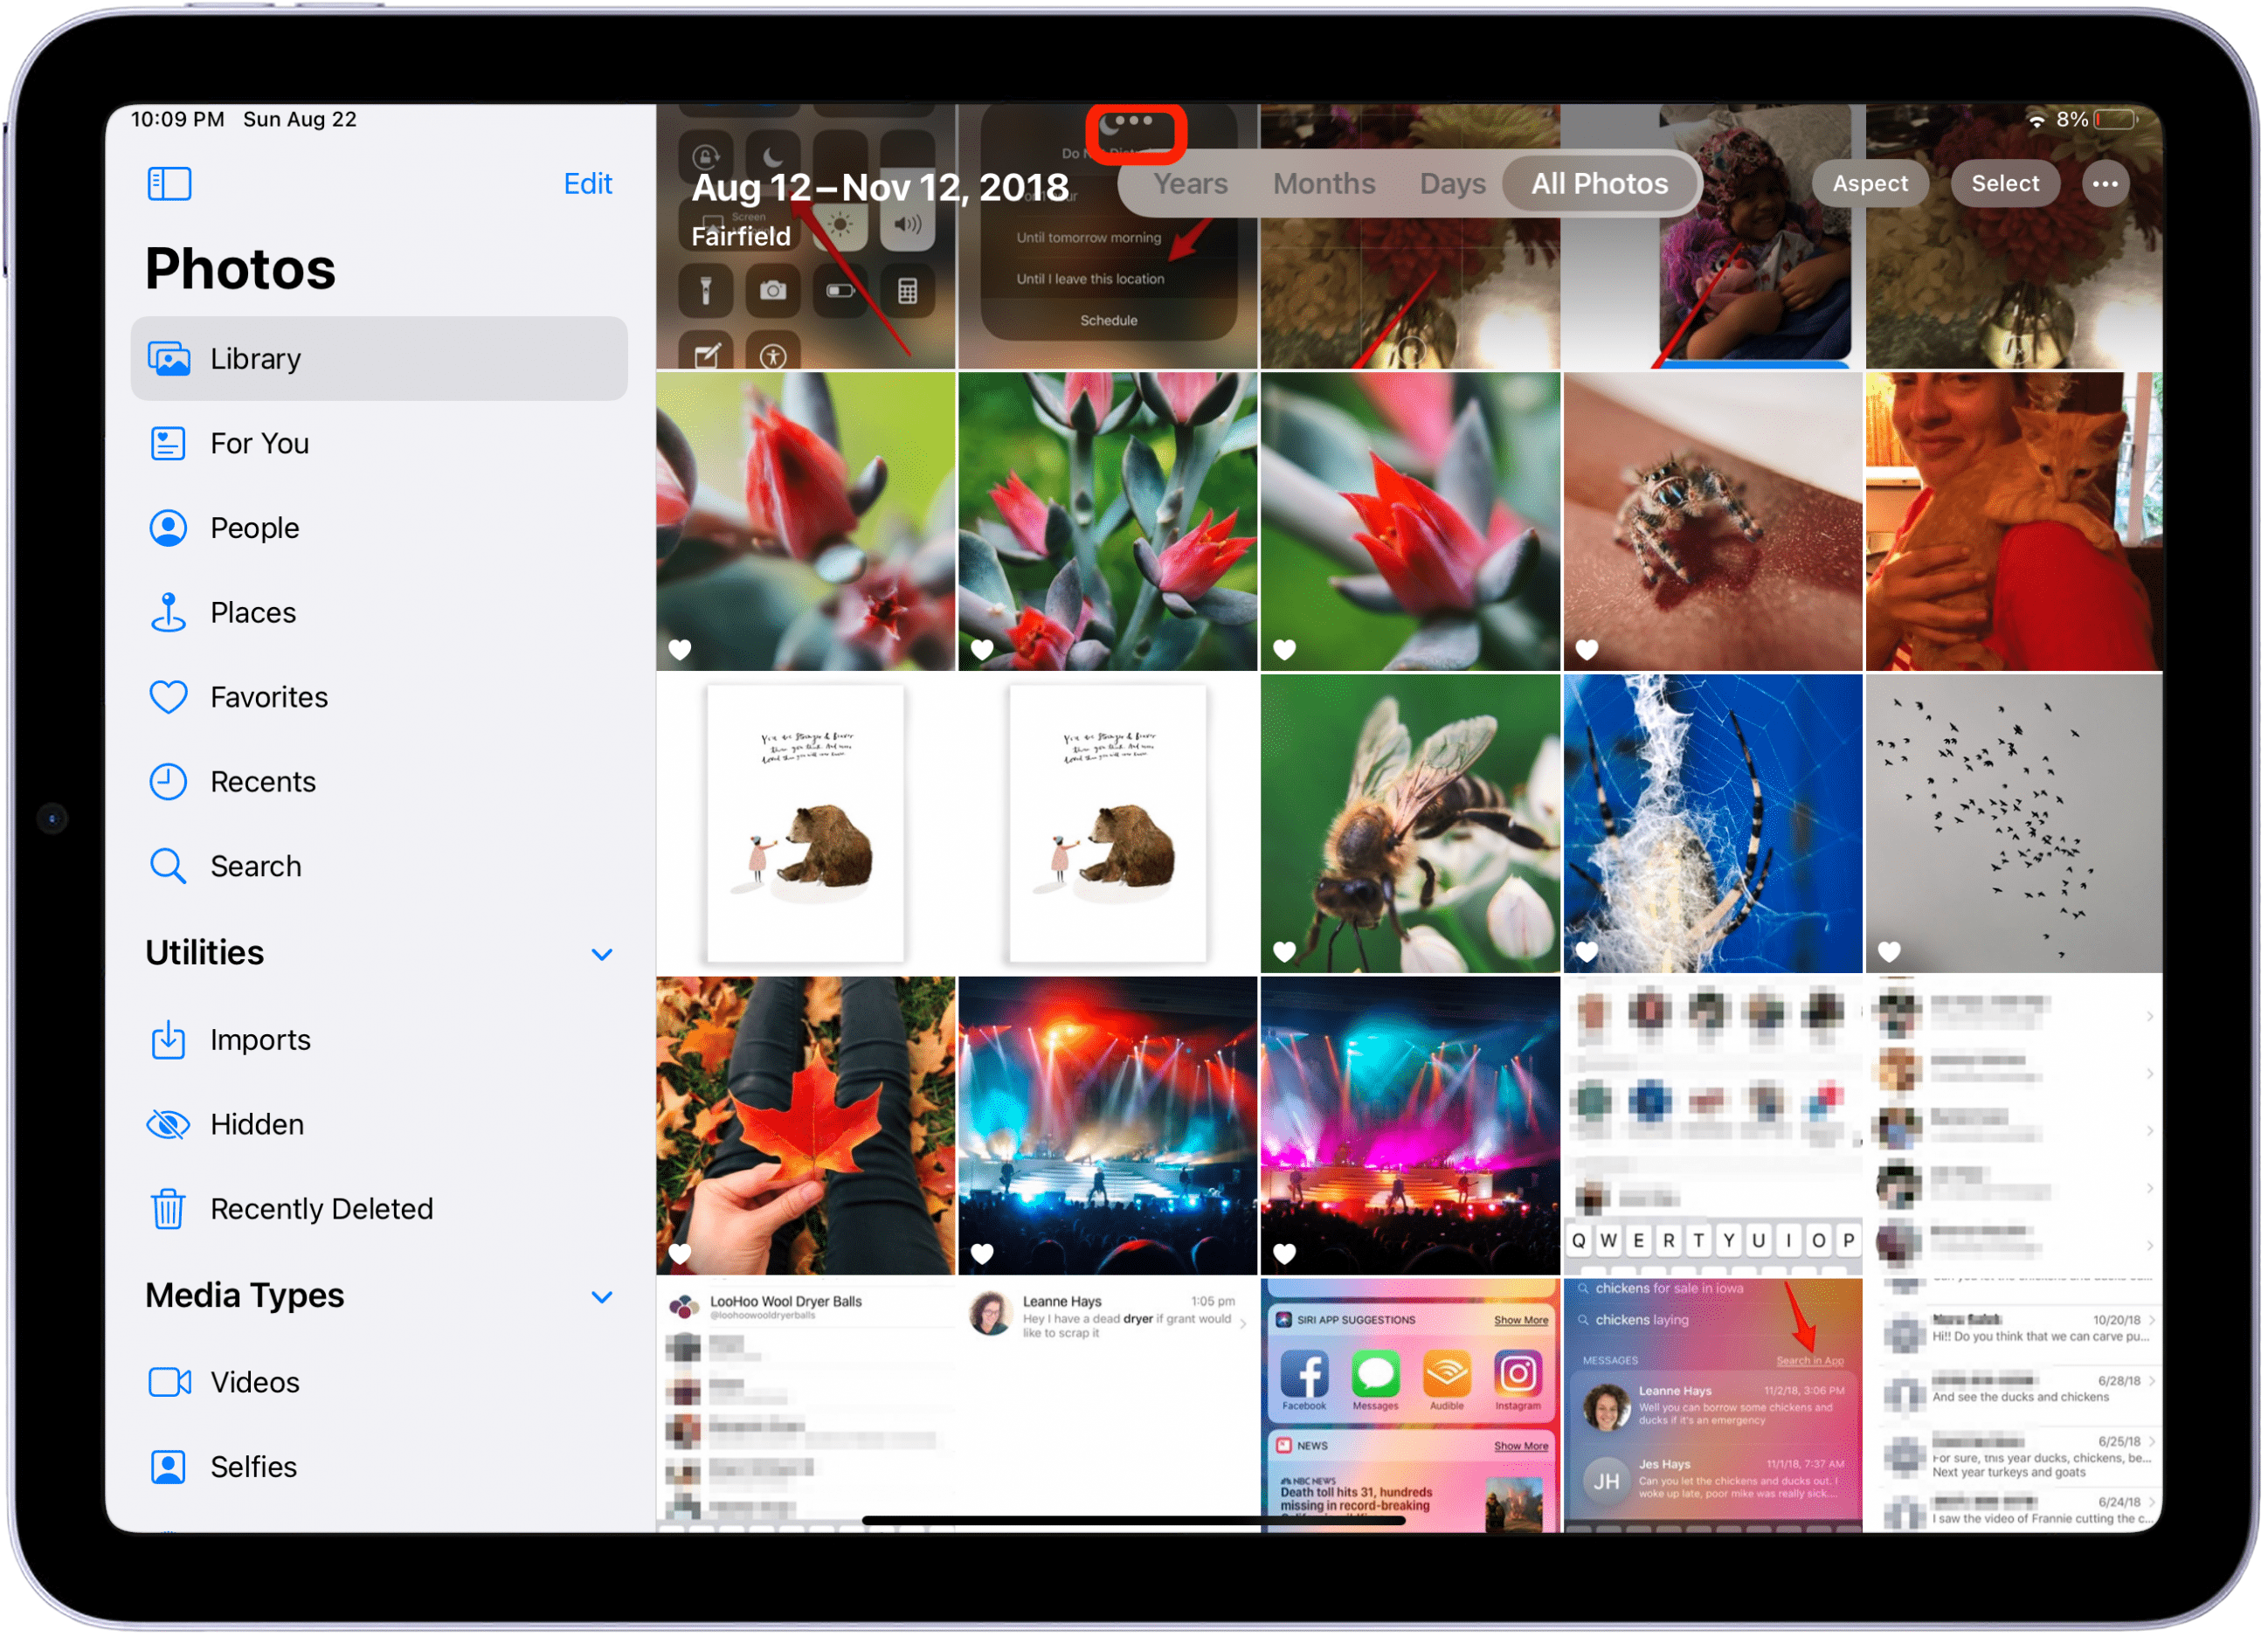
Split View is probably the most useful of the multitasking features, letting you use two apps simultaneously whether you’re in horizontal or vertical screen orientation. You can use Split View with most of Apple’s stock apps and with many popular third-party apps, such as the Microsoft Office apps for iPad. When an app is compatible with Split View, you’ll see three grey dots at the top of the screen. This is the multitasking icon. Follow the steps below to learn how to use this multitasking feature.
Summon Split View
-
Open the first app you want to use. If the app is compatible with Split View or Slide Over, you’ll see the Multitasking icon at the top of the screen. Tap this icon.
-
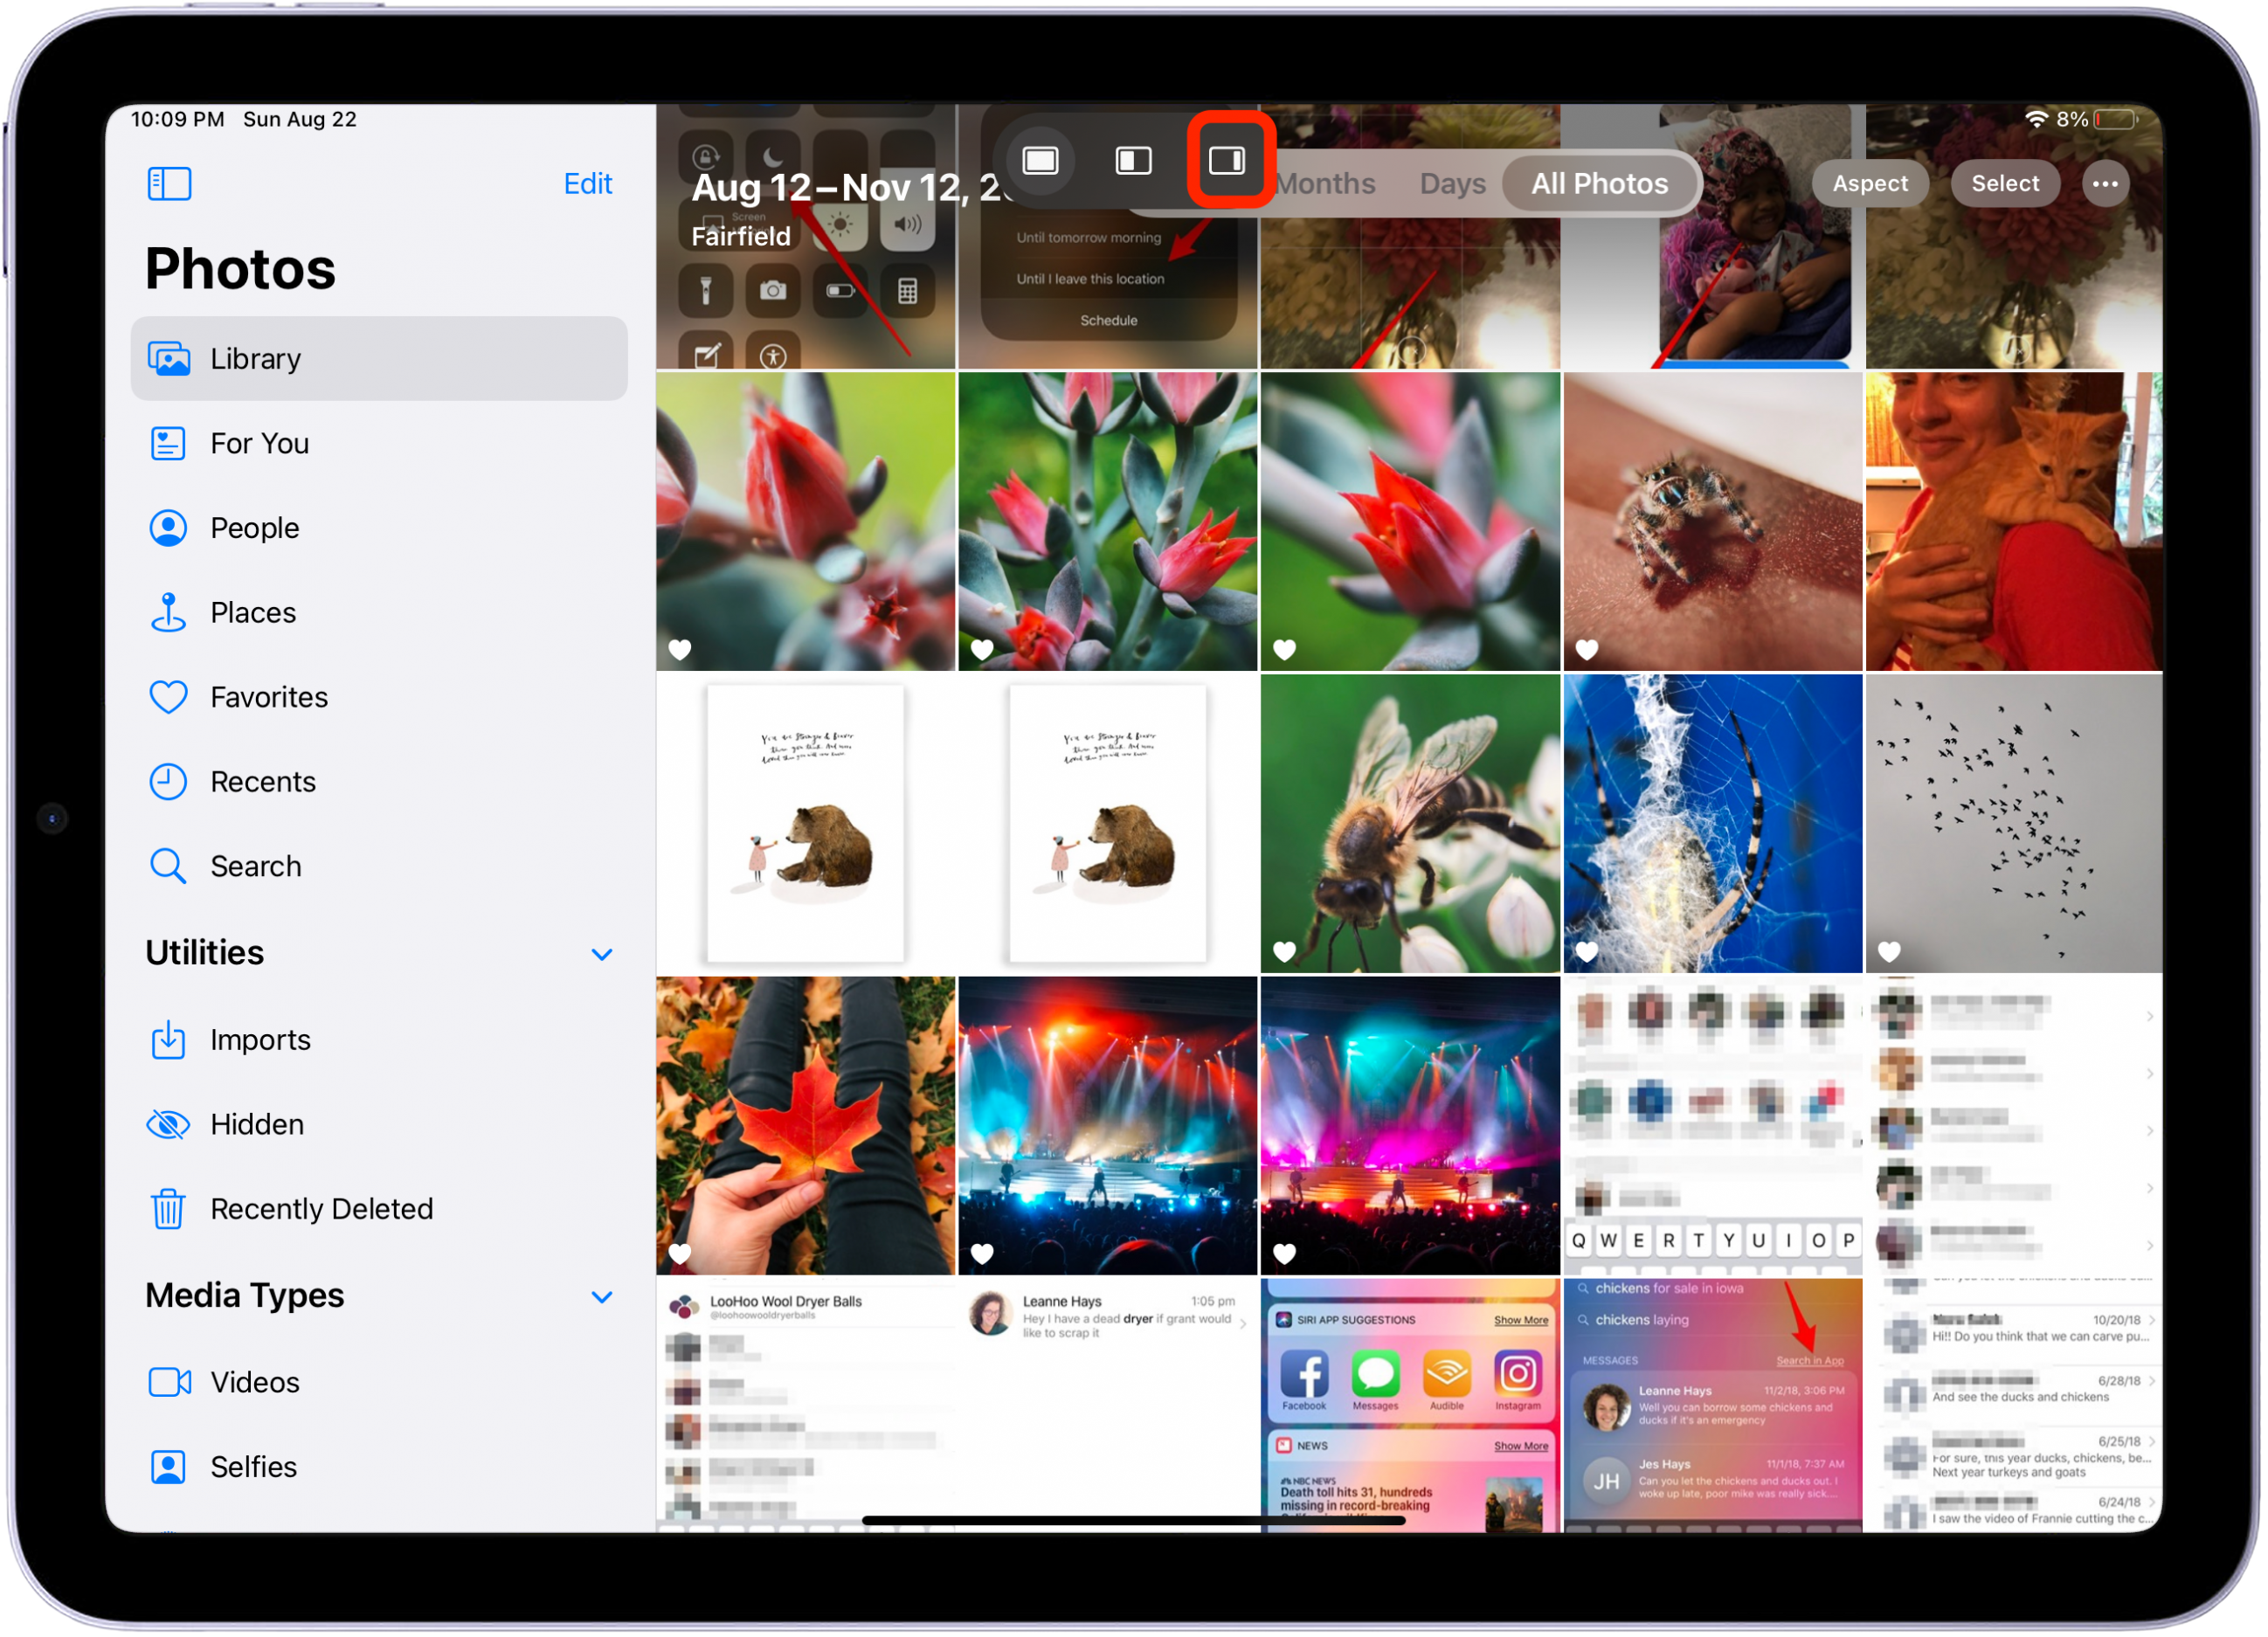
Tap the Split View icon. Your current app will slide to the side, and you can select your second app from the Home Screen. Both apps will now be displayed in Split View.
-
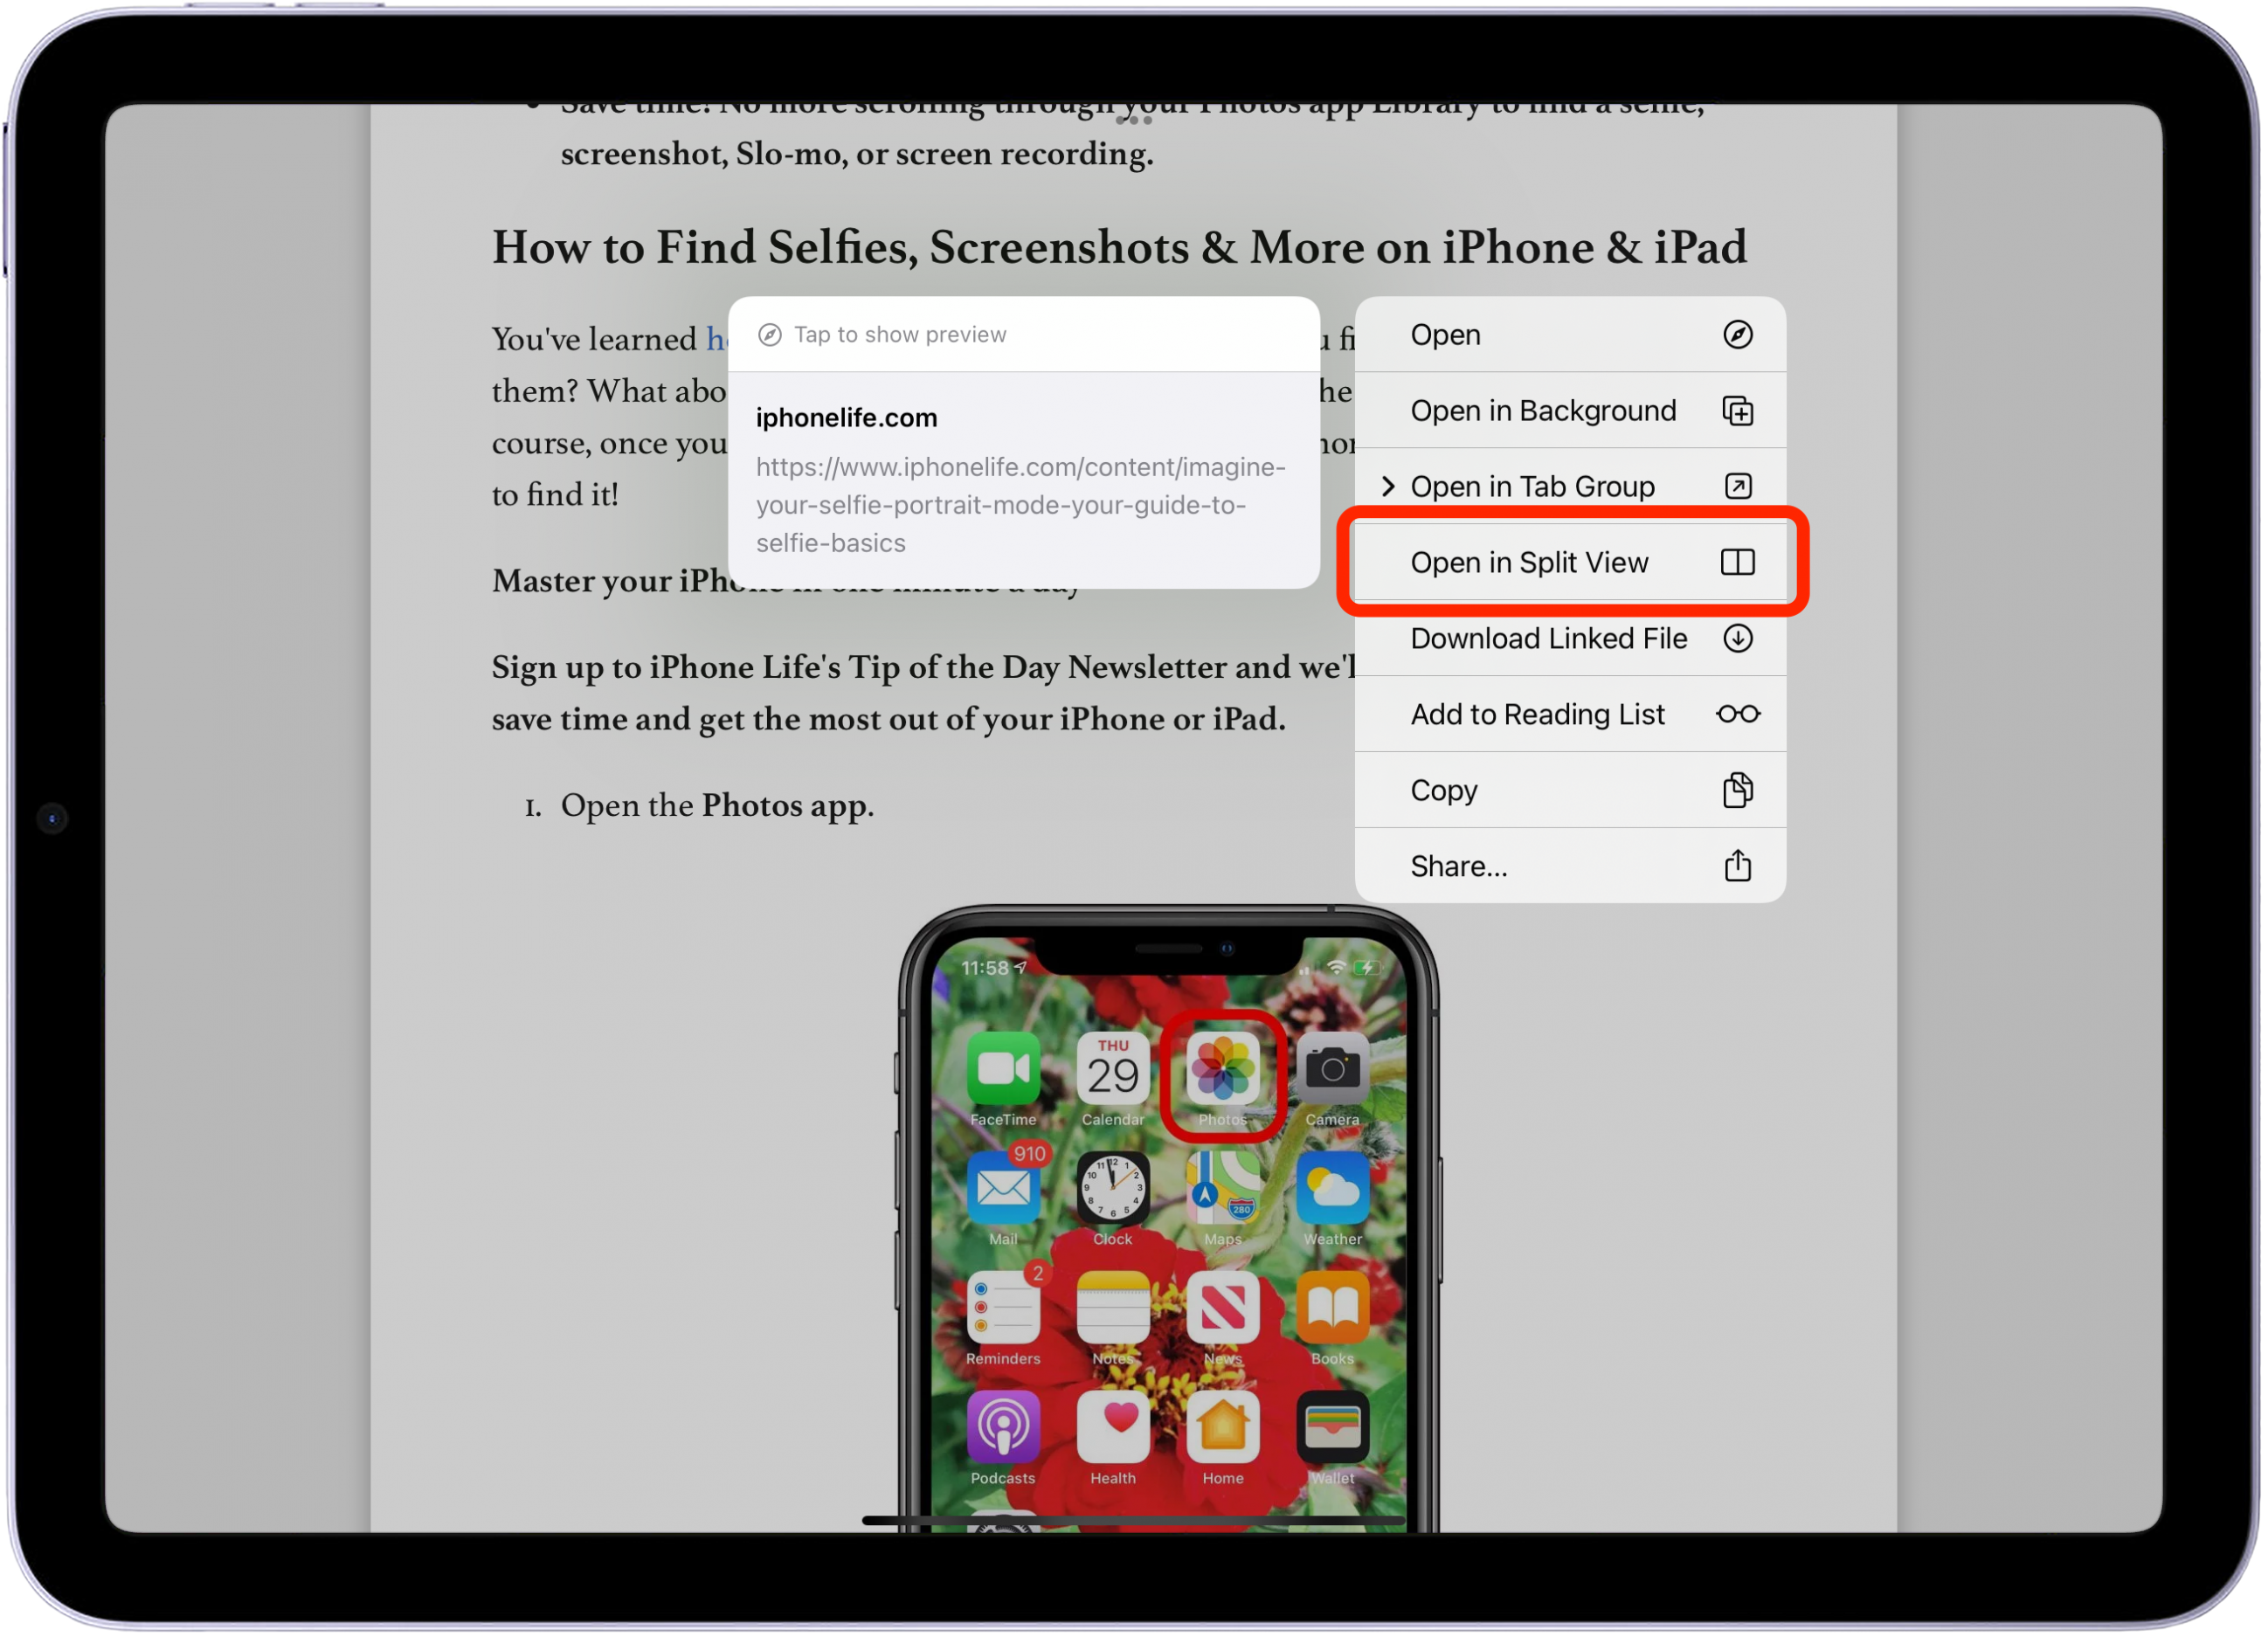
If you want to open an embedded link on a web page in Split View, another method is to press and hold the link and tap Open in Split View.
-
Once in Split View, you can tap and drag an app to switch positions on your screen display. You can also tap and drag the divider to adjust the width of your Safari windows, and allocate more screen space to one of the apps.
-
To return to the single window viewing mode, tap the Multitasking icon and select the Full Screen option. (Another method is to drag the slider bar to the edge of the screen over the app you wish to close.)



Keyboard Tip!
Command +N for Split View For those using an external keyboard, you can also tap Command+N to invoke Split View. Multitasking just became even easier!
Slide Over
With Slide Over, you can display a primary app in full-screen mode and a secondary app in a small floating window on the left or right side of the screen. Similar to Split View, you can use Slide Over with both horizontal and vertical screen orientation. You can use Split View with most of Apple’s stock apps and with many popular third-party apps, such as the Microsoft Office apps for iPad. When an app is compatible with Slide Over, you’ll see the multitasking icon (three grey dots) at the top of the screen. To access and use Slide Over, follow the steps below.
Open Slide Over
- Open the first app you want to use. Tap the Multitasking icon at the top of the screen.
- Tap the Slide Over icon. Your current app will slide to the side, and you can tap the app you'd like to open behind your Slide Over window.
- Another way to open Slide Over is to open your main app, then drag a second app from the Dock onto the screen.
- You can move the second app around your screen by placing your finger on the Multitasking icon at the top and dragging it to the left or right.
- To hide the Slide Over window, swipe to the edge of your iPad screen. Swipe from the gray arrow across the screen to show the Slide Over window again.
- To exit Slide Over view, tap tHe Multitasking icon and select the full screen mode.
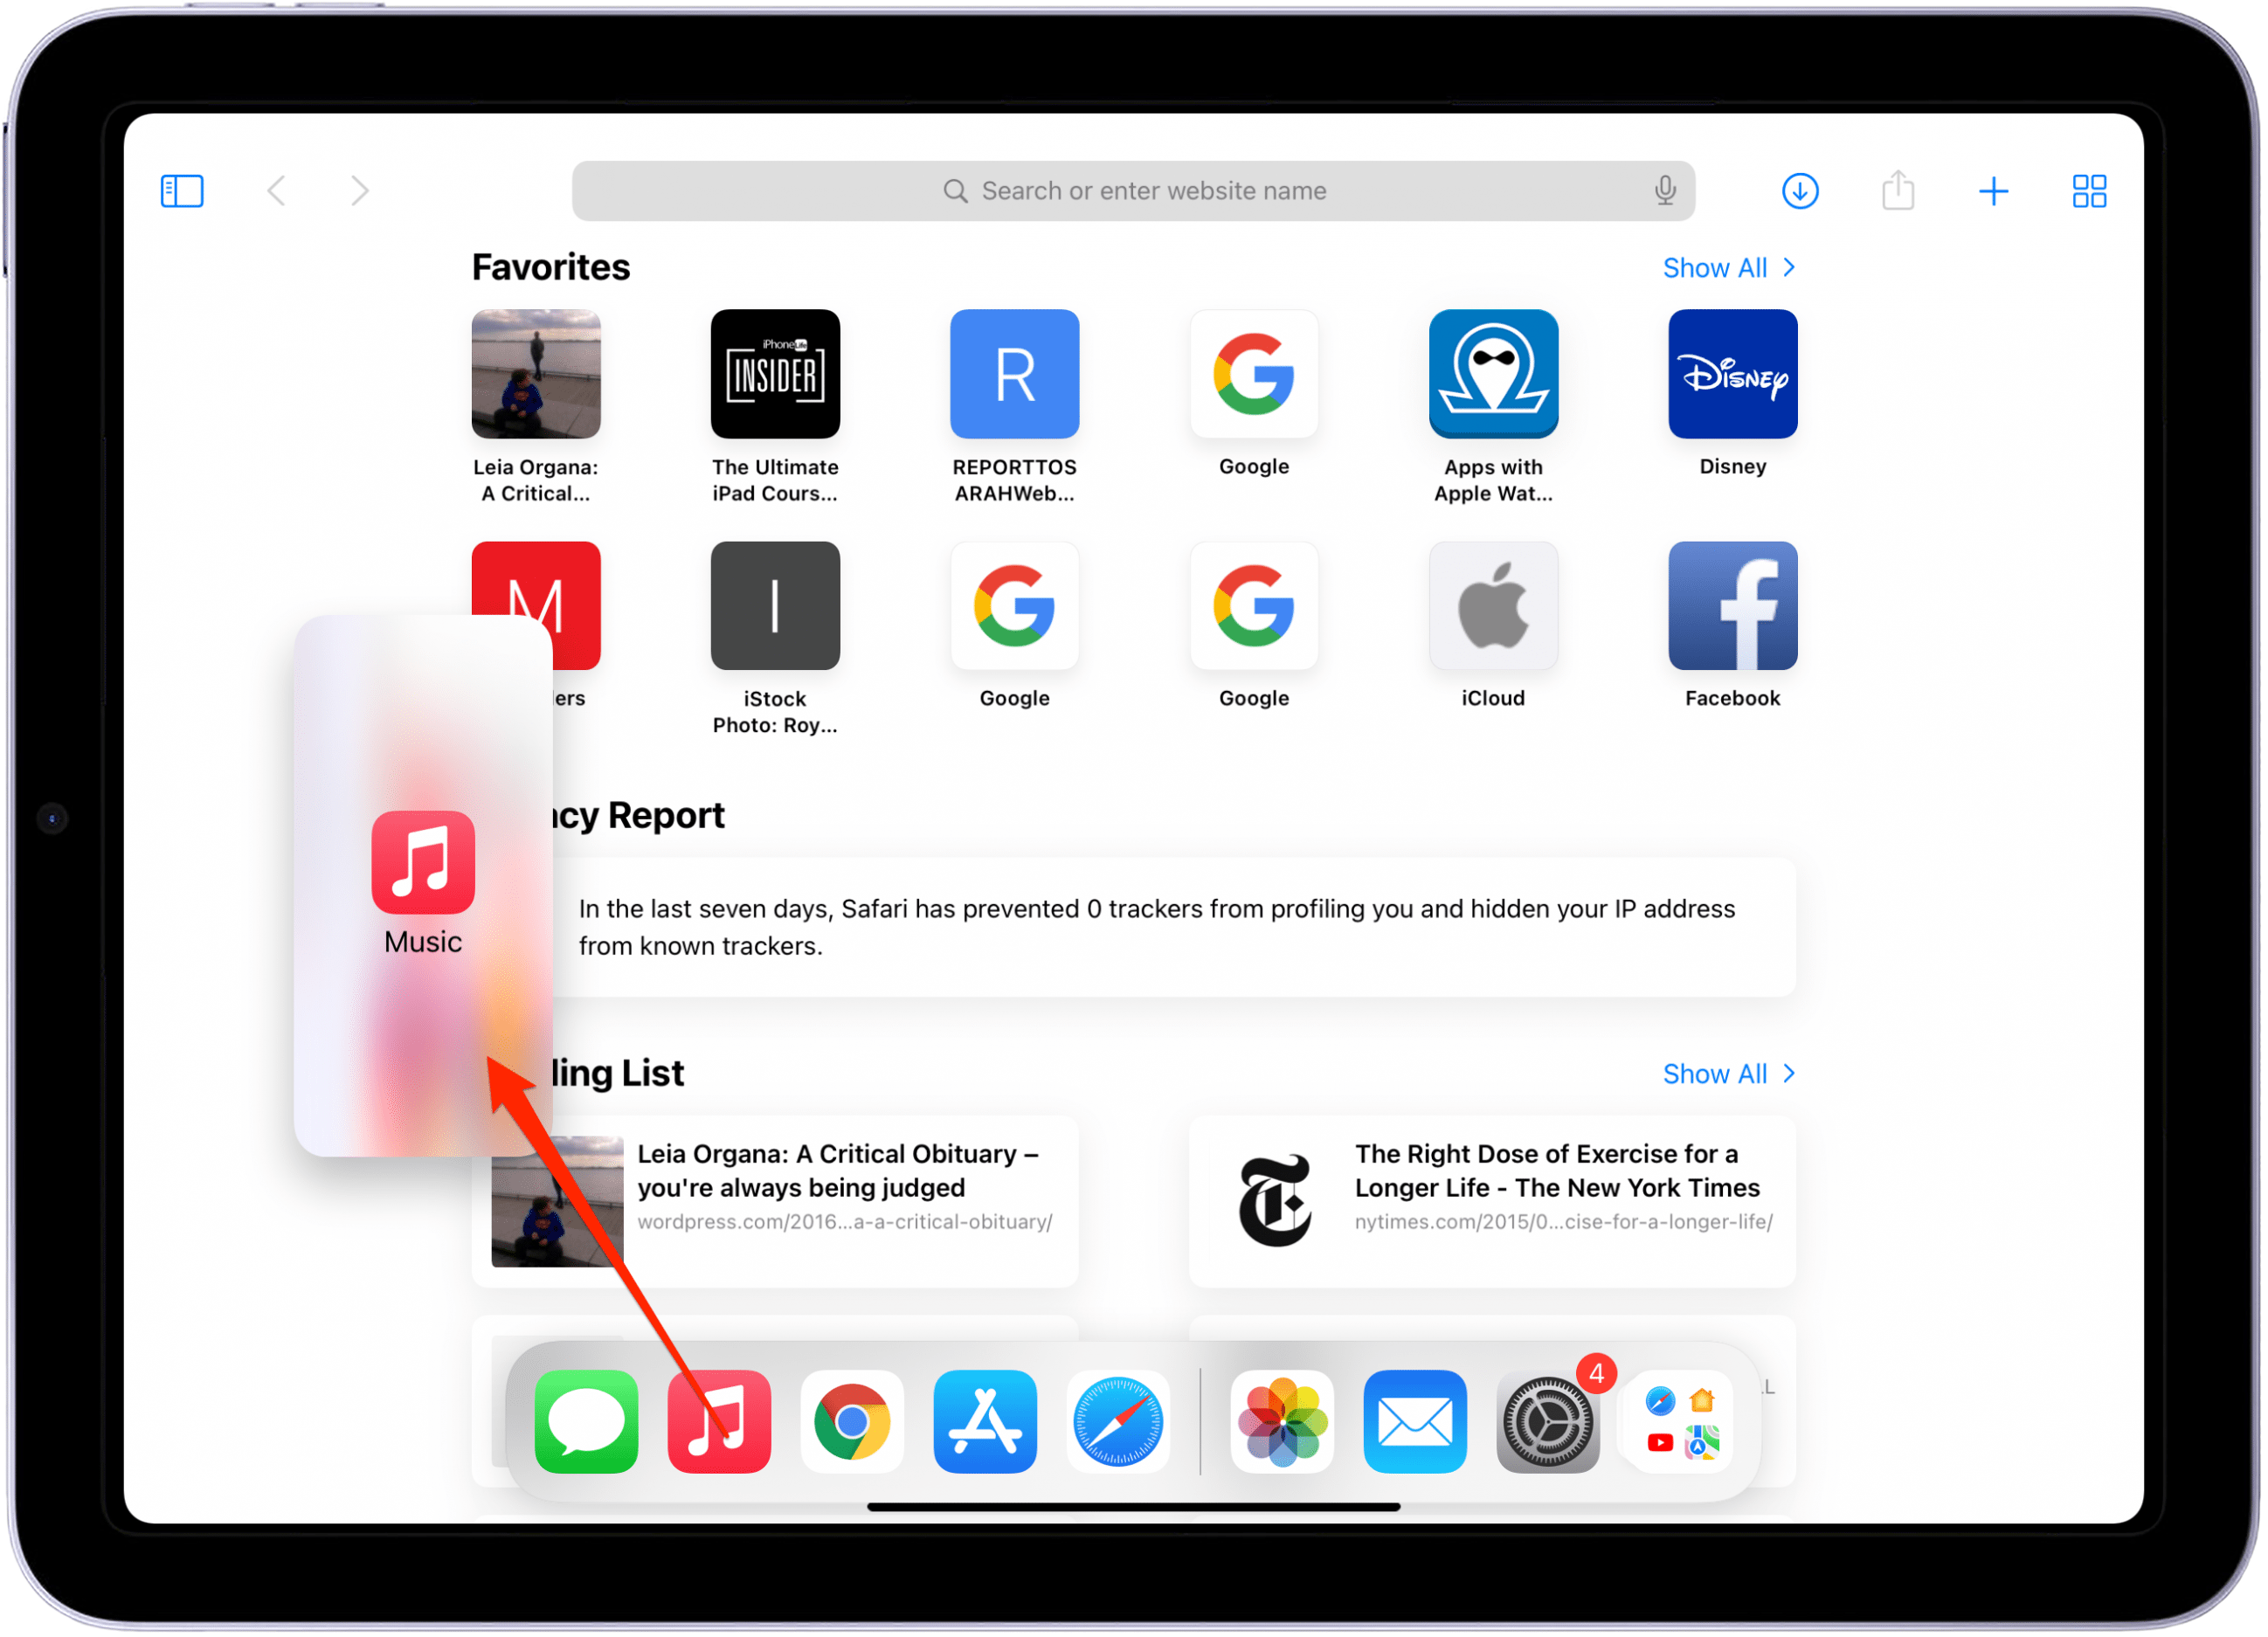


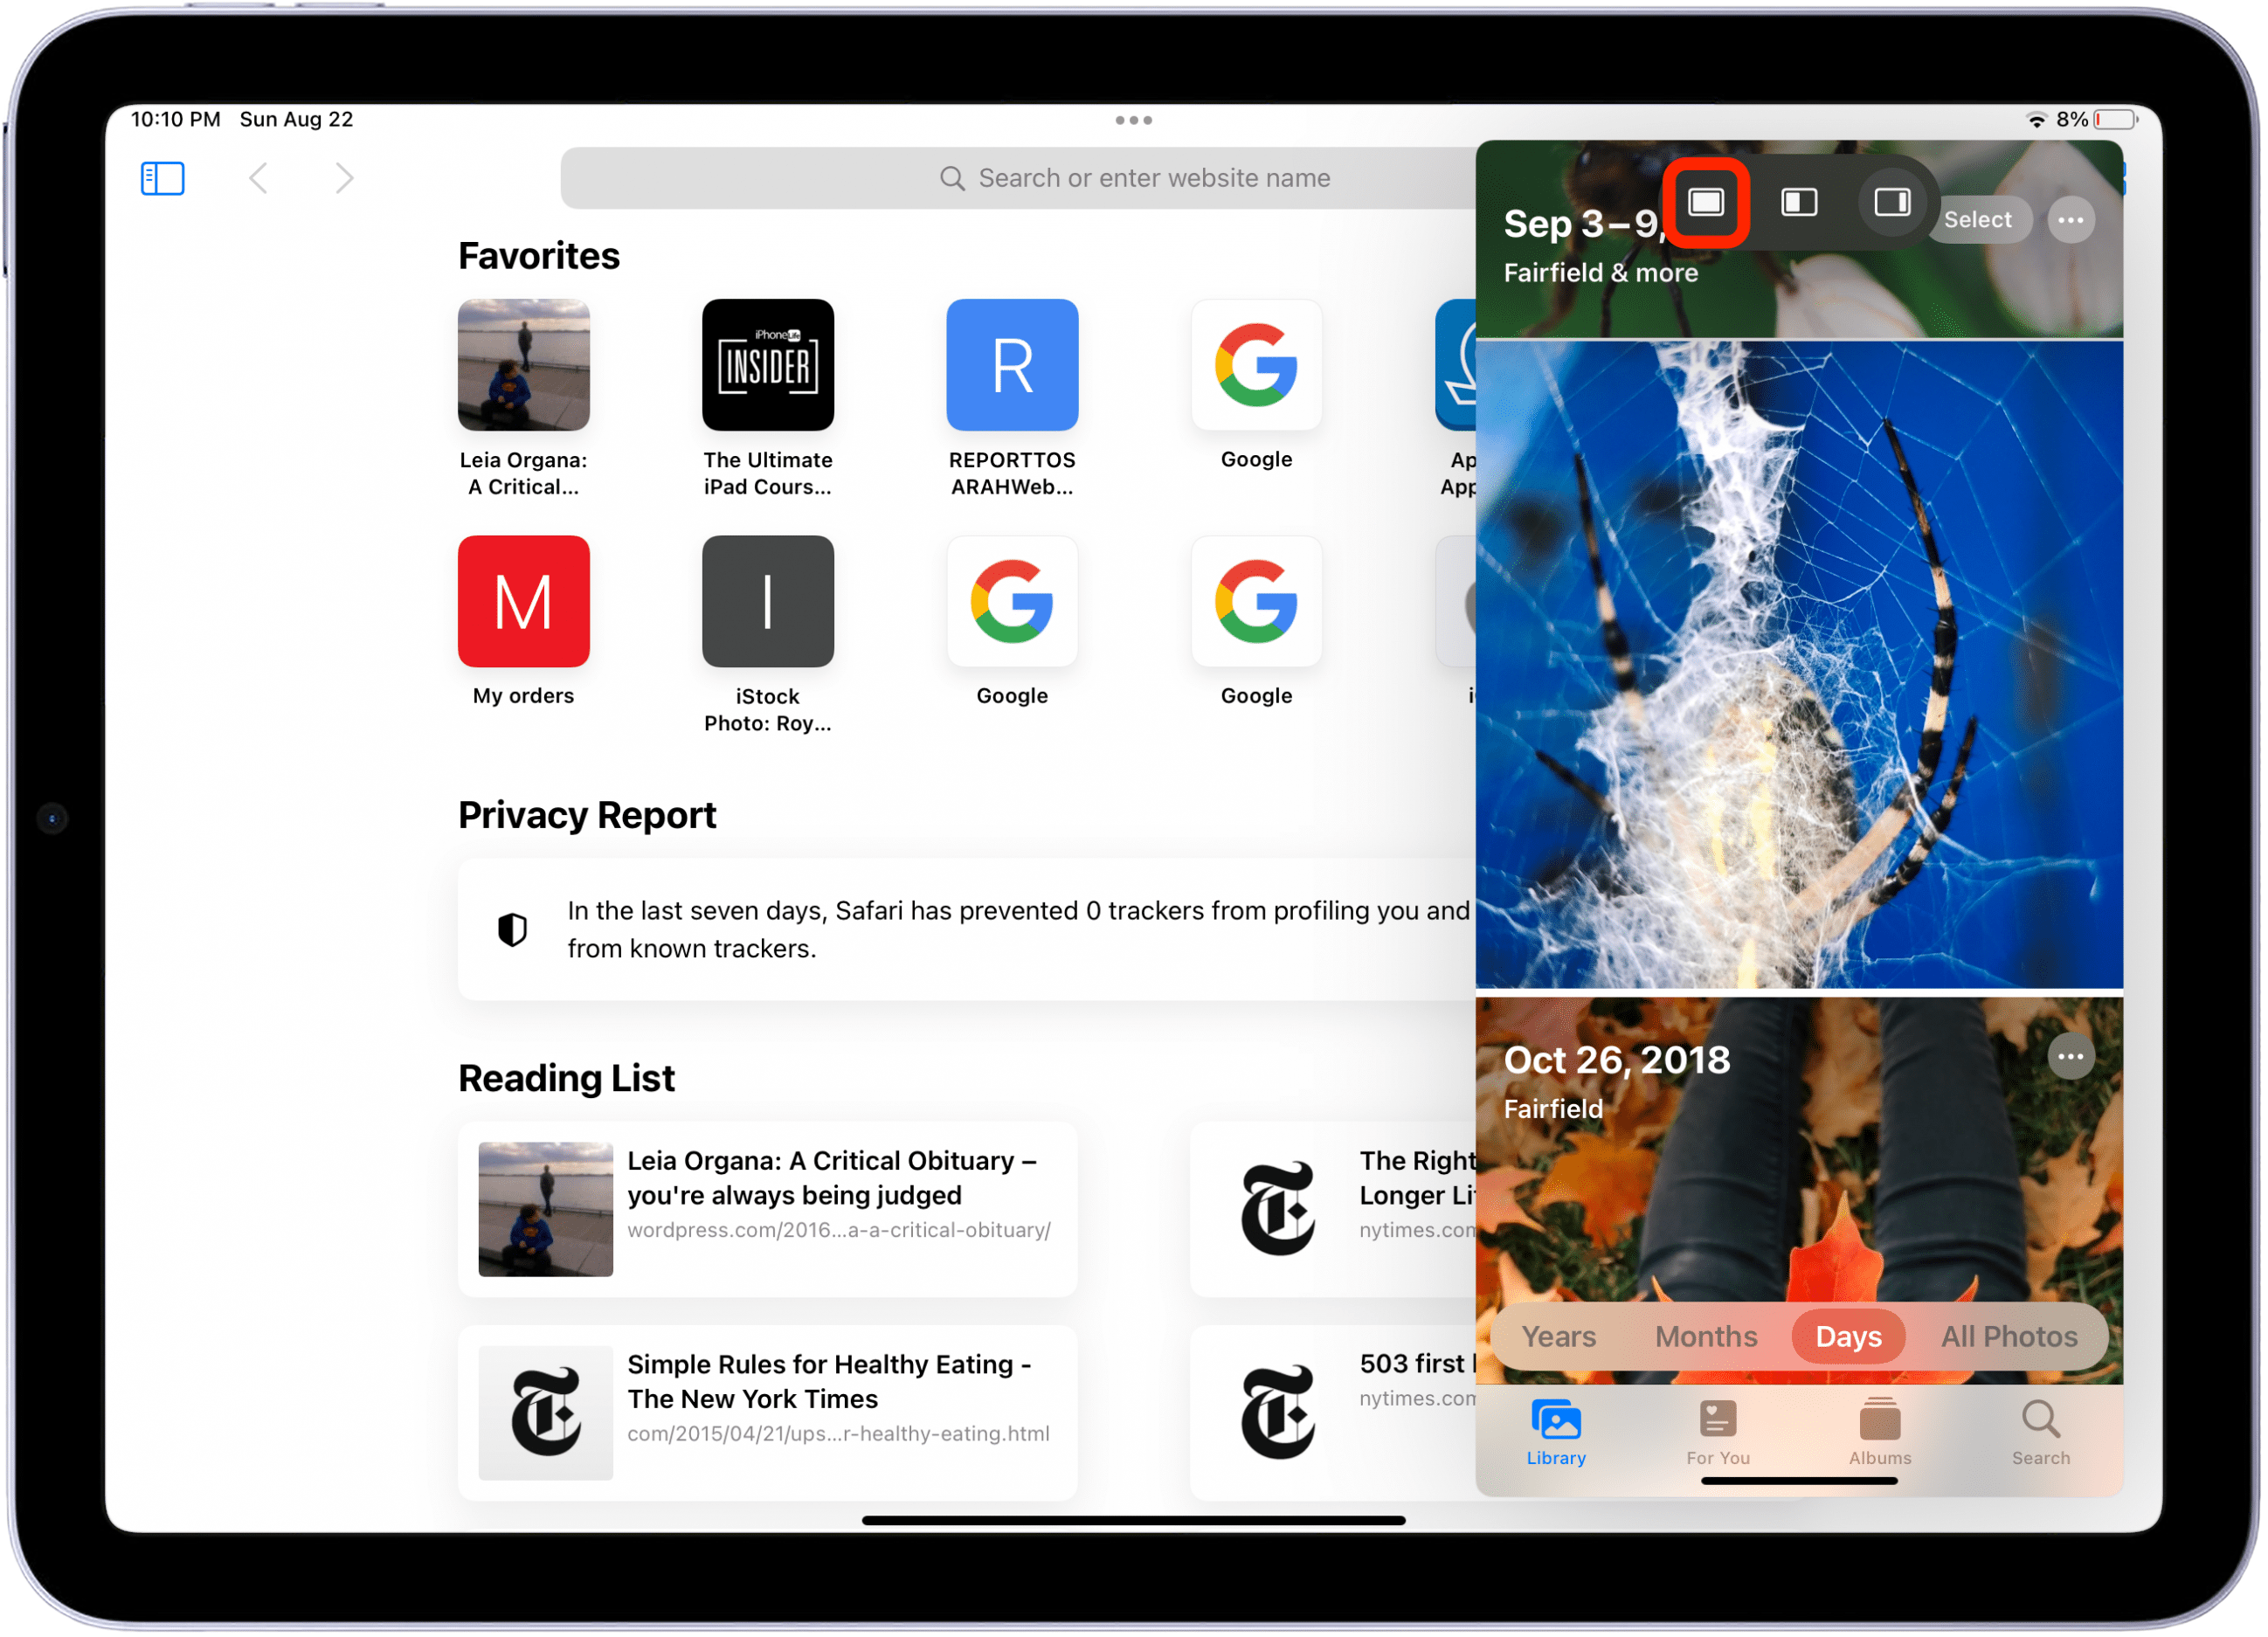
While only one Slide Over window can be displayed at a time, you can open multiple Slide Over windows using the steps above, then simply swipe right to switch between your open Slide Over windows.
Using the Slide Over Switcher
While you can rotate through multiple Slide Over windows by swiping right, you can also spread them out and pick the one you want to open with the Slide Over Switcher. This is similar to the App Switcher, except it displays all open Slide Over windows. Here’s how to access and use the Slide Over Switcher.
- With multiple Slide Over apps active, touch and drag the handle at the bottom of the Slide Over app slightly upwards, then release your finger.
-
All apps that you've opened in Slide Over view will appear spread out in cards. You can scroll through them by swiping left and right, or by tapping a window you want to display as your new Slide Over window.
-
You can close a window by swiping up on it. Closing all Slide Over windows will exit you from the Slide Over view.


Picture in Picture
If you’re on a FaceTime call, watching a video in Safari or on a compatible video player, you can minimize the video window and continue to browse or use other apps while continuing the call or video.
Picture in Picture mode is supported on video conferencing platforms such as FaceTime, Skype, and WhatsApp. It is also available on the Google Chrome, Firefox, and Safari web browsers, and can be used on many streaming services like Amazon Prime Video, Netflix, Hulu, and ESPN. To use Picture in Picture:
-
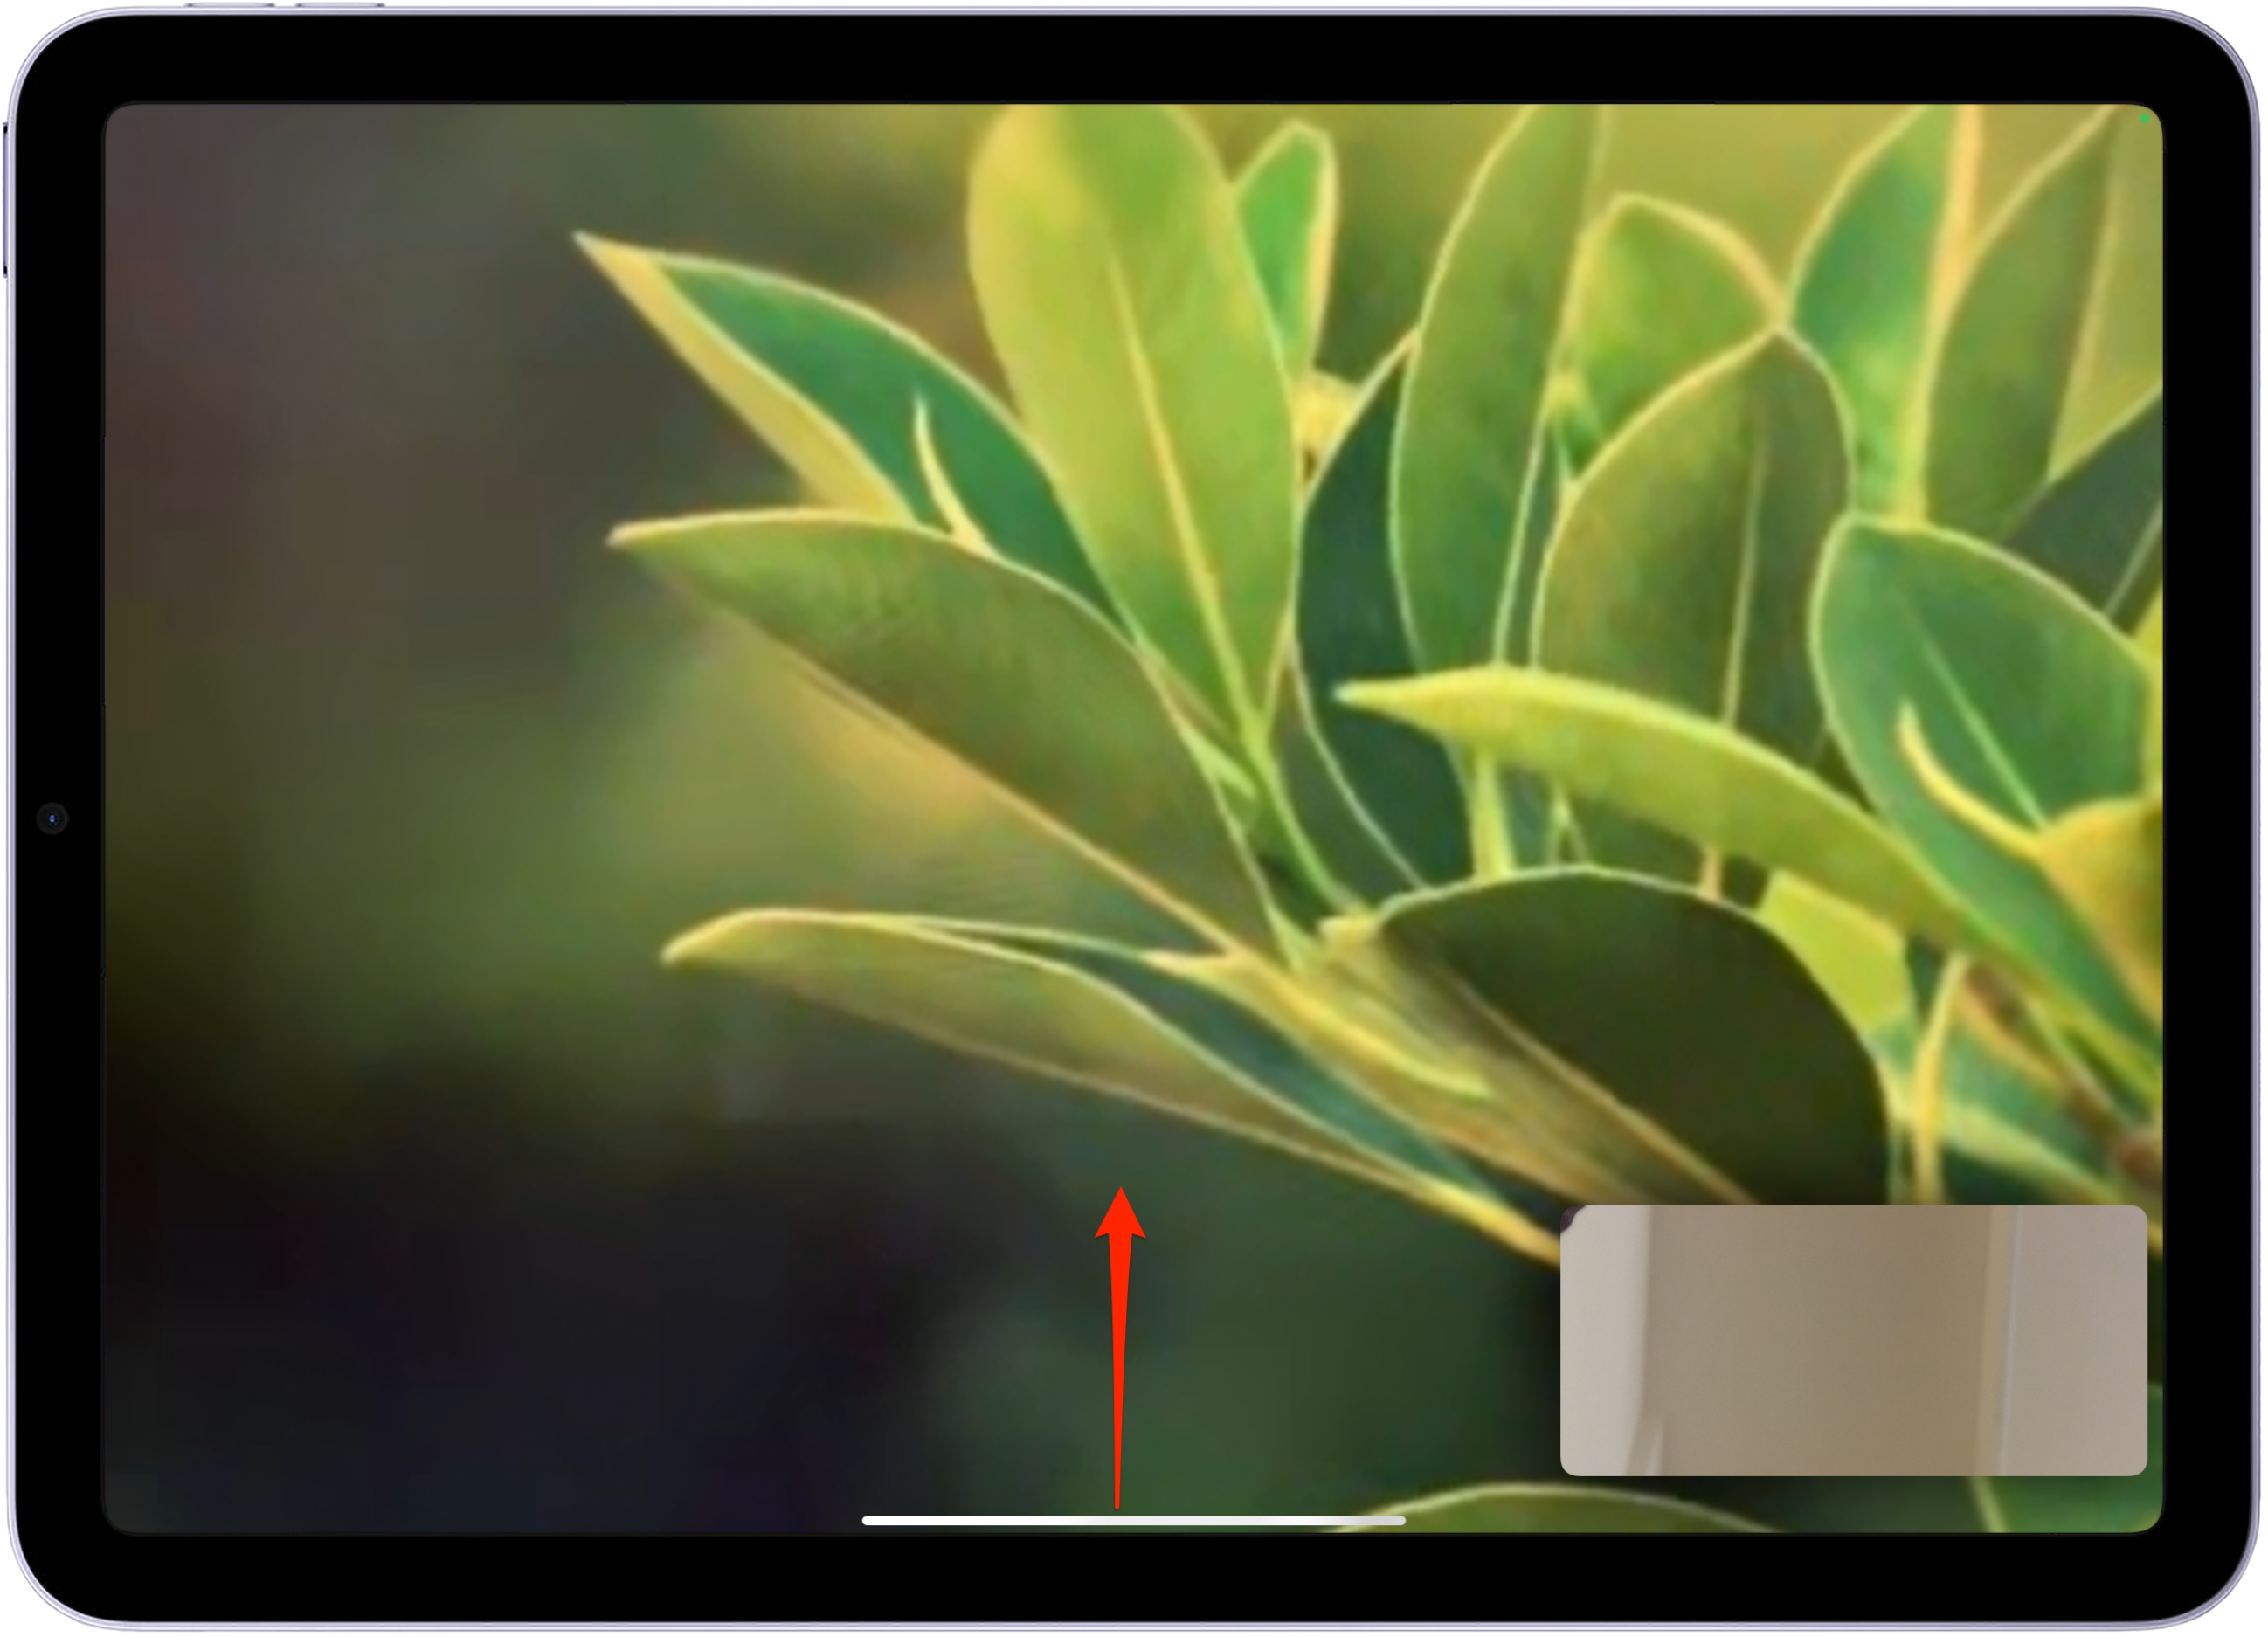
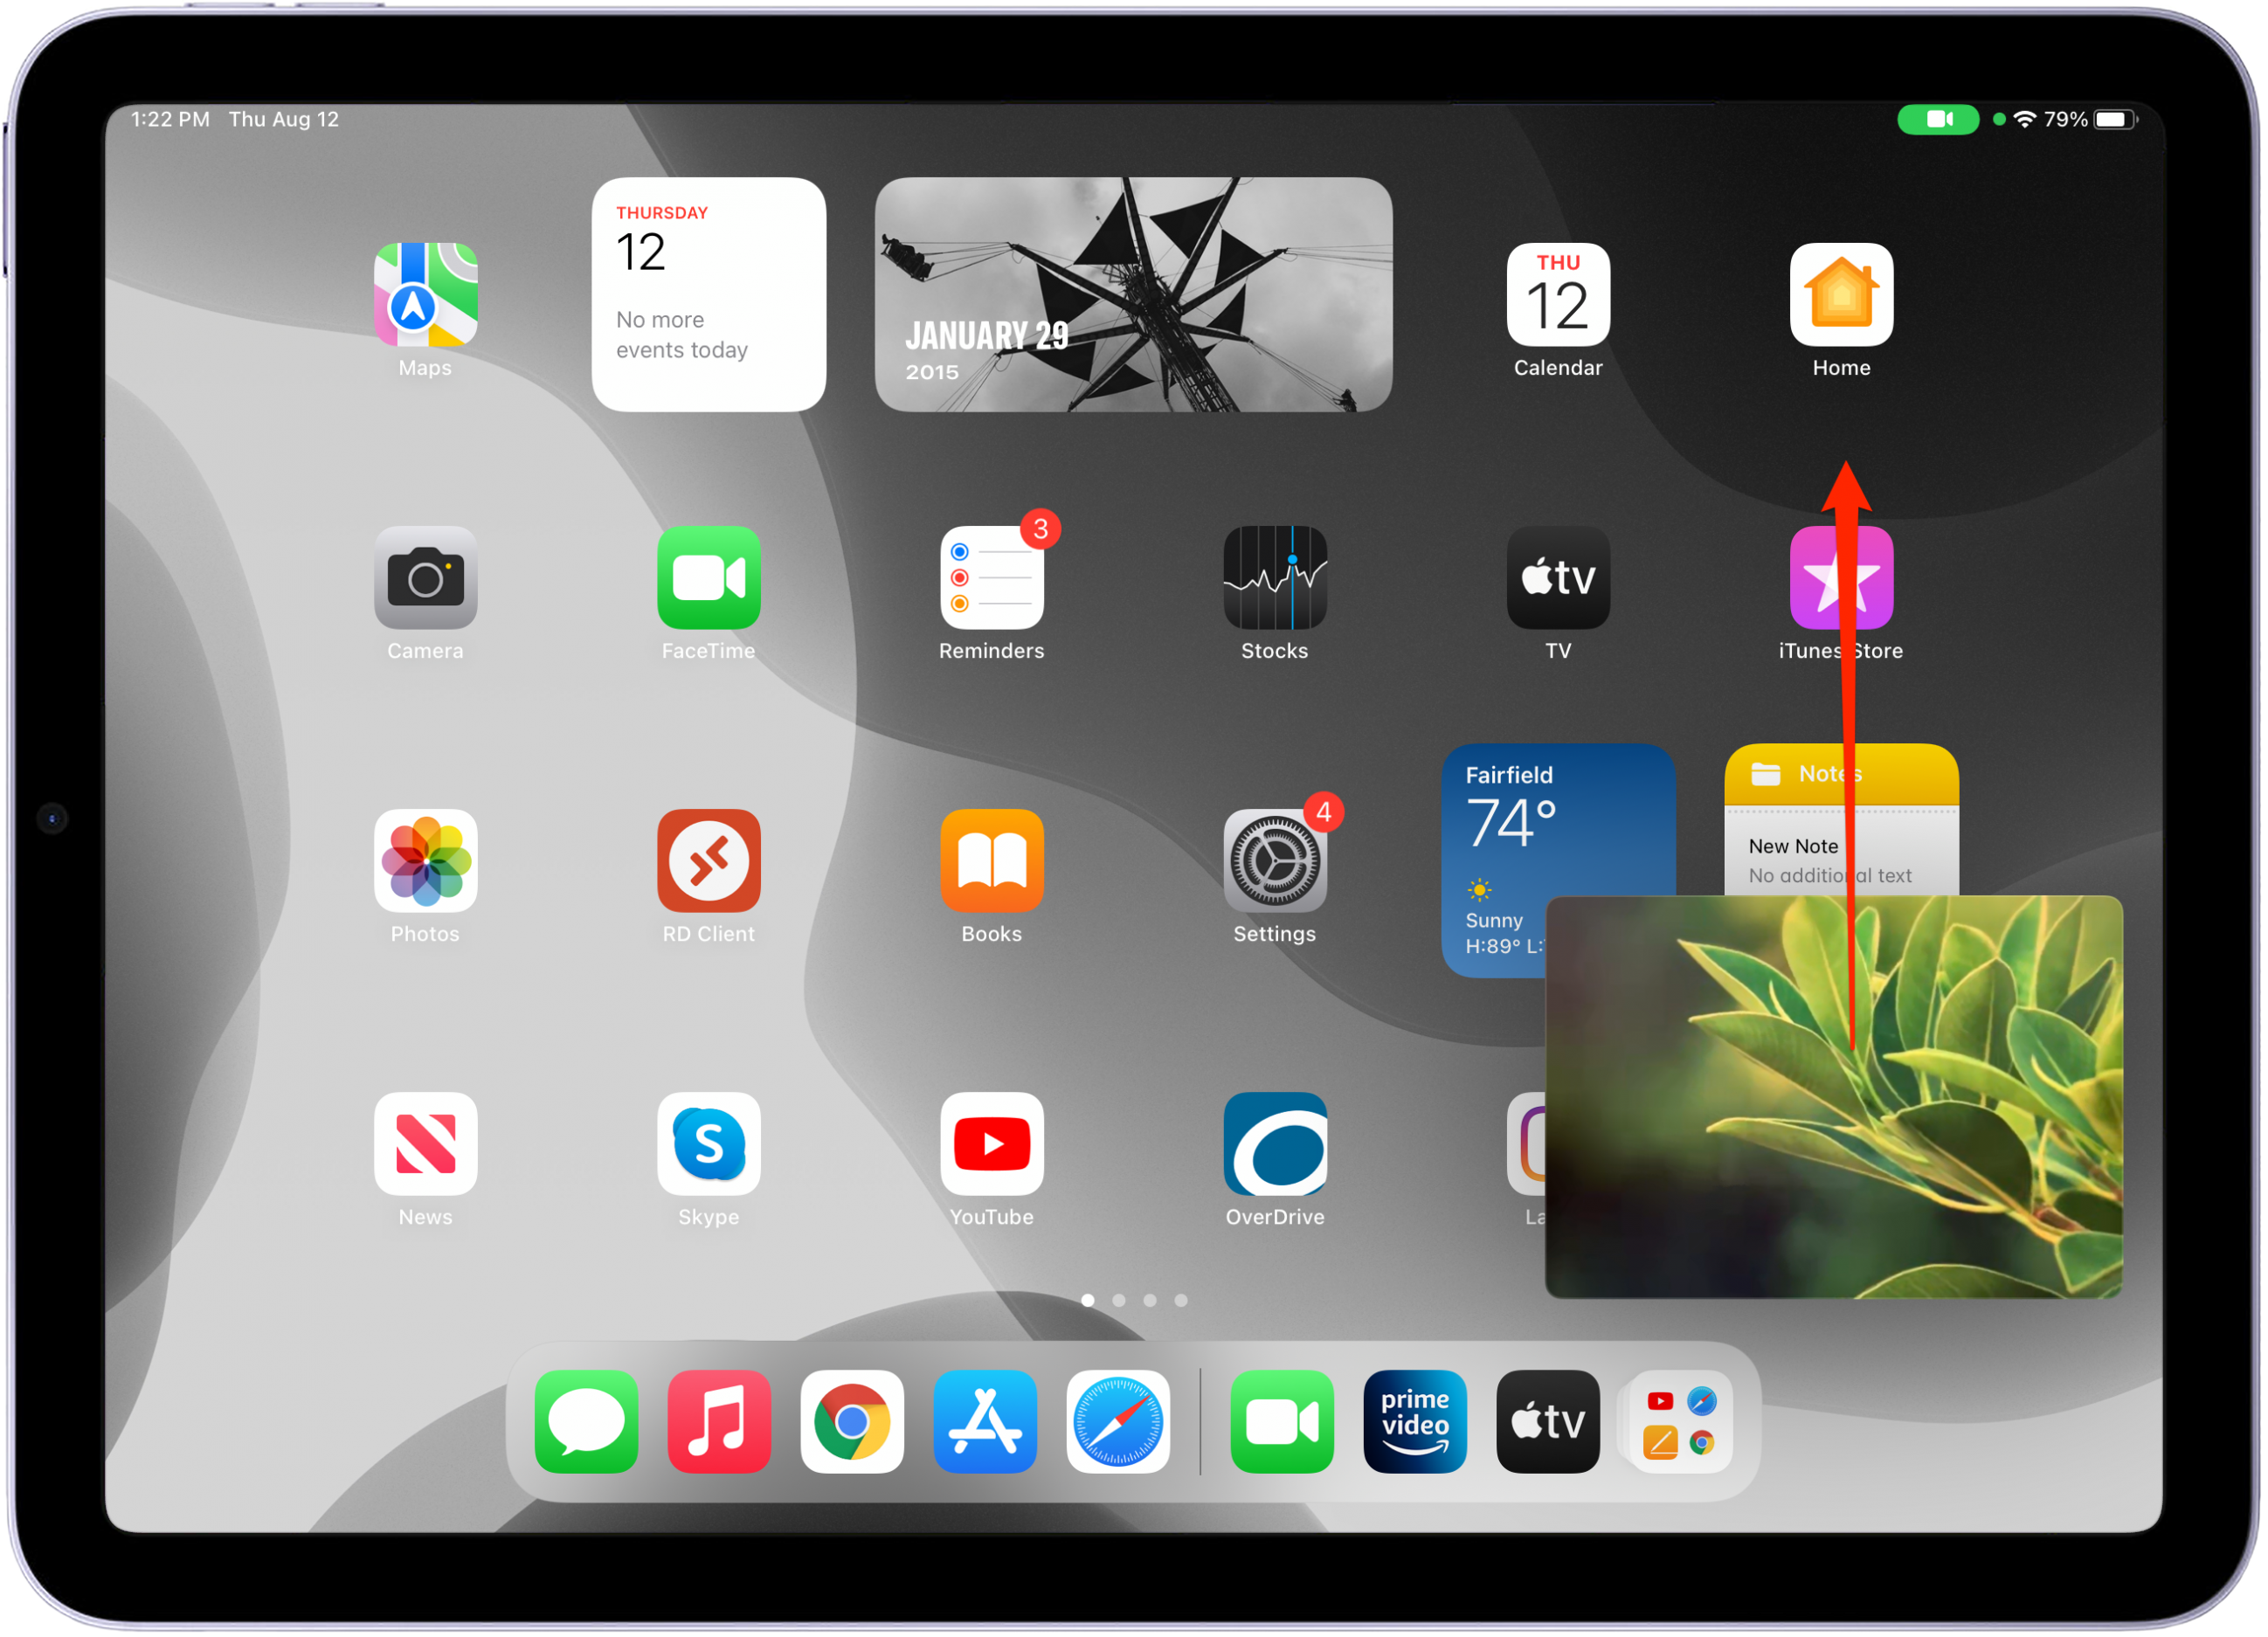
Once you’ve started your call or video, tap the Picture in Picture icon. (If you’re in full screen mode, you can also swipe up from the bottom of your screen.) This will enable Picture in Picture mode and the video will appear in the corner of the screen.
-
You can tap and drag the video to move it to another section of the screen. Pinch your fingers together to shrink the size of the screen and pull them apart to make the screen larger.
-
To return to full screen, tap the Picture in Picture screen. To hide the video, drag it off of the edge of your screen. You’ll notice a gray arrow icon that will appear at the edge of your display. Tap the arrow icon to make the video reappear.

Drag & Drop
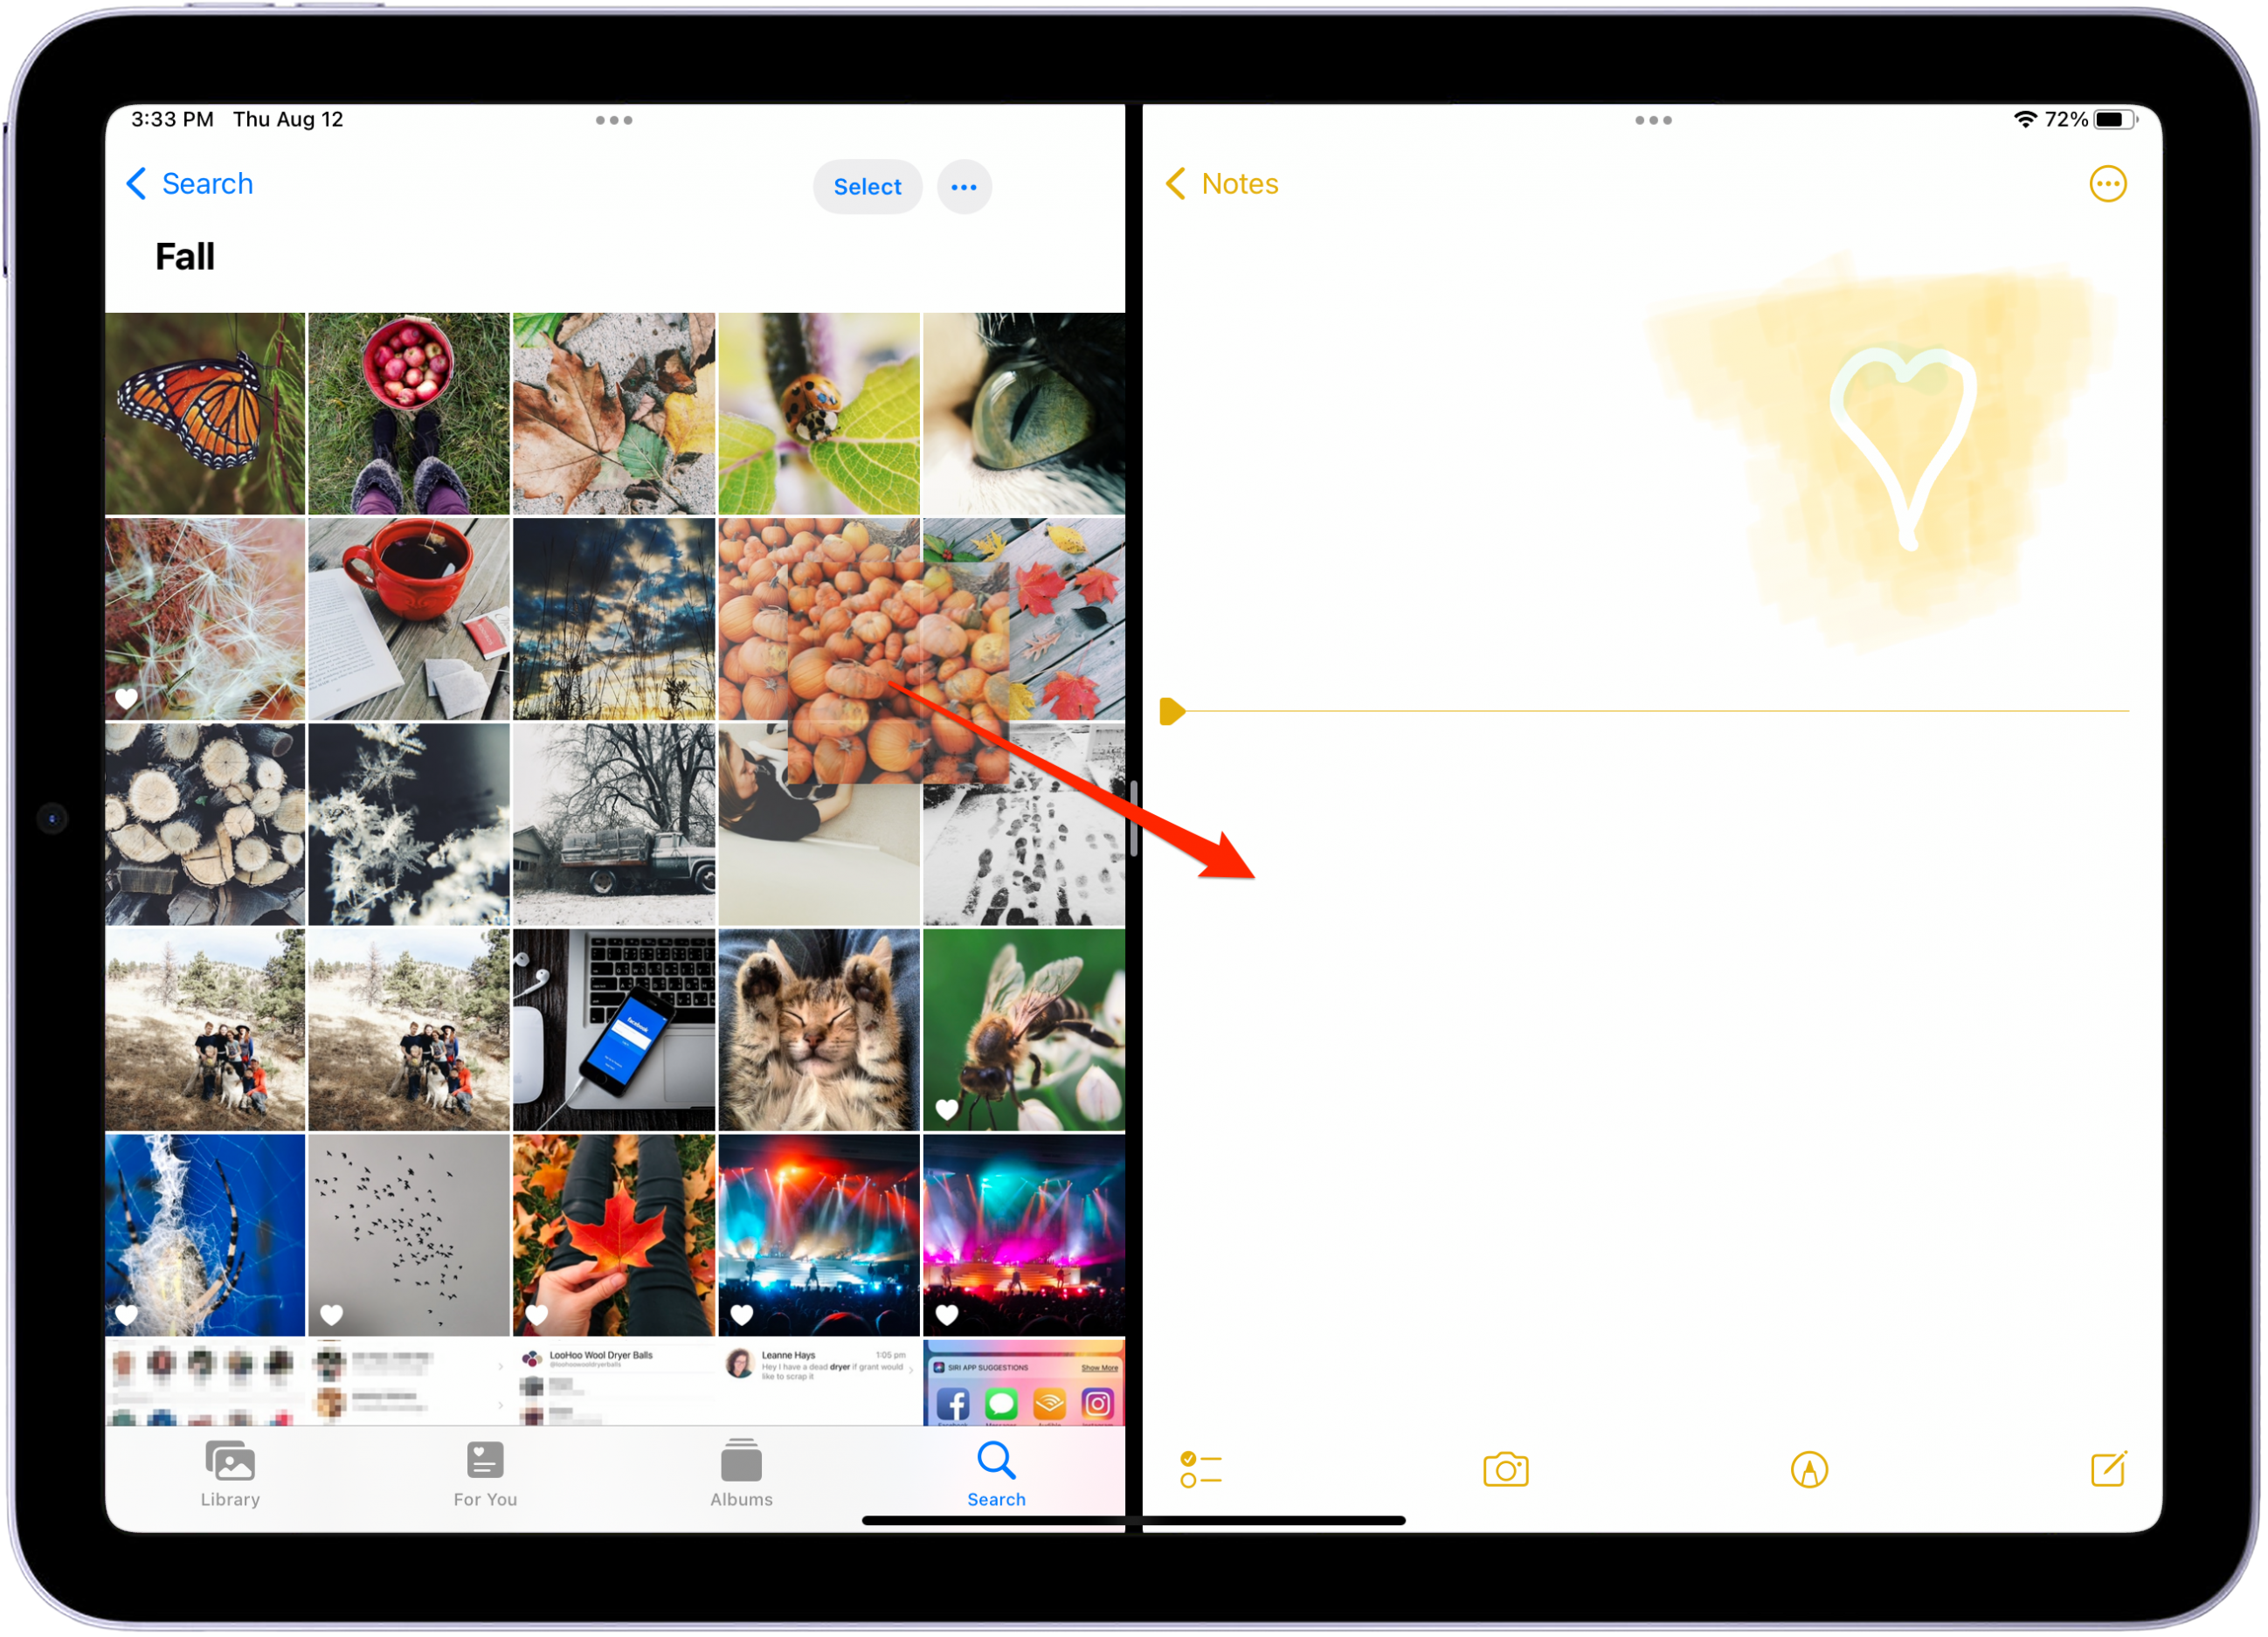
Another basic Multitasking iPad tool is Drag & Drop. This feature allows you to skip the process of sharing a piece of content to another app. Instead, you can drag files, photos, apps, text selections, and reminders from one app and drop them into another. For example, instead of selecting an image in the Photos app and then sharing it to the Messages app, you can drag the picture from the Photos app directly into a text message. It's easiest to use Drag & Drop in iPad Split View, but you can also use it in Slide Over.
-
With Split View or Slide Over open, place and hold your finger on a piece of content (such as an image or a text selection) until it pops out slightly. Drag your selection into the other app and drop it where you want it to go.
-
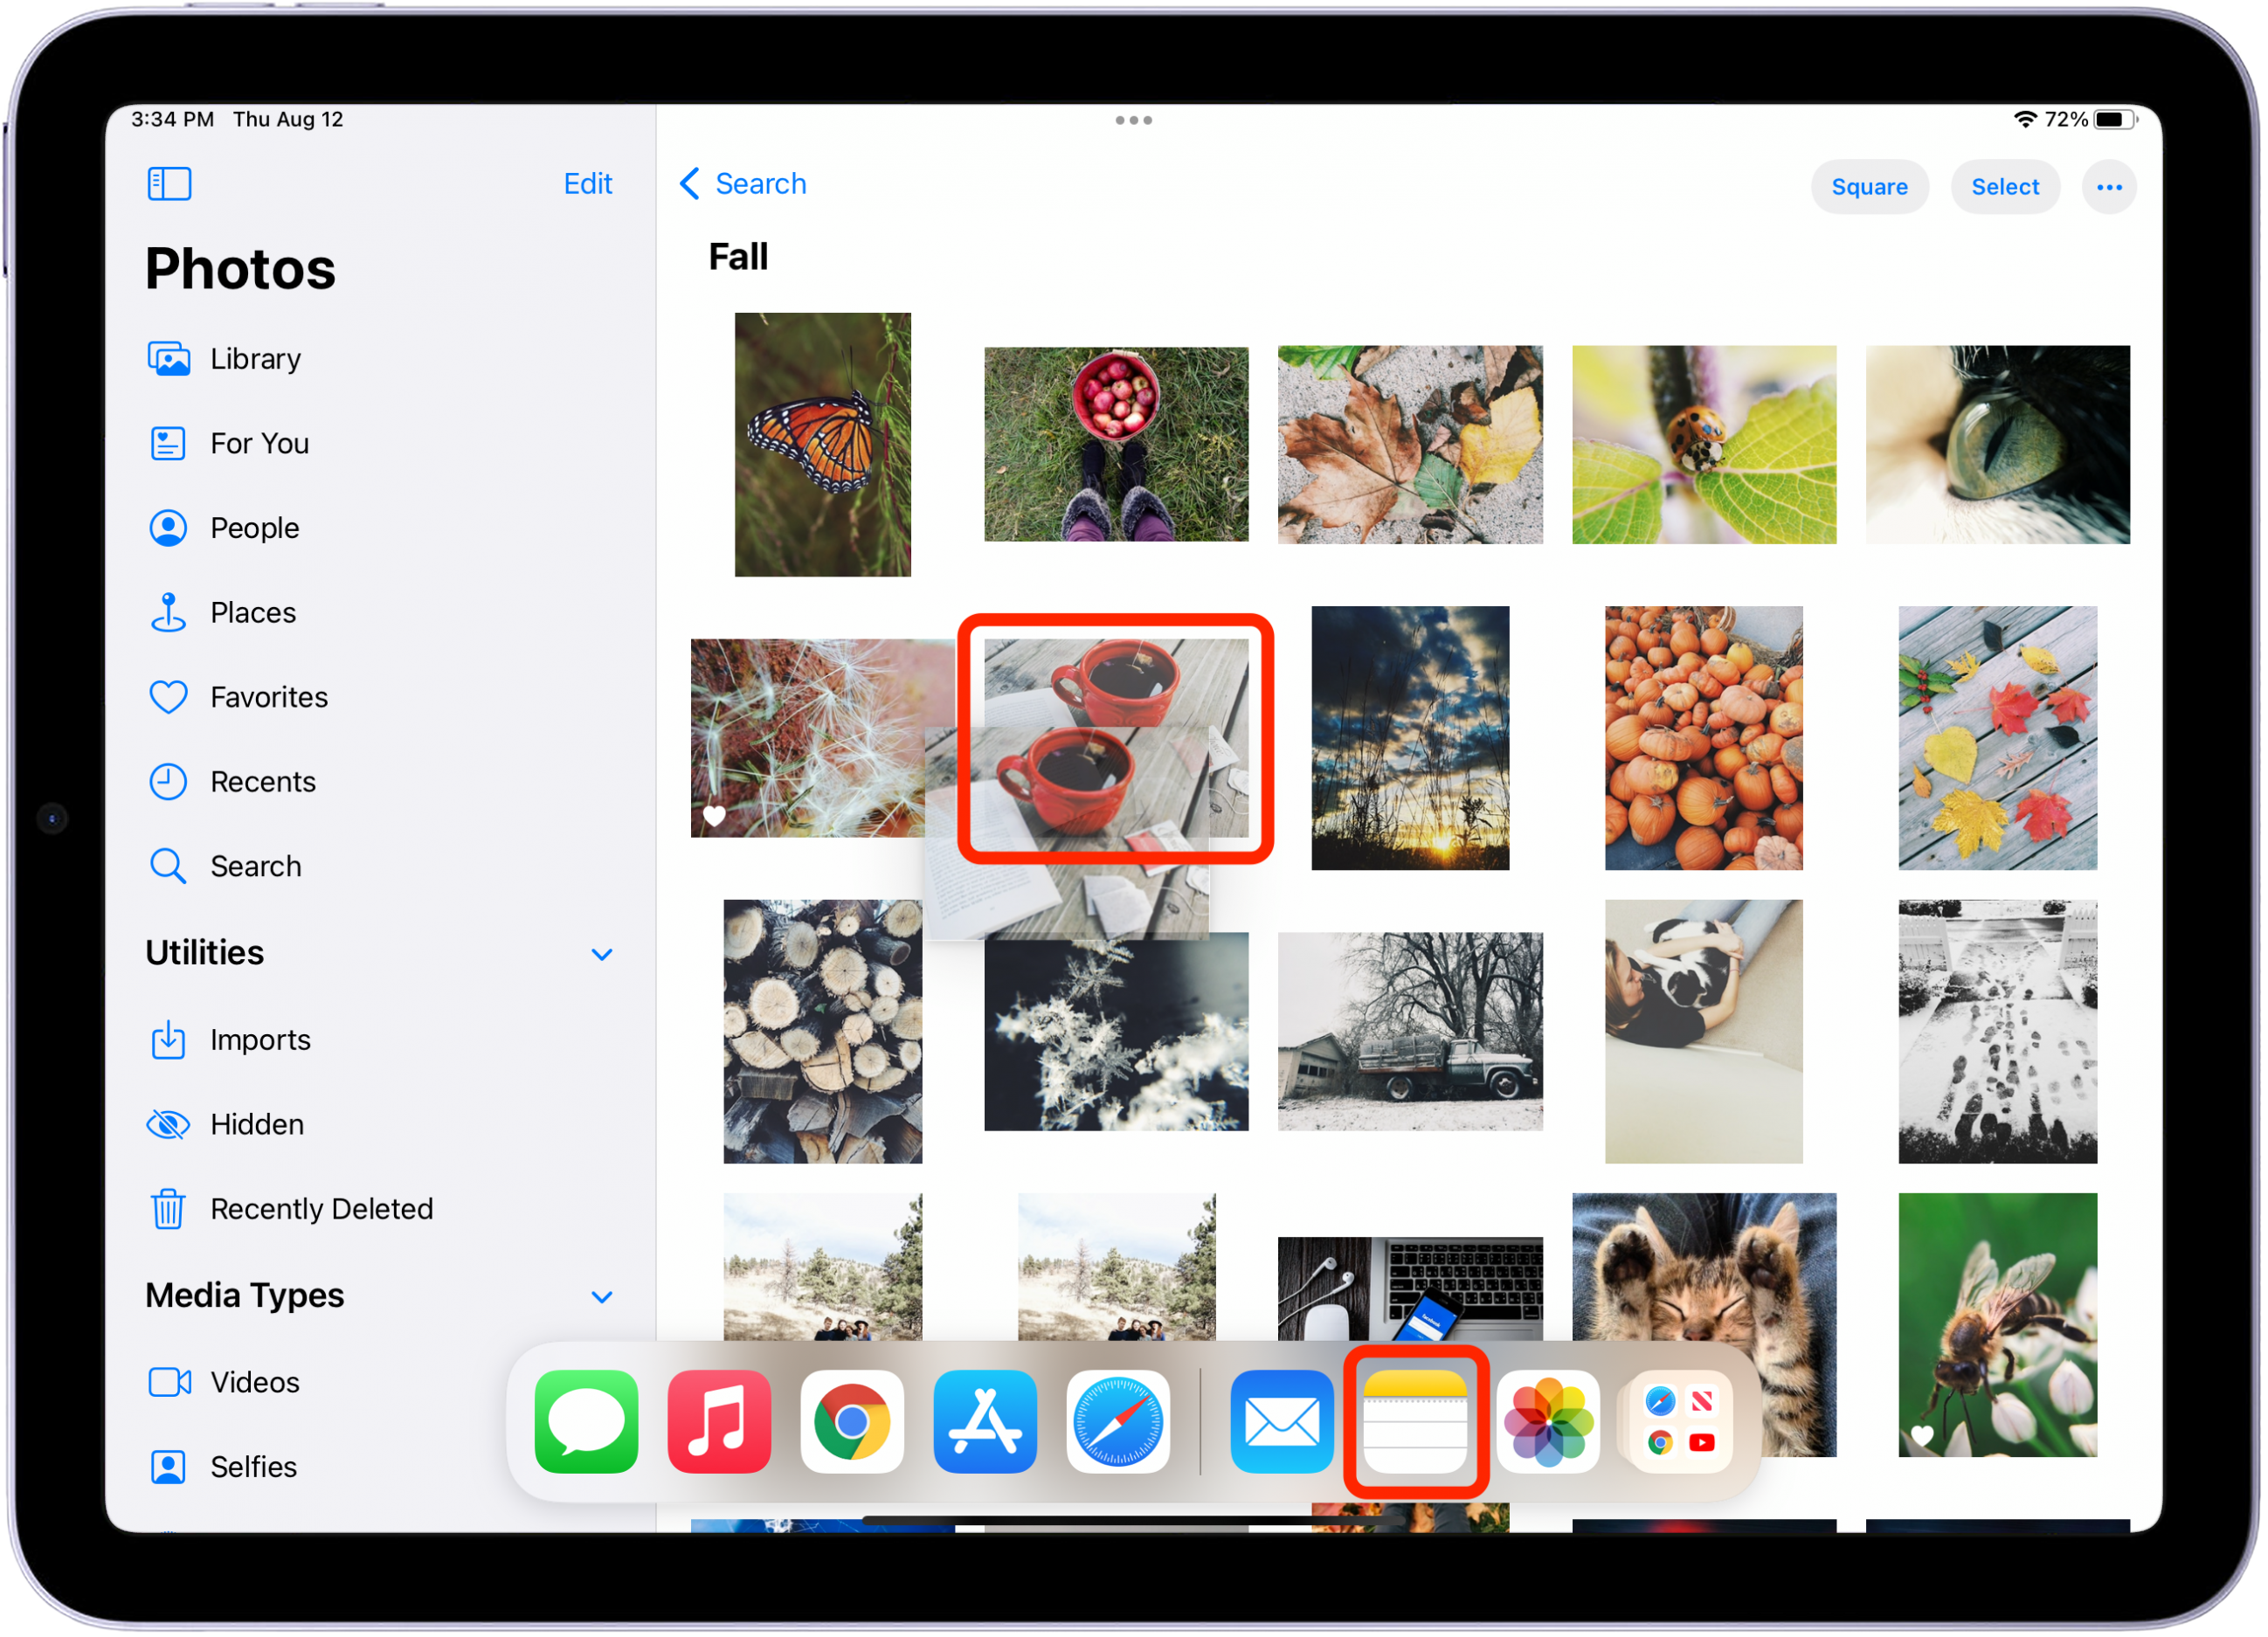
If you’re moving an item into an app that isn't open, hold the popped-out file with one finger and use another finger to swipe up and open the Dock. Tap on the app you want to move the item to. Once it opens, drop the item where it needs to go
-
To Drag & Drop multiple items, tap and hold one image to pop it out and drag it slightly to the side. Keep holding the image. With your other hand, tap the other images you want to add to the first. A blue number will appear in the top corner of the bundle, letting you know how many pieces of content you’ve selected. If you’re using Split View or Split Screen, you can drag the content from one app to the other open app.

App Shelf
The multi-window App Shelf gives you quick access to all the open windows for an app. The App Shelf displays open windows as small icons at the bottom of your screen. If you have multiple windows open, the shelf appears when you open an app and fades away when you interact with the app. Here’s how to access your App Shelf:
-
In your open app, swipe up slightly to bring up your Dock and tap the app that is open.
-
The App Shelf will appear at the bottom of the screen. You can tap New Window or tap an existing window to open it. Swipe up to close any windows you no longer need.


If multiple windows are open, the App Shelf will also appear when you tap the Multitasking icon at the top of your screen.
Open a Window in the Center
Opening a window in the center of your iPad screen is a great way to quickly preview and edit content without leaving your current view. It is not available for all apps, but is for Messages, Email, and Notes.
-
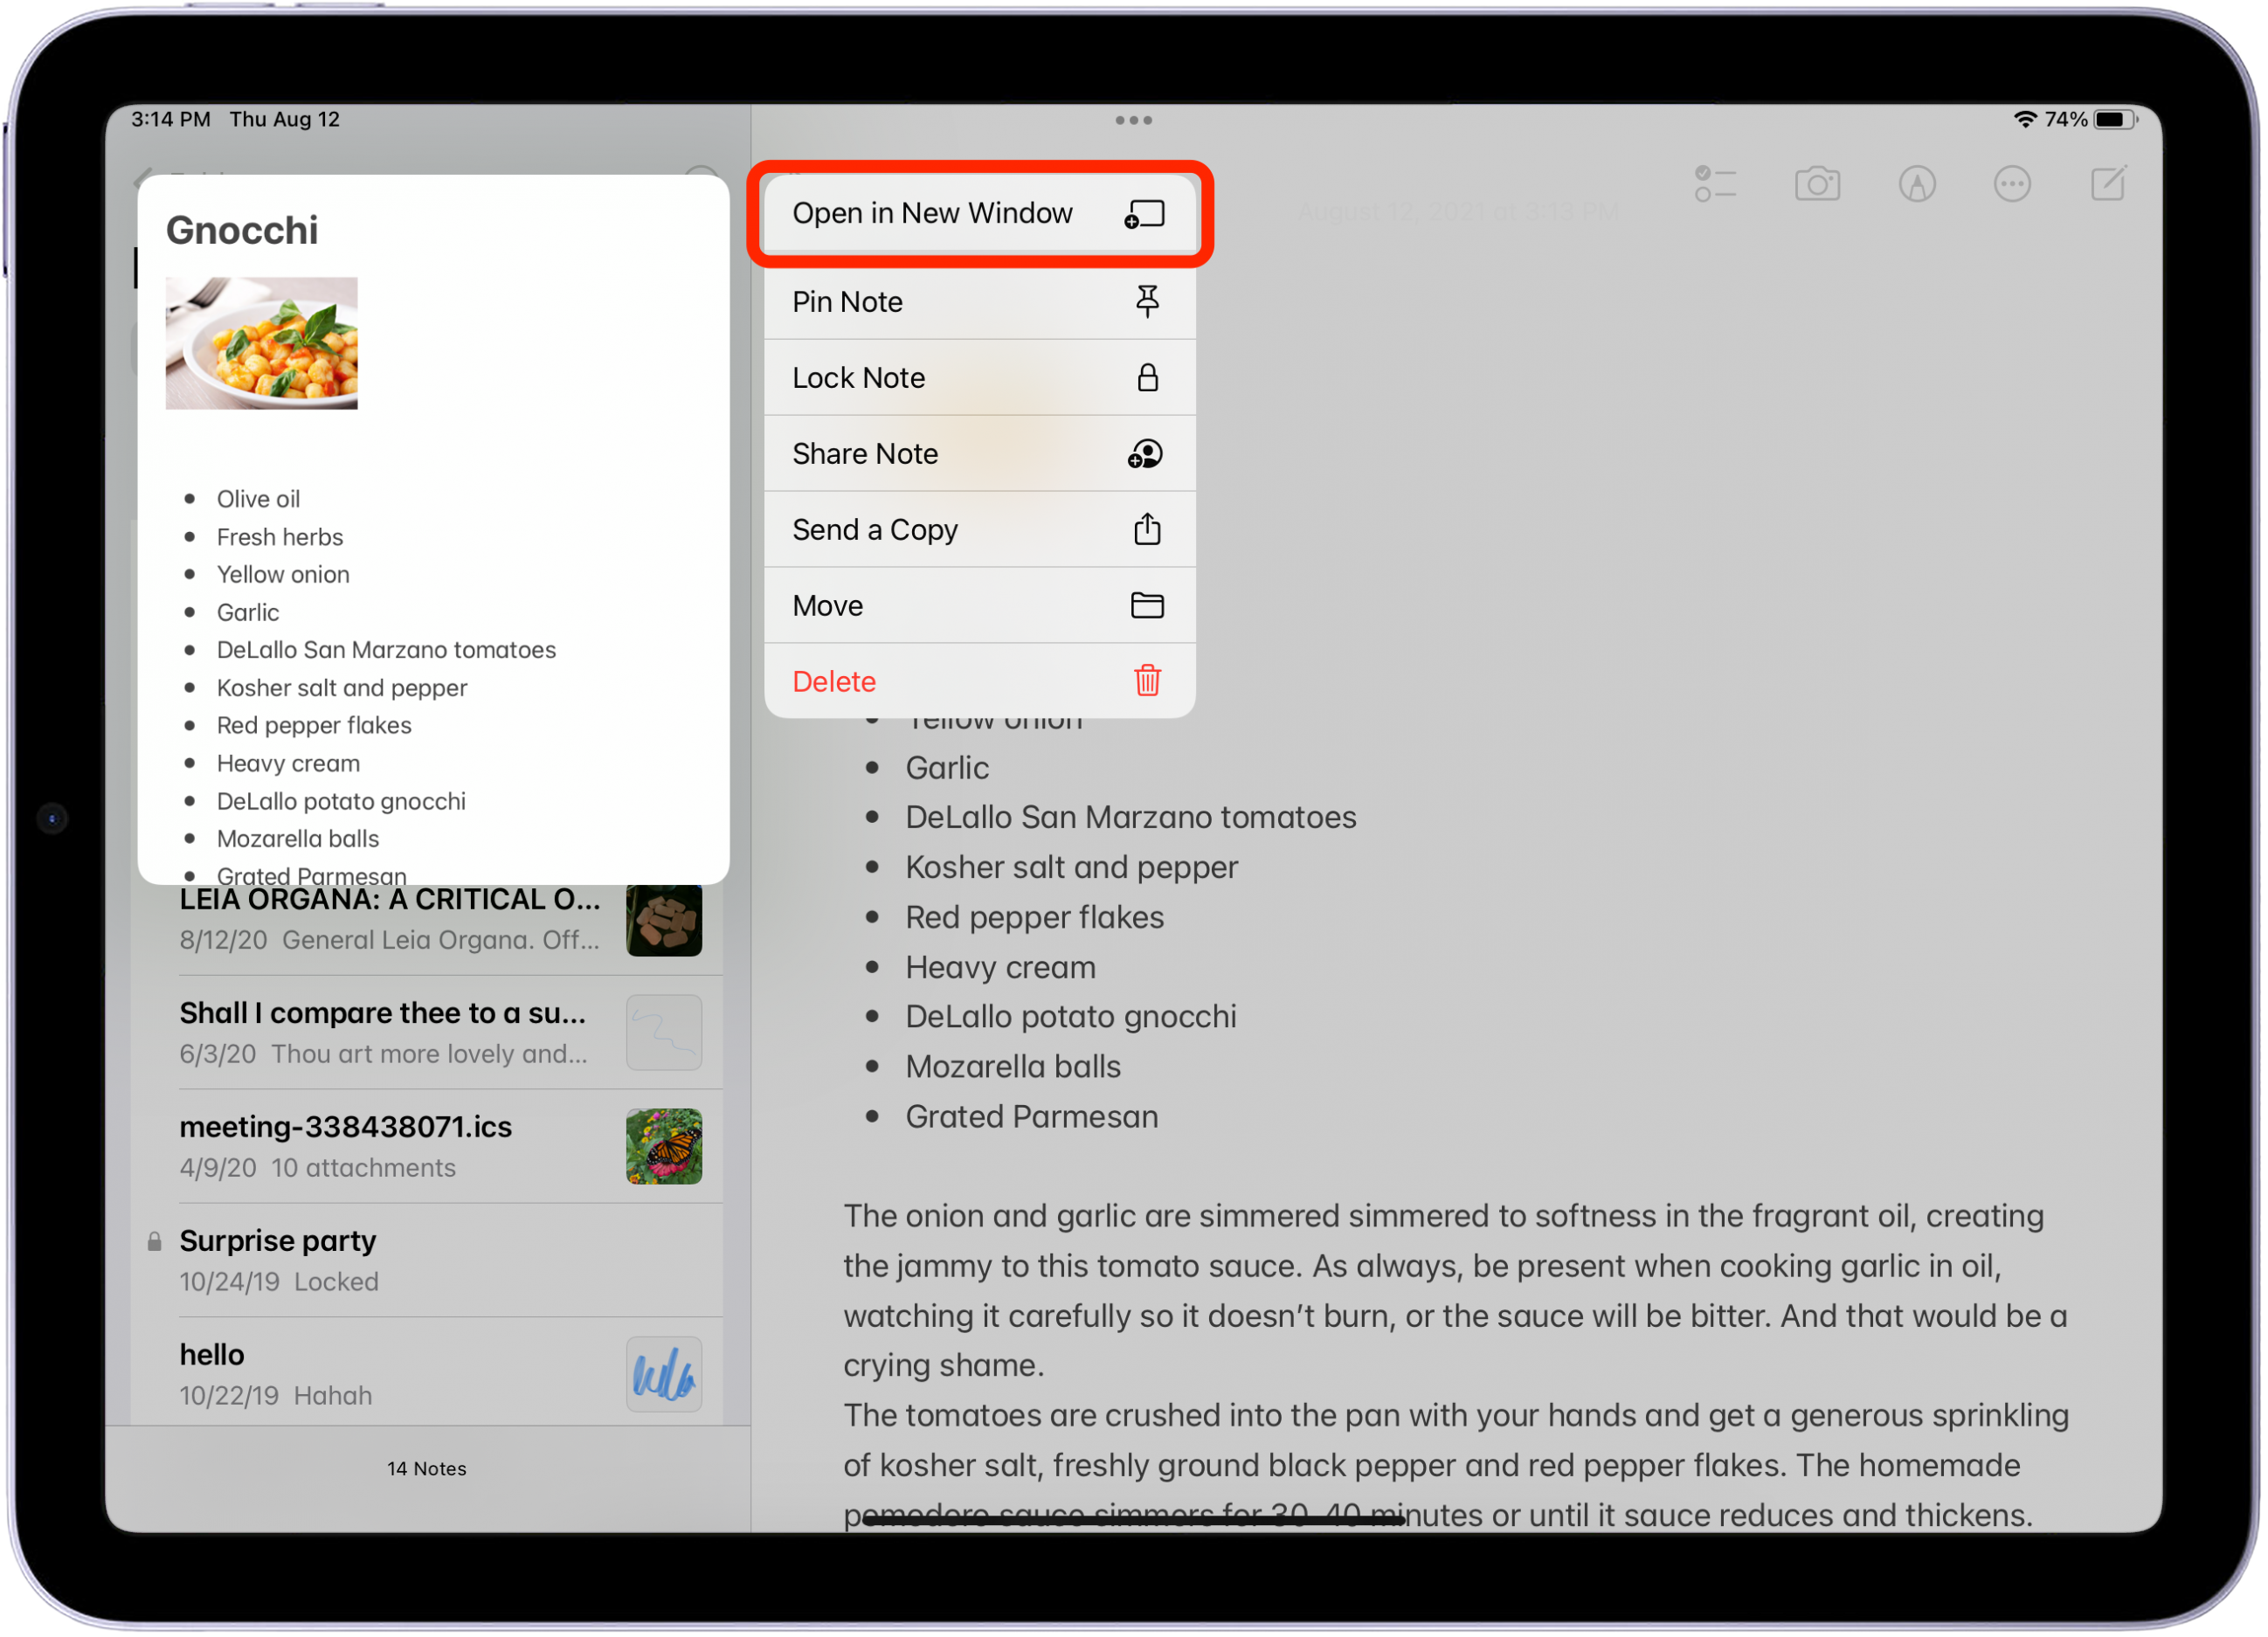
Tap and hold an email, message conversation, or note to open a window in the center of your iPad screen. Tap Open in New Window.
-
Swipe down on the Multitasking icon to add it to the App Shelf (which can be accessed by following the steps in the above section). You can also tap the Multitasking icon to create a Split View or use the Slide Over option.

NEW! Stage Manager
Stage Manager is the most anticipated new software feature that dropped with iPadOS 16. Apple’s multitasking solution for iPad users, Stage Manager, organizes open windows and apps so you can see everything in a single glance while still focusing on a specific app or task. The currently open window is displayed prominently in the center, and other open apps or windows will appear on the left. This allows you to switch between open apps or windows super quickly and easily. You can also group windows when working on specific tasks or projects that require different apps. Stage Manager also works with other macOS windowing tools, like Mission Control and Spaces.
Enable Stage Manager on Your iPad
On an M1 iPad running iPadOS 16 or later, pull down the Control Center menu from the top right corner of your screen. Next, tap the Stage Manager button. The button will look like 3 little squares next to 1 big square. After turning it on for the first time, you can quickly toggle it on and off with one tap in Control Center. Stage Manager is automatically added to Control Center on compatible iPads with iPadOS 16, but you can also reorder the buttons by going to Settings > Control Center.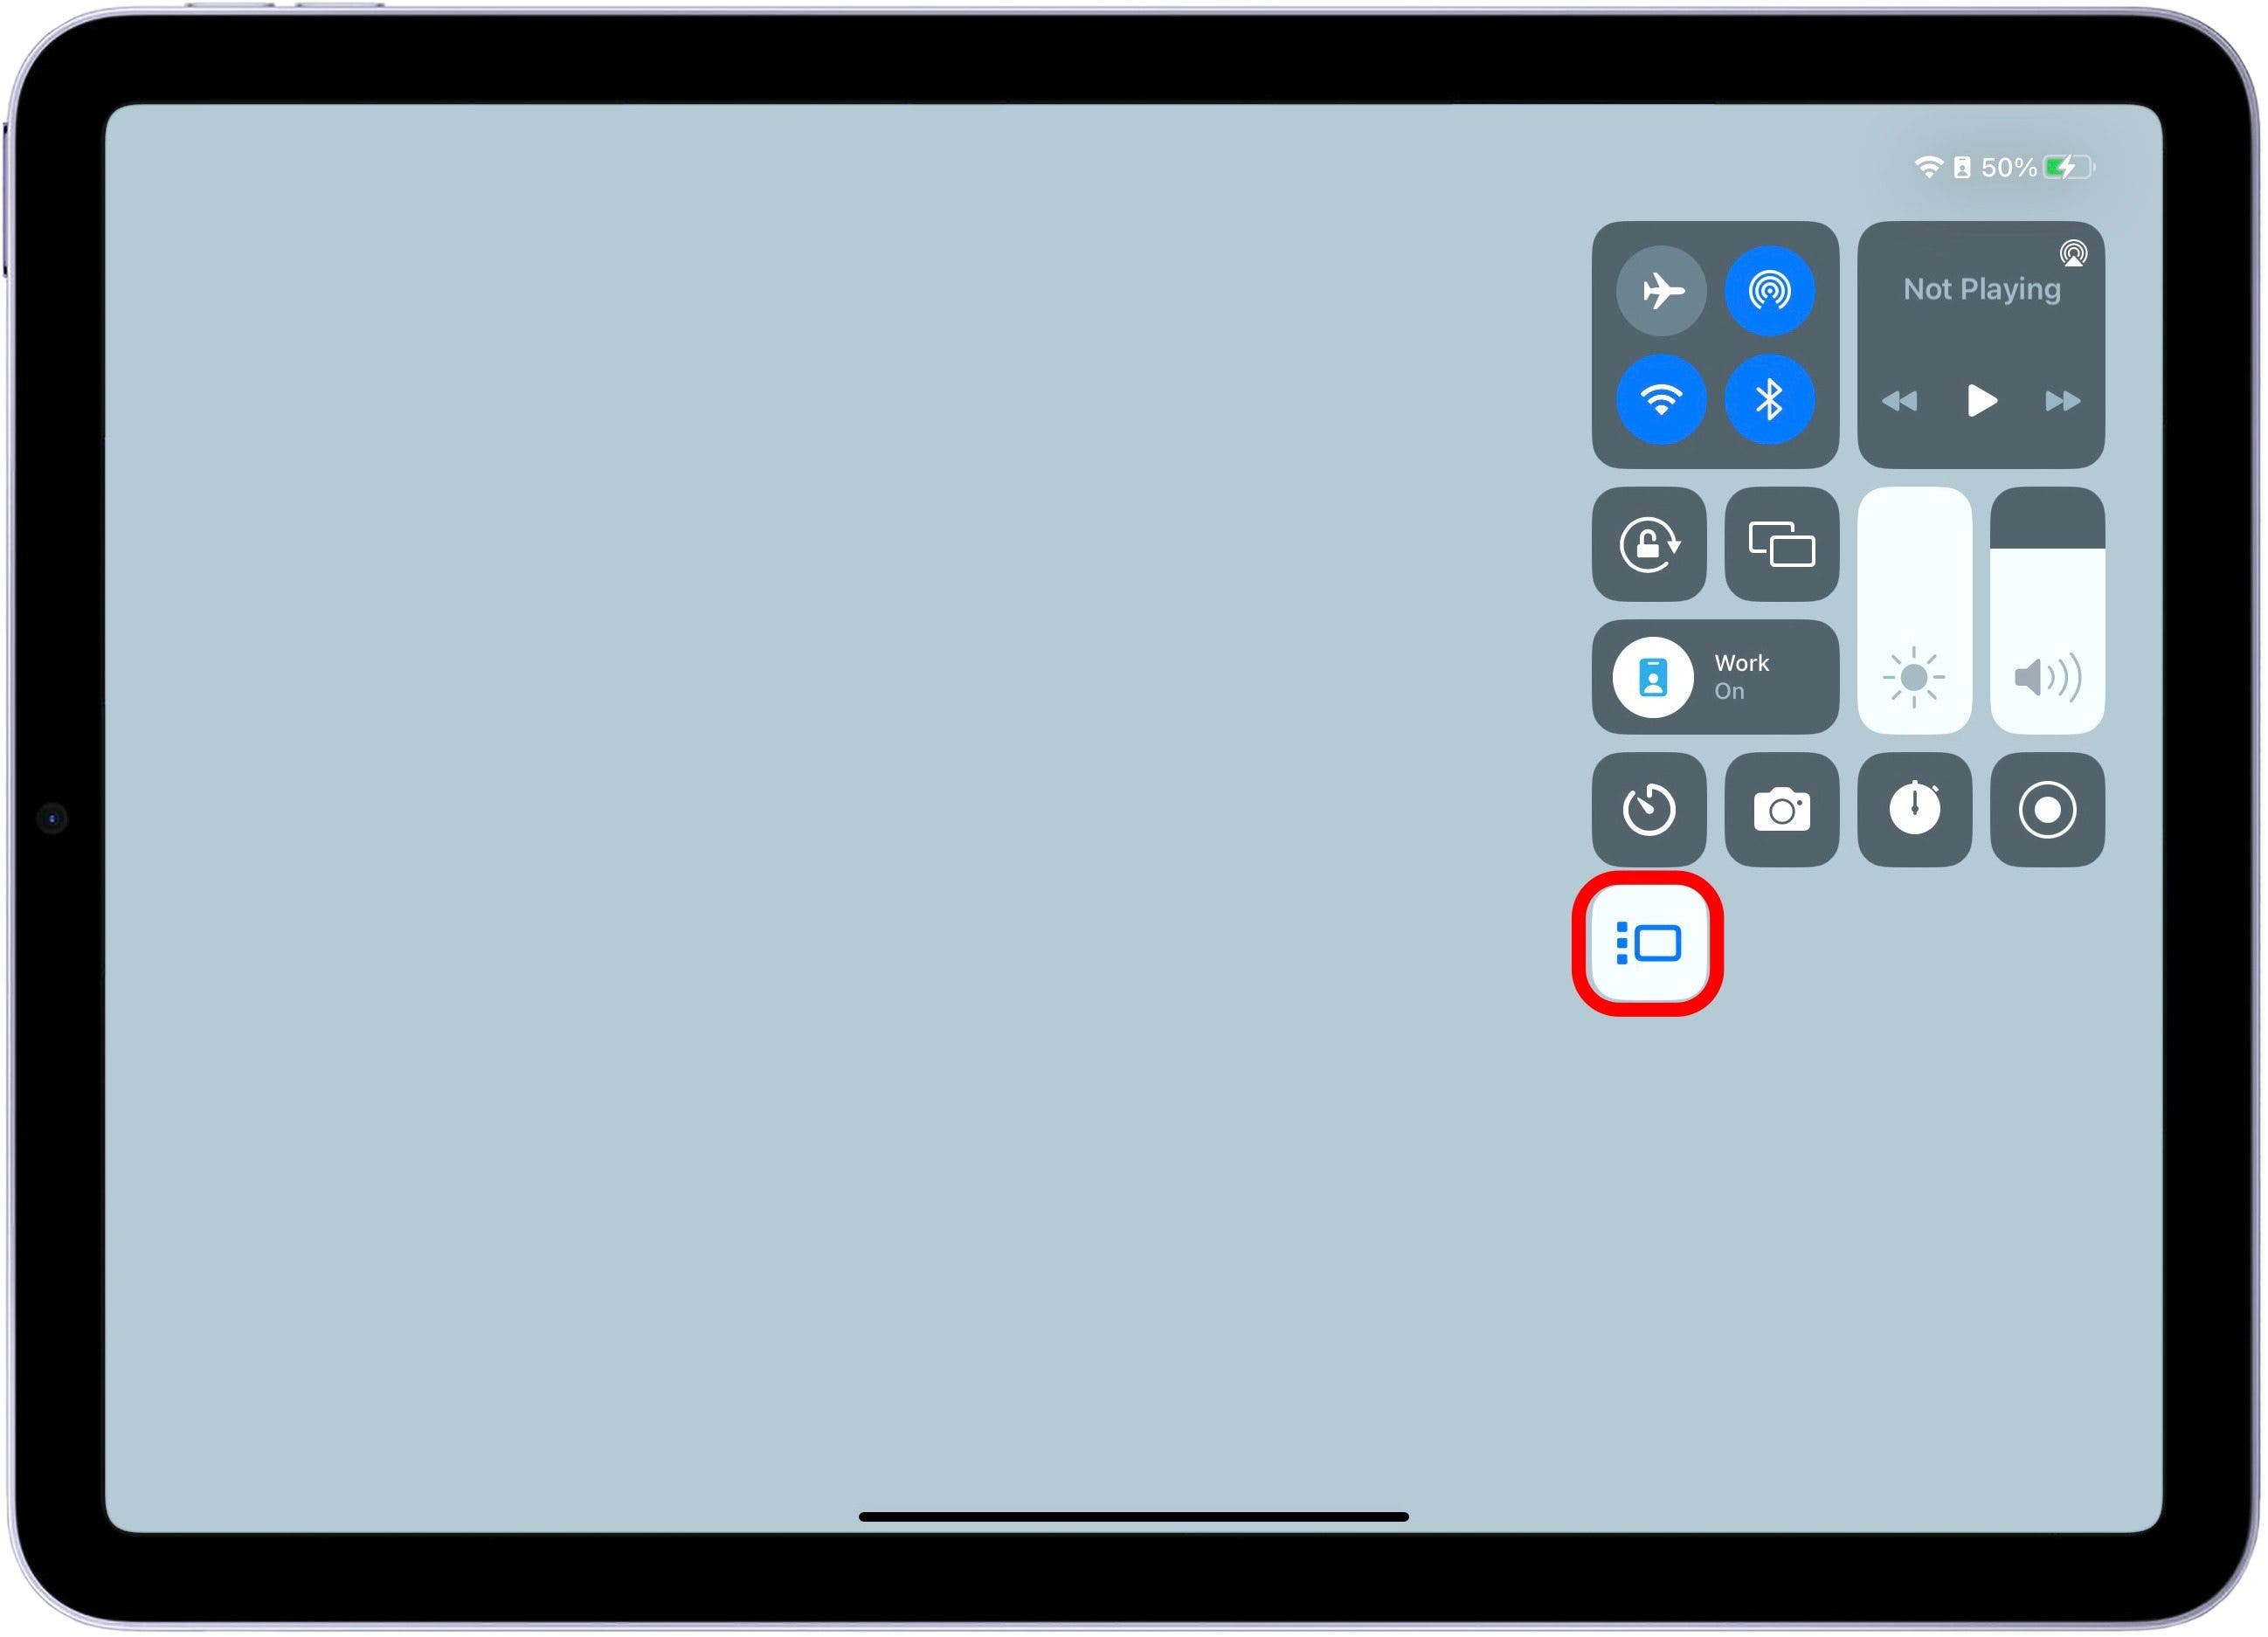
To edit Stage Manager, drag down the Control Center from the top left corner and long press on the Stage Manage icon. This will give you the ability to either show or hide the Recent Apps side bar and the iPad’s dock. 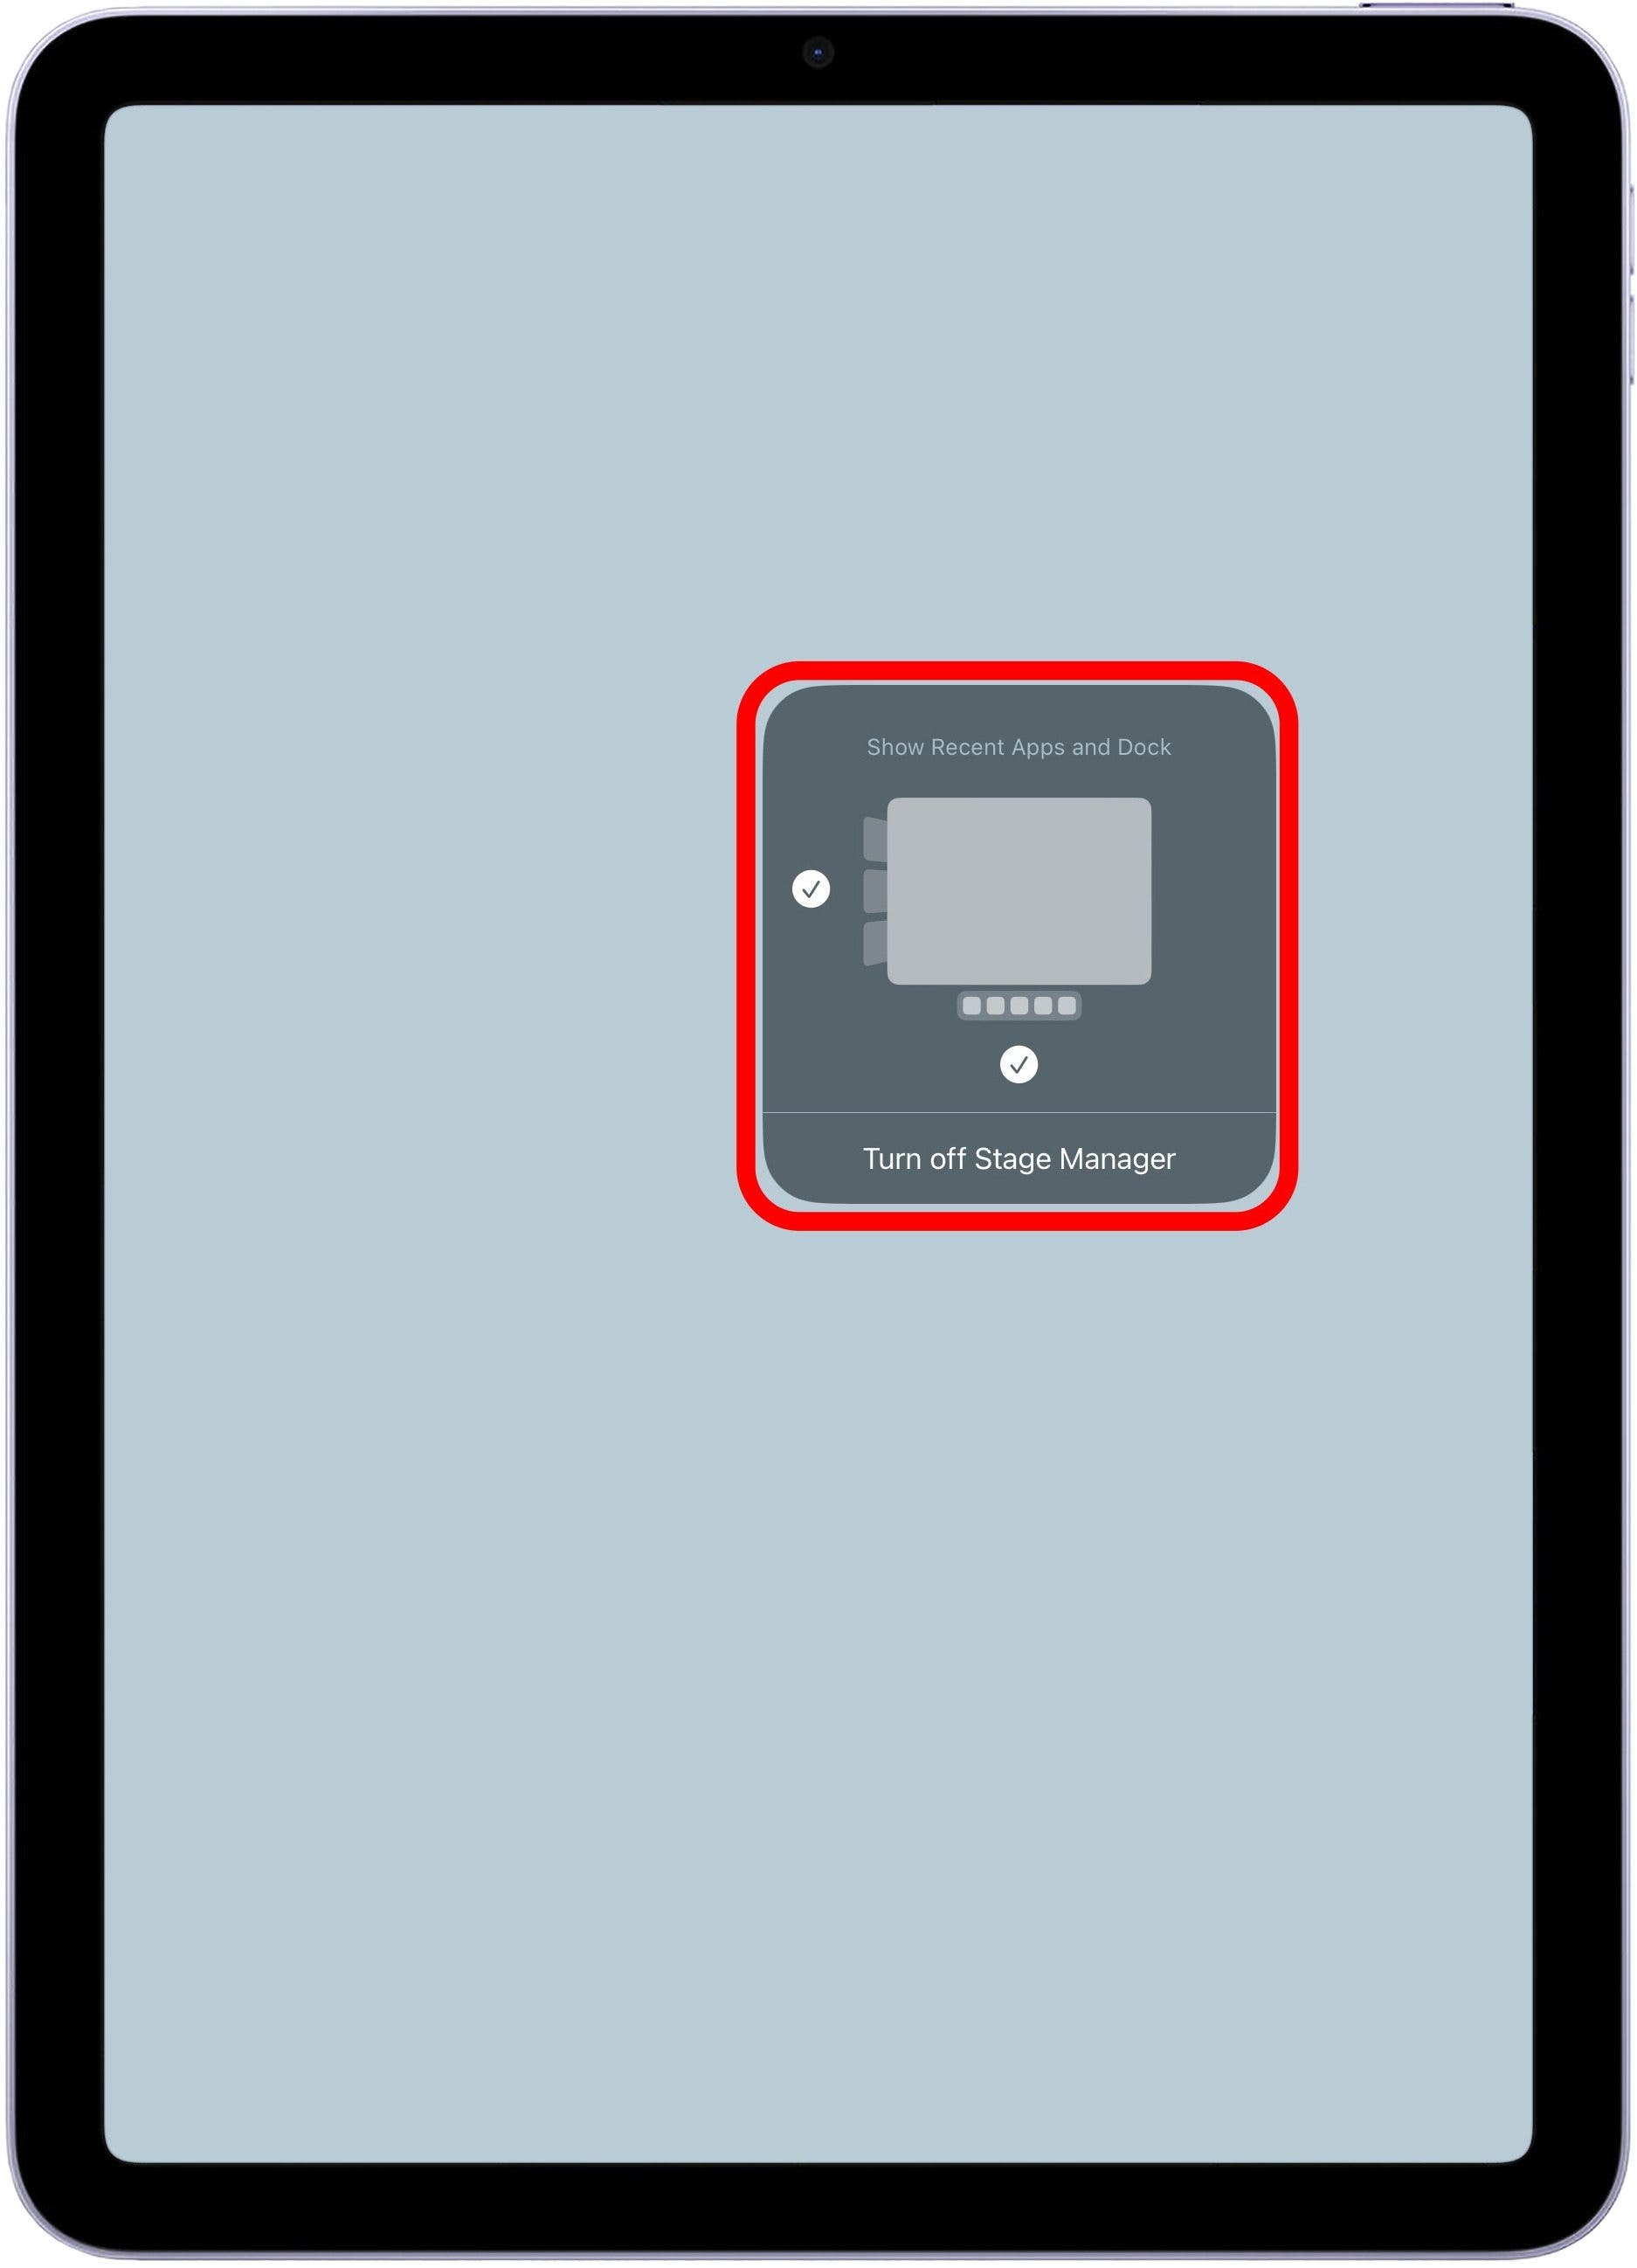
Using Stage Manager on Your iPad
To get the most out of Stage Manager, it is recommended that you use your iPad in landscape mode, or horizontally, because when the iPad is in Portrait mode, you will not be able to see the open apps in the sidebar navigation unless you tap to display it. Additionally, remember that you can always return to your iPad’s Home Screen by swiping up as you normally would. So don’t worry about getting trapped in the Stage Manager view! Let’s get into how to use this cool new interface.
Resizing Windows
Once Stage Manager is turned on, you will see a curved line in the bottom right corner of your apps. If you tap and drag the white corner, you can adjust the size of a window.


There will be various different sizes depending on the app you’re working within. For instance, you have more options in terms of resizing the window in the Safari app than you do in the Netflix app. This is because the app size is optimized for best viewing. So a video player window will always be slightly larger than other apps. It appears that the smallest size seems to imitate the way the app looks on the iPhone, while the largest size takes up the entire screen as the apps do when Stage Manager is not enabled.
Adding and Switching Between Windows
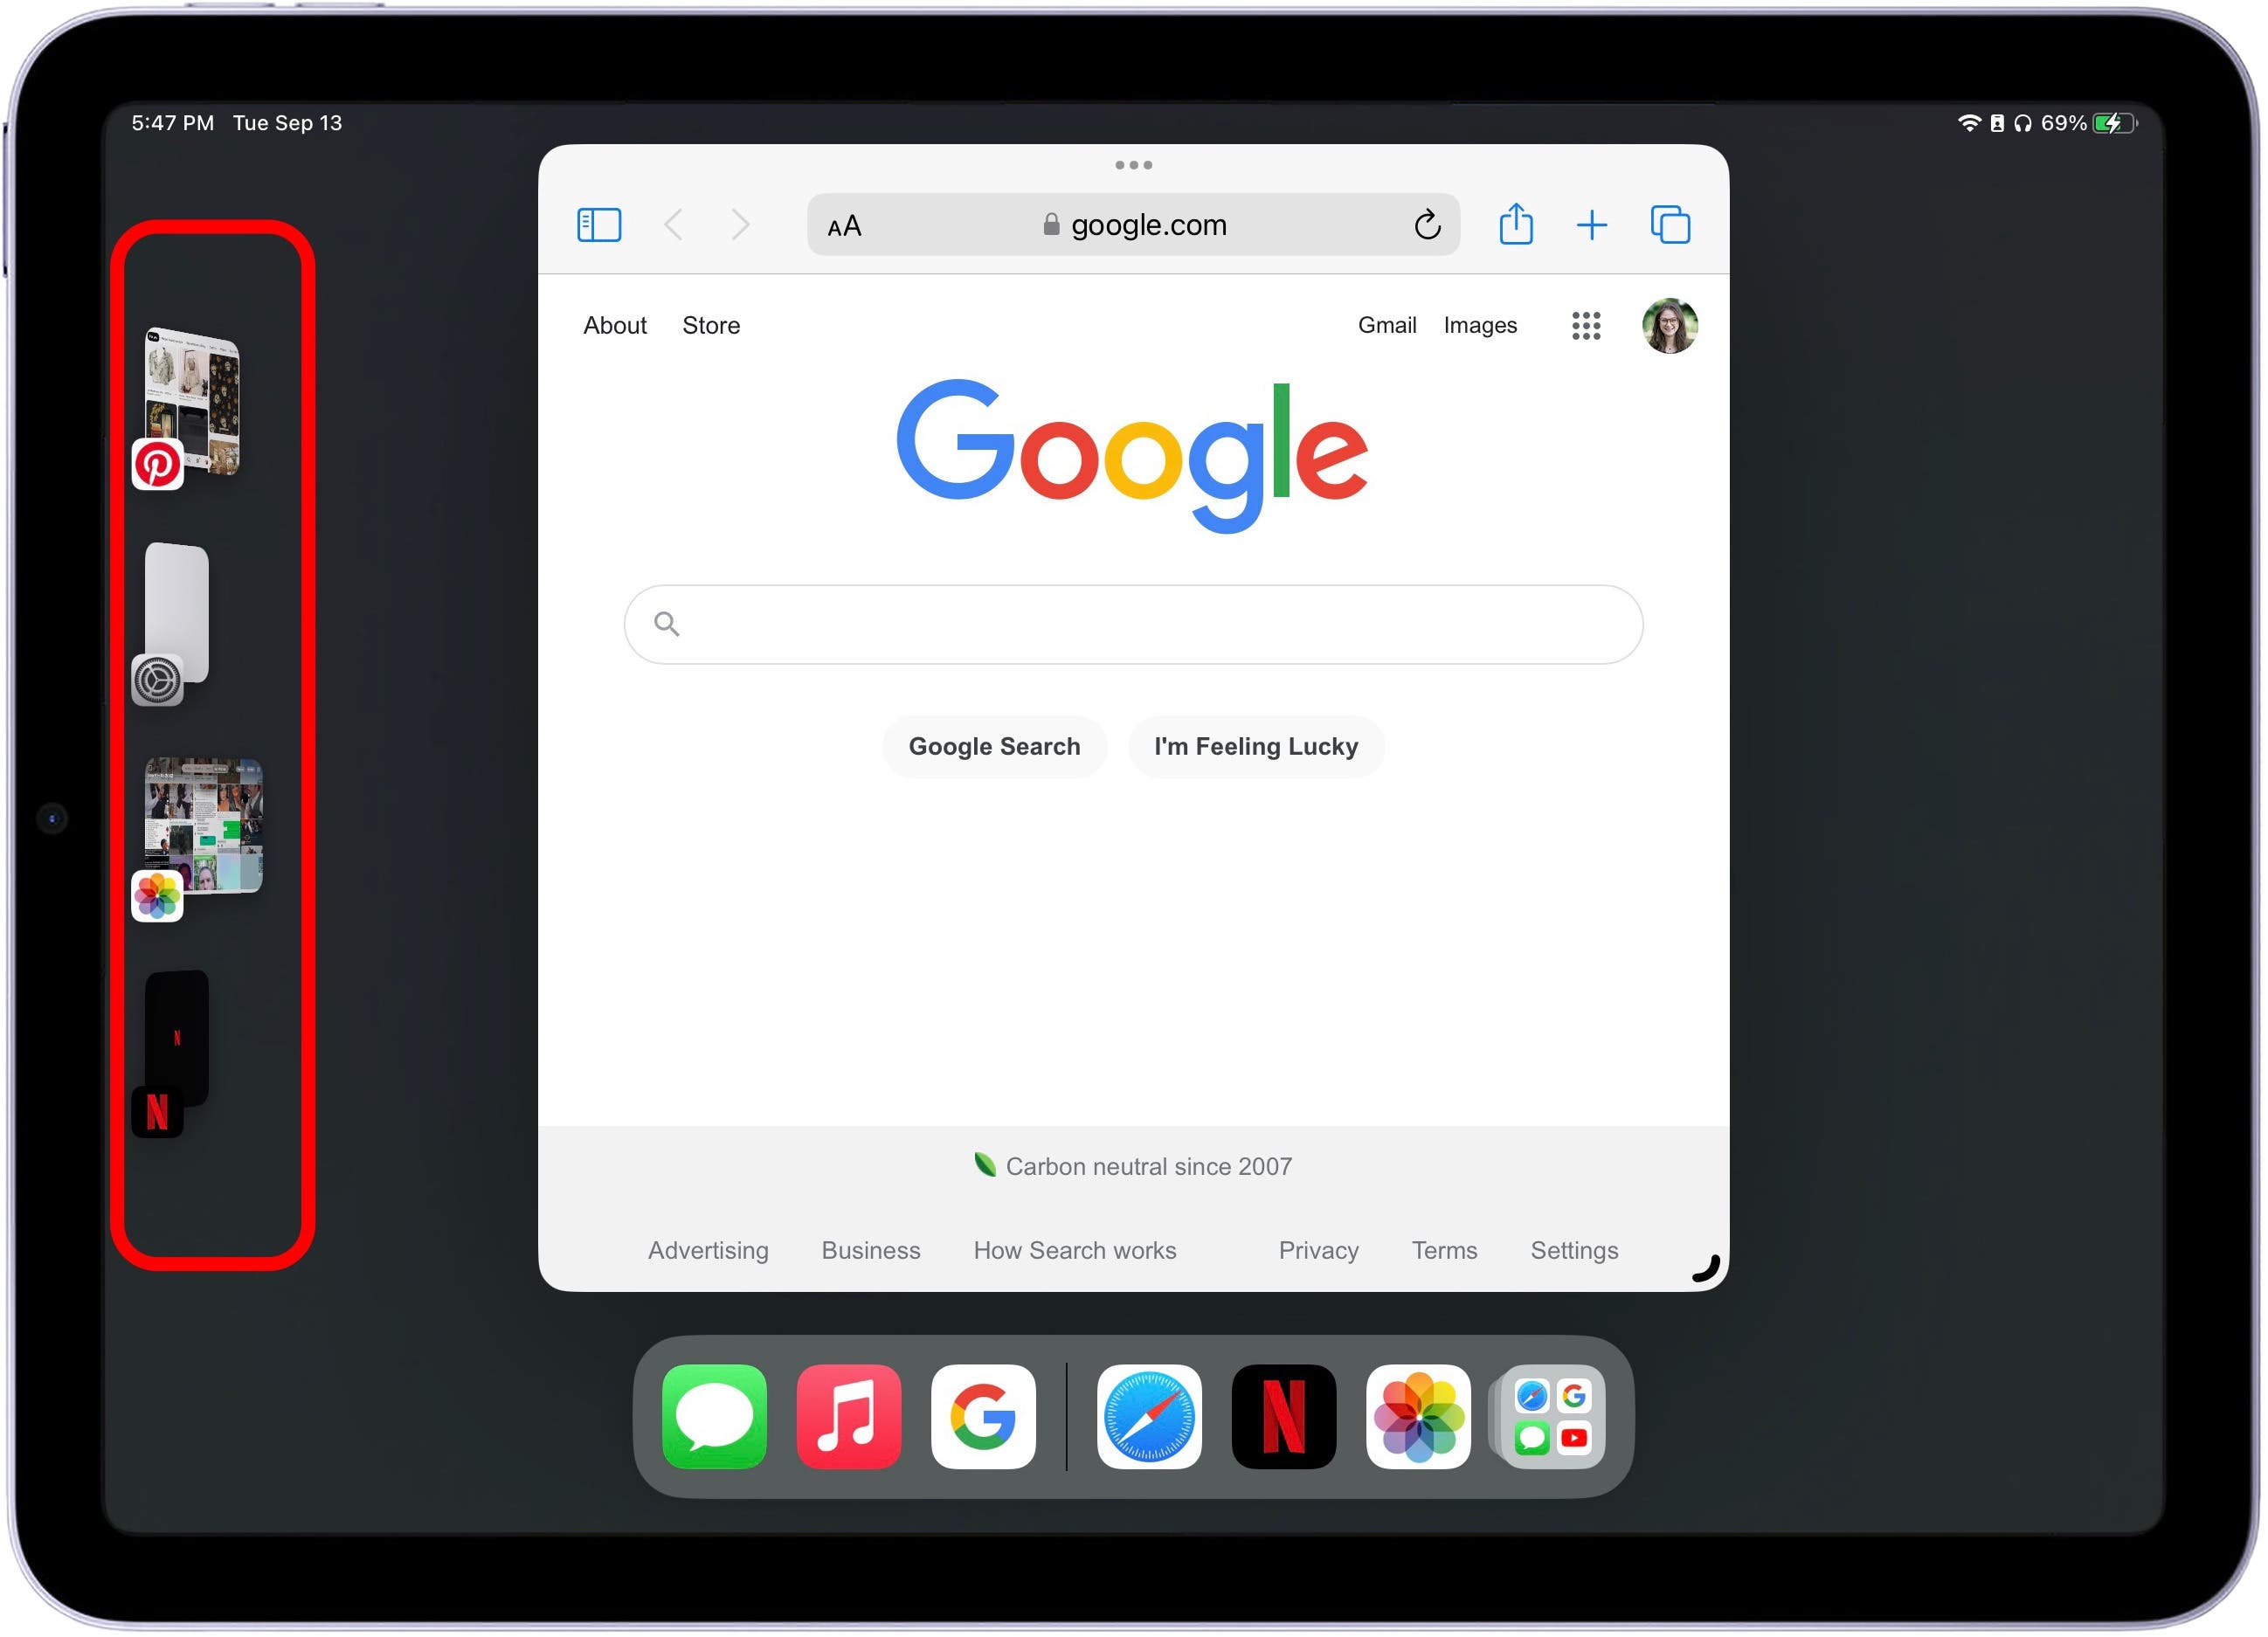
Stage Manager is all about making multitasking and switching between apps super quick and easy. The way to do this with Stage Manager is by using the sidebar to quickly store and switch between apps.
-
The sidebar will show your four most recently opened apps. If you have no other open apps on your iPad, then no apps will appear in your sidebar.
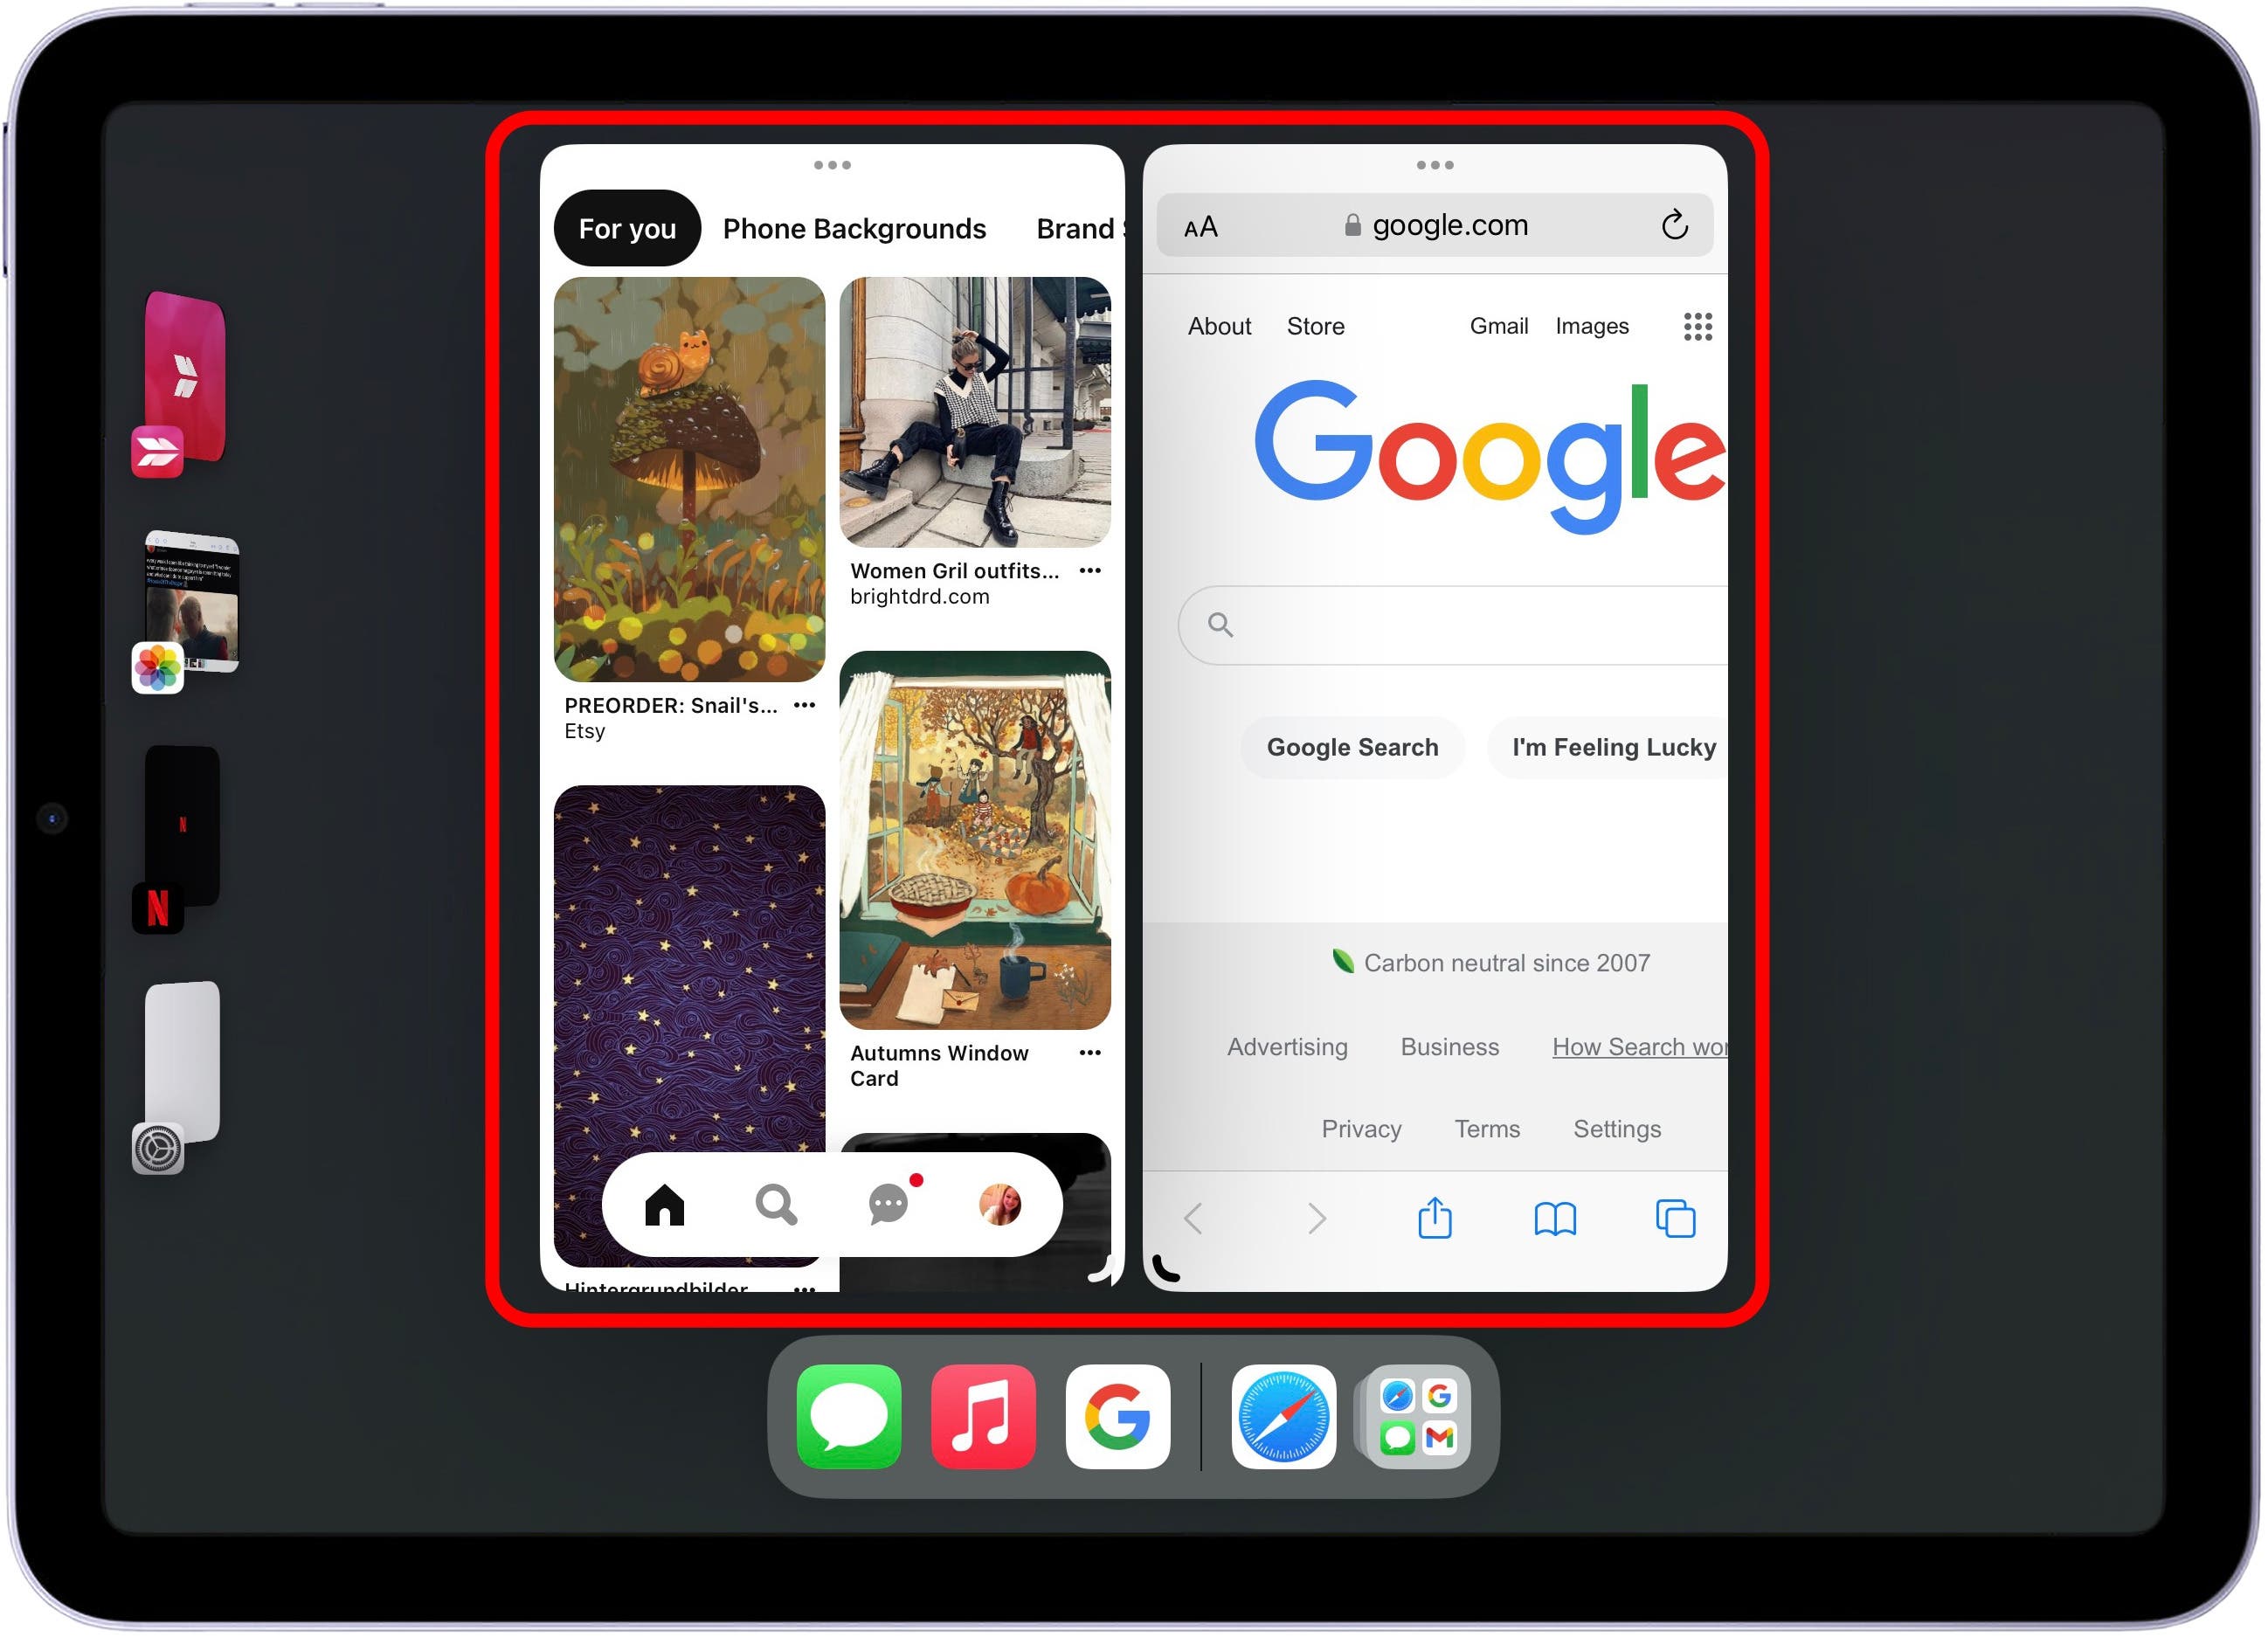
- Tap an app on the sidebar to switch to it. Tap and drag an app from the sidebar to add it to your currently open window.
- From here, you can now view multiple windows with either a split screen view.
- Or, by resizing the windows to your liking, one app can be slightly larger and overlap another, not unlike the way windows work on a computer.
- At this point, it seems only 3-4 windows are possible to have open in a single group. But you can group multiple windows and minimize the set up to the sidebar.
To do this, first make sure that the windows open are small enough to see the sidebar. You may have to close a window if you have three open. If the windows are too large, the side bar will minimize itself. Then, when the sidebar is visible, simply tap on a different open window group in the sidebar and it will automatically switch. This makes the sidebar work similarly to the way different desktops work on a Mac, and it really shows how far the iPad has come as a personal computer. To move a window back to the sidebar, tap the top of the app near the three dots, and drag it back over the sidebar.



Three-Dot Navigation Button
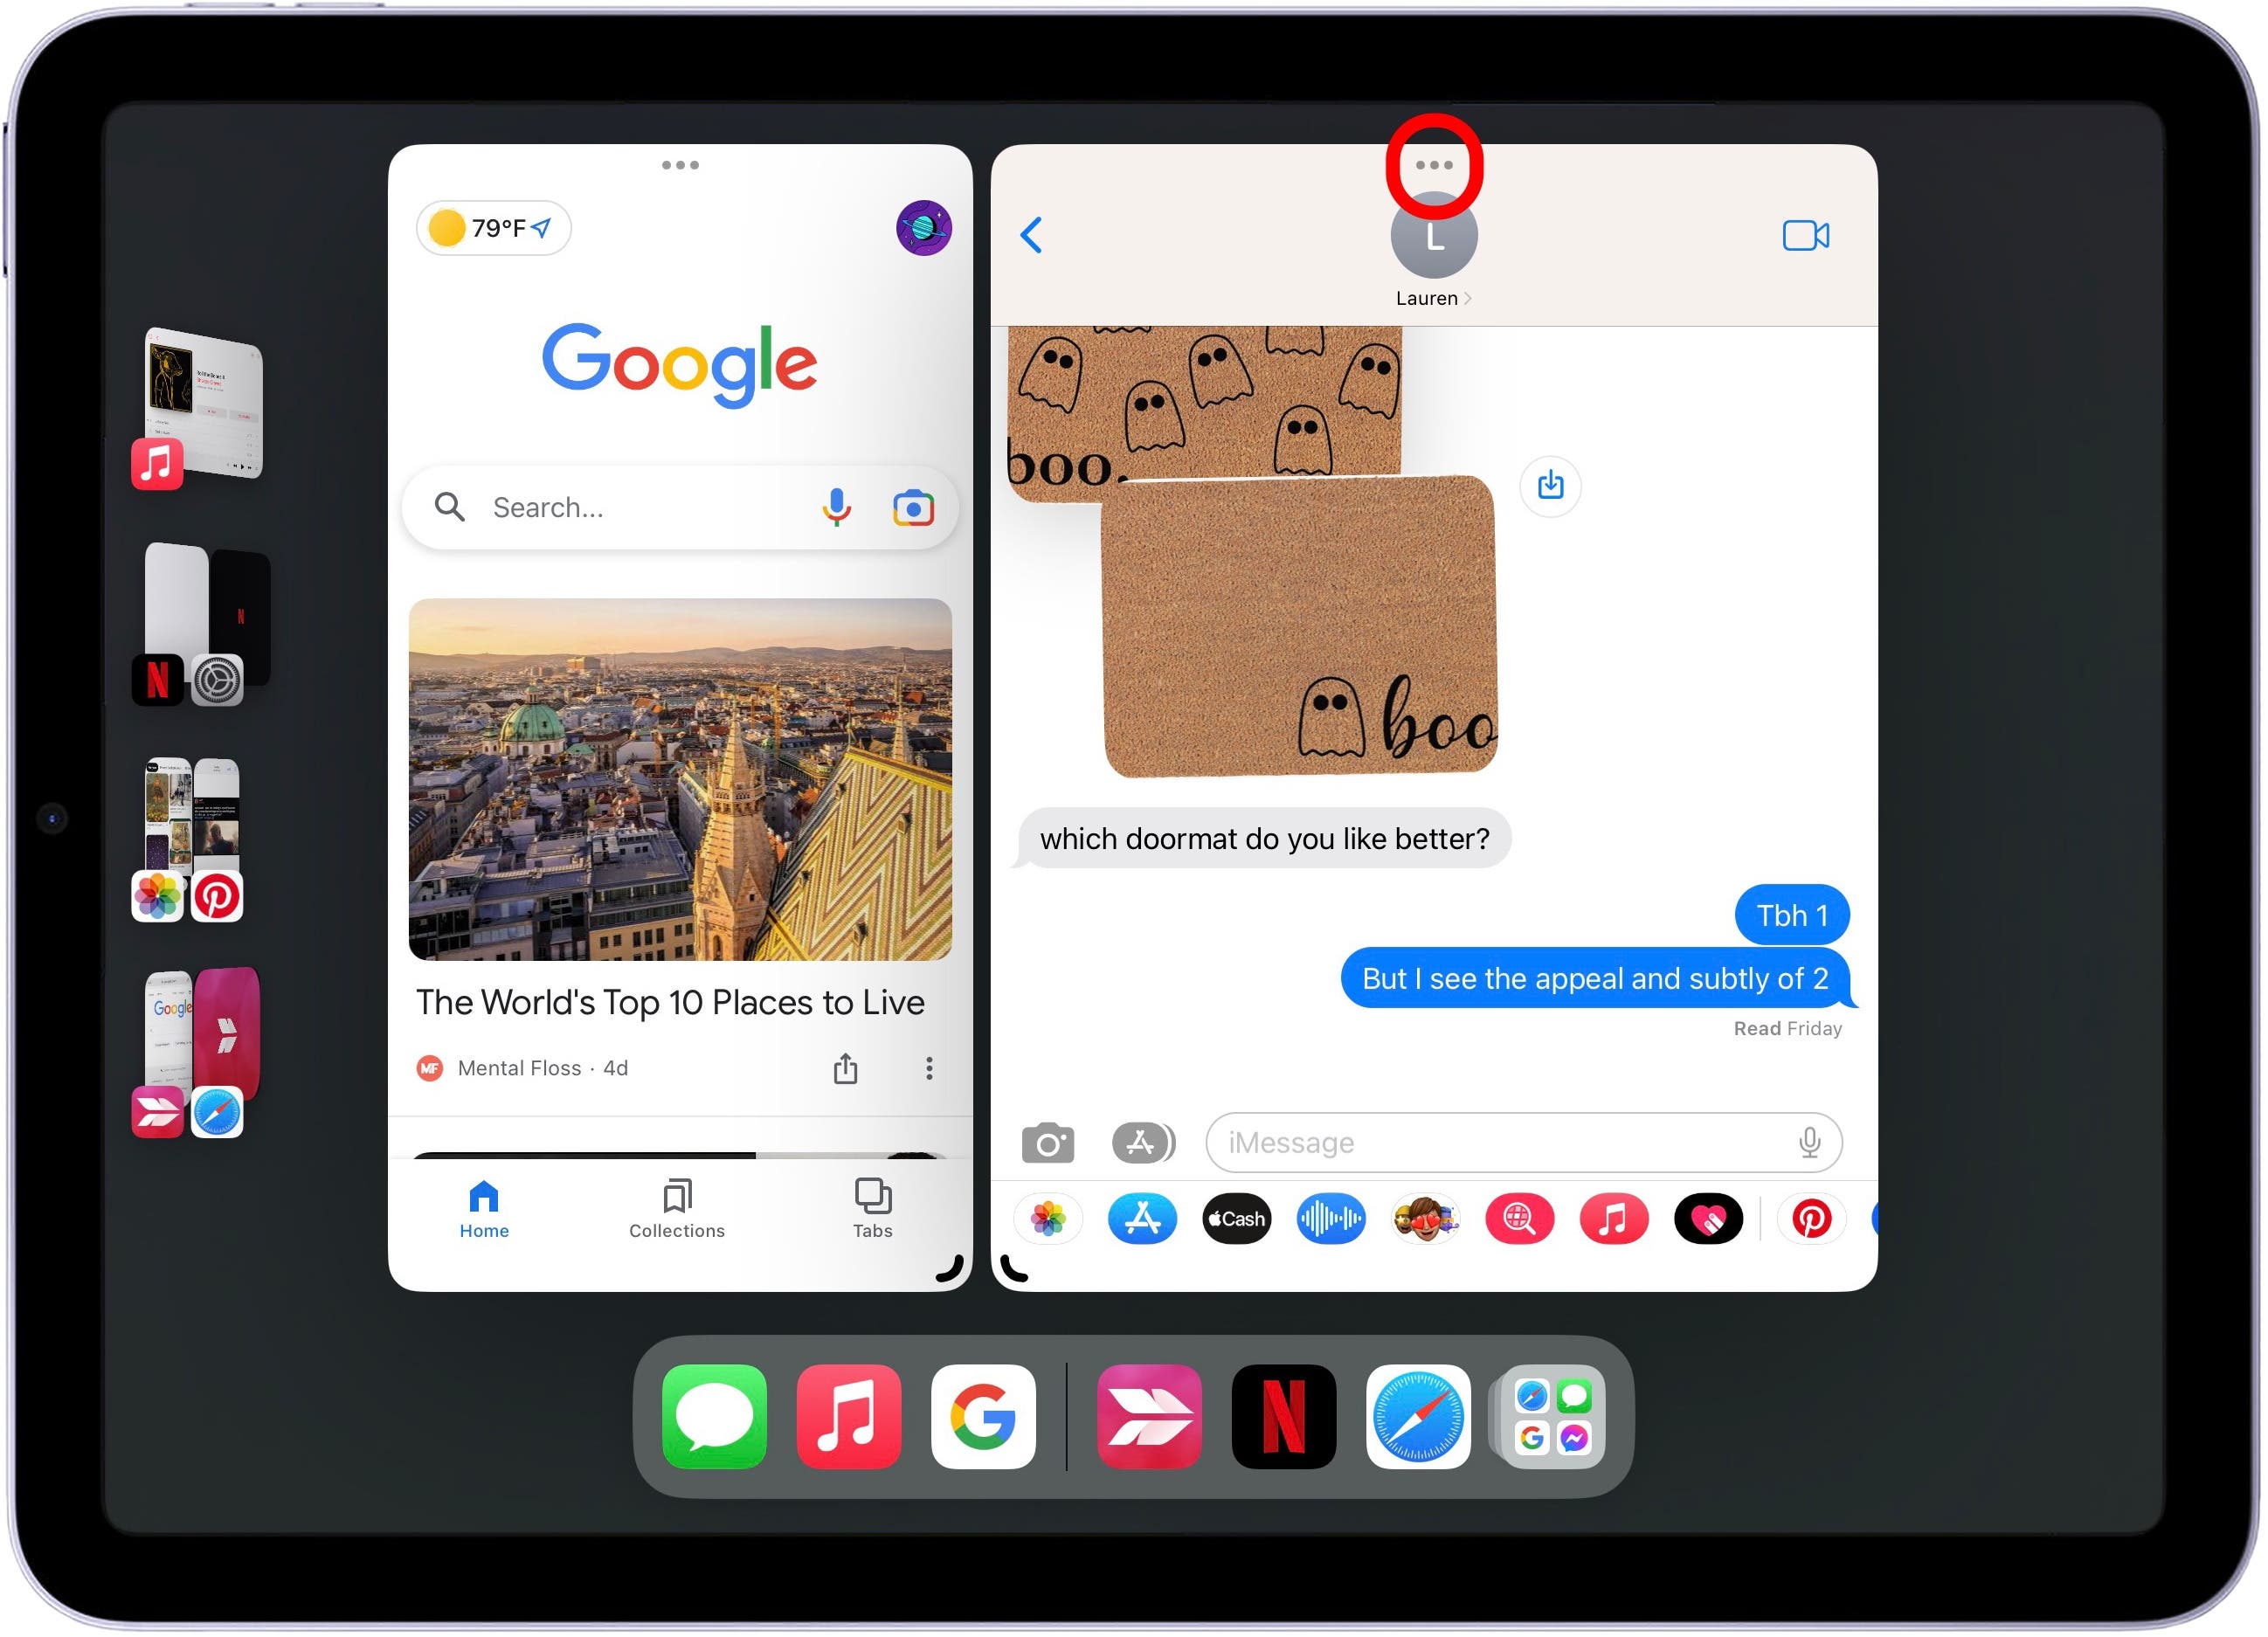
Another key to using Stage Manager is the little button at the top of each app that looks like three little dots.
- When you tap the dots, you will see a menu with four options: Zoom, Add Another Window, Minimize, and Close.
- If you tap Zoom, the app will return to the full-screen view in standard mode. Add Another Window allows you to add another window to your current open windows, unless there are already too many open at the time. Minimize will put the app back into the side bar. And lastly, Close will shut down the app completely.

After using with Stage Manager for a while, my opinion is that the multi-window interface is even more efficient than the classic split screen view on my MacBook. It is much easier to navigate the apps I’m working within, as well as being able to return quickly to the home screen with a simple swipe. One way I have really loved using the multi-window view is to watch Netflix or FaceTime while scrolling on Pinterest or Instagram.
This is something Stage Manager does so much better than Split Screen or Picture in Picture. While the entire video is not always wholly visible if you’re working in another app, the size and ease with which you can tap the video window make watching or chatting while working very convenient. Seeing the video is much less of an eye strain, the video is not always in the way of something on the screen, and it’s so much easier to click through the controls.

