How to Update HomePod to the Latest Version of iOS


What to Know
- Your HomePod will automatically update unless it is set otherwise.
- Go into your Home app, tap the more icon in the top right corner, tap Home Settings, then tap Software update to see if it's automatically updating.
- If it's not automatically updating, you can select an update to initiate it.
After you've downloaded the latest version of iOS to your iPhone or iPad, you'll need to make sure that your HomePod gets a software update, too. The HomePod automatically updates software, but sometimes there's a bit of lag time. Let's learn how to check if your HomePod has completed the download, and how to update the HomePod's software if an automatic update hasn't occurred.
How to Update HomePod Software
Your HomePod software updates automatically, but if an update hasn't gone through yet, here's how to update it manually. For more easy ways to get your devices working, check out our free Tip of the Day newsletter.
- Open the Home app on your iOS device, making sure you're logged in with the same Apple ID you used to set up your HomePod.

- Tap the more icon in the top right corner of your screen.

- Tap Home Settings.

- Tap Software Update.

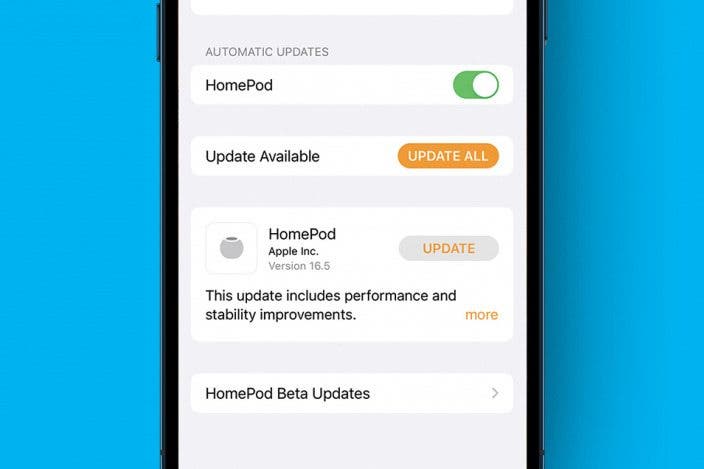
- If there is an update available that hasn't been installed, you'll see an option to UPDATE ALL next to Update Available and UPDATE next to your HomePod. Tap the first to update your HomePod and install other available updates, and tap the second to just update your HomePod.

- If HomePod isn't toggled on under Automatic Updates, toggle it on. The slider should be to the right and the bar green.

You'll be able to tell that your HomePod is updating software by the spinning white light on top. This light will remain on until the update is finished, which may take some time. Be sure to leave your HomePod plugged in for the duration of the update. Next, learn what to do when your HomePod won't turn on.

Leanne Hays
Leanne Hays has over a dozen years of experience writing for online publications. As a Feature Writer for iPhone Life, she has authored hundreds of how-to, Apple news, and gear review articles, as well as a comprehensive Photos App guide. Leanne holds degrees in education and science and loves troubleshooting and repair. This combination makes her a perfect fit as manager of our Ask an Expert service, which helps iPhone Life Insiders with Apple hardware and software issues.
In off-work hours, Leanne is a mother of two, homesteader, audiobook fanatic, musician, and learning enthusiast.

 Amy Spitzfaden Both
 Rhett Intriago

 Olena Kagui
 Cullen Thomas


 Susan Misuraca

 Rachel Needell
 Leanne Hays
