This section covers various methods to help you streamline your iPad workflow across multiple devices. Perhaps you simply want to sync certain content across your Apple devices or maybe you’d like to use your iPad as a second monitor. In either case, I’ll cover the different setups and requirements to help get you started.
Syncing Content across Devices
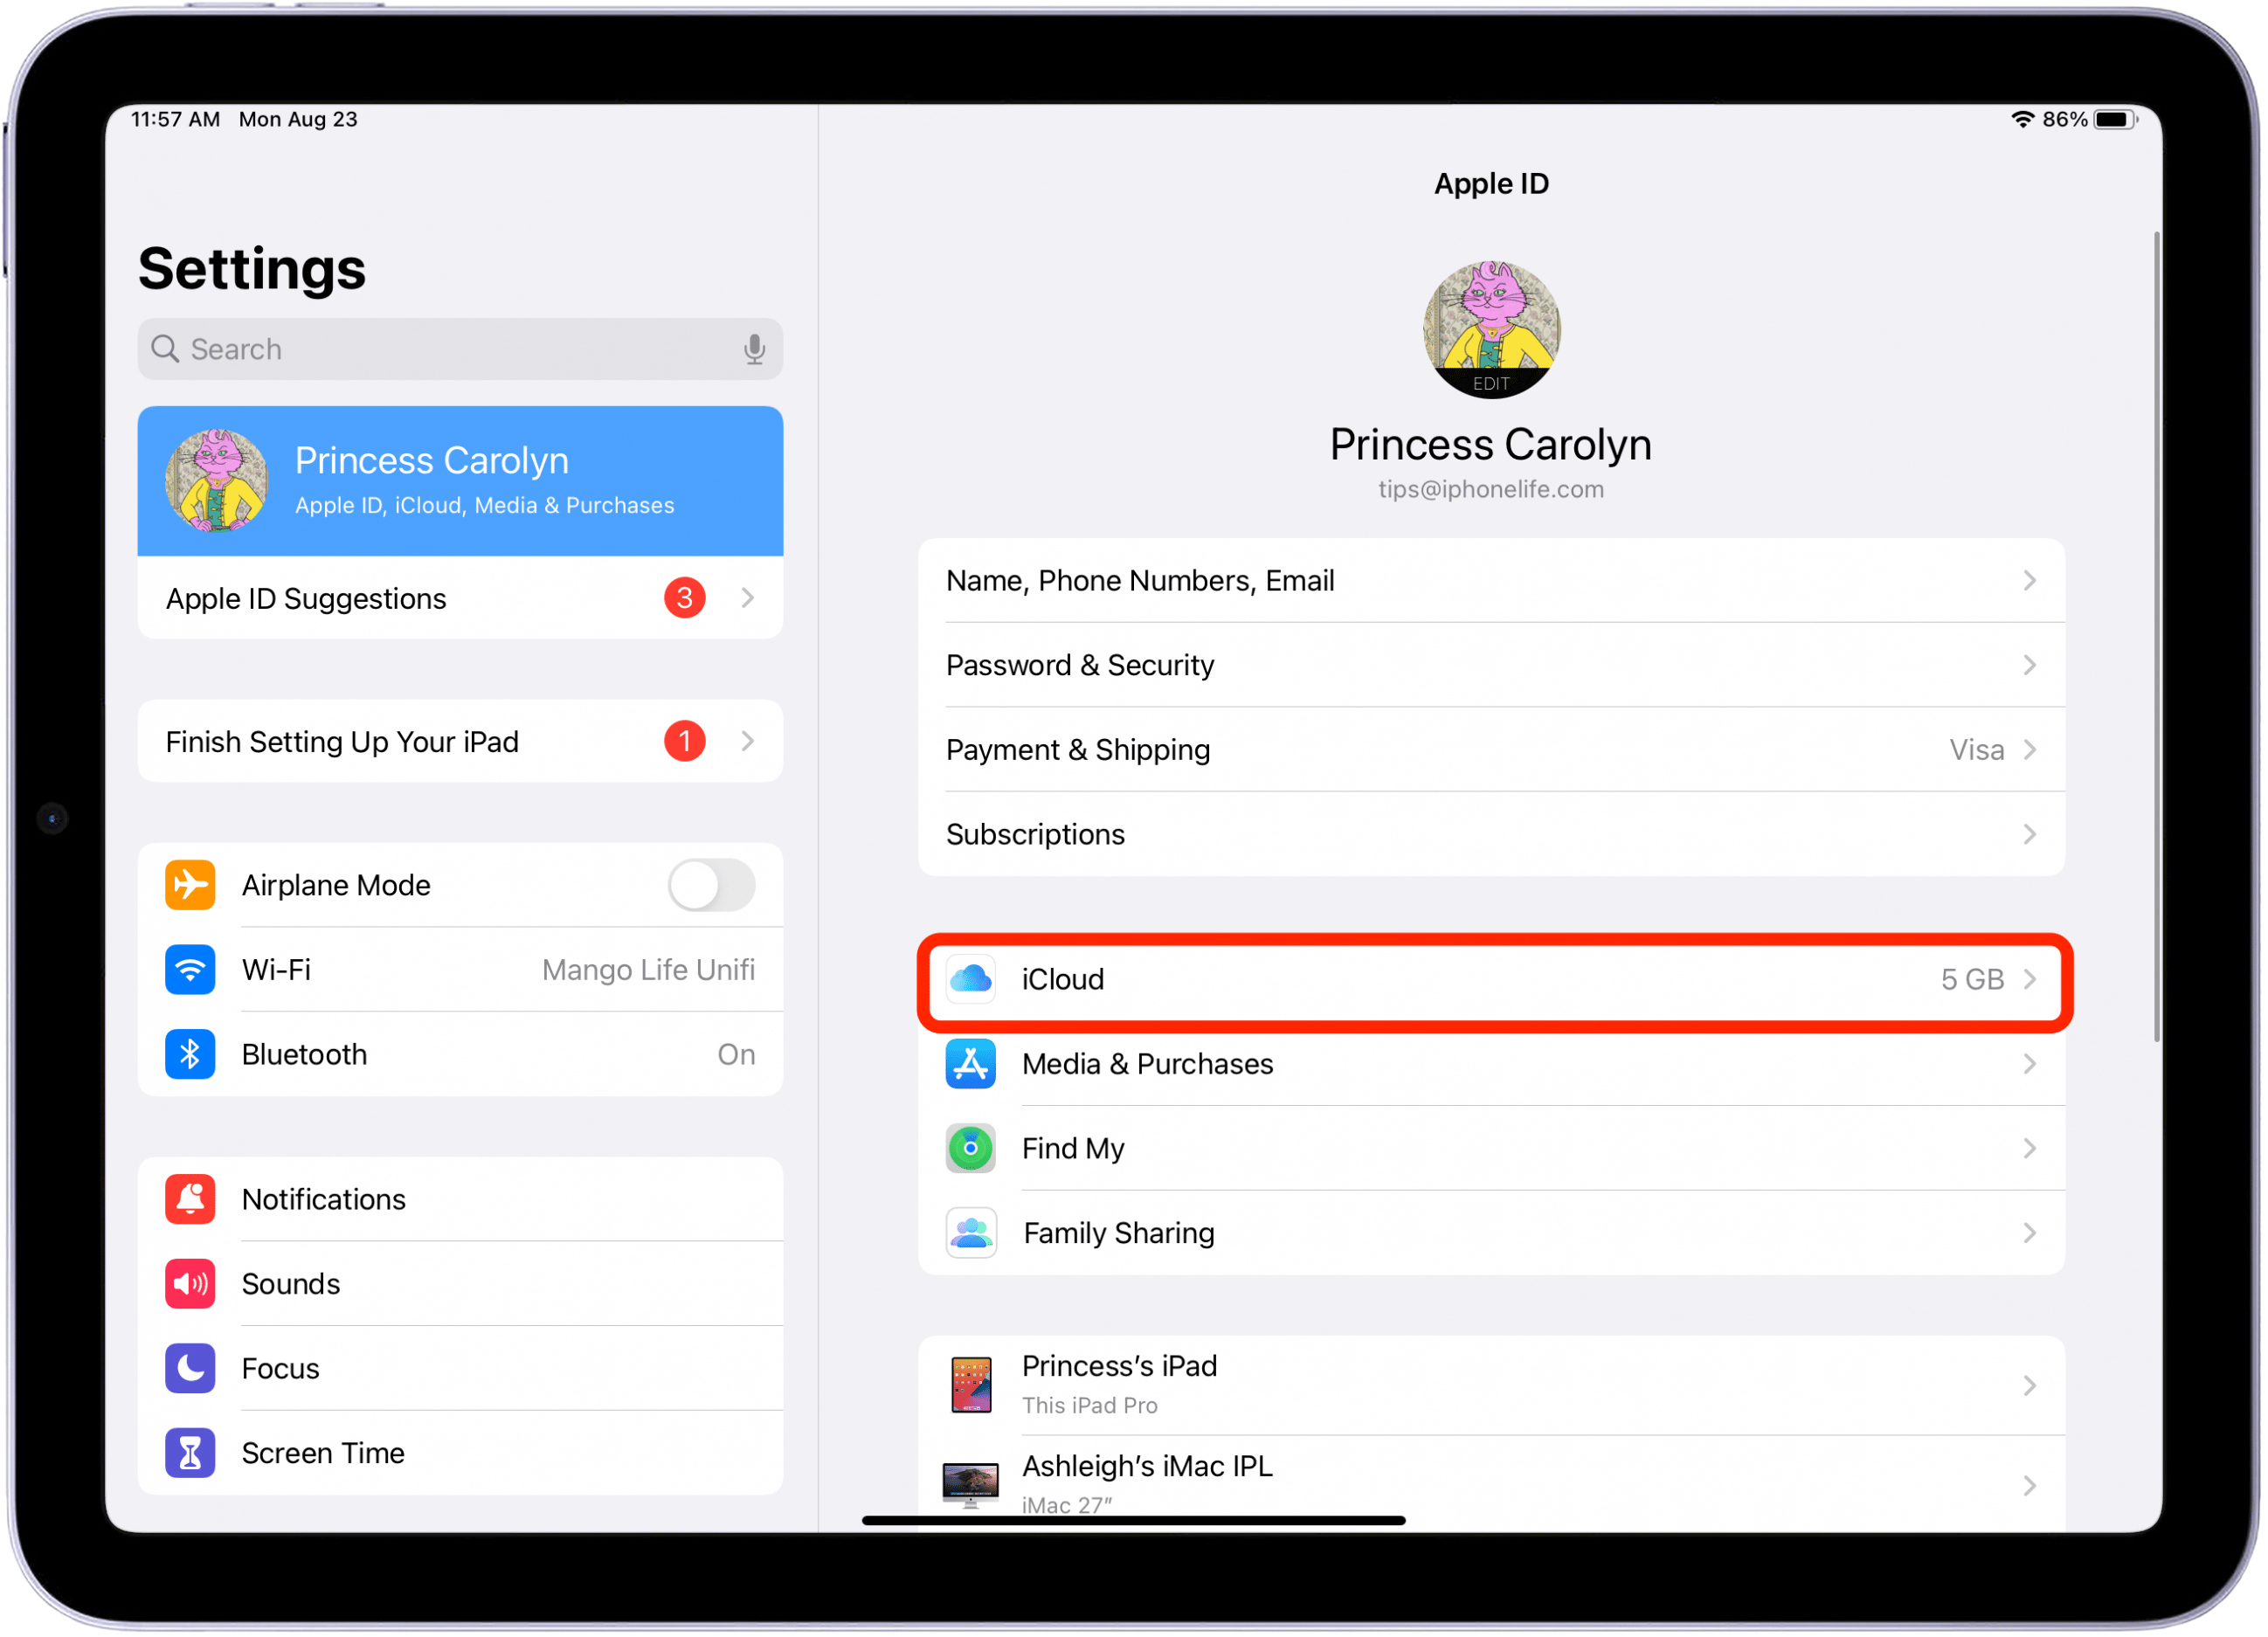
If you intend to sync or manage content across multiple devices, you should sign in with the same Apple ID to iCloud and the rest of Apple’s apps on your device. Your Apple ID is your ticket to connecting to all of Apple’s services, and signing in on all of your devices means your content and purchases will stay synced across devices. Then, you can simply enable iCloud for specific apps you’d like to sync across devices. To sync content:
-
Open Settings and tap your name at the top of the screen. Tap iCloud.
-
From here, you can tap the toggles next to specific apps (such as Contacts, Calendar, and Photos) to store content in iCloud and sync across devices.
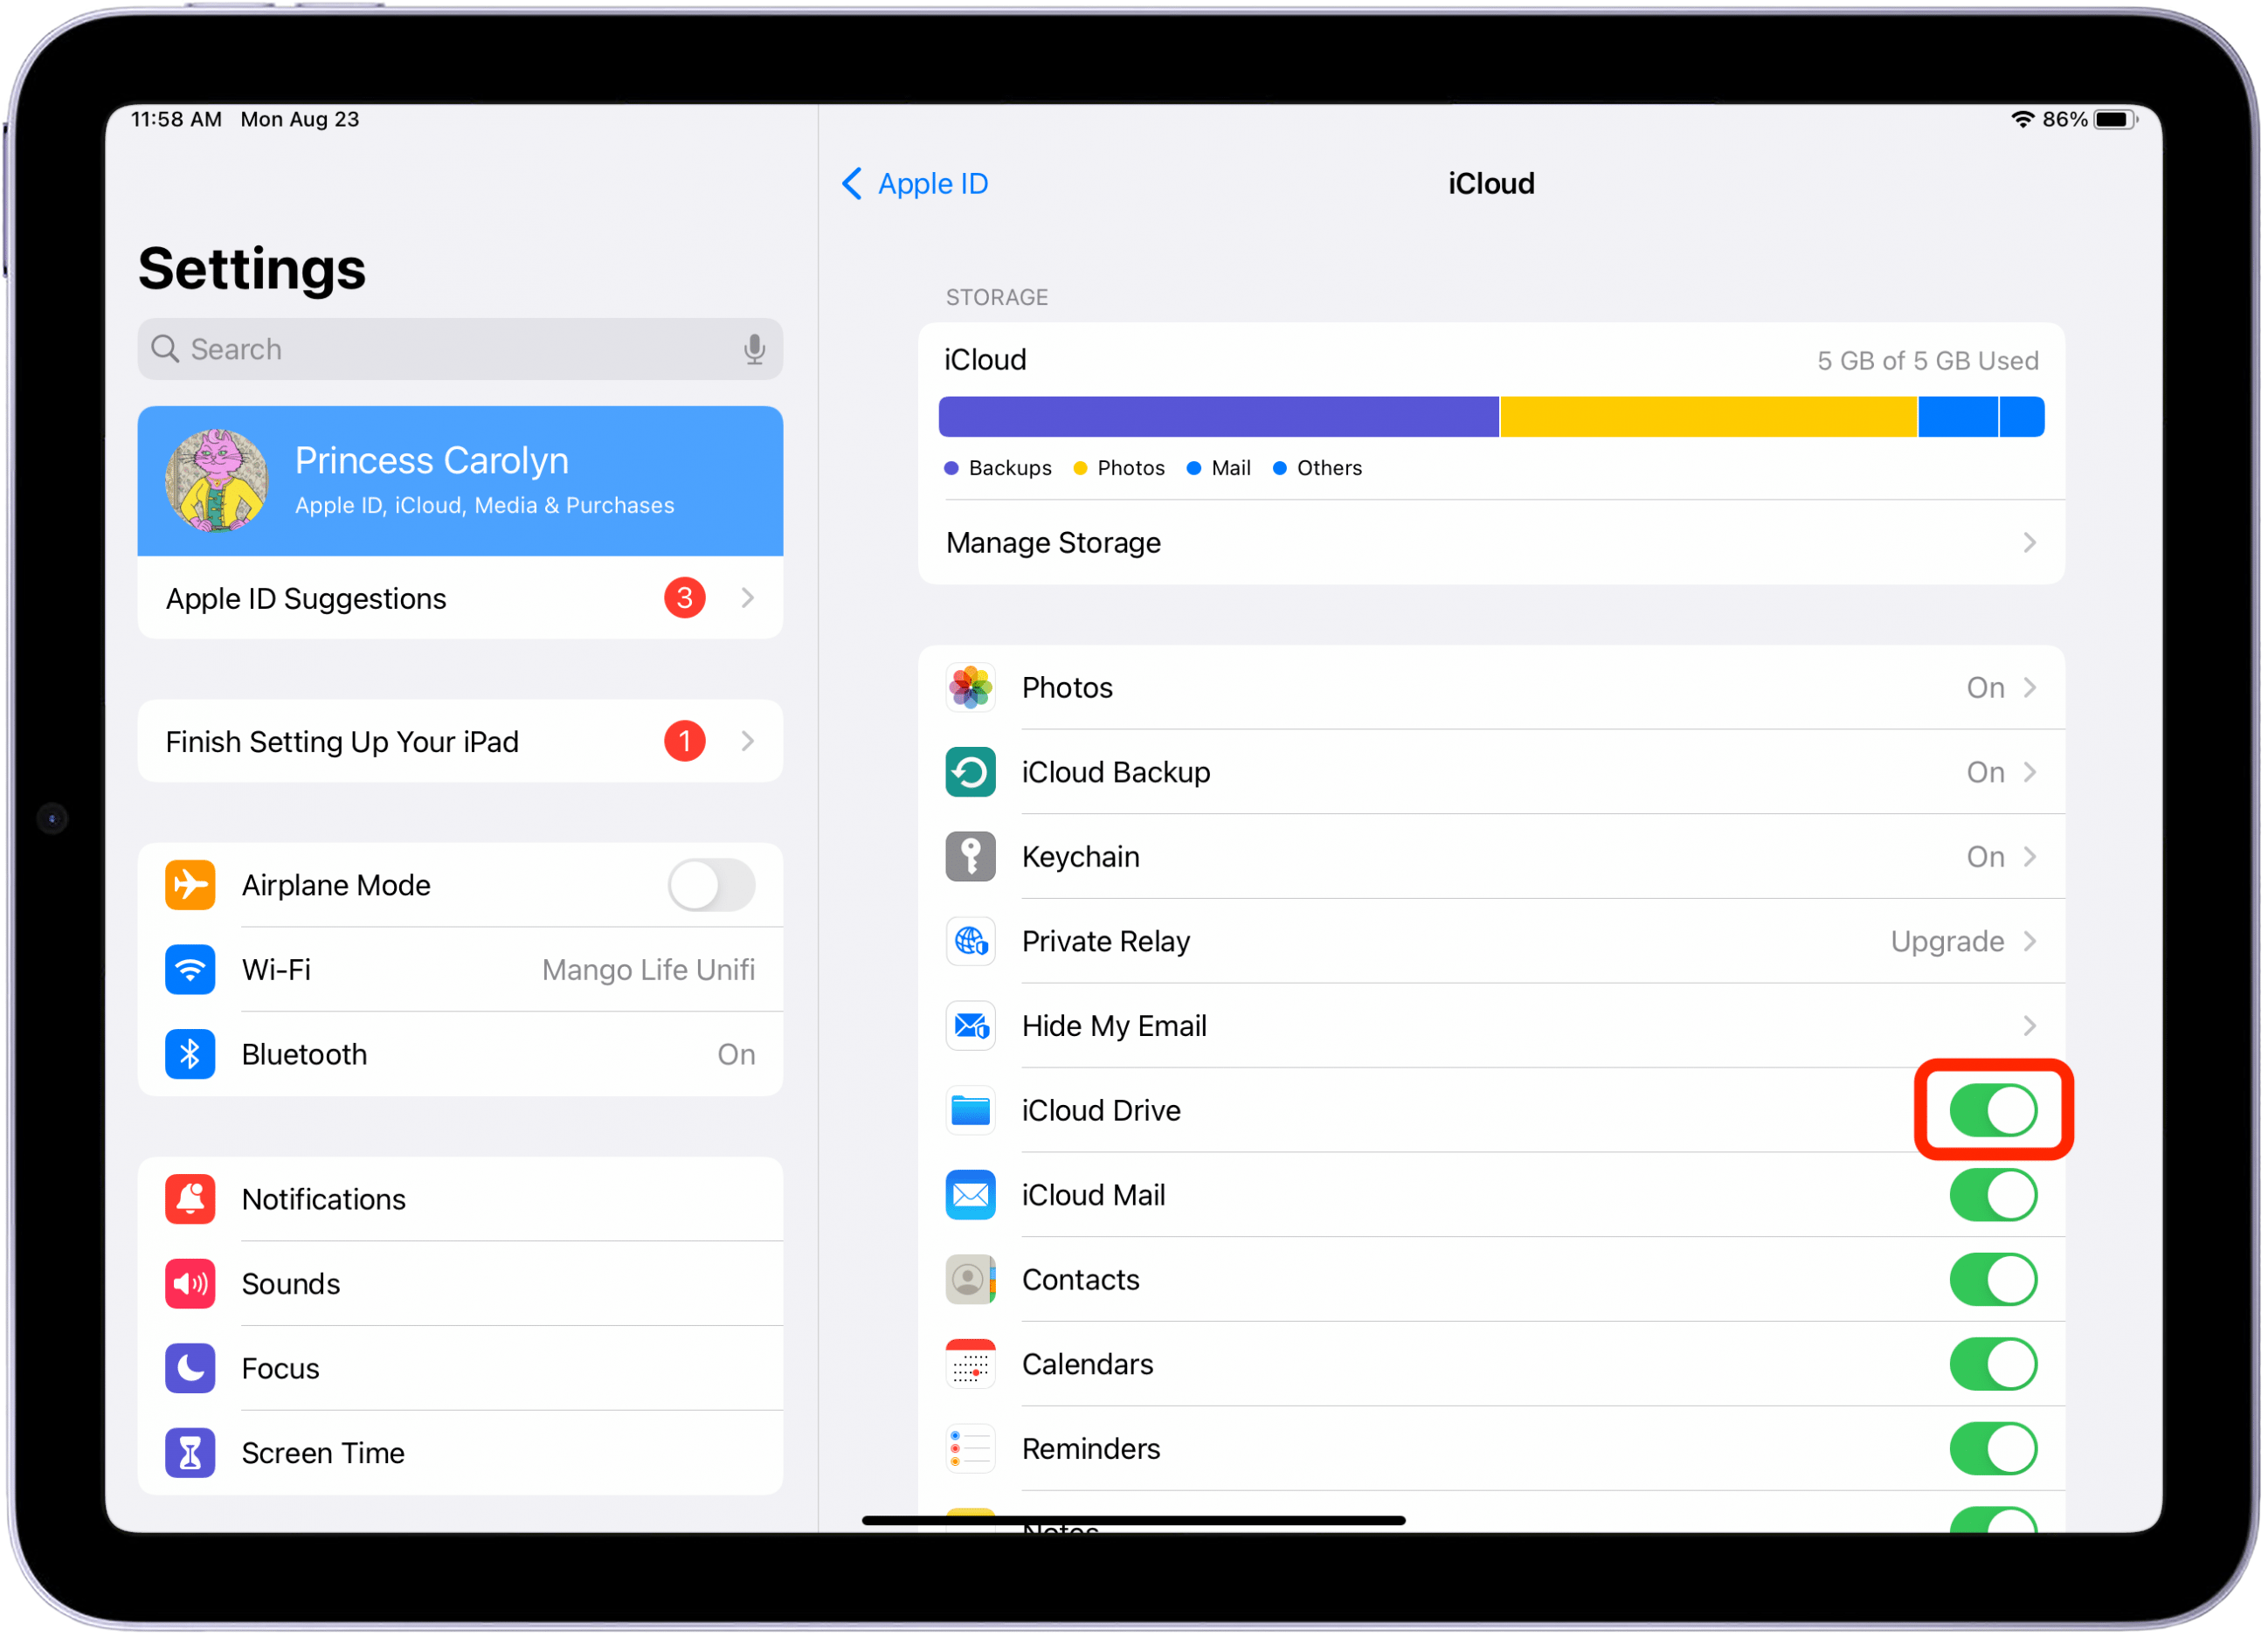
I highly recommend syncing your passwords and credit card info across devices. From the iCloud screen above, tap Keychain and tap the toggle next to iCloud Keychain. If you’re setting it up for the first time, you’ll be led through a short setup process.
If you already have it on your iPhone or Mac, you’ll be asked to enter your iCloud Security Code, which is a 4- or 6-digit code you created during setup that lets you allow extra devices to access your keychain passwords. Then when you enter passwords while using Safari, you’ll see suggested passwords—or, if it hasn’t stored it already—the option above your keyboard to store the password for next time.
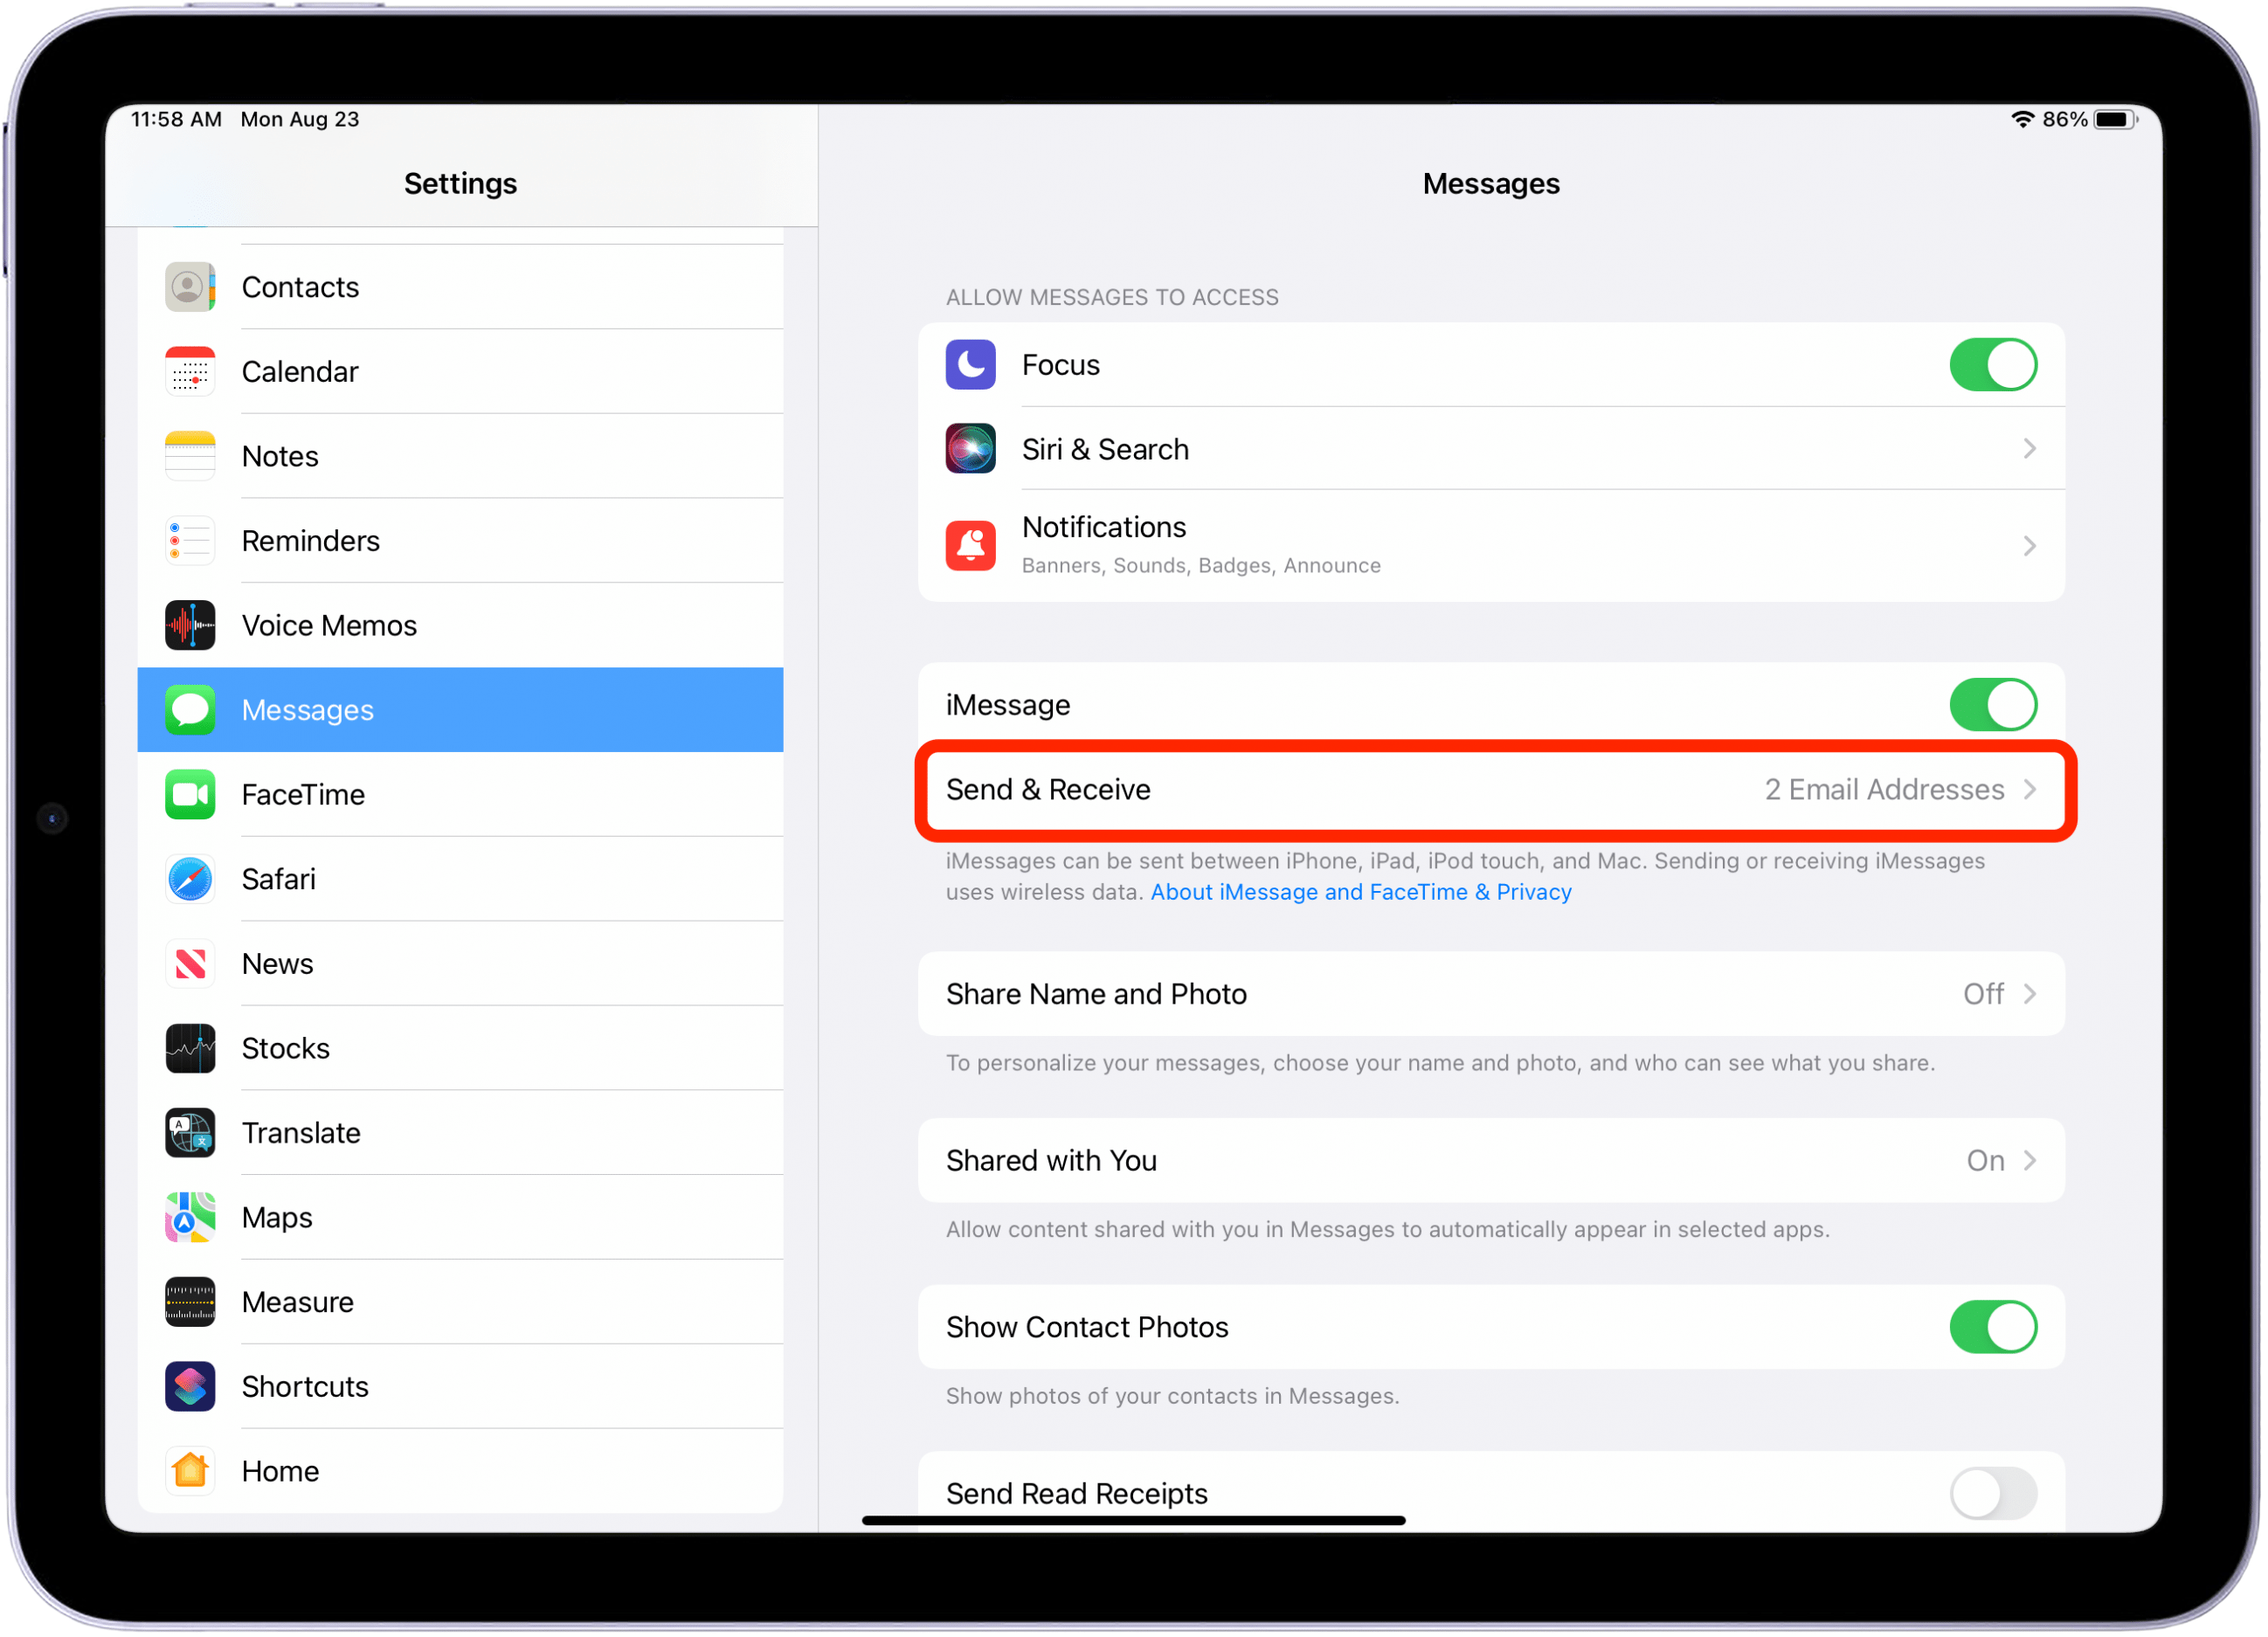
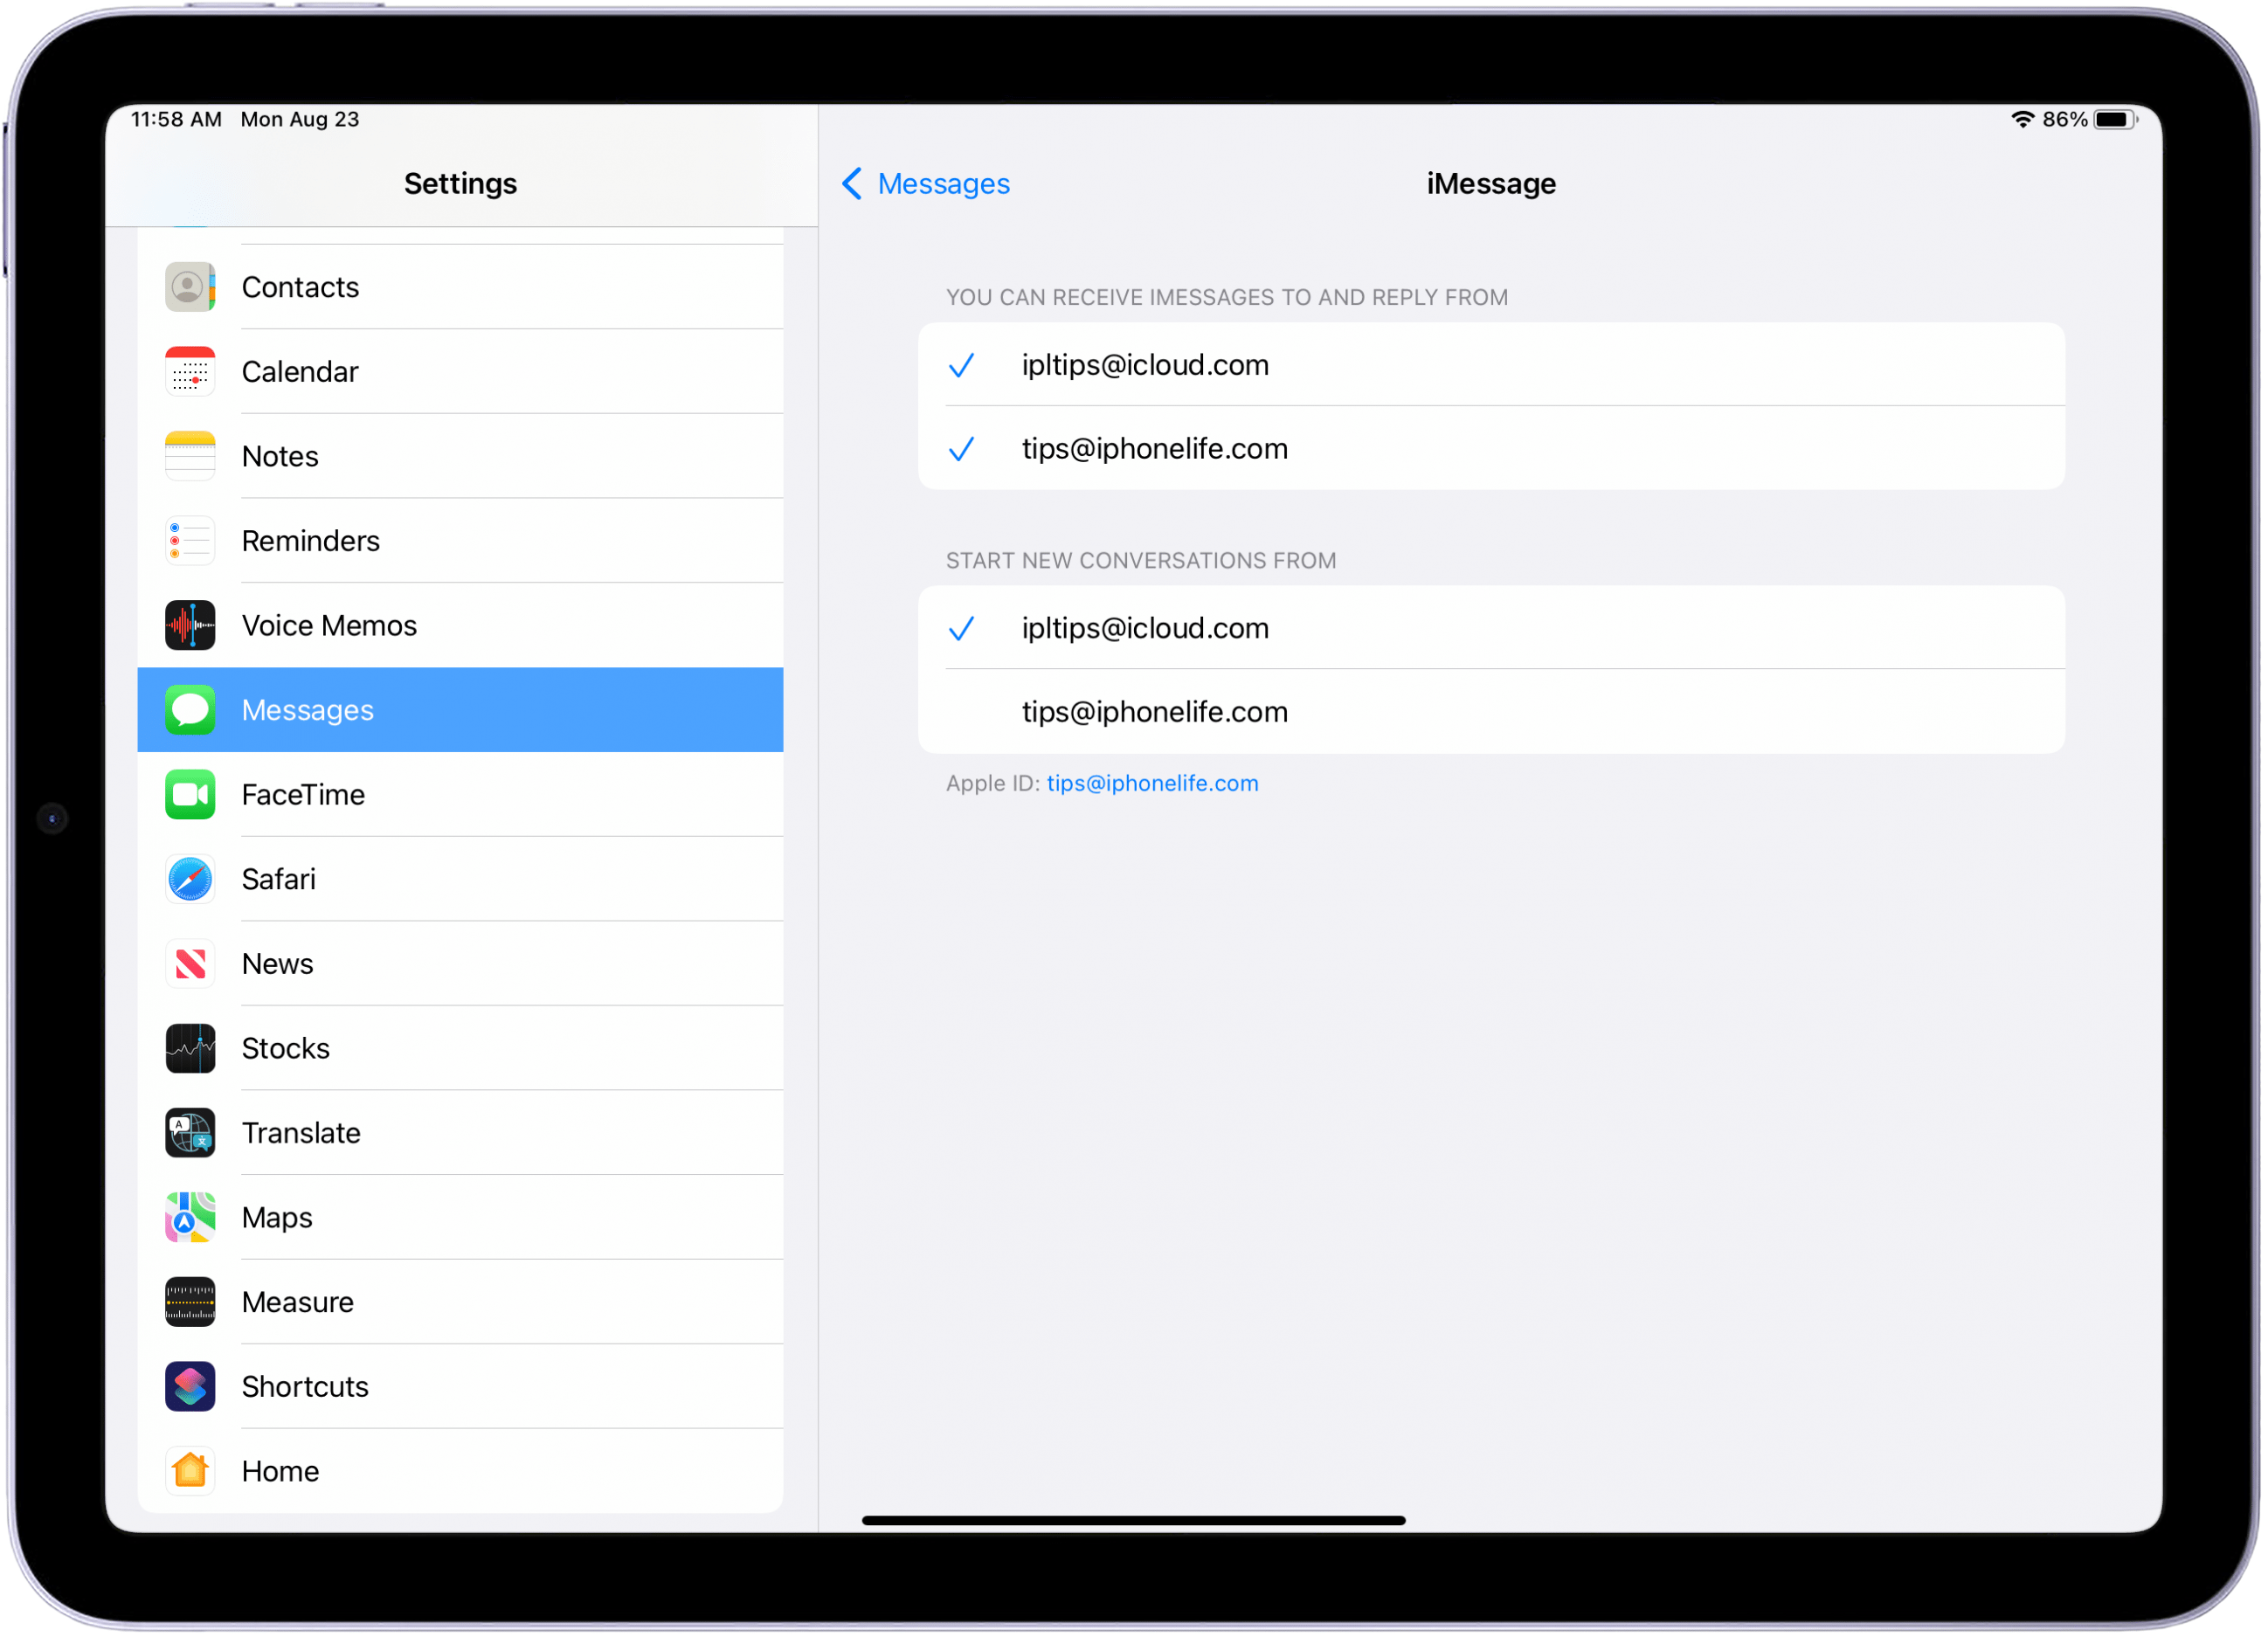
While it’s really useful to have all your info synced across devices, there may be reasons you wouldn’t want to. For instance, if you use your iPad at work and it’s logged in to your personal iCloud account, you may not want to receive your personal texts to your work device. Therefore, in Settings > Messages, don’t enter your Apple ID under Send & Receive, but instead use your work email address. Then you’ll just get texts that people sent specifically to your work email.
Using Universal Control
Universal Control is a feature that allows you to place up to three Apple devices close together and use a single keyboard and mouse or trackpad across devices. Then, you can easily drag and drop files between devices and switch between them as needed. Rather than just using your iPad as a second monitor (like you would with Sidecar), Universal Control allows you to use your Mac and iPad as linked devices, while maintaining each device’s separate displays and content access.
At the time of writing, this feature has been announced but not released. Read below to learn how to set up your devices to use Universal Control.
Device Compatibility
In order to use Universal Control, you need Apple devices that are running iPadOS 15 and macOS 12 software.
Supported Macs:
-
MacBook (2016 or later)
-
MacBook Air (2016 or later)
-
MacBook Pro (2016 or later)
-
iMac (2017 or later)
-
iMac Pro
-
Mac mini (2018 or later)
-
Mac Pro
Supported iPads:
-
iPad mini (fifth-generation or later)
-
iPad (sixth-generation or later)
-
iPad Air (third-generation or later)
-
iPad Pro
Setting Up Universal Control
-
All devices need to be connected to the same Wi-Fi network, and must be within 30 feet of each other.
-
Each device will also need to have Bluetooth enabled and Handoff turned on. To turn on Handoff, open Settings, tap General, tap AirPlay & Handoff, and tap the toggle next to Handoff.
-
Each device needs to be signed into iCloud with the same Apple ID.
-
Place your iPad near a compatible Mac, and you will be able to pair your devices together via Continuity features in the AirPlay & Handoff section under your Mac's settings.
-
A gray bar will appear on the side of your paired devices. Drag your cursor to the edge of the screen of your device, and continue dragging in the same direction to move your cursor to the other device screen. This is especially useful for dragging documents and images between your Apple device.
Continuing Tasks on Multiple Devices with Handoff
Handoff lets you start a project on one device (such as your iPad) and then continue it on another device (such as your Mac). If you're reading a web page on your iPad, for example, and you then sit down in front of your Mac, an icon will appear on the Mac that, with a click, will let you continue reading that same page on your Mac.
Set Up Handoff
To use Handoff, you have to first make sure that it's enabled on your iPad. You do this by going to Settings > General > AirPlay & Handoff and then toggling on Handoff.
You’ll also need to enable Handoff for any Apple device you’ll be switching tasks between. To enable Handoff on a Mac, open Settings, tap General, and select Allow Handoff between this Mac and your iCloud Devices. To enable Handoff for an iPhone, open Settings, select General, tap AirPlay & Handoff and then toggle on Handoff.
To use this feature, you'll need to be running iOS 8 or later on your iOS device, and you'll need a Mac that's from 2012 or later. You’ll also need to make sure all devices are connected to the same iCloud account, have Bluetooth enabled, and have Wi-Fi turned on.
Handoff in Action
To get started, you’ll need to open an app that works with Handoff (Safari, Reminders, Mail, etc.).
-
Start a task within an app on one of your Apple Devices enabled for Handoff. For example, you could search for a recipe in Safari or begin an email in Mail.
-
Then, switch to your other device. The way you open your task will vary depending on which device you are moving to. If you are moving a task to your iPhone, then you will need to open the App Switcher. This is done by swiping up from the bottom of your screen to the middle of your screen, or double tapping the Home button. If you are moving a task to your iPad, then you’ll see the app’s icon in your Dock. You’ll also notice a badge on it, letting you know what device you’re switching from.
Turn Your iPad into a Second Monitor with Sidecar
Want to use your iPad as a monitor for your Mac? Sidecar has you covered! With macOS Catalina (or later) and iPadOS 13 (or later), you can use a feature called Sidecar to turn your handy iPad into a second screen. 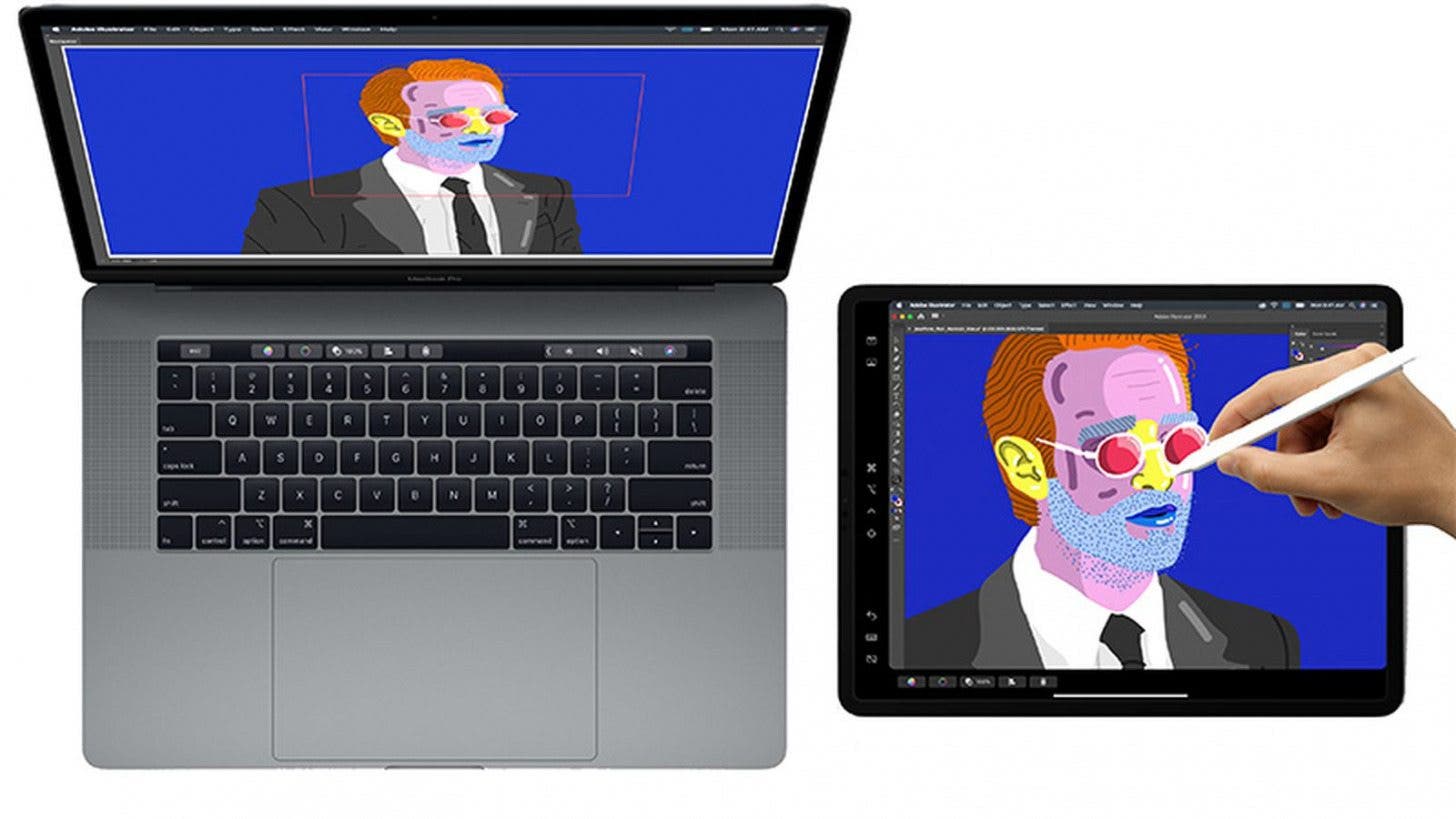
What You Need for This Feature to Work
-
Your iPad must be one of the following: iPad Pro, iPad (6th gen or later), iPad mini (5th gen), iPad Air (3rd gen).
-
Your iPad must have iPadOS version 13 or higher.
-
Your Mac model must be one of the following: A MacBook Pro, MacBook, or iMac introduced in 2016 or later; A MacBook Air or Mac Mini introduced in 2018 or later; An iMac Pro; or a Mac Pro introduced in 2019 or later.
-
Your Mac must have macOS Catalina software or later.
-
Both your Mac and iPad must be logged in to the same Apple ID.
-
Bluetooth, Wi-Fi, and Handoff must be turned on for both devices.
-
The two devices must be within 10 meters of each other.
Once you've met the requirements, this feature is remarkably easy to use.
How to Use Sidecar
To get started, click the AirPlay menu at the top of your Mac’s screen. The menu icon looks like a rectangle with a triangle at the bottom. Select your iPad's Name from the list of AirPlay options. Then the iPad will turn into a second monitor! To set the iPad to mirror your Mac's screen, select the Mirror option corresponding to the display you want the iPad to match. To extend your Mac desktop onto the iPad, select Use As Separate Display. To Disconnect, click the AirPlay menu, and then click Disconnect.
Note: When an iPad is paired with a Mac using Sidecar, you can use the Apple Pencil as a stylus in Photoshop or any other advanced drawing software. Just run the app on the Mac, then move the app's window onto the iPad screen, and pencil away. Neat, huh?
Making & Receiving Cellular Calls on iPad
Did you know you can extend your iPhone’s cellular call capabilities to your iPad? This makes it easy to get to work on whatever device is most convenient, knowing you can hop on a call at any moment. Here’s how to do it:
Checking Call Settings
Make sure your iPad and iPhone are connected to the same Wi-Fi network and that you’ve signed in to iCloud and FaceTime on both devices with the same Apple ID. Finally, in Settings on your iPad, go to FaceTime, and make sure to enable Calls from iPhone.
Making & Receiving Calls
Once you have your settings in place, you can initiate calls from your iPad by tapping a phone number in apps like Contacts, Calendar, or Safari. You can also make calls in FaceTime by entering a phone number in the search field and tapping the result to call. When someone calls you, you’ll have the option to answer it on your iPhone or your iPad. If you answer on your iPad, you’ll see a blue bar at the top of your screen giving you the option to switch the call to your phone.
Setting Up SMS on iPad
You can also extend your texting capabilities to your iPad from an iPhone when you’re connected to the same Wi-Fi network. This means you can stay in touch with Android users on your iPad, instead of just fellow Apple users. First you’ll want to tweak a few Messages settings on your devices.
-
On your iPhone and iPad, go to Settings > Messages > Send & Receive, and make sure you’re signed in with the same Apple ID.
-
Tap to select your phone number and email address, so you can receive messages using either. (A phone number will only be displayed if your iPad is set up for SMS.
Once you’ve done this, you’ll be able to use your iPad for all of your texting, as long as you’re on the same Wi-Fi network as your iPhone.

