Buttons and Ports on an iPhone without a Home Button

- Front-facing HD camera
- Side button
- SIM card tray
- Lightning connector port
- Volume buttons
- Ring/Silent switch
- Rear camera
- Quad LED True Tone flash
The Side Button
The Side button along the right side of the iPhone X is used in a variety of ways:
- When your iPhone is off, you press and hold this button to power your iPhone back on.
- You can also press the Side button to put your phone in Sleep mode (where the screen is black).
- If you want to "wake" your iPhone (illuminate the screen) to check the time or check for notifications, then you can also press the Side button when your screen is black, and it will light up.
Volume Buttons
The two buttons on the left side of your device are your volume buttons.
The top button turns the volume on your phone up; the bottom button turns your volume down. By default, this will only adjust the volume of things like music, videos, and other media.
You can adjust your ringer volume with your volume buttons. Learn how to do this in the section below.
Adjust Your Ringer and Alerts with the Volume Buttons
- Open the Settings app.
- Tap Sounds & Haptics.
- Under Ringer and Alerts, toggle on Change with Buttons.
![]()
![]()
![]()
With that setting toggled on, you will still be able to adjust video and music volume as you are interacting with media content, but now you can adjust ringer volume from other pages.

Ring/Silent Switch
Also located on the left side of your device is a switch that allows you to easily silence your iPhone without having to adjust and readjust the volume levels. Simply slide the switch downward, and all calls and notifications will be silenced—that means no embarrassing interruptions while you're in the movie theater. Once you are ready to turn your sound back on, you can flip the switch upward, and voila! Your phone will ring again as usual.

Lighting Port
Your Lightning port is located along the bottom of your device. This is used to charge your iPhone and, if you have a Lightning to headphone jack adapter, to listen to audio through your wired headphones.
Navigating the iPhone without a Home Button

Waking Your Device
When your iPhone is turned on, but the screen is black, that means your iPhone is currently "asleep." To "wake" your iPhone (in other words, to illuminate the screen), simply press the Side button. Pretty simple!
Raise to Wake
This feature allows you to wake your iPhone by picking it up, which is super convenient when you want to quickly check the time or see if you have any notifications awaiting you. And with the iPhone X or later, this feature goes a step further: you can wake your device just by tapping the screen.
To turn on Raise to Wake:
- Open Settings.
- Tap Display & Brightness.
- Toggle on Raise to Wake.
![]()
![]()
![]()
Always-On Display
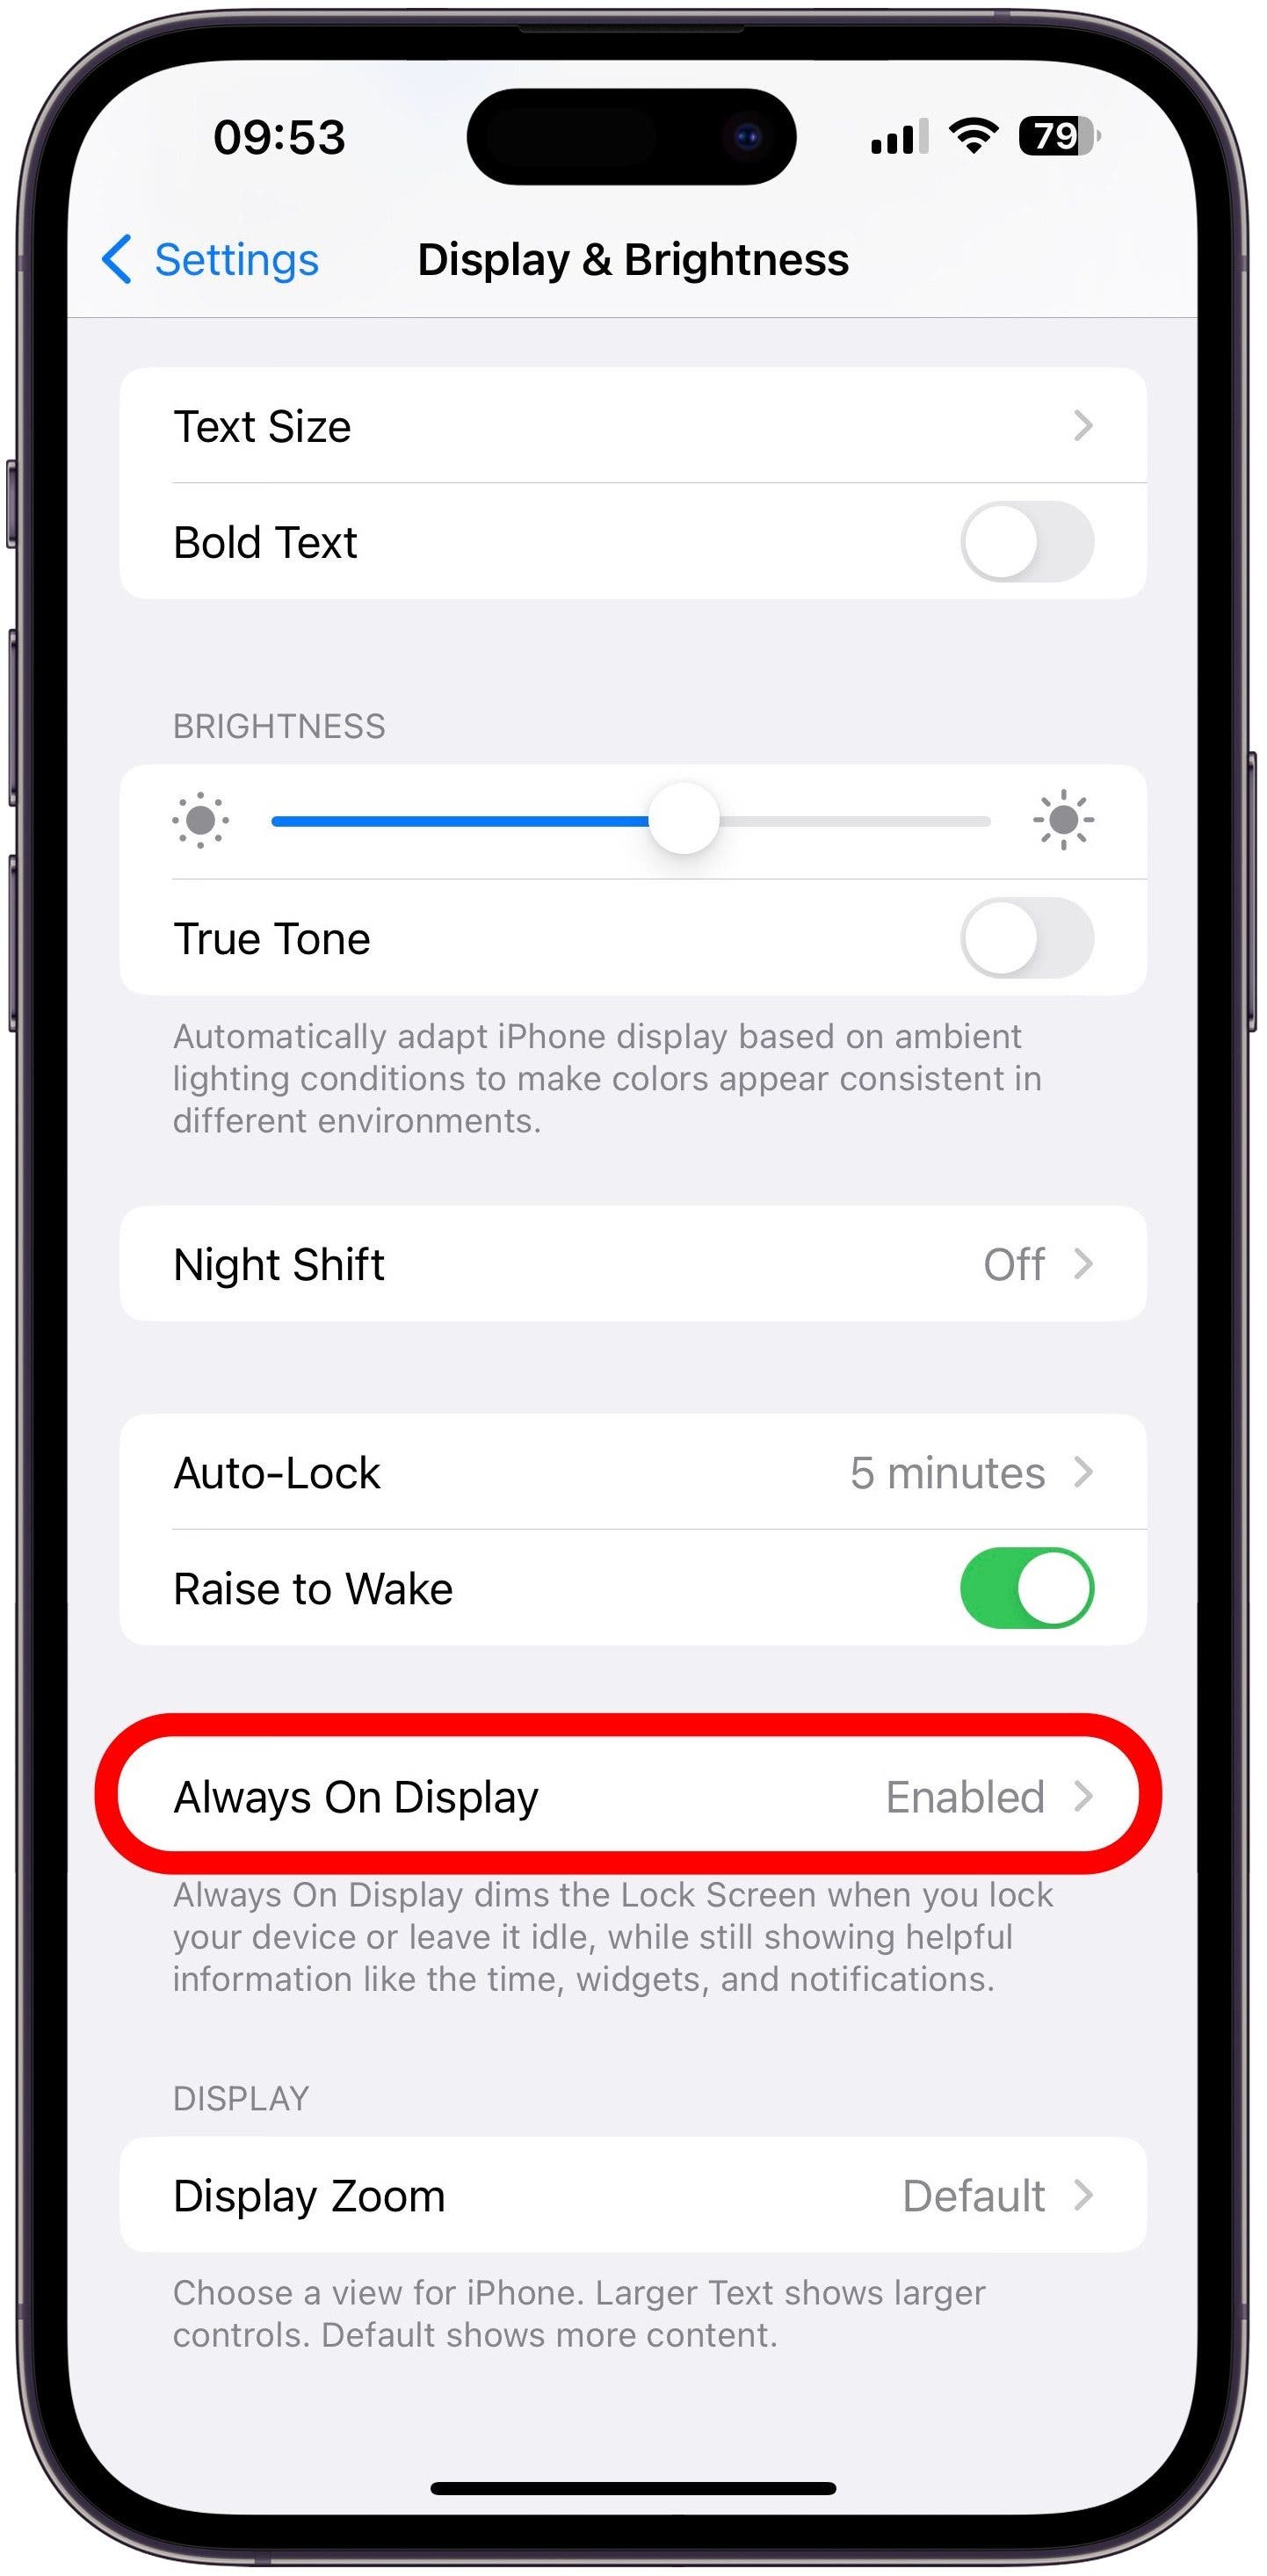
The iPhone Always-On Display is a feature of the iPhone 14 Pro and iPhone 14 Pro Max. Always-On Display uses a low-power mode to limit power consumption while still showing useful information on your Lock Screen. This setting displays useful information on the Lock Screen while keeping it dim, but not everyone loves this feature. If you would like to disable it:
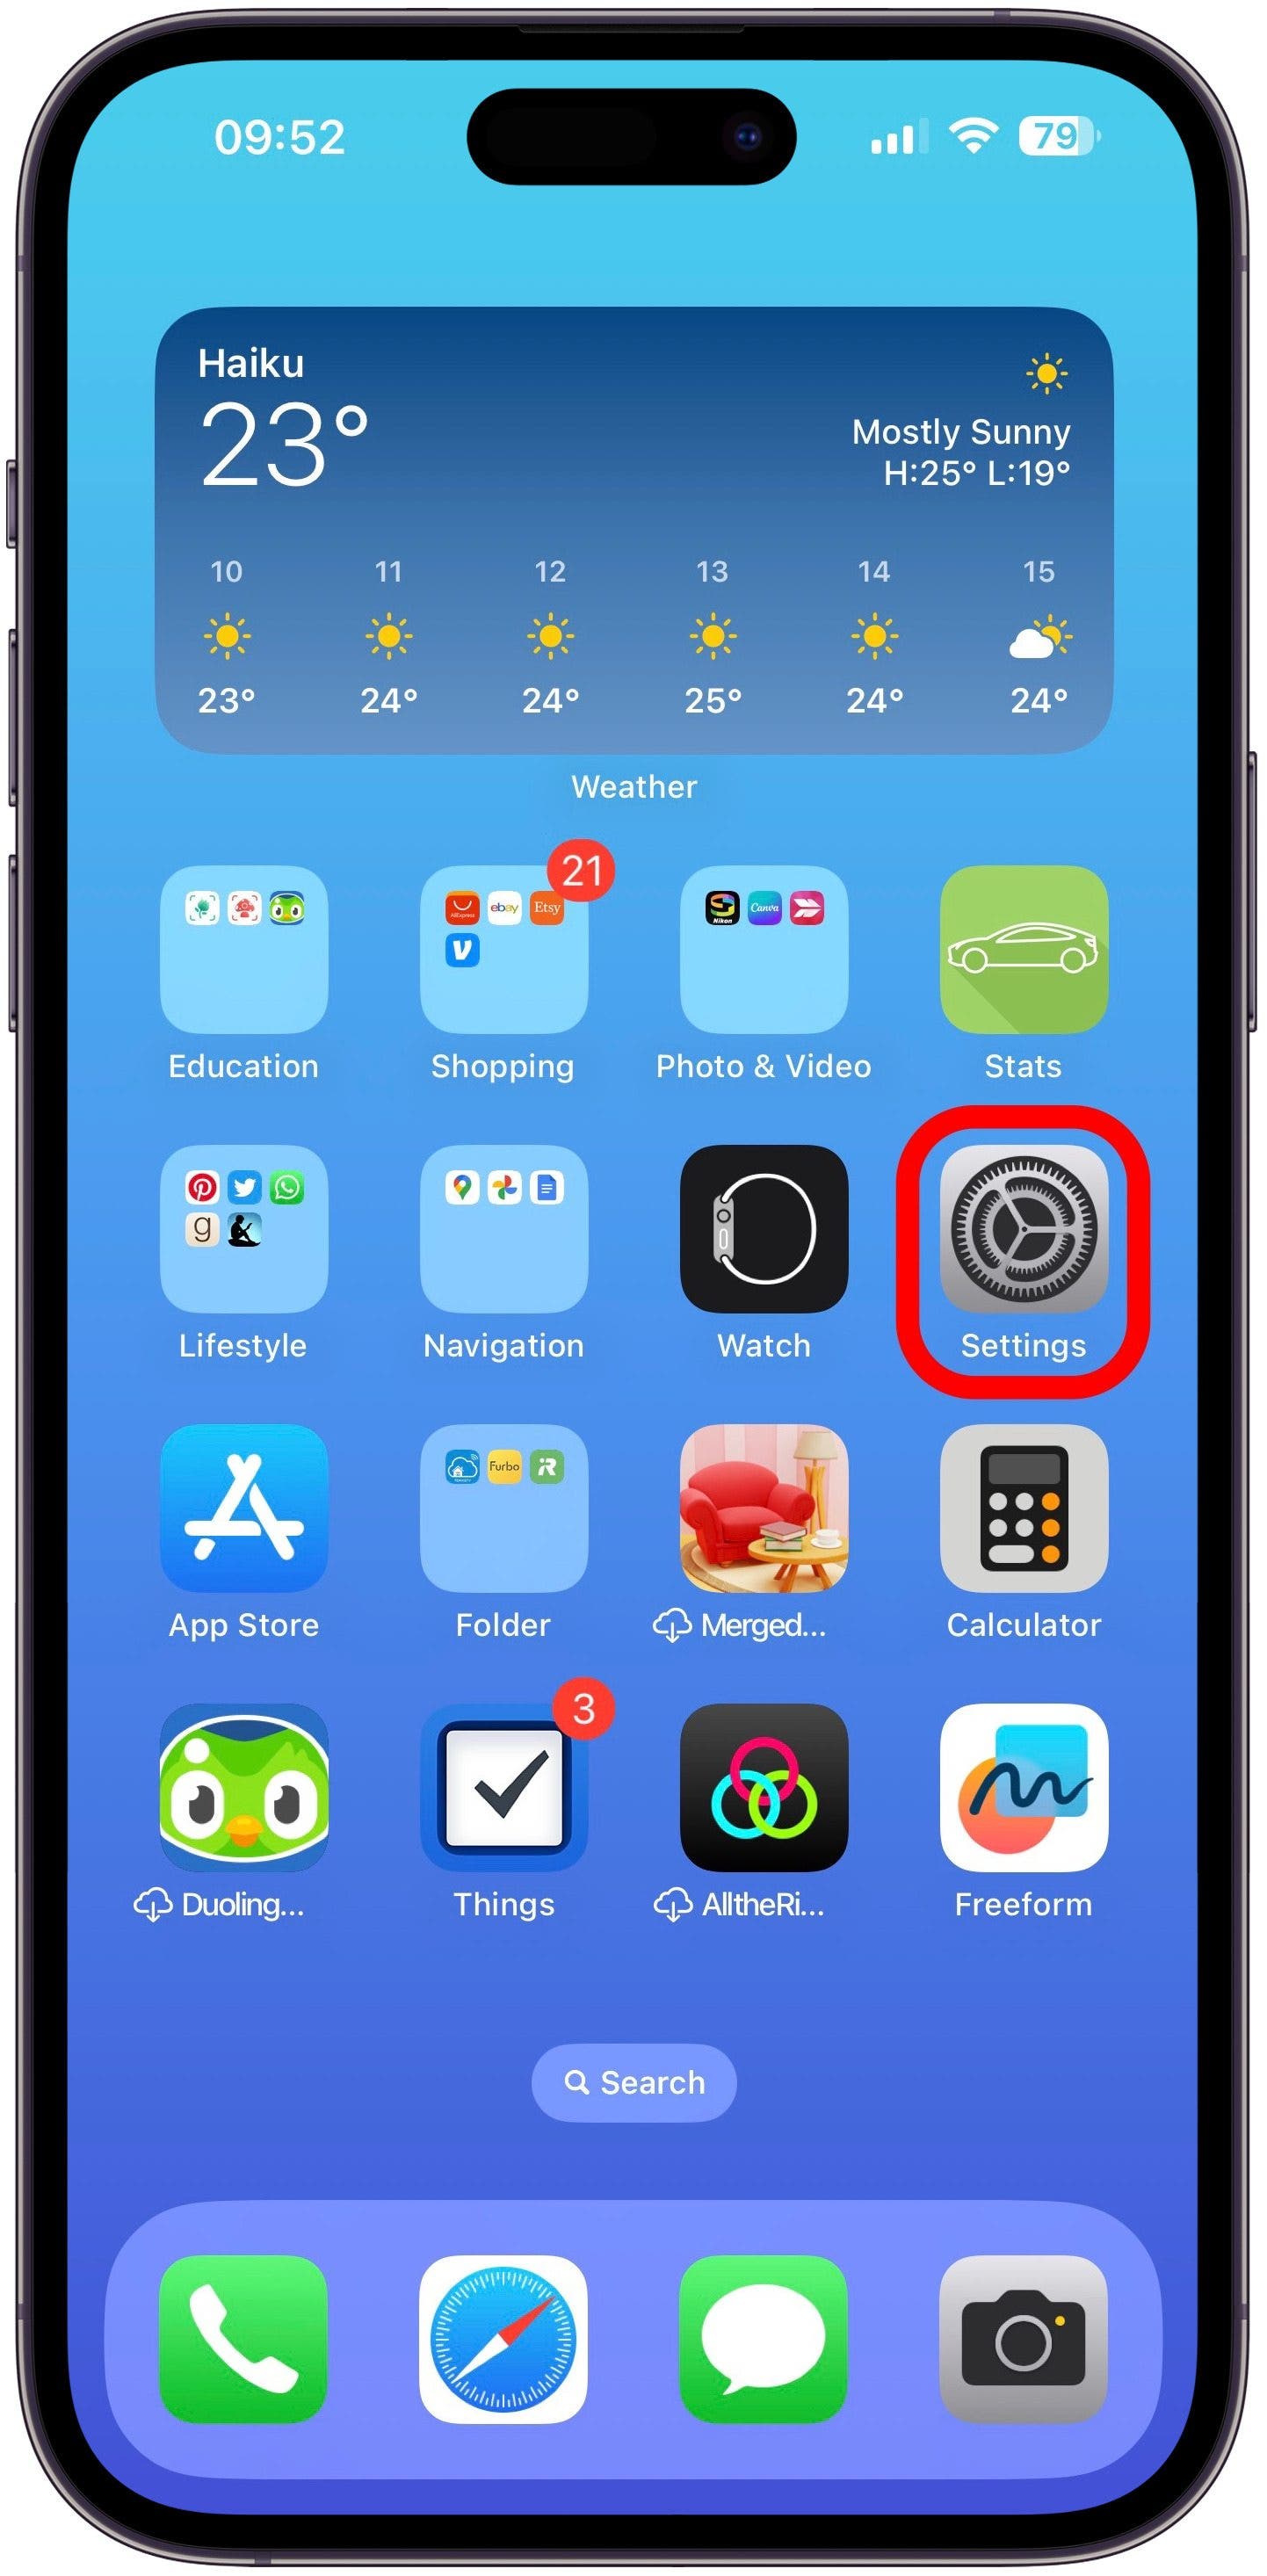
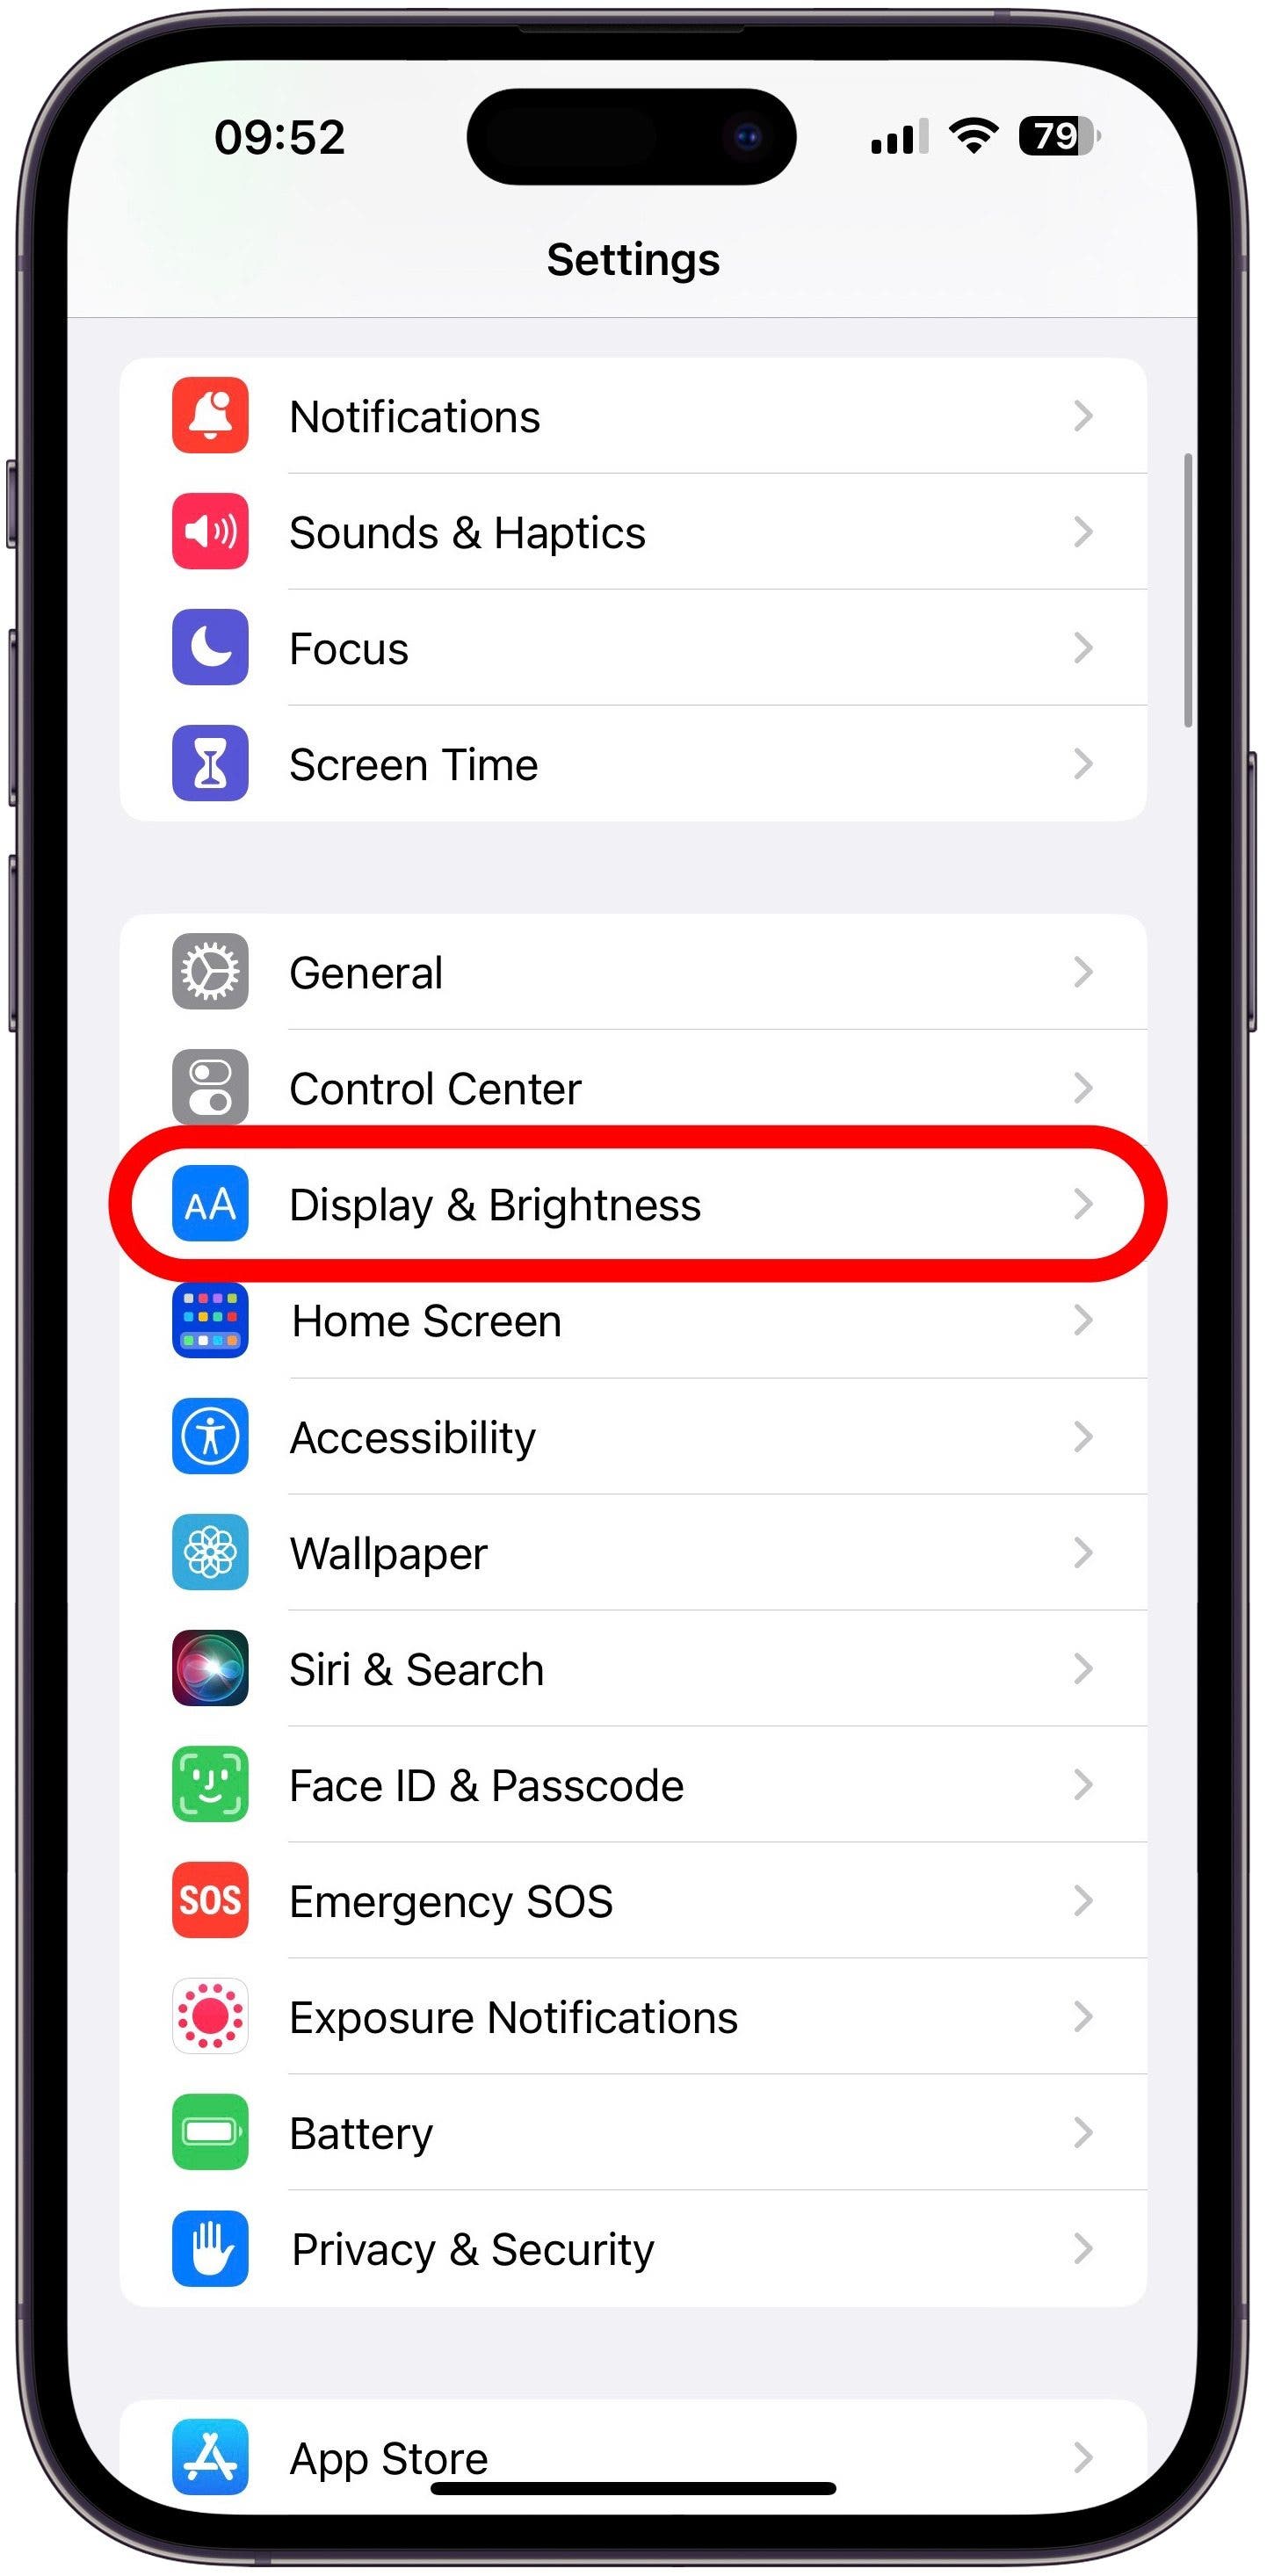
- If you'd like to simply disable Always-On Display, the option to do so is in the Settings app.
- Find and tap the Display & Brightness option.
- Tap Always On Display.
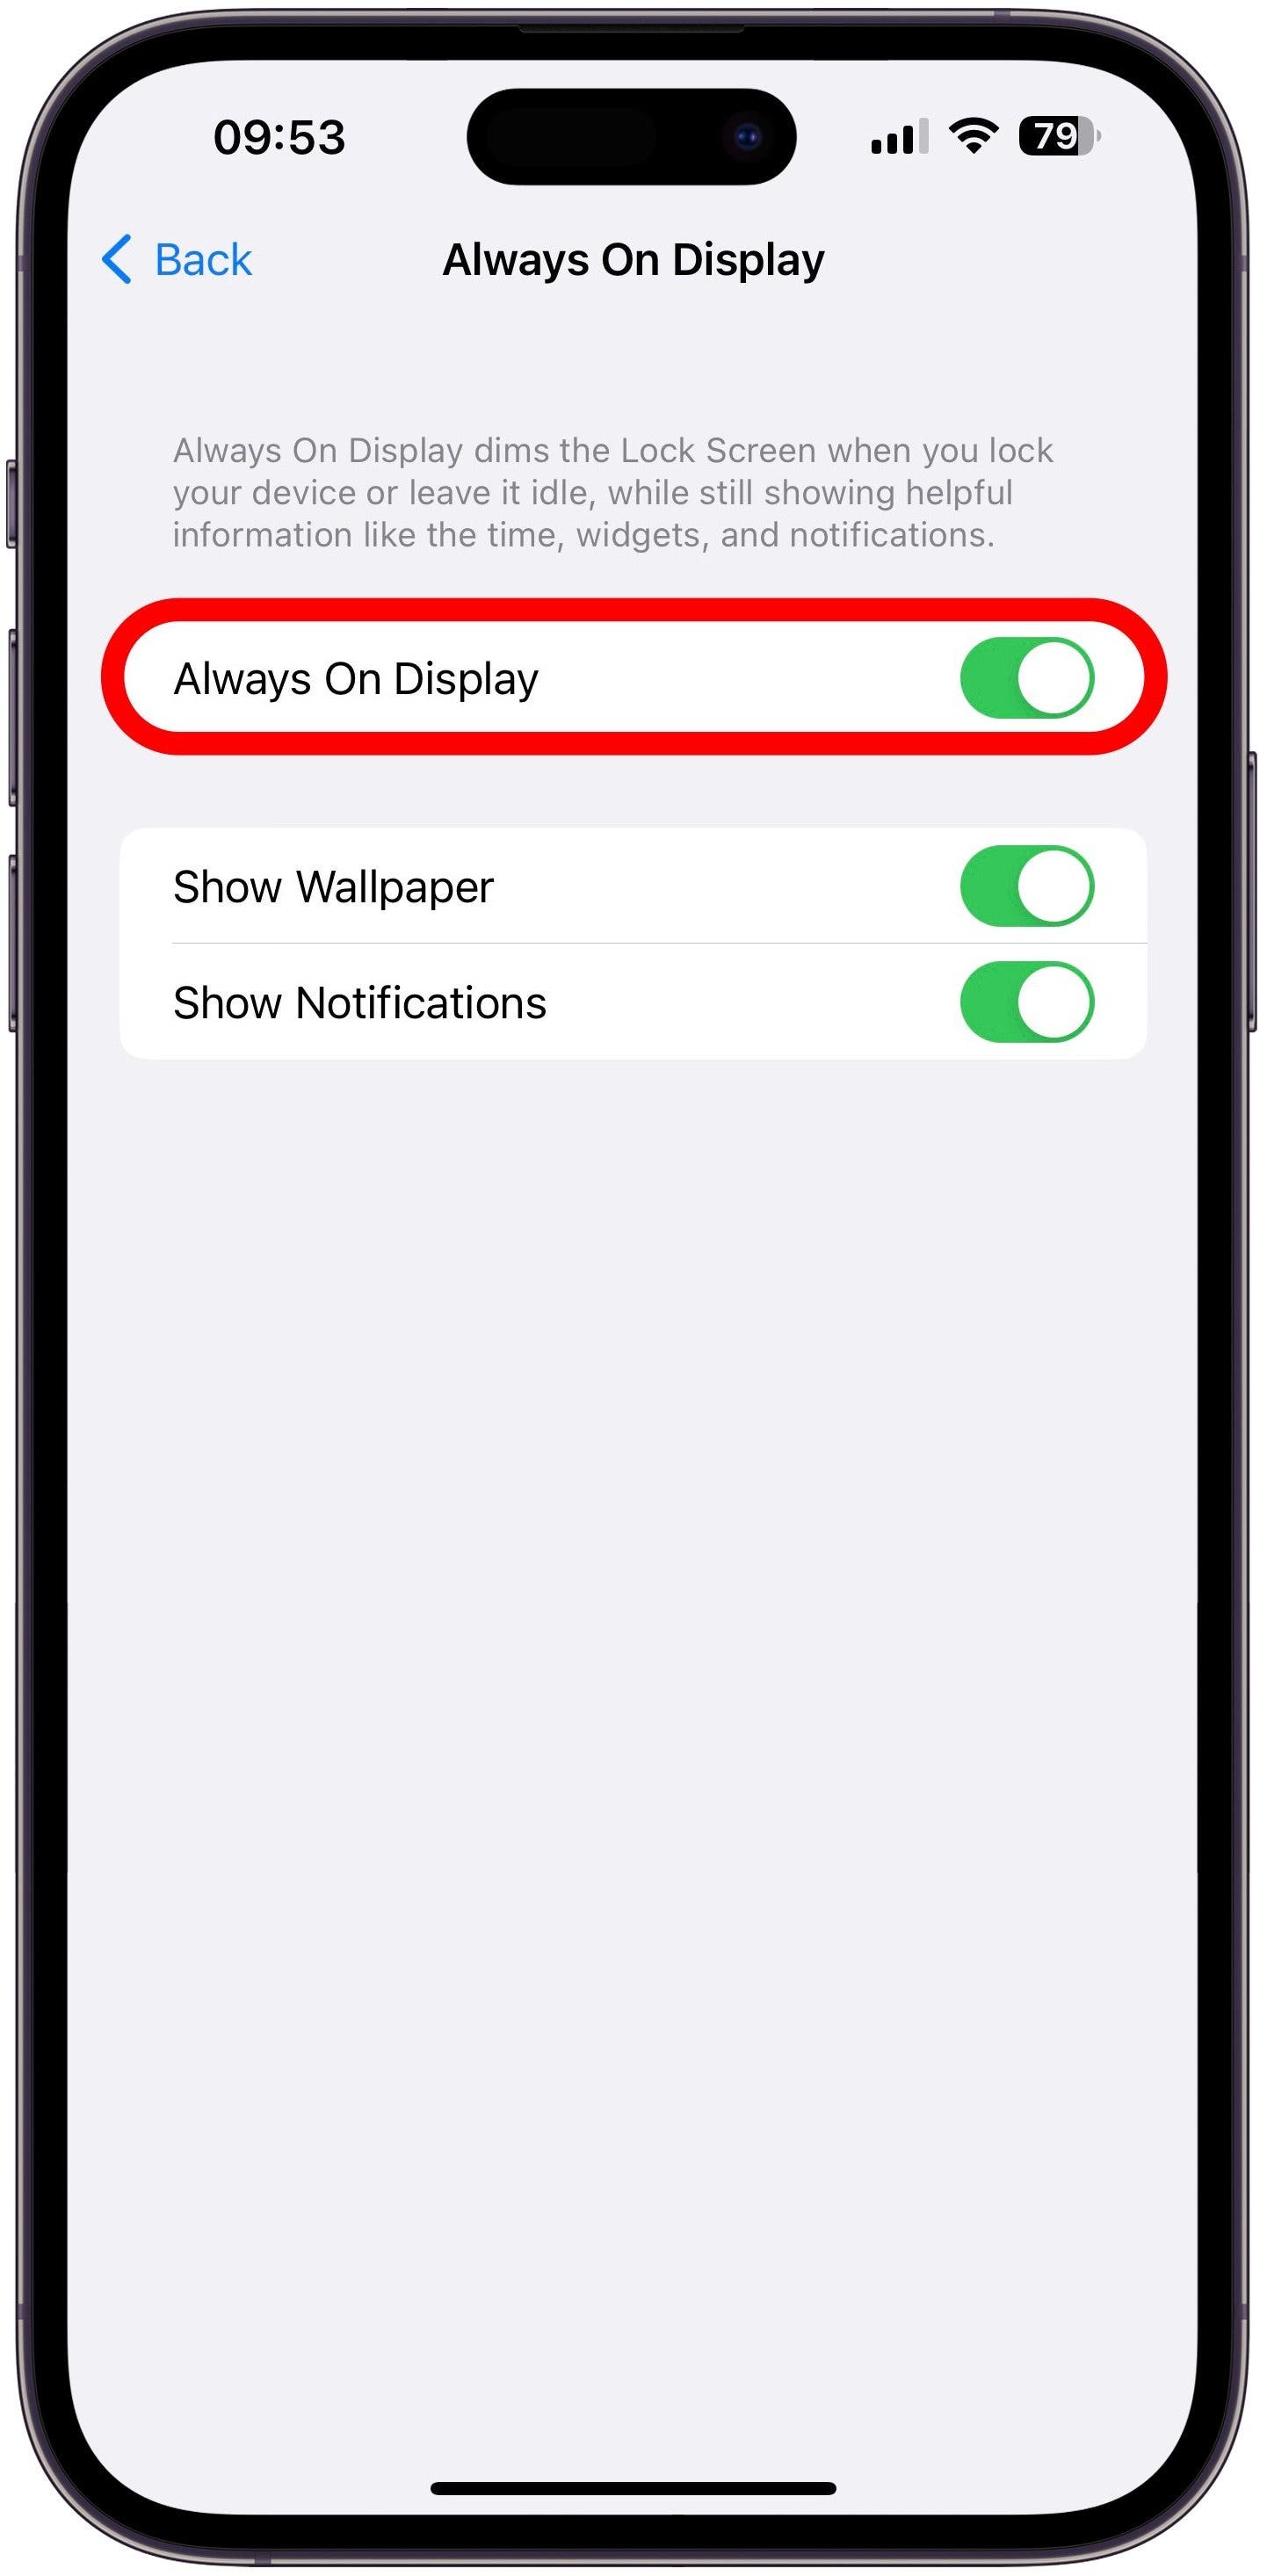
- By default, this will be enabled (green), but you can tap it to turn it off (gray).
![]()
![]()
![]()
![]()
After this, the Always-On Display feature of your iPhone 14 Pro or iPhone 14 Pro Max will be disabled. You can turn it back on at any time from the same setting if you decide you want to use it again.
Face ID
If you have Face ID enabled, then to unlock your device, you simply wake your iPhone and look at the screen. The lock icon along the top should unlock once you are recognized, indicating that you can start using the device. Swipe up from the bottom of the screen to go to your Home screen. To lock your phone once again, press the Side button. If you don't have Face ID enabled, then to unlock your device, you must wake your iPhone, swipe up from the bottom of the screen, and then enter your passcode.

Going to the Home Screen
If you have an app open and want to close it, just swipe up from the bottom of your screen, and you will be taken back to the Home screen.

Navigating Home Screens
The main screen on your iPhone, the Home screen, has all your app icons. If you have many apps, then you might find you need multiple pages of home screens, with apps overflowing to the extra pages. Swipe left on your Home screen to navigate the extra pages.

Taking a Screenshot
To take a screenshot, you press the Side button and volume up button simultaneously. A smaller version of the image you just captured will appear at the lower-left corner of your screen. If you tap it, you can mark up the screenshot, share it with friends, add your signature, and more. When you tap Done, you'll be given two options: Save to Photos or Delete Screenshot.

Accessing Spotlight Search
Trying to find an app, contact, or even a nearby business? That's what Spotlight Search is for! You can access Spotlight Search by swiping down from the middle of your Home screen. From there, you can use Search to find whatever you're looking for.
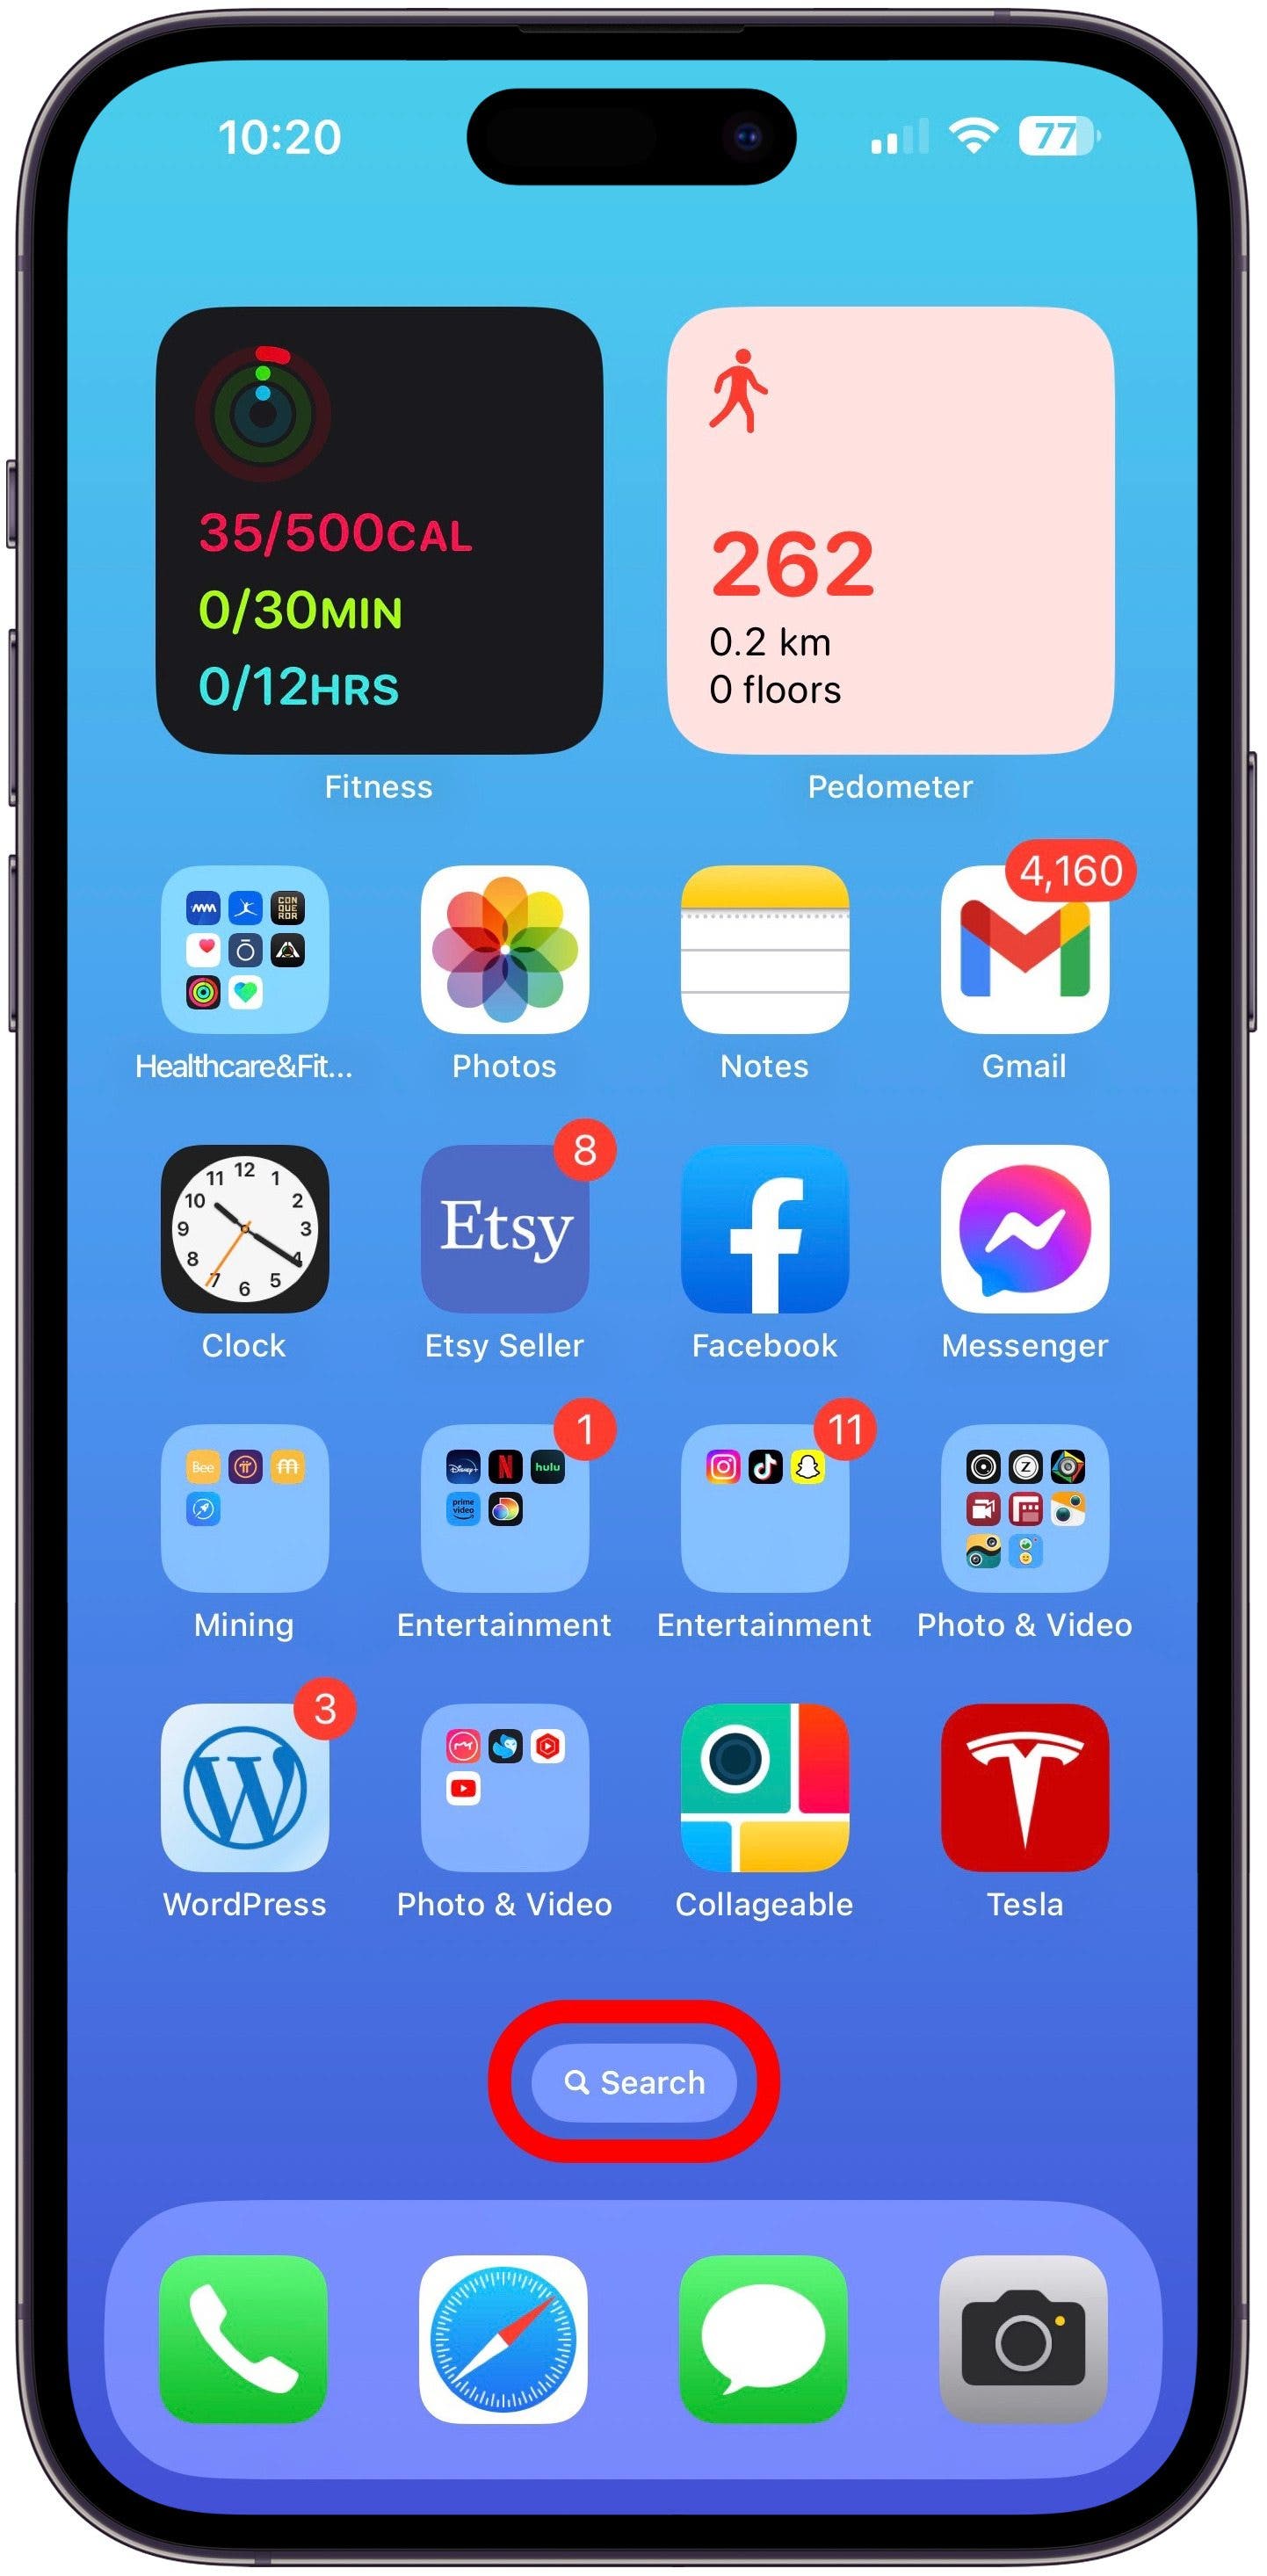
Devices running iOS 16 or later will find a search bar on your iPhone’s Home Screen, making it easy to quickly tap on it and search for anything on your phone or on the web. While this feature definitely makes it easier for folks who aren't familiar with pulling down on the center of the Home Screen to open Search, it also hides the Home Screen dots that allow you to quickly swipe through all your pages of apps. If you want to get the old iPhone Home Screen layout back, do this:
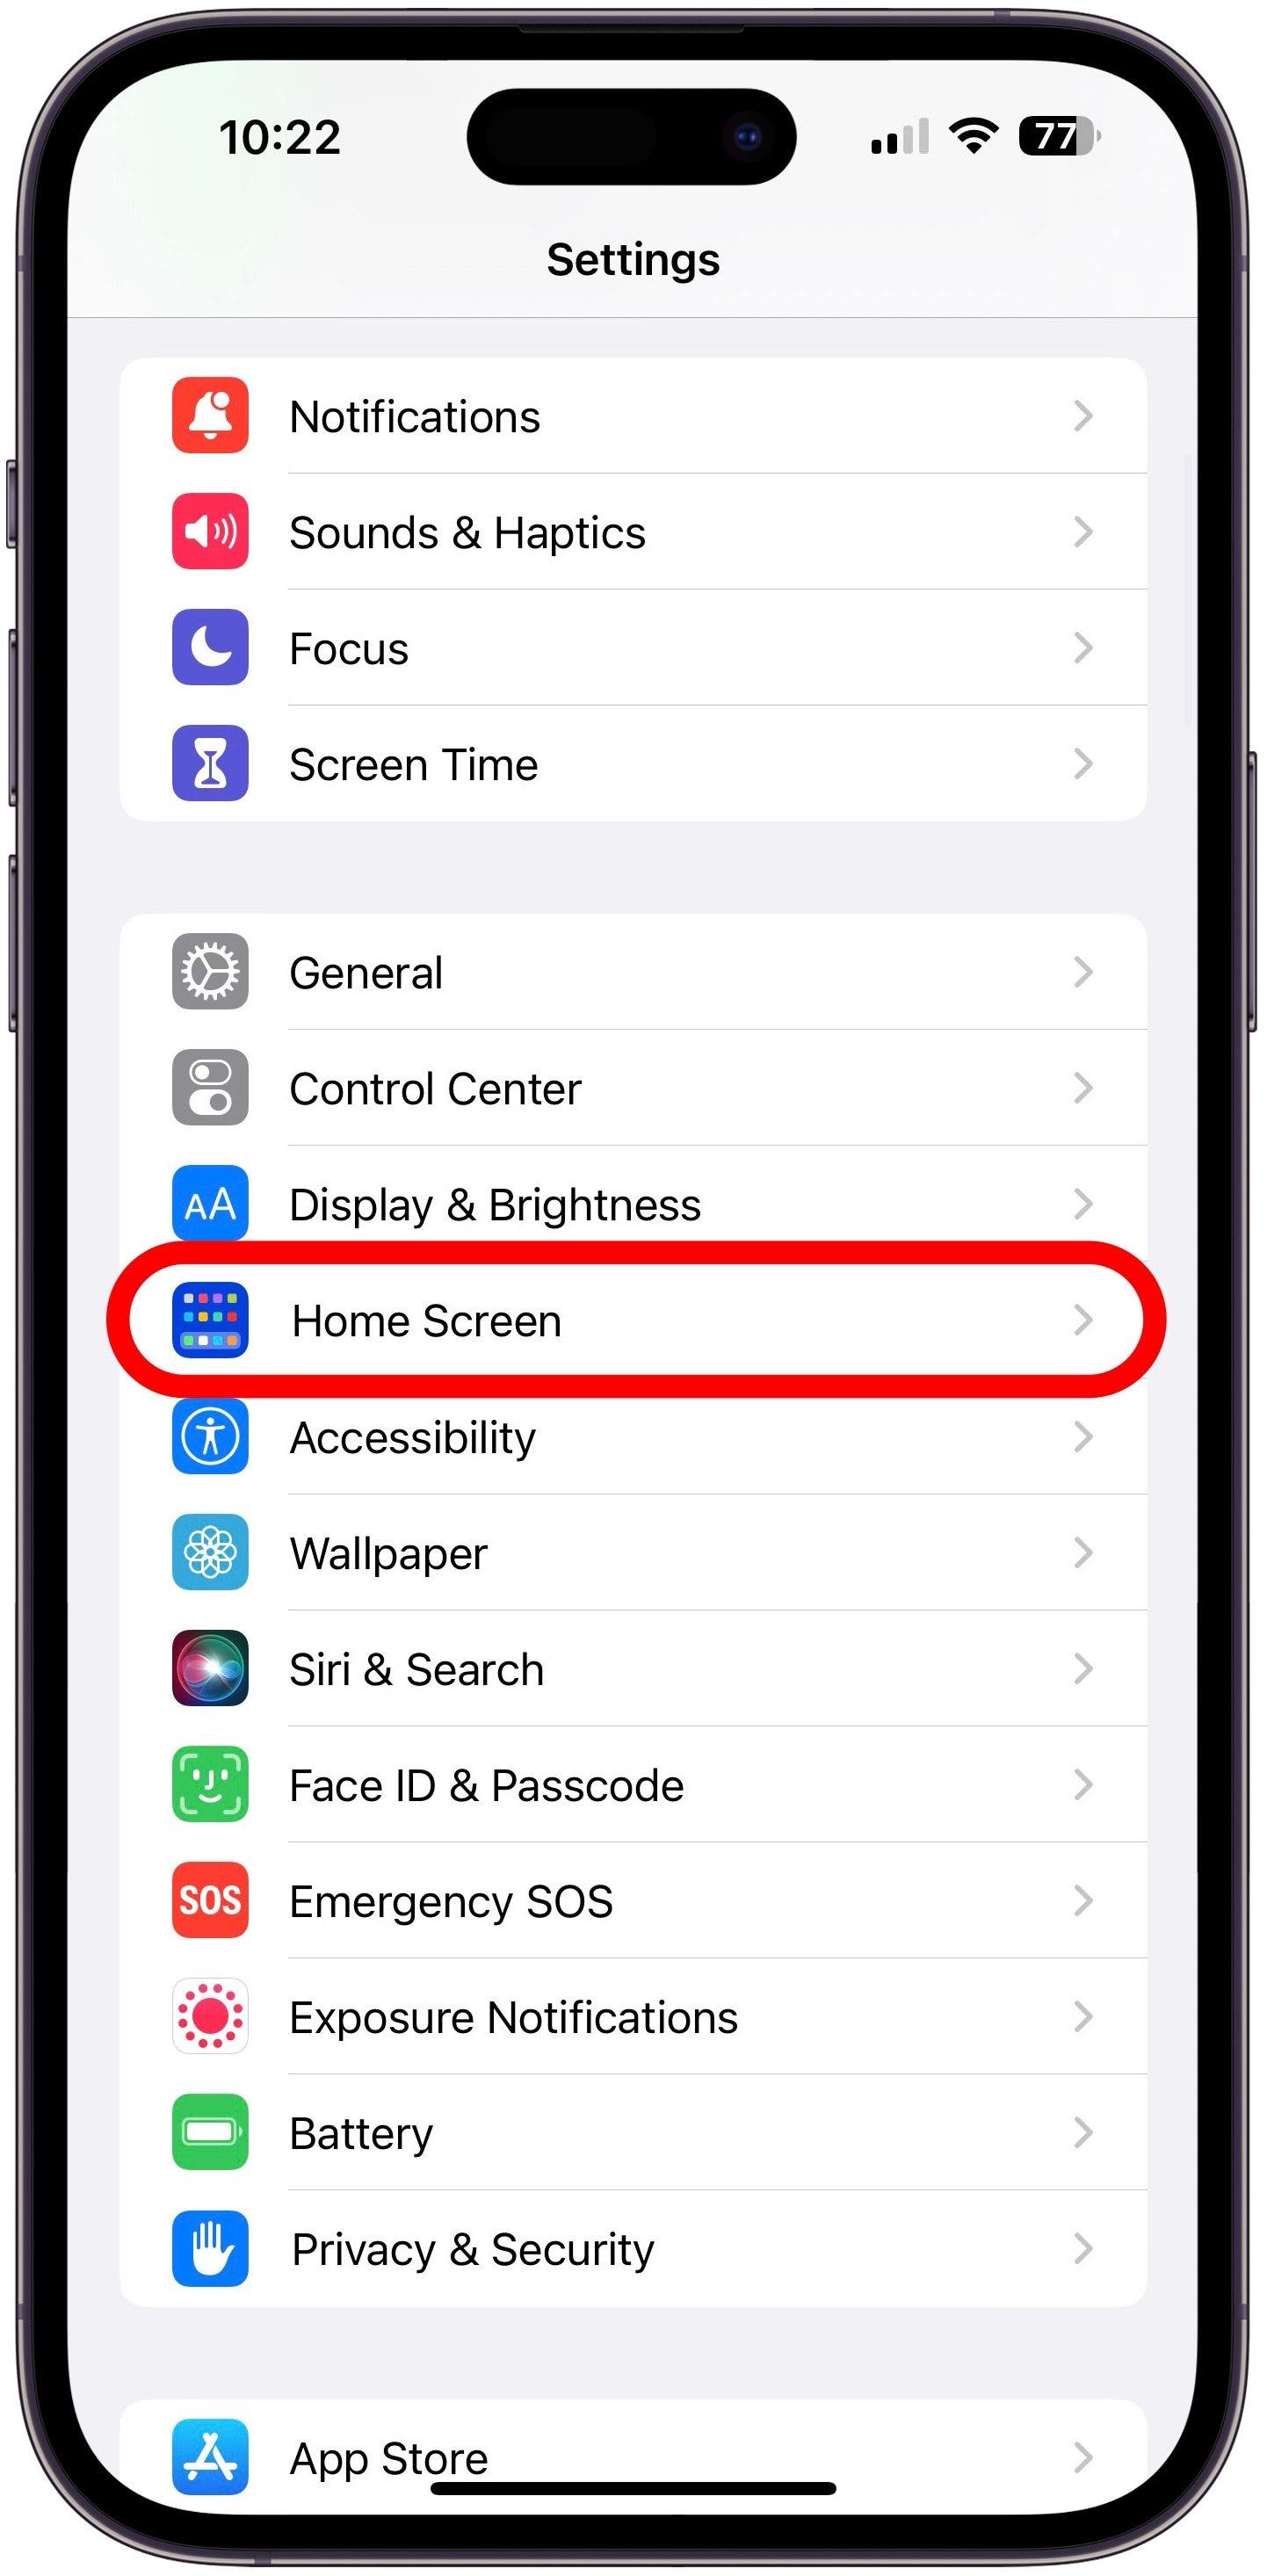
- To get rid of the new Search bar on your Home Screen, go to Settings on your iPhone, then tap Home Screen.
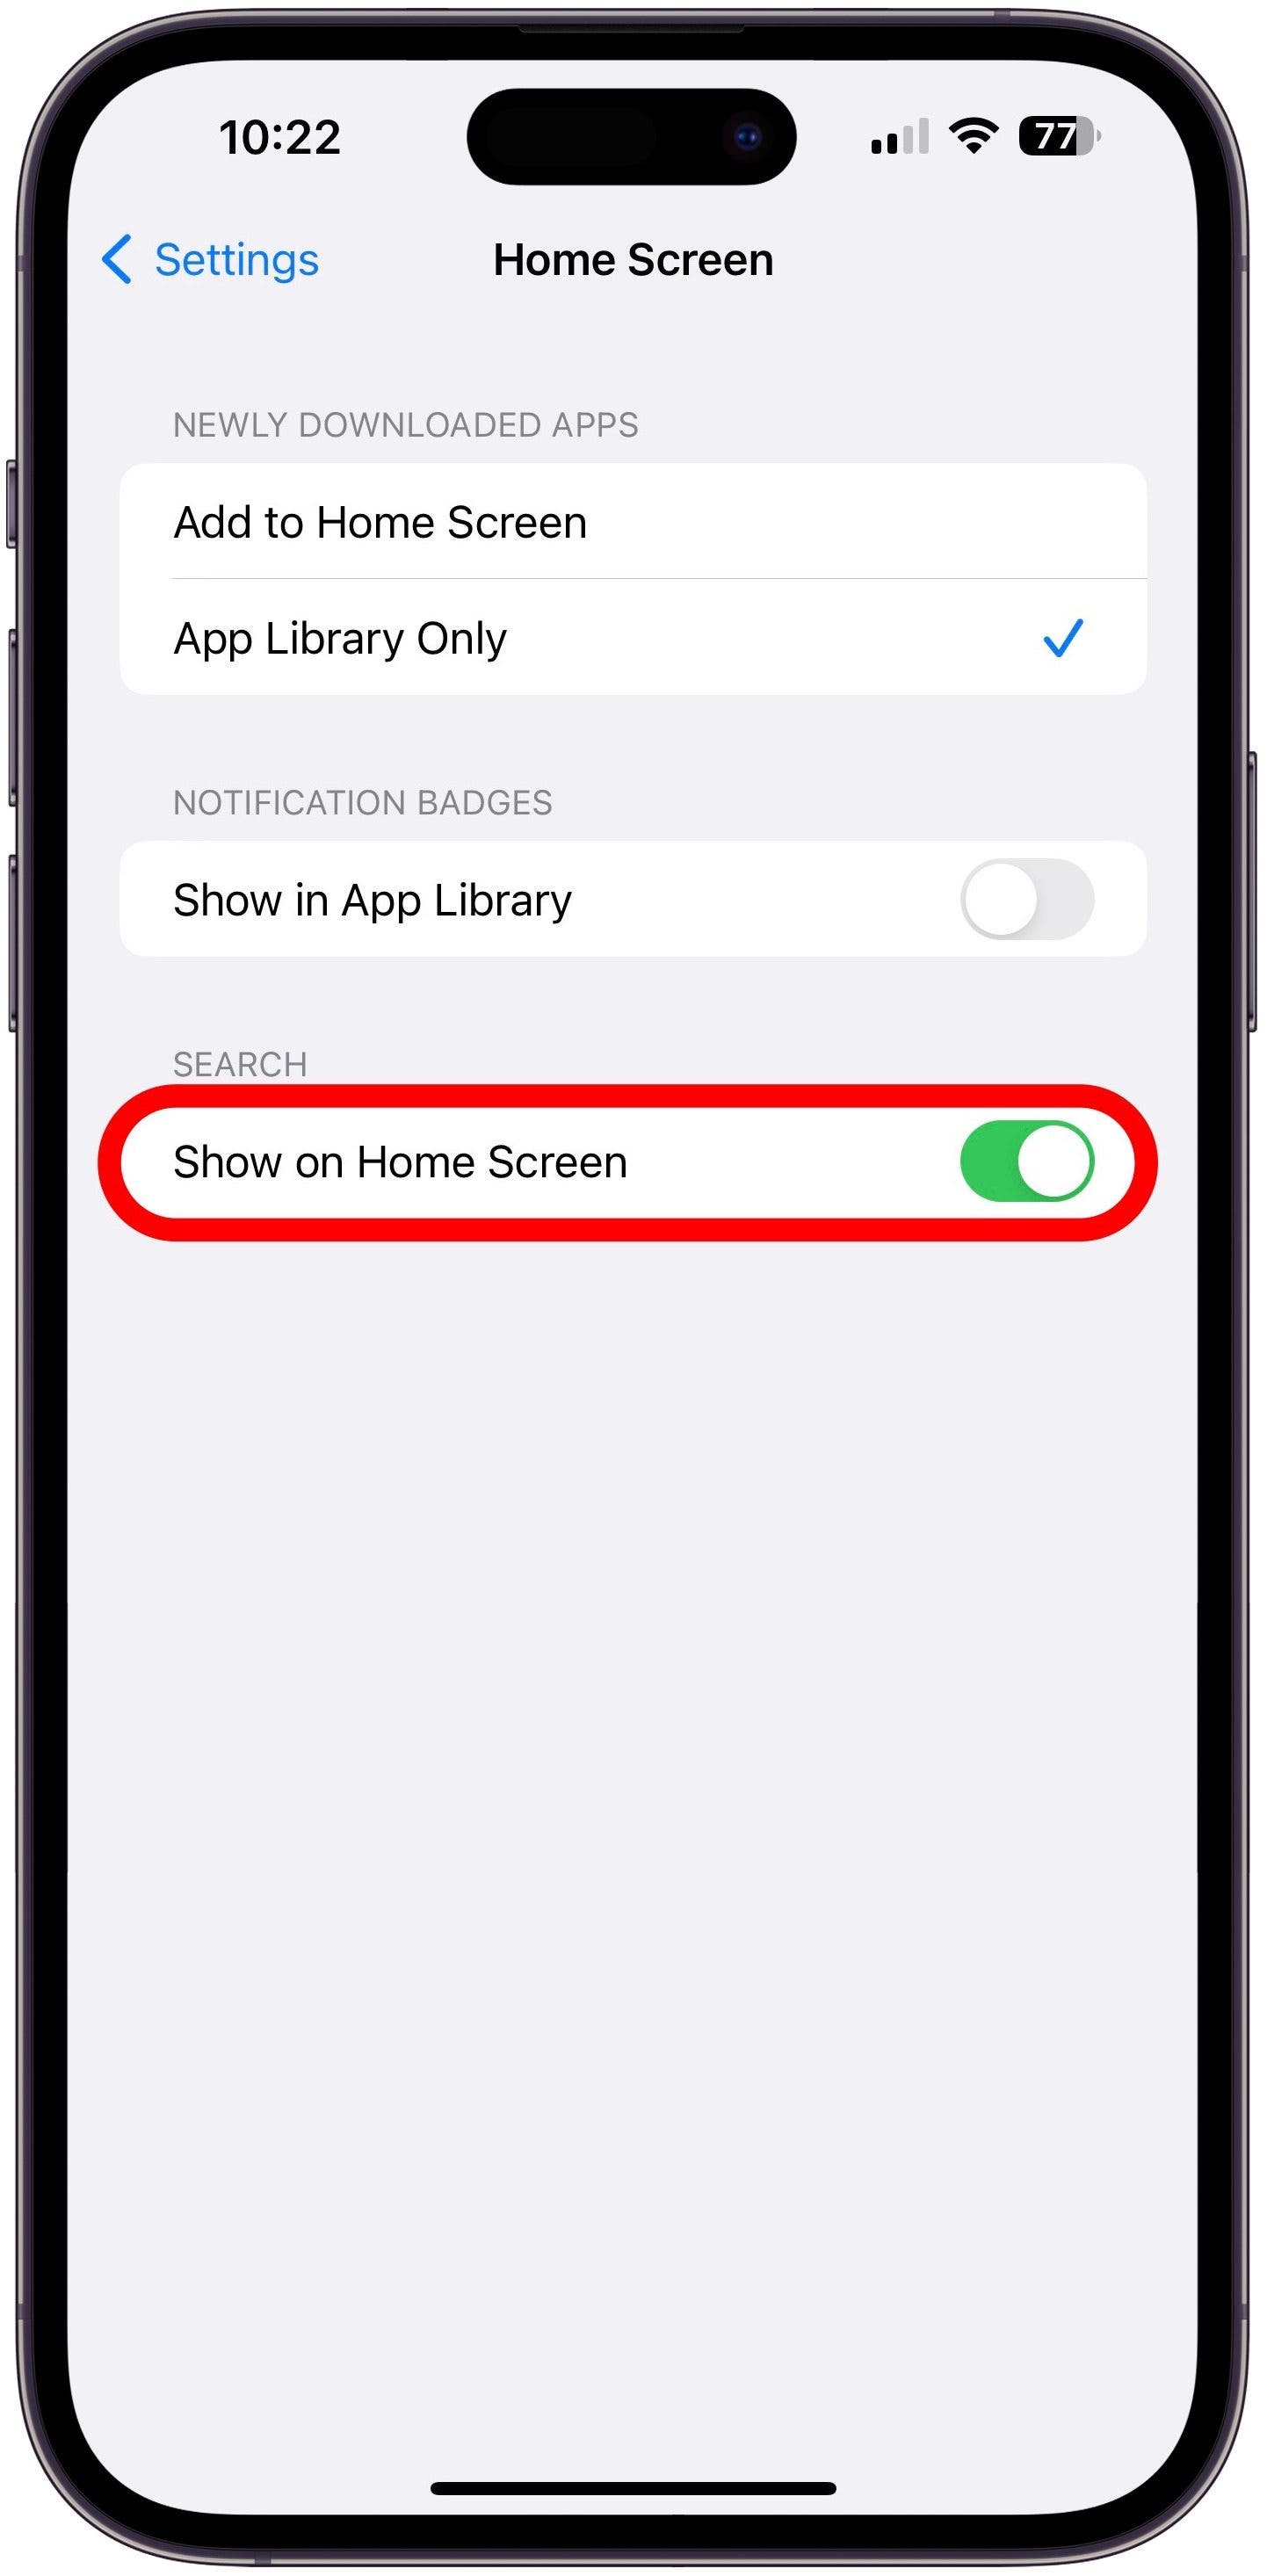
- Under Search, toggle Show on Home Screen to off. The feature will be gray when disabled and the Search Bar will no longer appear on your Home Screen.
![]()
![]()
If you decide to bring it back in the future, just follow the same steps and toggle it on so that it is green instead of gray in step 2.

Accessing Control Center
Control Center is where you can easily access your iPhone's most-used features, such as your Camera, Flashlight, and Calculator app. To access Control Center, swipe down from the top right corner of your screen.

Accessing Notification Center
Have you ever heard your iPhone ping (indicating you've received a notification) only to accidentally unlock your iPhone before you were able to see the notification? No worries. You can quickly view your notifications from Notification Center by swiping down from the top left corner of your iPhone display.

Accessing Apple Pay
In order to use Apple Pay, you need to first make sure that you have a card added on your device. If you haven't done this yet, you can add a card to your Apple Pay:
- Open Settings, then tap Wallet & Apple Pay.
- Tap Add Card.
![]()
![]()
Your bank or card issuer will need to verify your information. Once your information is verified, tap Next. Now you can use Apple Pay! All you have to do is double-click the Side button to access Apple Pay and then enter your passcode or use Face ID (if enabled). Hold your phone next to the contactless reader until Done appears on your screen. Pretty simple!

Turn Off & Force Restart Your iPhone
To turn off your iPhone, simultaneously press and hold the Side button and either volume button until the Slide to Power Off slider appears. Drag the top slider to the right.
If your iPhone isn't responding for whatever reason, you can also Force Restart. To do this, press and release the volume up button, press and release the volume down button, and then press and hold the Side button. Only release the Side button when the Apple logo appears on your screen.

Buttons and Ports on an iPhone with a Home Button
- Front-facing HD camera
- Side button
- SIM card tray
- Home button
- Lightning connector port
- Volume buttons
- Ring/Silent switch
- Rear camera
- Quad LED True Tone flash

The Side Button
The Side button along the right side of the iPhone 8 and earlier (or the Sleep/Wake button along the top of the iPhone SE) is used in a variety of ways. When your iPhone is off, you press and hold this button to power your iPhone back on. When your phone is on, you can also press the Side button to put your phone in Sleep mode (where the screen is black). If you want to "wake" your iPhone (illuminate the screen) to check the time or check for notifications, then you can also press the Side button when your screen is black, and it will light up.
Home Button
The Home button is the circular button that appears below the touchscreen and plays a vital role in navigating your device. It
is used to activate Siri, return to the Home screen, unlock your iPhone, and use Apple Pay. When you open an app, you return to the Home screen by pressing the Home button. You can also double press the Home button to easily view all your apps currently running in the background. To activate Siri, press and hold the Home button. This is also where the Touch ID sensor is stored, so if you have enabled Touch ID, you will press the Home button to approve Apple Pay purchases, download apps, and unlock your device.
Volume Buttons
The two buttons on the left side of your device are your volume buttons. The top button turns the volume on your phone up; the bottom button turns your volume down. However, by default, this will only adjust the volume of things like music, videos, and other media. If you want to be able to adjust your ringer volume, you will need to go to
Settings > Sounds & Haptics and adjust the volume under Ringer and Alerts. From here, you can also choose to adjust ringer volume with your volume buttons by toggling on the Change with Buttons option. With that setting toggled on, you will still be able to adjust video and music volume as you are interacting with media content, but now you can adjust ringer volume from other pages.

Ring/Silent Switch
Also located on the left side of your device is a switch that allows you to easily silence your iPhone without having to adjust and readjust the volume levels. Simply slide the switch downward, and all calls and notifications will be silenced—that means no embarrassing interruptions while you're in the movie theater. Once you are ready to turn your sound back on, you can flip the switch upward, and voila! Your phone will ring again as usual.

Lighting Port
Your Lightning port is located along the bottom of your device. This is used to charge your iPhone and, if you have a Lightning to headphone jack adapter, to listen to audio through your wired headphones.

Headphone Jack
If you have iPhone 6 and 6 Plus, iPhone 6s and 6s Plus, or the iPhone SE, then you have a headphone jack beside the Lightning port. You use the headphone jack to plug in your headphones and other accessories.
Navigating the iPhone with a Home Button

Waking Up and Unlocking Your iPhone
When your iPhone is turned on, but the screen is black, that means your iPhone is currently "asleep." To "wake" your iPhone (in other words, to illuminate the screen), simply press the Side button along the right side of an iPhone 8 or earlier or the top button along the top of an iPhone SE, and your iPhone screen will illuminate. Pretty simple! You can also toggle on Raise to Wake under Settings > Display & Brightness. This feature allows you to wake your iPhone by picking it up, which is super convenient when you want to quickly check the time or see if you have any notifications awaiting you.
If you have Touch ID enabled, unlocking your iPhone is a breeze. Simply press the Home button with whichever finger you have stored under Touch ID. To lock your phone once again, press the Side button (or Sleep/Wake button). If you don't have Touch ID enabled, press the Home button and then enter your passcode.

Going to the Home Screen
If you have an app open and want to close it, just tap the Home button, and you will be taken back to the Home screen.

Navigating Home Screens
The main screen on your iPhone, the Home screen, has all your app icons. If you have many apps, then you might find you need multiple pages of home screens, with apps overflowing to the extra pages. Swipe left on your Home screen to navigate the extra pages.

Taking a Screenshot
To take a screenshot, you press the Side button and Home button simultaneously. A smaller version of the image you just captured will appear at the lower-left corner of your screen. If you tap it, you can mark up the screenshot, share it with friends, add your signature, and more. When you tap Done, you'll be given two options: Save to Photos or Delete Screenshot.

Activating Siri
To activate Siri, hold down the Home button. Siri will await your request, even after you have lifted your finger from the Home button. However, if you want to prevent Siri from interrupting you, continue to hold down the Home button until you are finished with your request. Feeling lost and don't know what to ask Siri? No worries! Once you activate Apple's AI, just wait a second. Siri will then show you a list of ways that it can assist you. Remember, you can also choose to activate Siri by saying, "Hey Siri." This is done by going to Settings > Siri & Search and toggling on Listen for "Hey Siri."

Opening Spotlight Search
Trying to find an app, contact, or even a nearby business? That's what Spotlight Search is for! You can access Spotlight Search by swiping down from the middle of your Home screen. Now you can use Search to find whatever you're looking for.

Opening Control Center
Control Center is where you can easily access your iPhone's most-used features, such as your Camera, Flashlight, and Calculator app. To access Control Center, swipe up from the bottom of your screen.

Opening Notification Center
Have you ever heard your iPhone ping (indicating you've received a notification) only to accidentally unlock your iPhone before you were able to see the notification? No worries. You can quickly view your notifications from Notification Center by swiping down from the top of your iPhone display.
Accessing Apple Pay
In order to use Apple Pay, you need to first make sure that you have a card added on your device. If you haven't done this yet, you add a card to your apple Wallet by:
- Going to Settings.
- Tap Wallet & Apple Pay.
- Tap Add Card.
![]()
![]()
![]()
Your bank or card issuer will need to verify your information. Once your information is verified, tap Next. Now you can use Apple Pay! All you have to do is double-click the Side button to access Apple Pay and then enter your passcode or use Touch ID (if enabled). Hold your phone next to the contactless reader until Done appears on your screen. Pretty simple!
Turn Off & Force Restart Your iPhone

To turn off your iPhone, press and hold the Side button on the right side of your device. The option Slide to Power Off will appear. Slide your finger to the right.
If your iPhone isn't responding for whatever reason, you can also Force Restart. The way this is done will vary depending on your iPhone model.
- iPhone 8 & 8 Plus: Press and release the volume up button, then press and release the volume down button, and then press and hold the Side button. Only release the Side button when the Apple logo appears on your screen.
- iPhone 7 & 7 Plus: Press and hold the volume down button and the Side button. Release the buttons once the Apple logo appears on your screen.
- iPhone 6 & 6 Plus: Press and hold the Side button and Home button. Release the buttons once the Apple logo appears on your screen.
- iPhone SE & iPhone 5s: Press and hold the Sleep/Wake button (along the top of your device) and the Home button. Release the buttons once the Apple logo appears on your screen.
Understanding the Lenses and Sensors On Your iPhone Camera
The newer iPhones have three lenses on the back and a camera on the front. Every lens has its own purpose and functionality! I’ll help you figure out which lenses your iPhone has and explain the difference between the three lenses on the newer phones.
Which Lenses Does Each iPhone Have
The best way to figure out the specs of your iPhone camera is by checking out Apple’s Compare iPhone models page. Here you can compare up to three models that are newer than the iPhone SE (1st generation). Just pick your model from your drop-down menu and scroll down to Camera.
For quick reference, the Pro models of the iPhone 14, 13, 12, and 11 each have three rear-facing cameras. These are the Wide, Ultra Wide, and Telephoto lenses.
Apple’s regular and plus/mini versions of the iPhone 14, 13, 12, and 11 have two rear-facing camera lenses. These are the Wide and Ultra Wide lenses. The higher-end models of the iPhone X, 8, and 7 also have two rear-facing camera lenses. All other iPhones just have one rear-facing camera. Of course, all models since the 2010 iPhone 4 also have a front-facing camera, often called the selfie camera.
Which Lens Is Which?
Taking a look at the physical features of the iPhone 14 Pro cameras can help you understand the lenses better. On top, you’ll find the Telephoto lens, with the regular Wide lens right underneath it and the Ultra Wide lens on the right of the two. As you can see in the photo, each lens has different specs.
The Telephoto lens has a higher zoom and can take close up photos of your subject, it is useful for Portrait mode photos. The Ultra Wide lens can take Macro photos and is zoomed out wider than the regular Wide lens. The Wide lens is the standard iPhone lens that has no optical zoom and shows the subject the way you see it with your eyes.

Image from Apple: https://www.apple.com/iphone-14-pro/
You will also notice two other circles, one above the Ultra Wide lens and one below. The white circle above the Ultra Wide lens is your flash. You can turn your flash on and off via the Camera app. It also doubles as a flashlight, which you can turn on by tapping the flashlight icon on your Lock screen and in your Control Center. The black circle is LiDAR.
The front camera isn't quite as impressive but shouldn't be forgotten. It has a TrueDepth Camera, IR Camera, and IR Projector. IR stands for infrared, and together, these take quality Night mode selfies and improve Face ID and Memoji features. They work similarly to the rear camera's LiDAR sensor.
To learn more about the LiDAR sensor, the difference between digital and optical zoom, and other Camera app tips and tricks, don’t forget to check out our iPhone Camera App Guide!


