The iPad is an incredibly versatile device used for a wide range of purposes, from personal to professional. Because of this, common tasks and frequently used apps will often vary from person to person. In this section, I’ve focused on some of the iPad’s most central features to help you more easily adjust settings, navigate on your iPad, and find documents or apps. Let’s get started!
Taking a Screenshot
Taking a screenshot is a great way to save important moments and information. Below, I’ll walk through how to take a screenshot on different iPad models and by using Siri. You can also take a screenshot using an Apple Pencil, so if you have one, I recommend reading the section on the Apple Pencil to learn this useful shortcut.
- For iPads with a Home button, press the Top button and Home button simultaneously. For iPads without a Home button, press the Top button and Volume Up button simultaneously. A smaller version of the image you just captured will appear at the lower left corner of your screen.
- If you tap the small image thumbnail, you can mark 2 up the screenshot, share it with friends, add your signature, and more. Tap Done, and select either Save to Photos, Save to Files, or Delete Screenshot.

If you don’t tap on the thumbnail in the corner of the screen, it will disappear after a few seconds and automatically save in the Photos app.
Screenshots with Siri
Taking a screenshot is already a simple process. However, an even easier (and hands-free!) shortcut is to take a screenshot with Siri. All you have to do is say, “Hey Siri, take a screenshot.” From there, you can tap the thumbnail that appears in the lower left corner and edit it the same way you would in the steps above.
Using Screen Record
Perhaps you want to show off your mobile gaming skills or help a coworker or family member learn how to do something on the iPad. In either case, the ability to screen record on your iPad is a handy (and somewhat hidden) feature. Follow the steps below to learn how to create a screen recording on the iPad.
- Go to Settings and tap Control Center. Then, tap the plus icon next to Screen Recording.
- Open the Control Center by swiping down from the top right corner of your screen (or by swiping up if you have an iPad with Face ID). Tap the Screen Recording icon. There will be a three-second countdown before the screen record begins.
- If you want your screen recording to also capture sound (such as your voice), press and hold the Screen Recording icon. Tap the Microphone button to turn it on, and from here you can also press Start Recording.
- To stop recording, press the red status bar at the top of the screen. Then tap Stop.


Your screen recording will then be saved in the Photos app. Open the Photos app and tap the recorded video to view and edit your screen recording.
NEW! Making FaceTime Calls on the iPad
The iPad is an amazing device for making and receiving video calls. It’s relatively more portable than a MacBook, and the screen is much larger than an iPhone’s for viewing other people on the call. There are a few cool features the iPad has to offer when it comes to audio and video settings during a FaceTime call.
The Basics of Making a FaceTime Call
If you want to make a FaceTime call on the iPad,
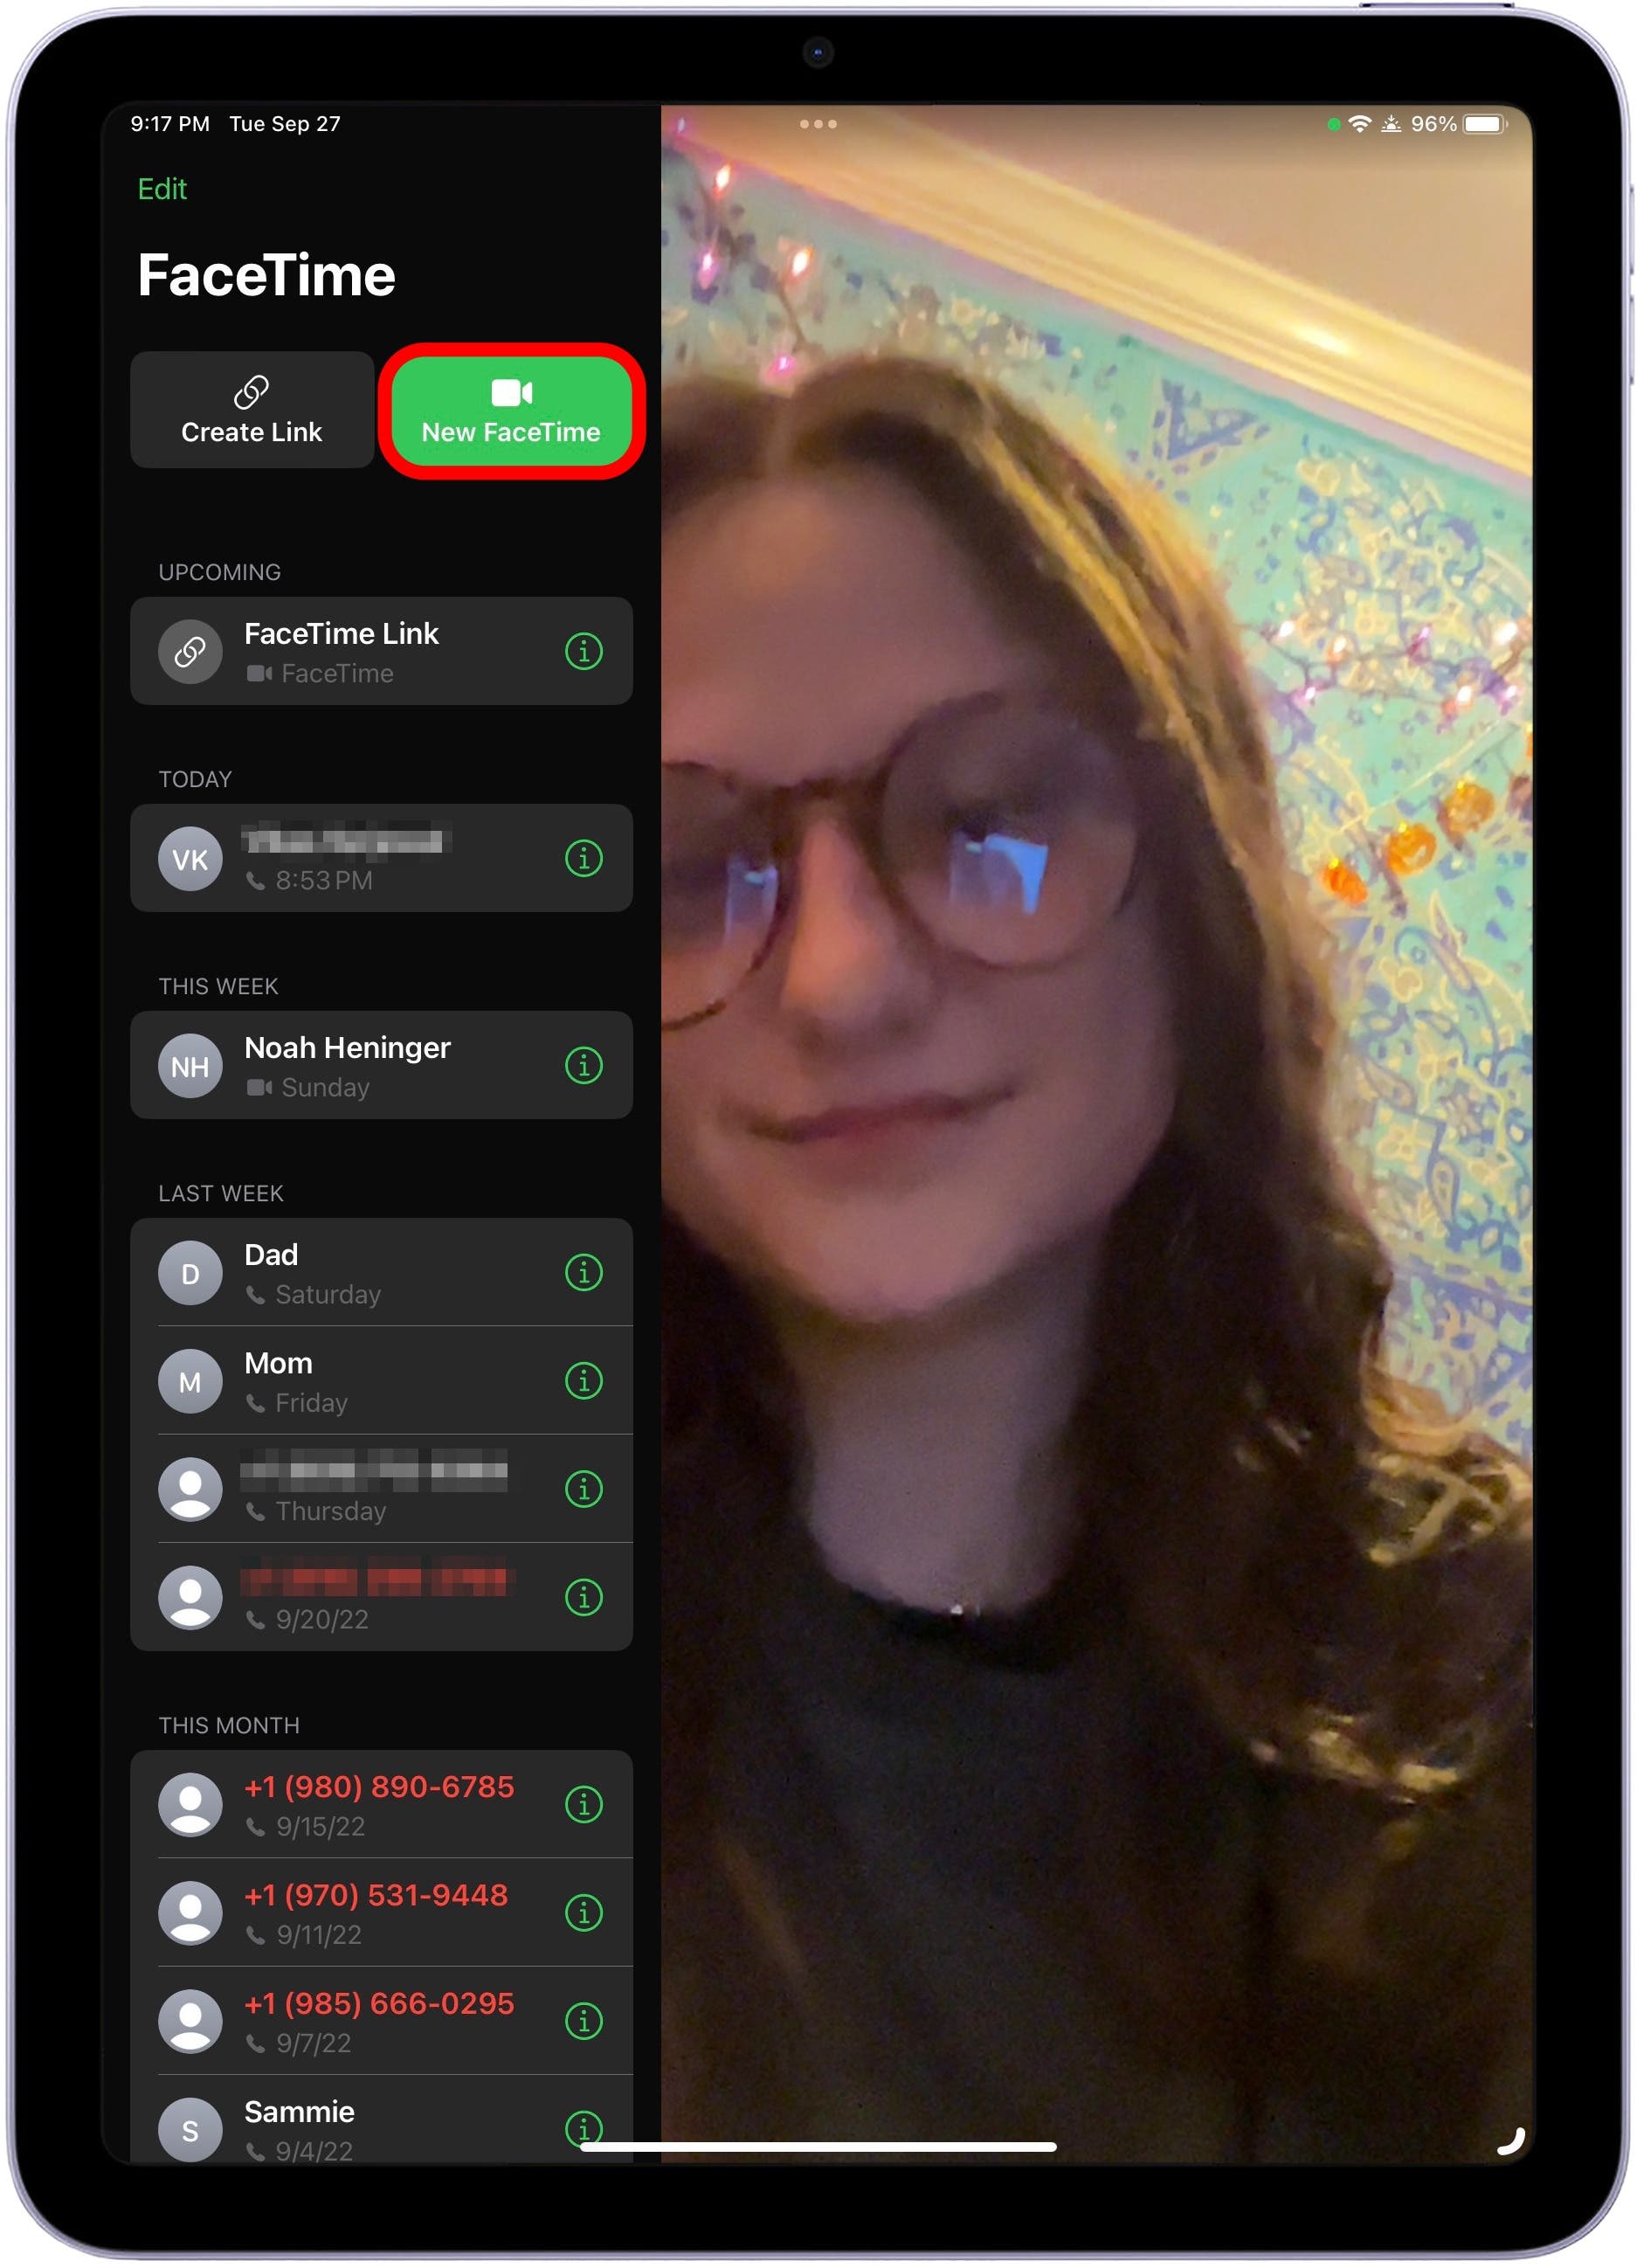
- First open the FaceTime app.
- There are a few ways from here to make a FaceTime call. First you can tap the big green button that says New Facetime. Then, either type in a contact’s name or a phone number.
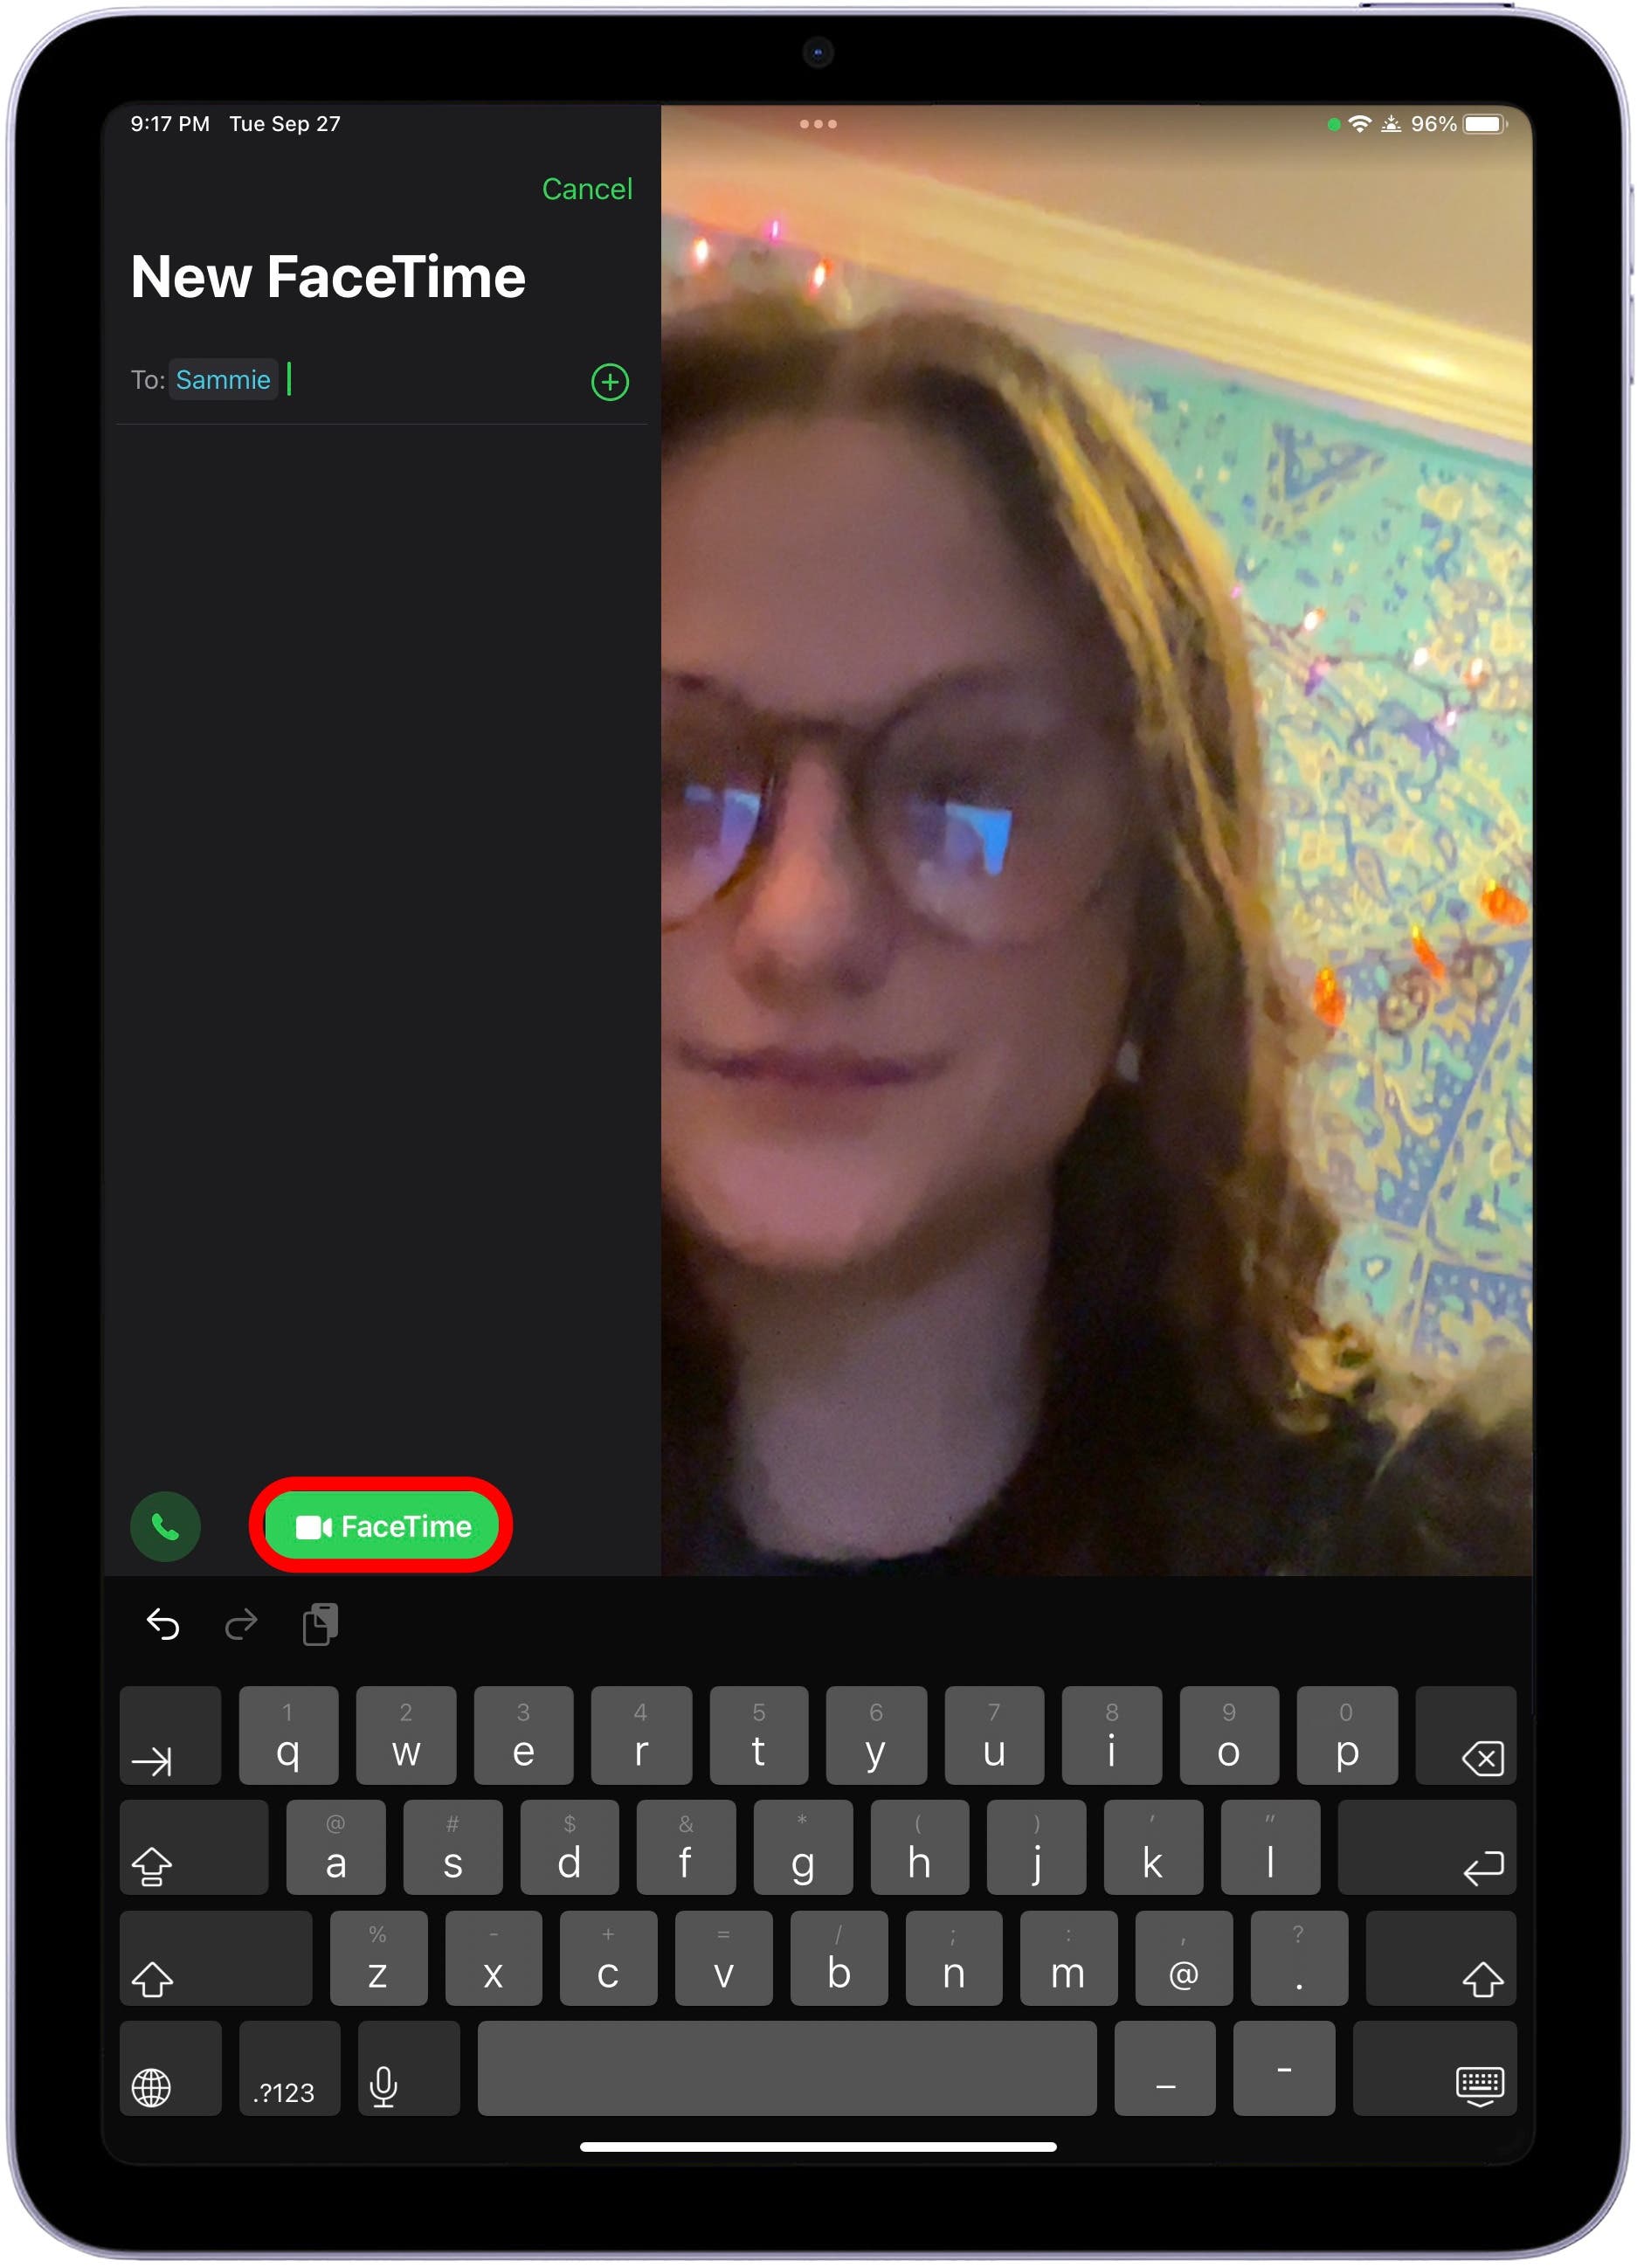
- Then, tap the green FaceTime button at the bottom.
- If you have WiFi or an iPad with cellular, you will also be able to make an audio call. It will appear as a small green phone in the bottom left corner.


Another handy way to make a FaceTime call from the iPad is by going into your Contacts app. Your contact will need to be an Apple user in order for this to work. I’ll show you how to FaceTime Android users in the next paragraph.
- Tap your contact’s name. From here, you will see the Video button in blue. If the button is grayed out, that means your contact is an Android user or does not have any connected Apple devices.
- You can tap the Video button or you can tap the camera button next to FaceTime.


Making a Call to a Non-Apple User
In order to make a call to an Android or non-Apple user from your iPad,
- Open up the FaceTime app on your iPad and tap the Create Link button.
- From here, you can edit the name of your FaceTime meeting, choose where and to whom to send an invite to, or save the link for later use.
- Just like with Zoom, once you’ve sent the link to a person, they can join the meeting by clicking the link. This link will work as long as your device remains logged in to your iCloud account.


iPad’s Center Stage
FaceTiming with family or friends doesn't have to mean you're stuck sitting in one place the whole time you're on the video call. With the Center Stage iPad feature for FaceTime, you can move around to cook, show off your dance or exercise moves, or have people enter or exit the frame and still stay perfectly zoomed, centered, and in focus. In order to use Center Stage in FaceTime, you'll need one of the following Center Stage-compatible iPads. As of right now, the iPads that have Center Stage capabilities are:
- iPad Pro 12.9 inch (5th Generation)
- iPad Pro 11 inch (3rd Generation)
- iPad (9th Generation)
- iPad mini (6th Generation)
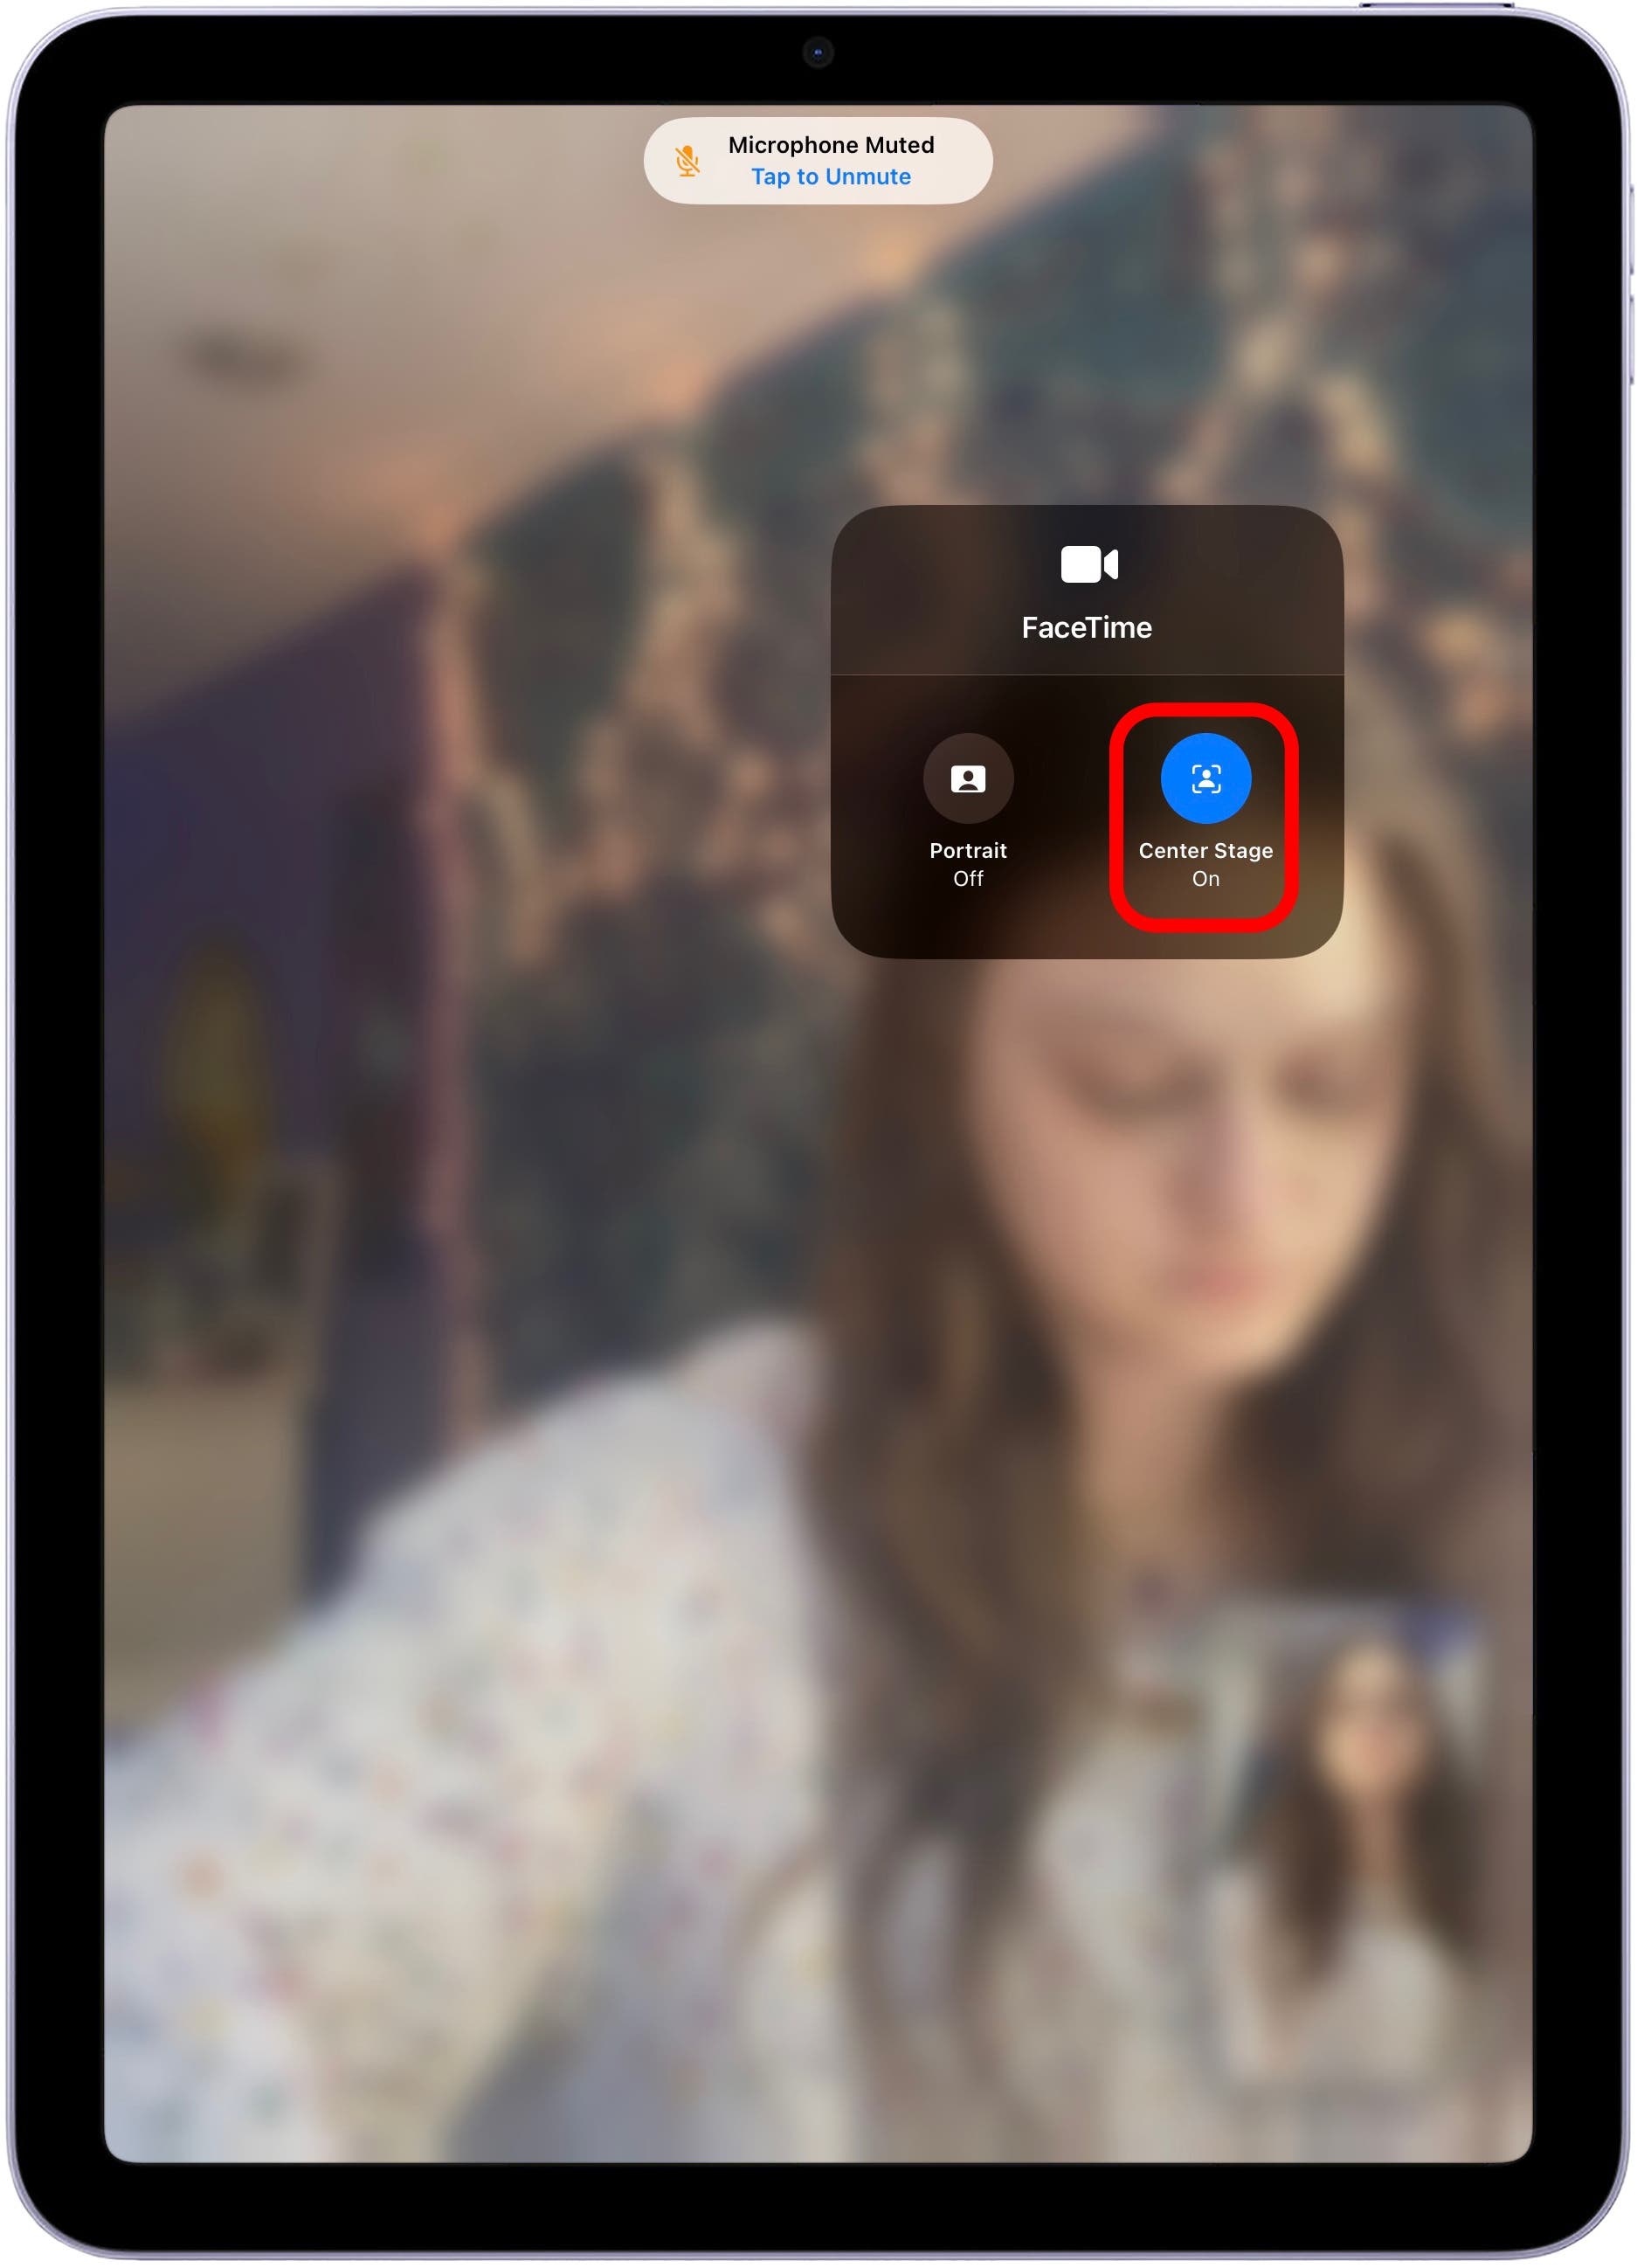
To enable and disable Center Stage on iPad, start a FaceTime call and swipe down from the upper-right corner to open the Control Center. Tap Video Effects. You will see the option for Portrait Mode and Center Stage. Tapping it will turn it on and off.
Improve Your Audio Quality with Voice Isolation & Wide Spectrum
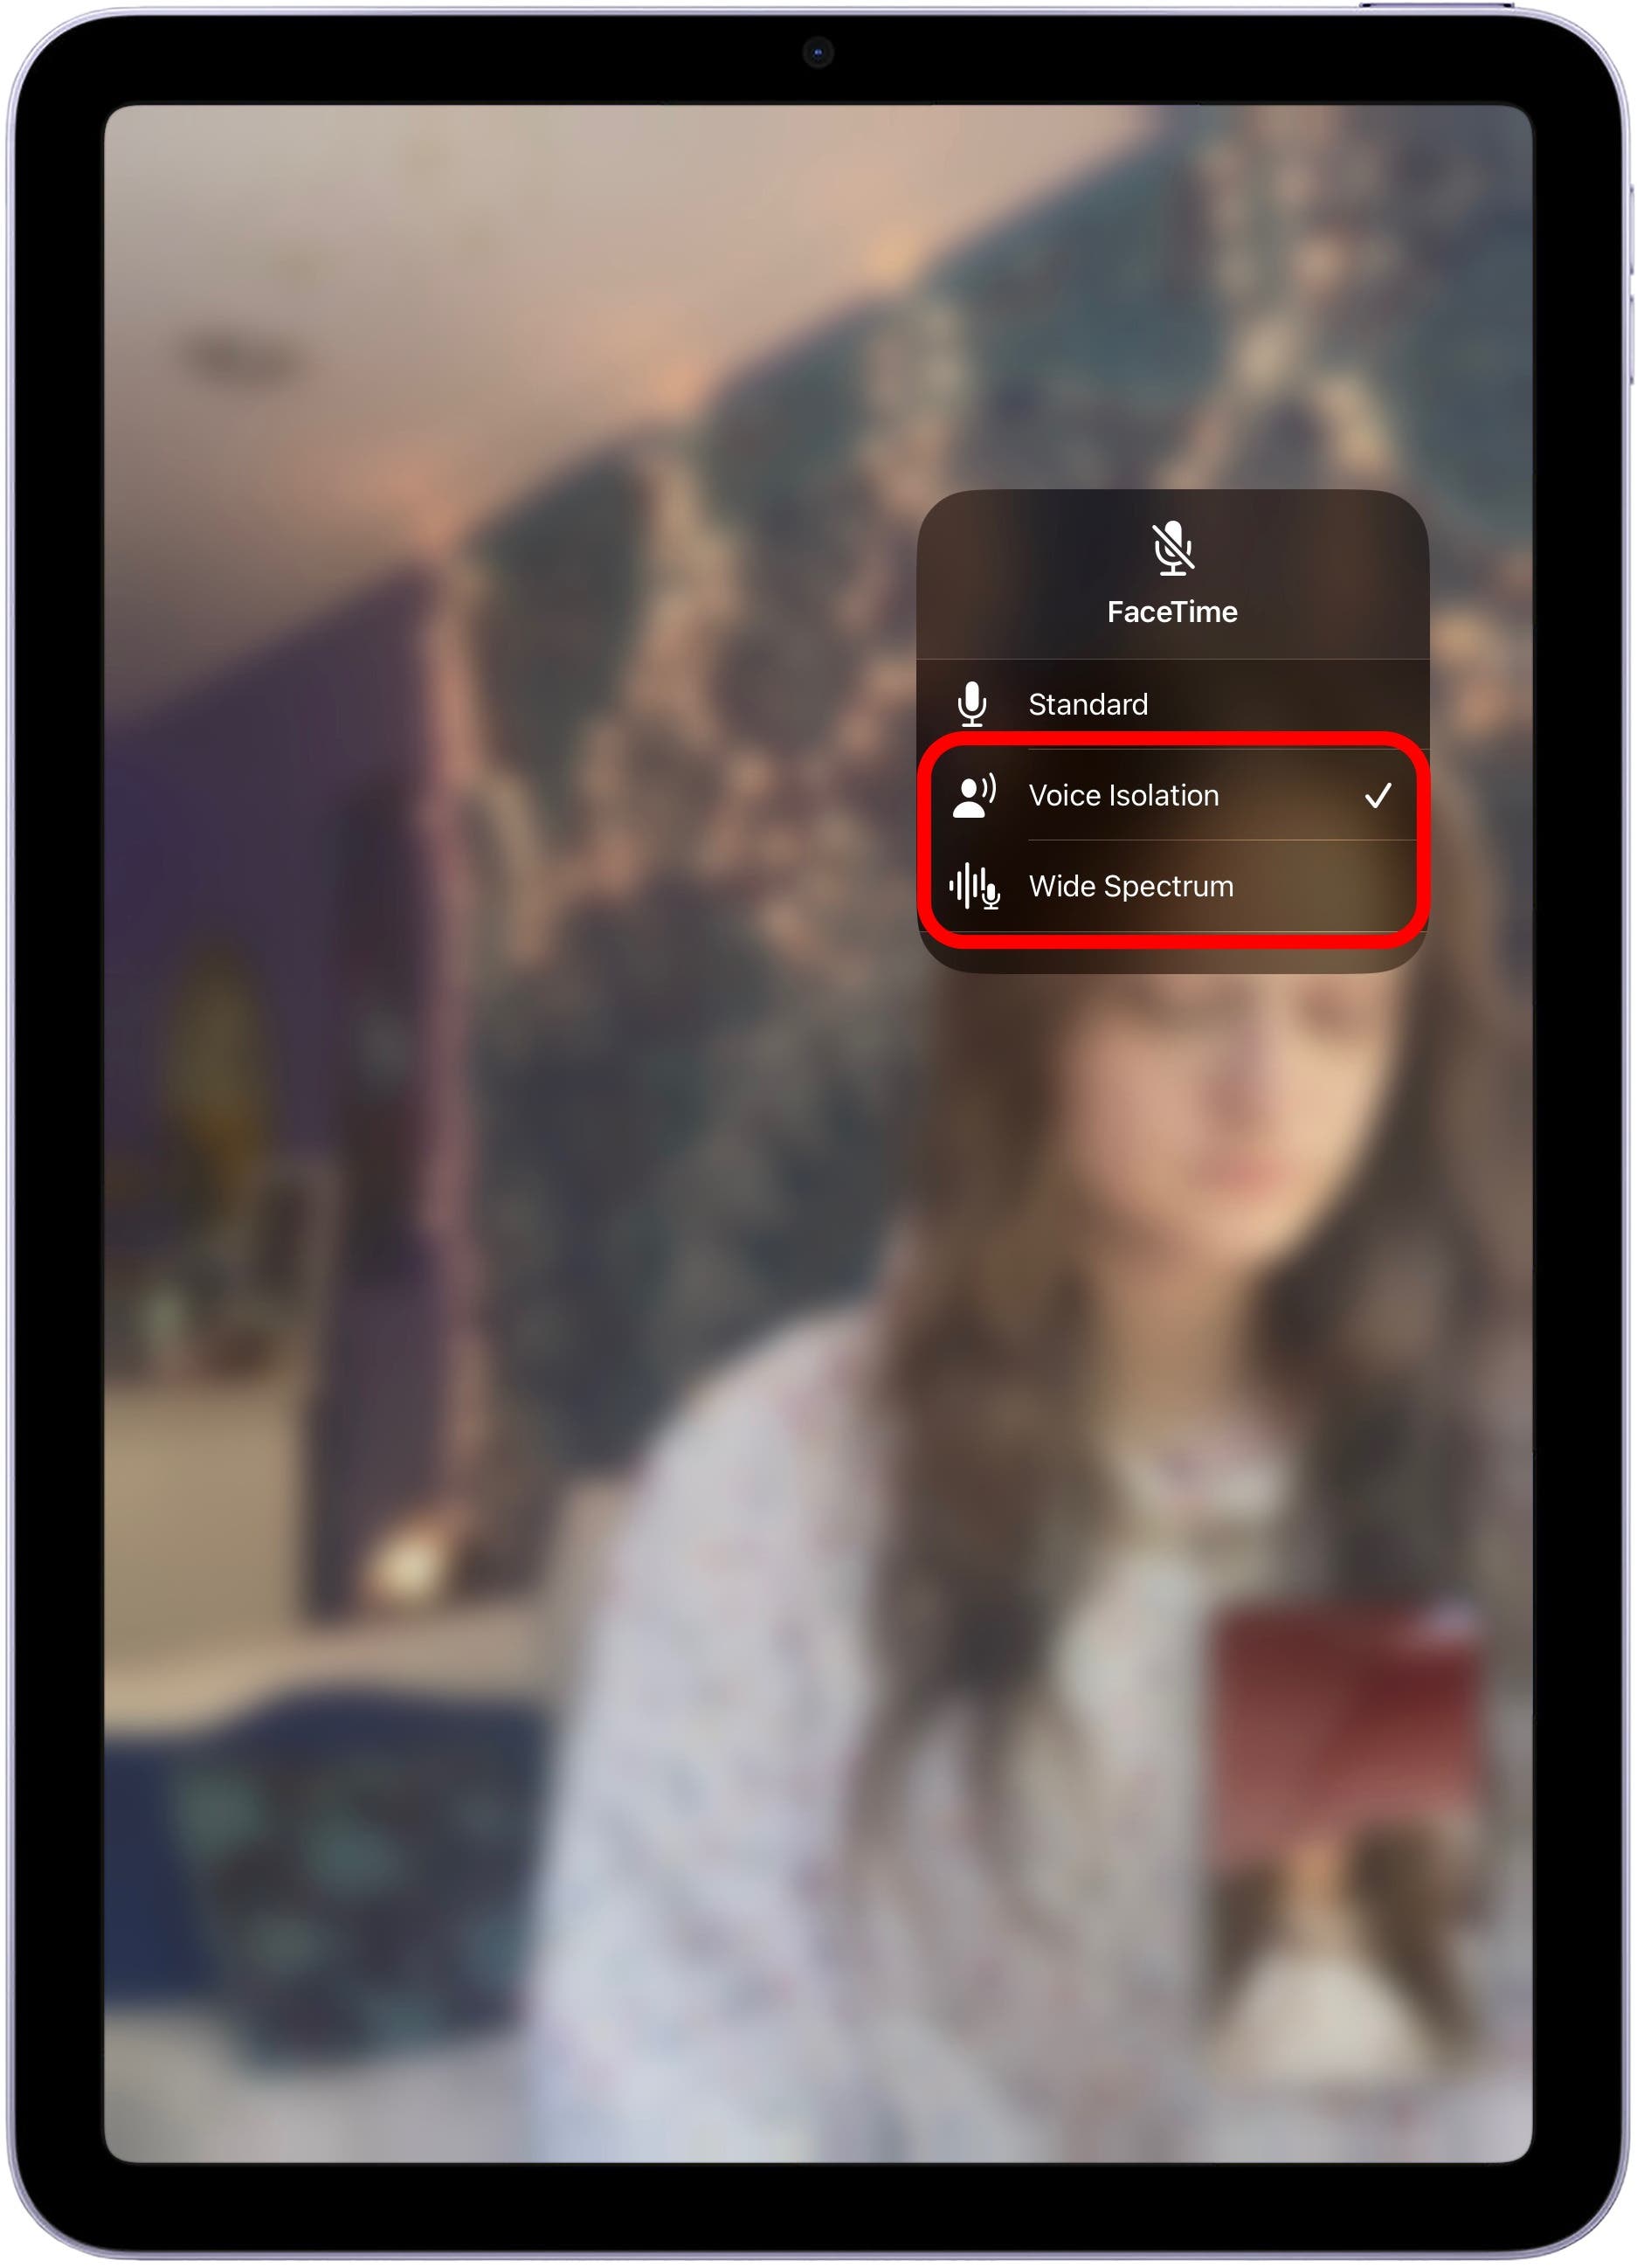
Two audio setting options give you extra control over the audio quality of your call. Especially if you’re unable to attend restaurants, concerts, or plays in person with your family, these features are amazing for maintaining that feeling of togetherness. The first feature is called Voice Isolation. If you've ever tried to make a FaceTime call in a noisy location, you know that FaceTime's audio clarity can leave a lot to be desired. With iOS 15, Apple aims to fix that by offering a Voice Isolation Mic Mode for FaceTime so your voice will stand out above the background noise. The second new feature is called Wide Spectrum Audio. This feature brings in and enhances all the background noise around you so your friends or family can hear things in your area, like a concert or a movie, with better quality.
You access both of these features with the same steps.
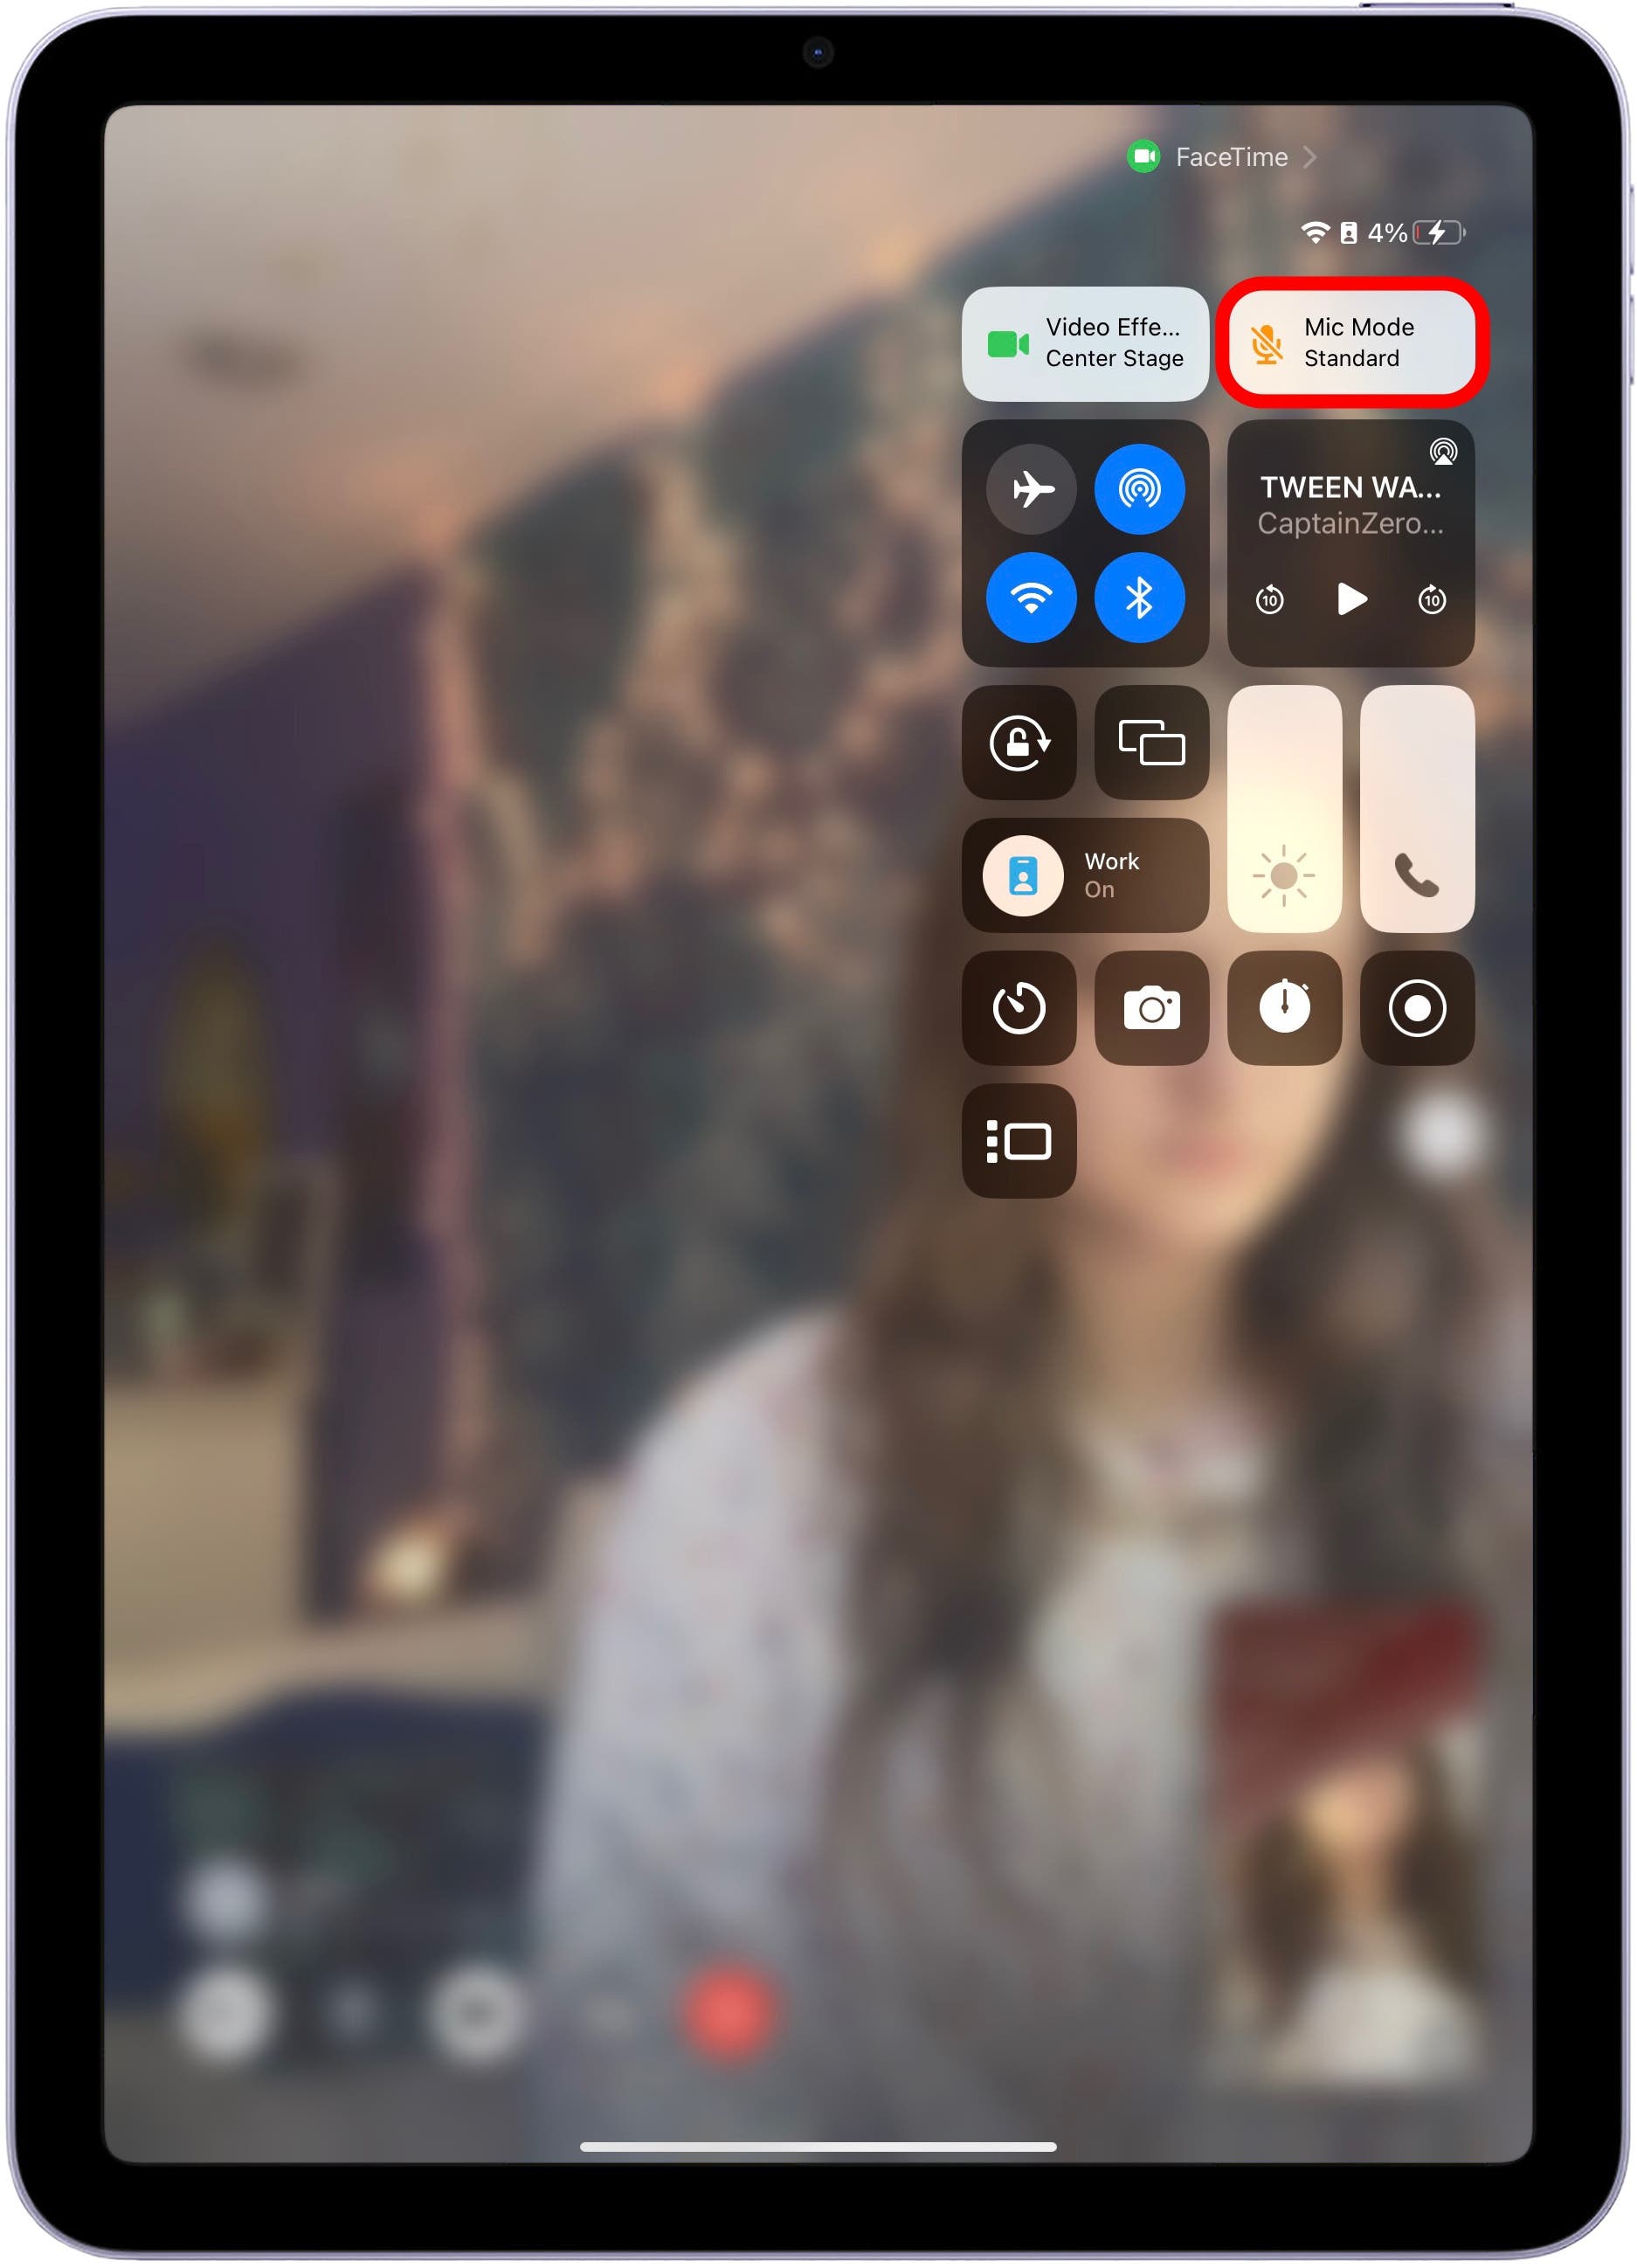
- First Open FaceTime. Then, swipe down from the upper right-hand corner of your screen to open the Control Center. If your phone has a home button, swipe up from the bottom center of your screen. Tap the Mic Mode button.
- From there, you can choose either Standard Mic Mode, or the two new features: Voice Isolation, and Wide Spectrum Audio.
NEW! Use Handoff to Switch FaceTime Calls
One of the most seamless features to arrive with iPadOS 16, iOS 16, and macOS Ventura is the ability to shift FaceTime calls from one device to the other. It’s so simple and easy to use, and it has already come in handy for me multiple times. This is especially useful when I want to switch from my iPhone to my iPad Air that uses Center Stage, a feature that keeps my face in the frame. It also helps that the iPad Air’s camera is so high quality, I’m always eager to switch my video calls over to my iPad. With Handoff, you no longer have to hang up completely to switch devices.
To ensure that Handoff has been activated on your iPad, go to Settings > General, then tap AirPlay & Handoff. Make sure Handoff is toggled on. It will be green when enabled. Double-check that Bluetooth and WiFi are turned on on all devices you’d like to use Handoff with. Then, when you make or receive a FaceTime call on any of your devices, you will get a notification on the FaceTime app on all nearby connected devices that shows the device you are currently FaceTiming with, in this instance, I was using my iPhone. Tapping it will open a preview of your video, and you can tap the Switch button and when you’re ready to handoff the FaceTime call onto your device. You will receive a banner notification on the device you are switching from as well, with the option to tap “Switch.” Then, you will pick up your call as usual on another device. Pretty cool!


Activating Siri
iPad with a Home Button
You activate Siri by holding down the Home button. Siri will await your request, even after you have lifted your finger from the Home button. However, if you want to prevent Siri from interrupting you, continue to hold down the Home button until you are finished with your request.
iPad without a Home Button
To activate Siri, just press and hold the Sleep/Wake button. Siri will await your request, even after you have lifted your finger. However, if you want to prevent Siri from interrupting you, continue to hold down the Sleep/Wake button until you are finished with your request.
Search with Spotlight
Trying to find an app, contact, web image, or even a nearby business? That’s what Spotlight Search is for! Think of Spotlight as your all-in-one search tool, allowing you to find both web content and files saved on your iPad. Below, I’ll cover how to access Spotlight, and some of the lesser-known ways to use it.
- Open Spotlight Search by swiping down from the middle of your Home screen. From here, you can search for web content or find files saved on your device.
- You can type in the name of an app to pull it up. If you don’t already own the app, a link from the App Store will appear and you can tap on it to install the app.
- You can also search your Photos library with Spotlight. Search by locations, people, animals, scenes, or objects (such as cars). Add a contact name in your search to find images sent via text message.


Access Control Center & Add Controls
The Control Center is where you can easily access your iPad’s most-used features and settings, such as your Camera, Flashlight, and display brightness. With a few quick taps, you can adjust notification settings and enable or disable a variety of features. Here’s how to access your Control Center and customize controls to only include the options you need.
- Open the Settings app and tap Control Center. From here, you can tap the red minus button to remove unnecessary features from your Control Center. Tap the green plus button in the More Controls section to add these features to your Control Center.
- Swipe down from the top right corner of the screen to open your Control Center. From here, you can quickly tap a feature (such as the Flashlight) to enable or disable it.

Opening the Notification Center
The Notification Center provides an overview of alerts from your iPad applications. This way, you can see a quick preview of unread text messages, missed calls, and any other pertinent alerts from your applications. I’ll cover the different ways you can access and make the best use of your Notification Center.
- For iPads with a Home button, swipe down from the top of your iPad display to access the Notification Center. If you own an iPad without a Home Button, swipe down from the top left corner.
- Tap a single notification or group of notifications to open the app that it is from. For further options, you can also swipe left over a notification. Tap Clear to remove the notification. Tap Options to temporarily mute the alert or adjust alert settings.


You can also see your recent notifications on the Lock screen by waking your iPad. To show the contents of notifications on the Lock screen without unlocking your device, open Settings, tap Notifications, tap Show Previews, and select Always.
Viewing Widgets
Widgets allow you to view valuable information such as upcoming events, Siri app suggestions, battery level, the weather forecast, etc. You can even use widgets to perform certain actions without having to open an app! You view your widgets by navigating to the Today view by swiping right on your Home screen or Lock screen.
You can also add your favorite widgets directly to your Home screen so they can be viewed without opening the Today view. I’ll cover how to personalize widgets in the Customize iPad Settings section below.
Using Your iPad’s Dock
Before you can take advantage of Apple’s many multitasking features, you need to first know how to use the iPad’s Dock. Accessing your iPad’s Dock is pretty simple.
- If you are on your Home screen, then the Dock is already visible along the bottom of your screen. Remember, if you swipe up too far, you’ll just close out of your app. You need to make sure you only swipe up slightly.
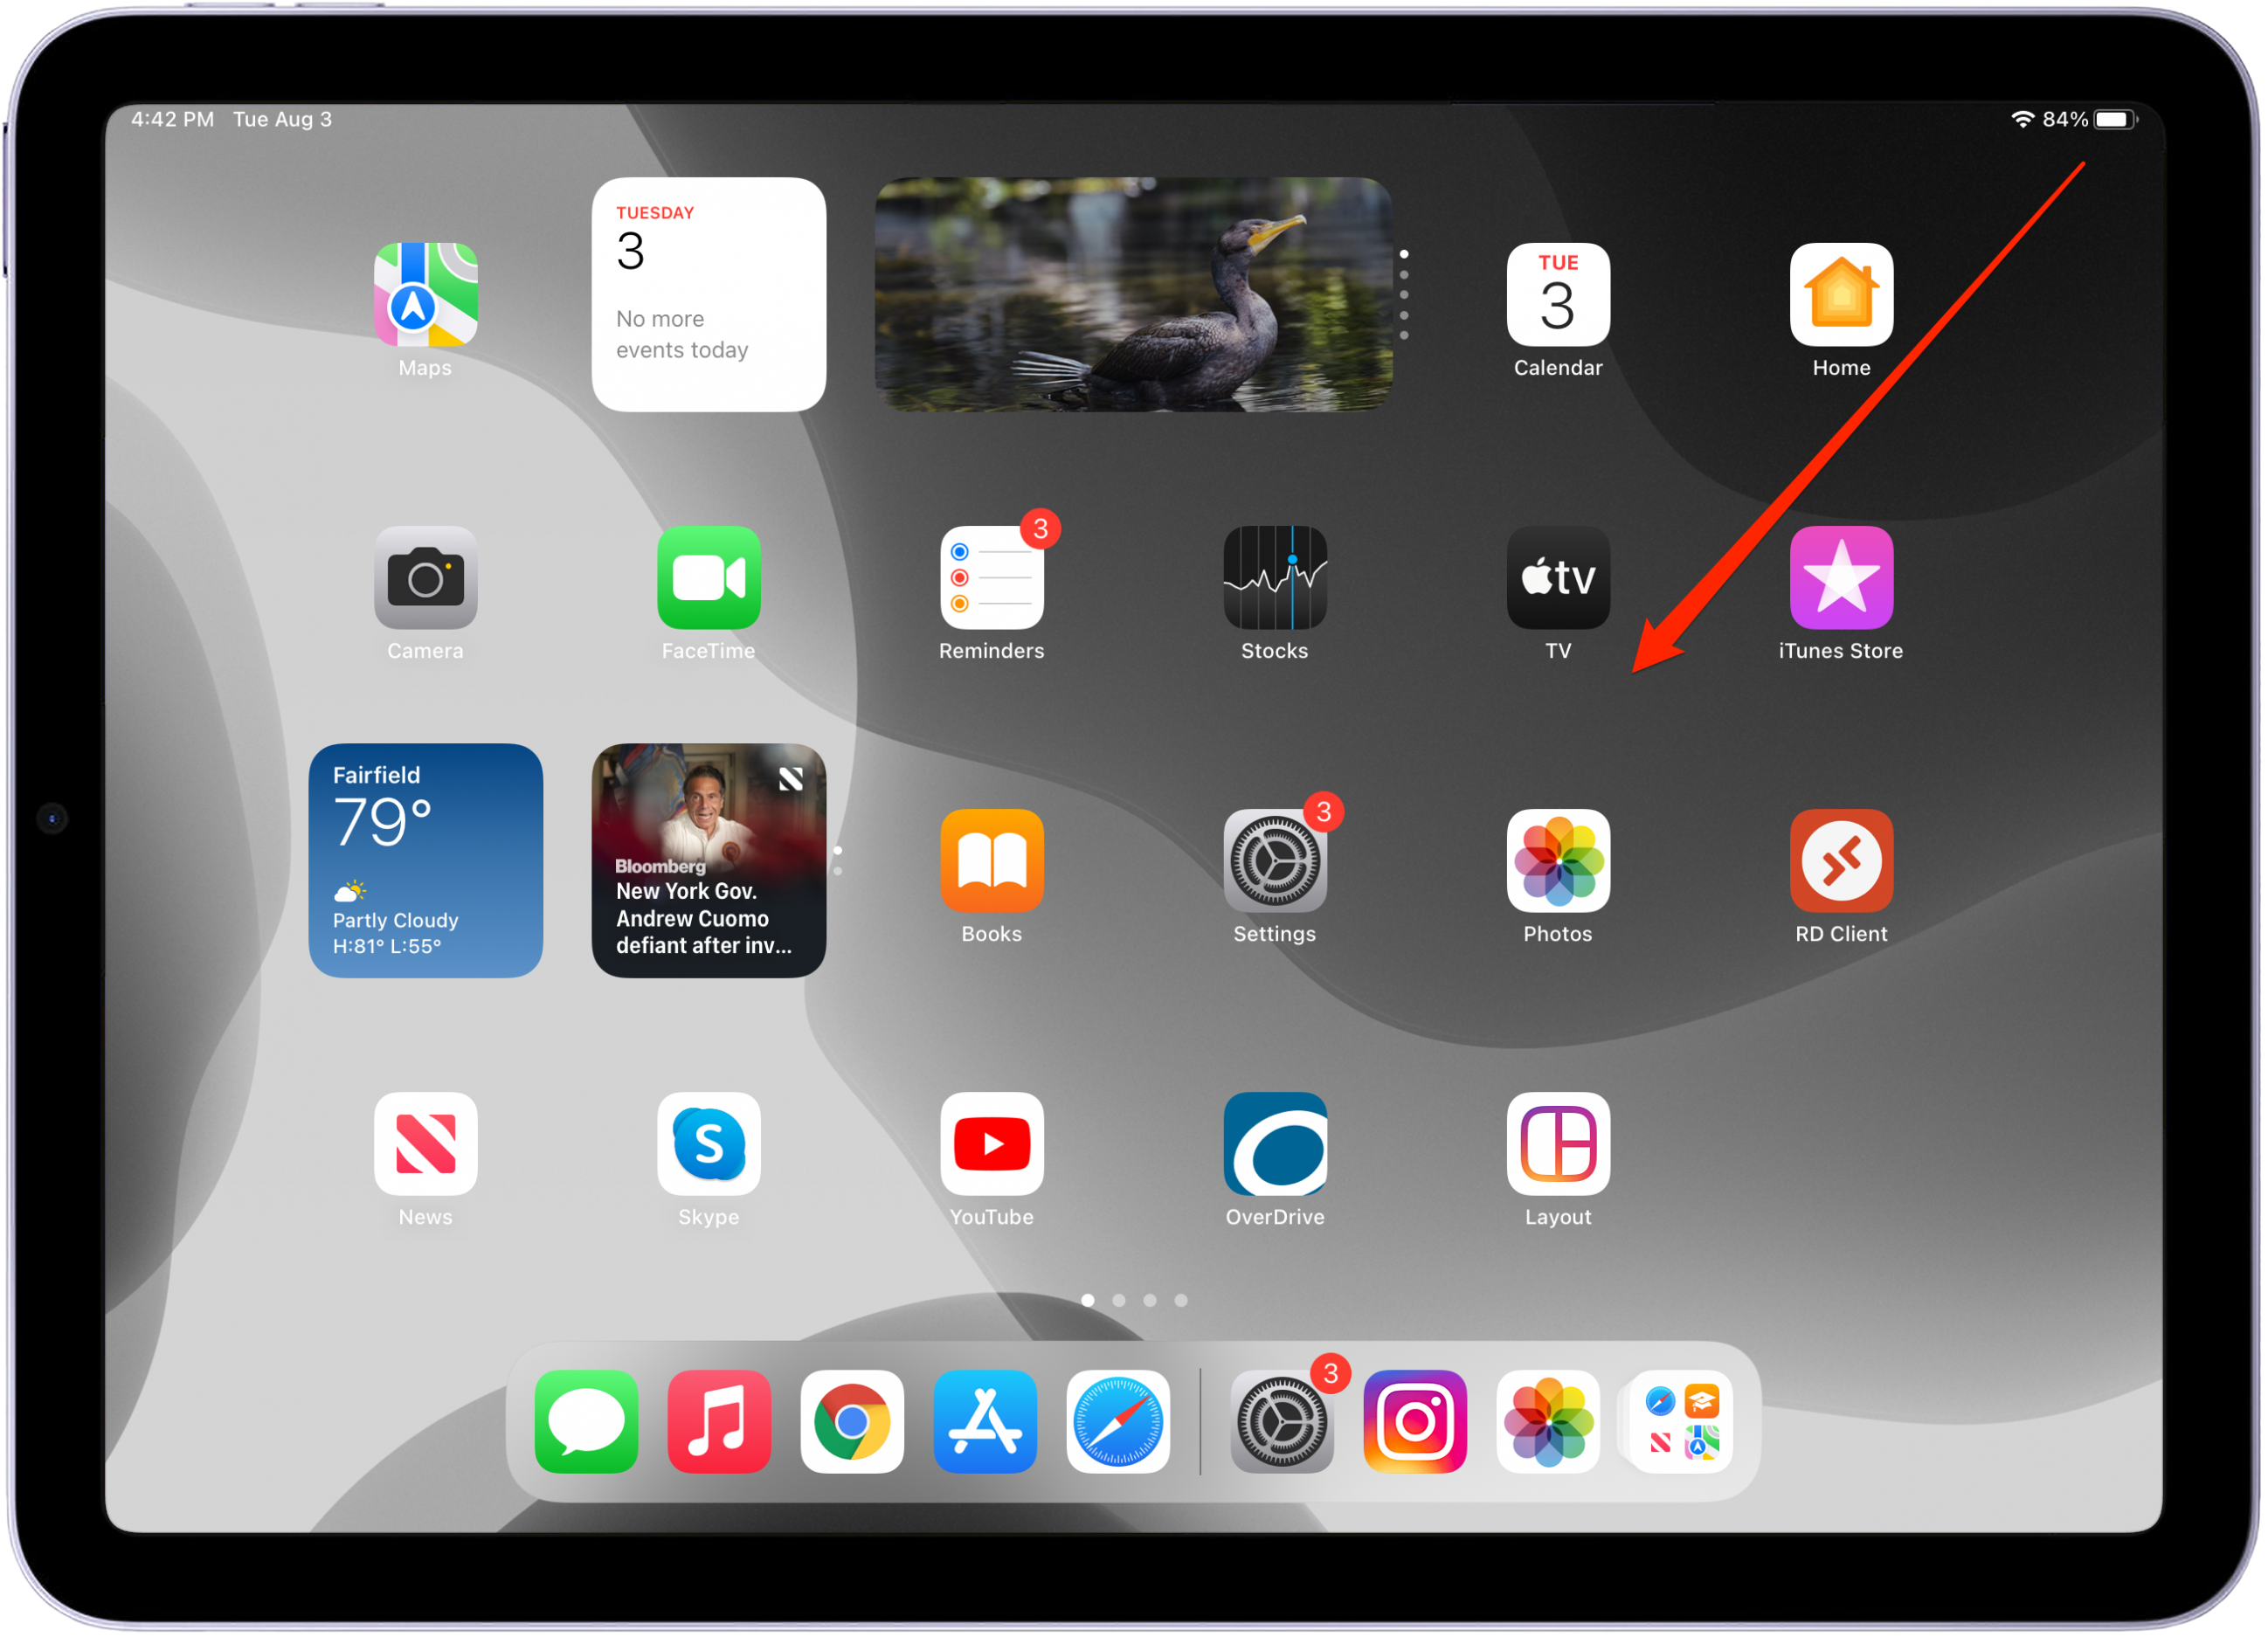
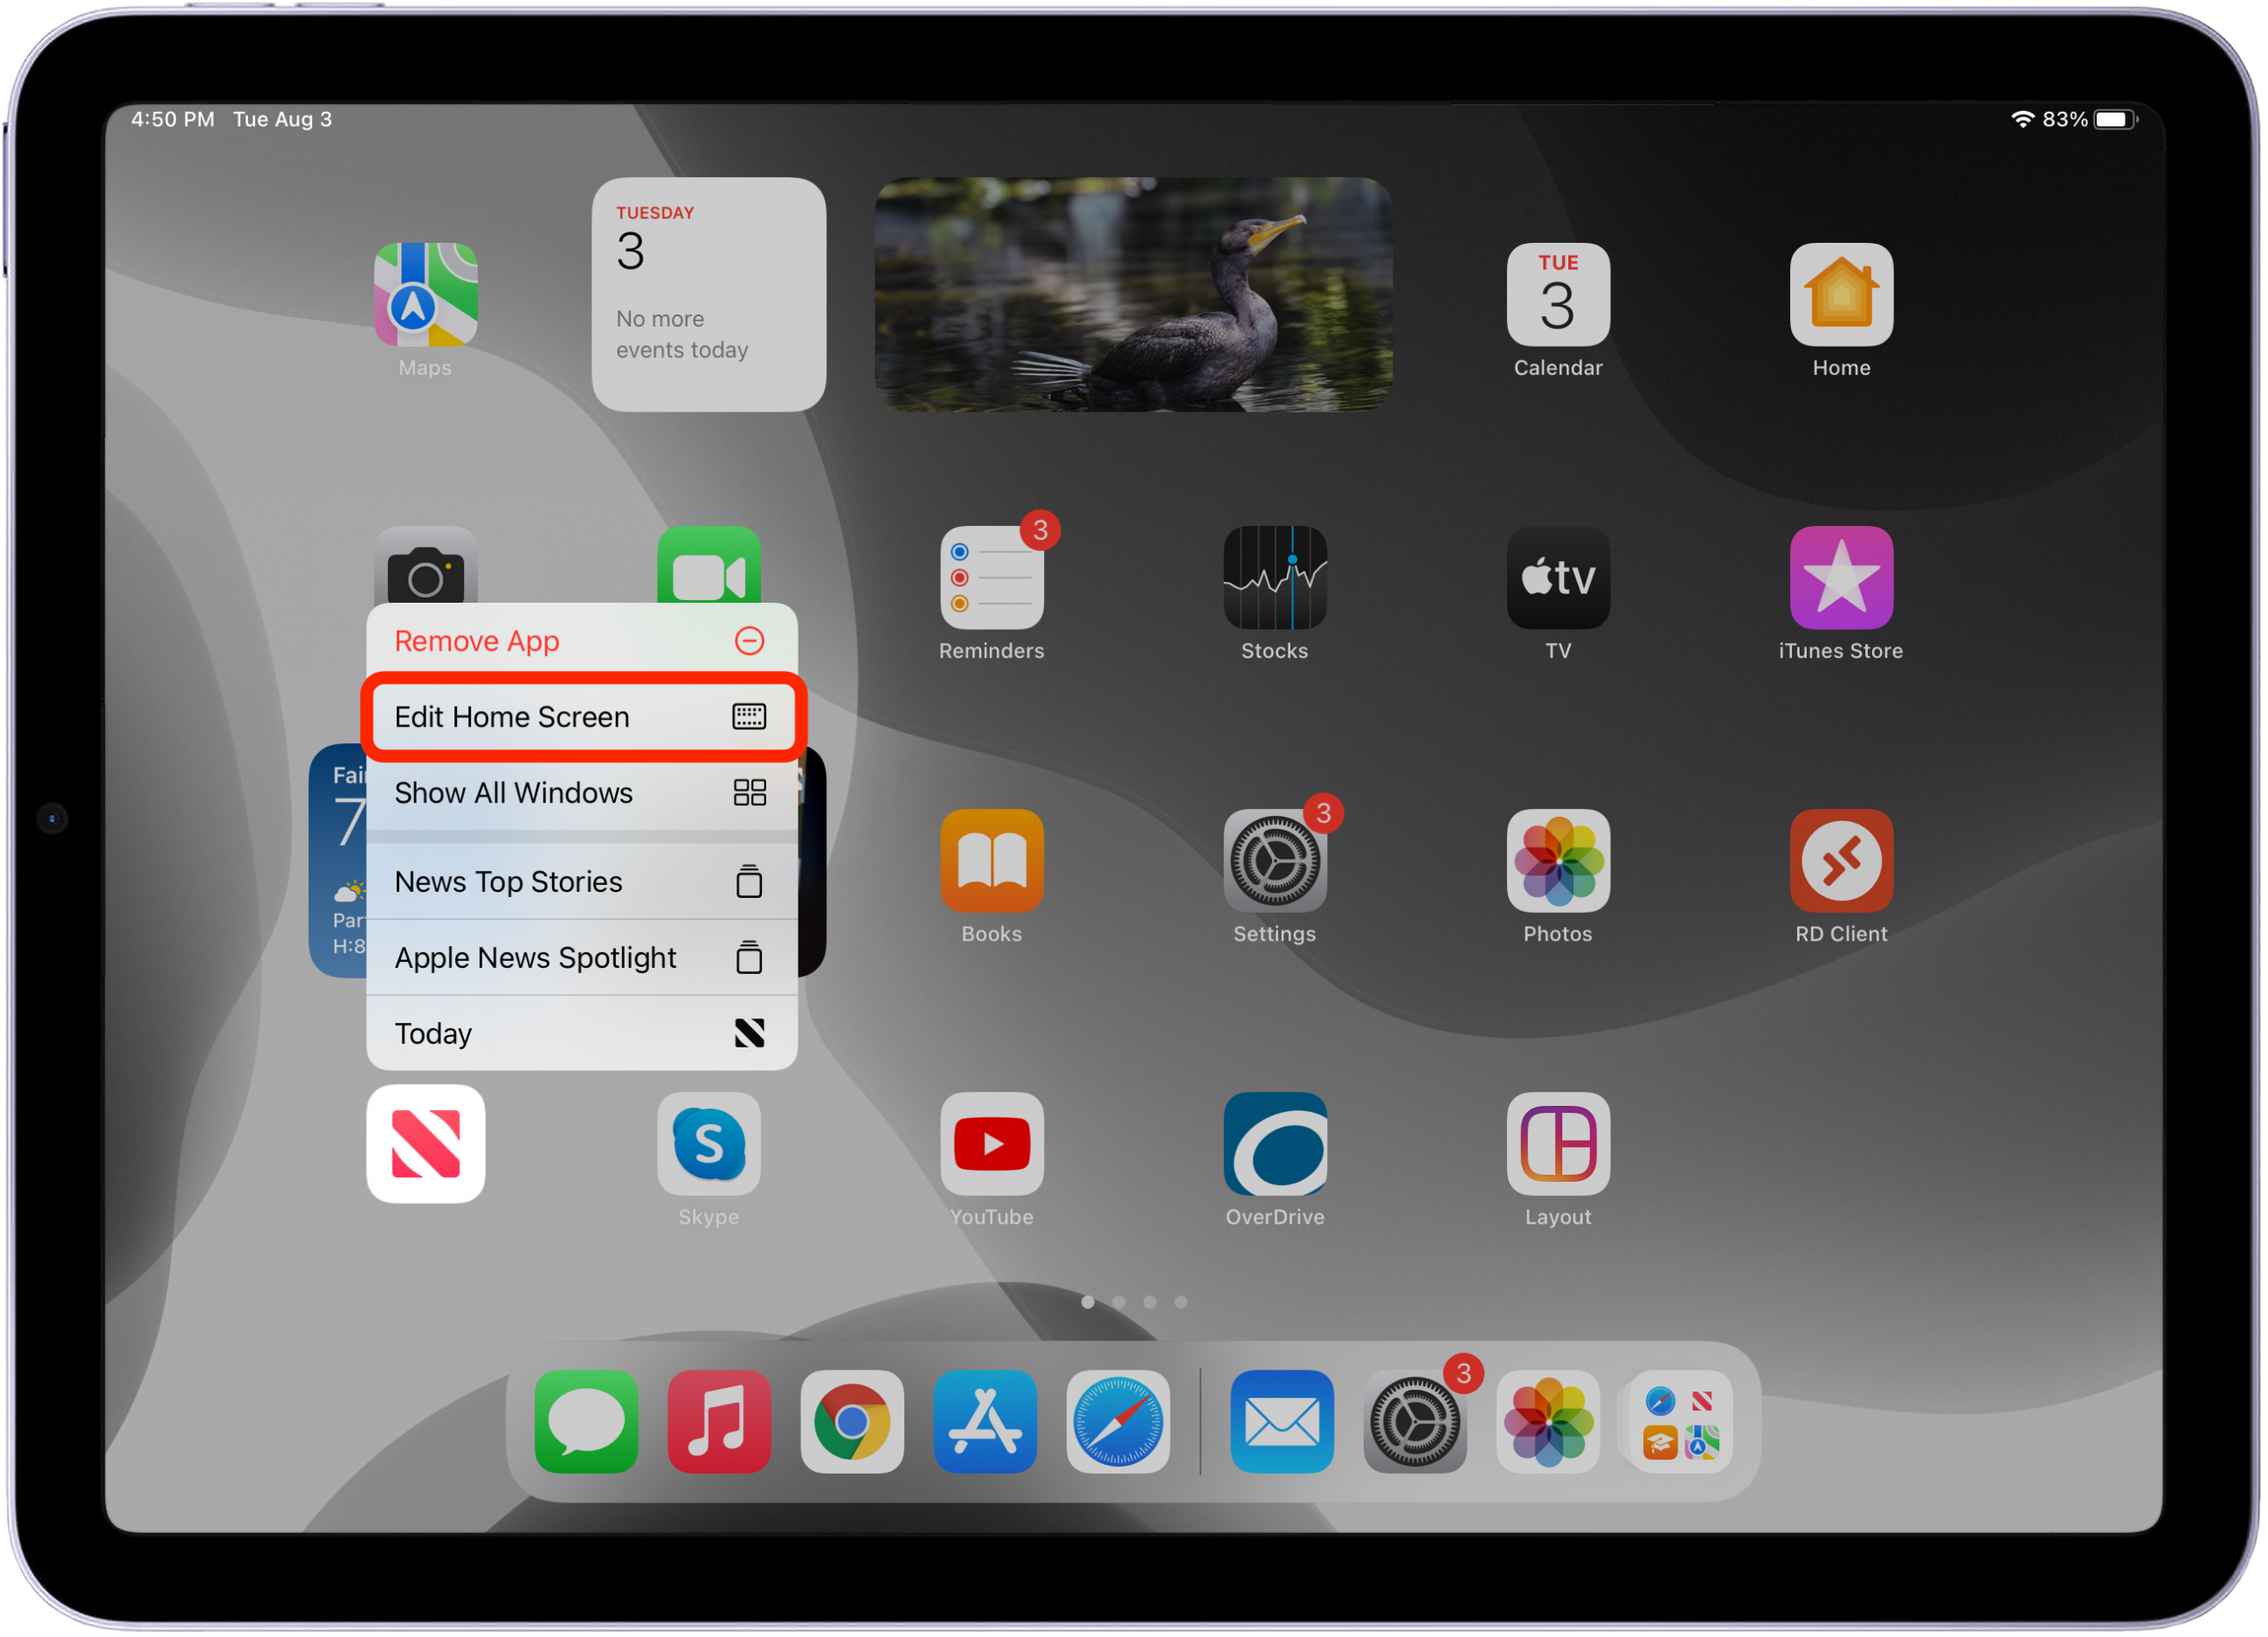
- To add an app to your Dock, just long-press on an app icon until the pop-up menu appears. Tap Edit Home Screen.
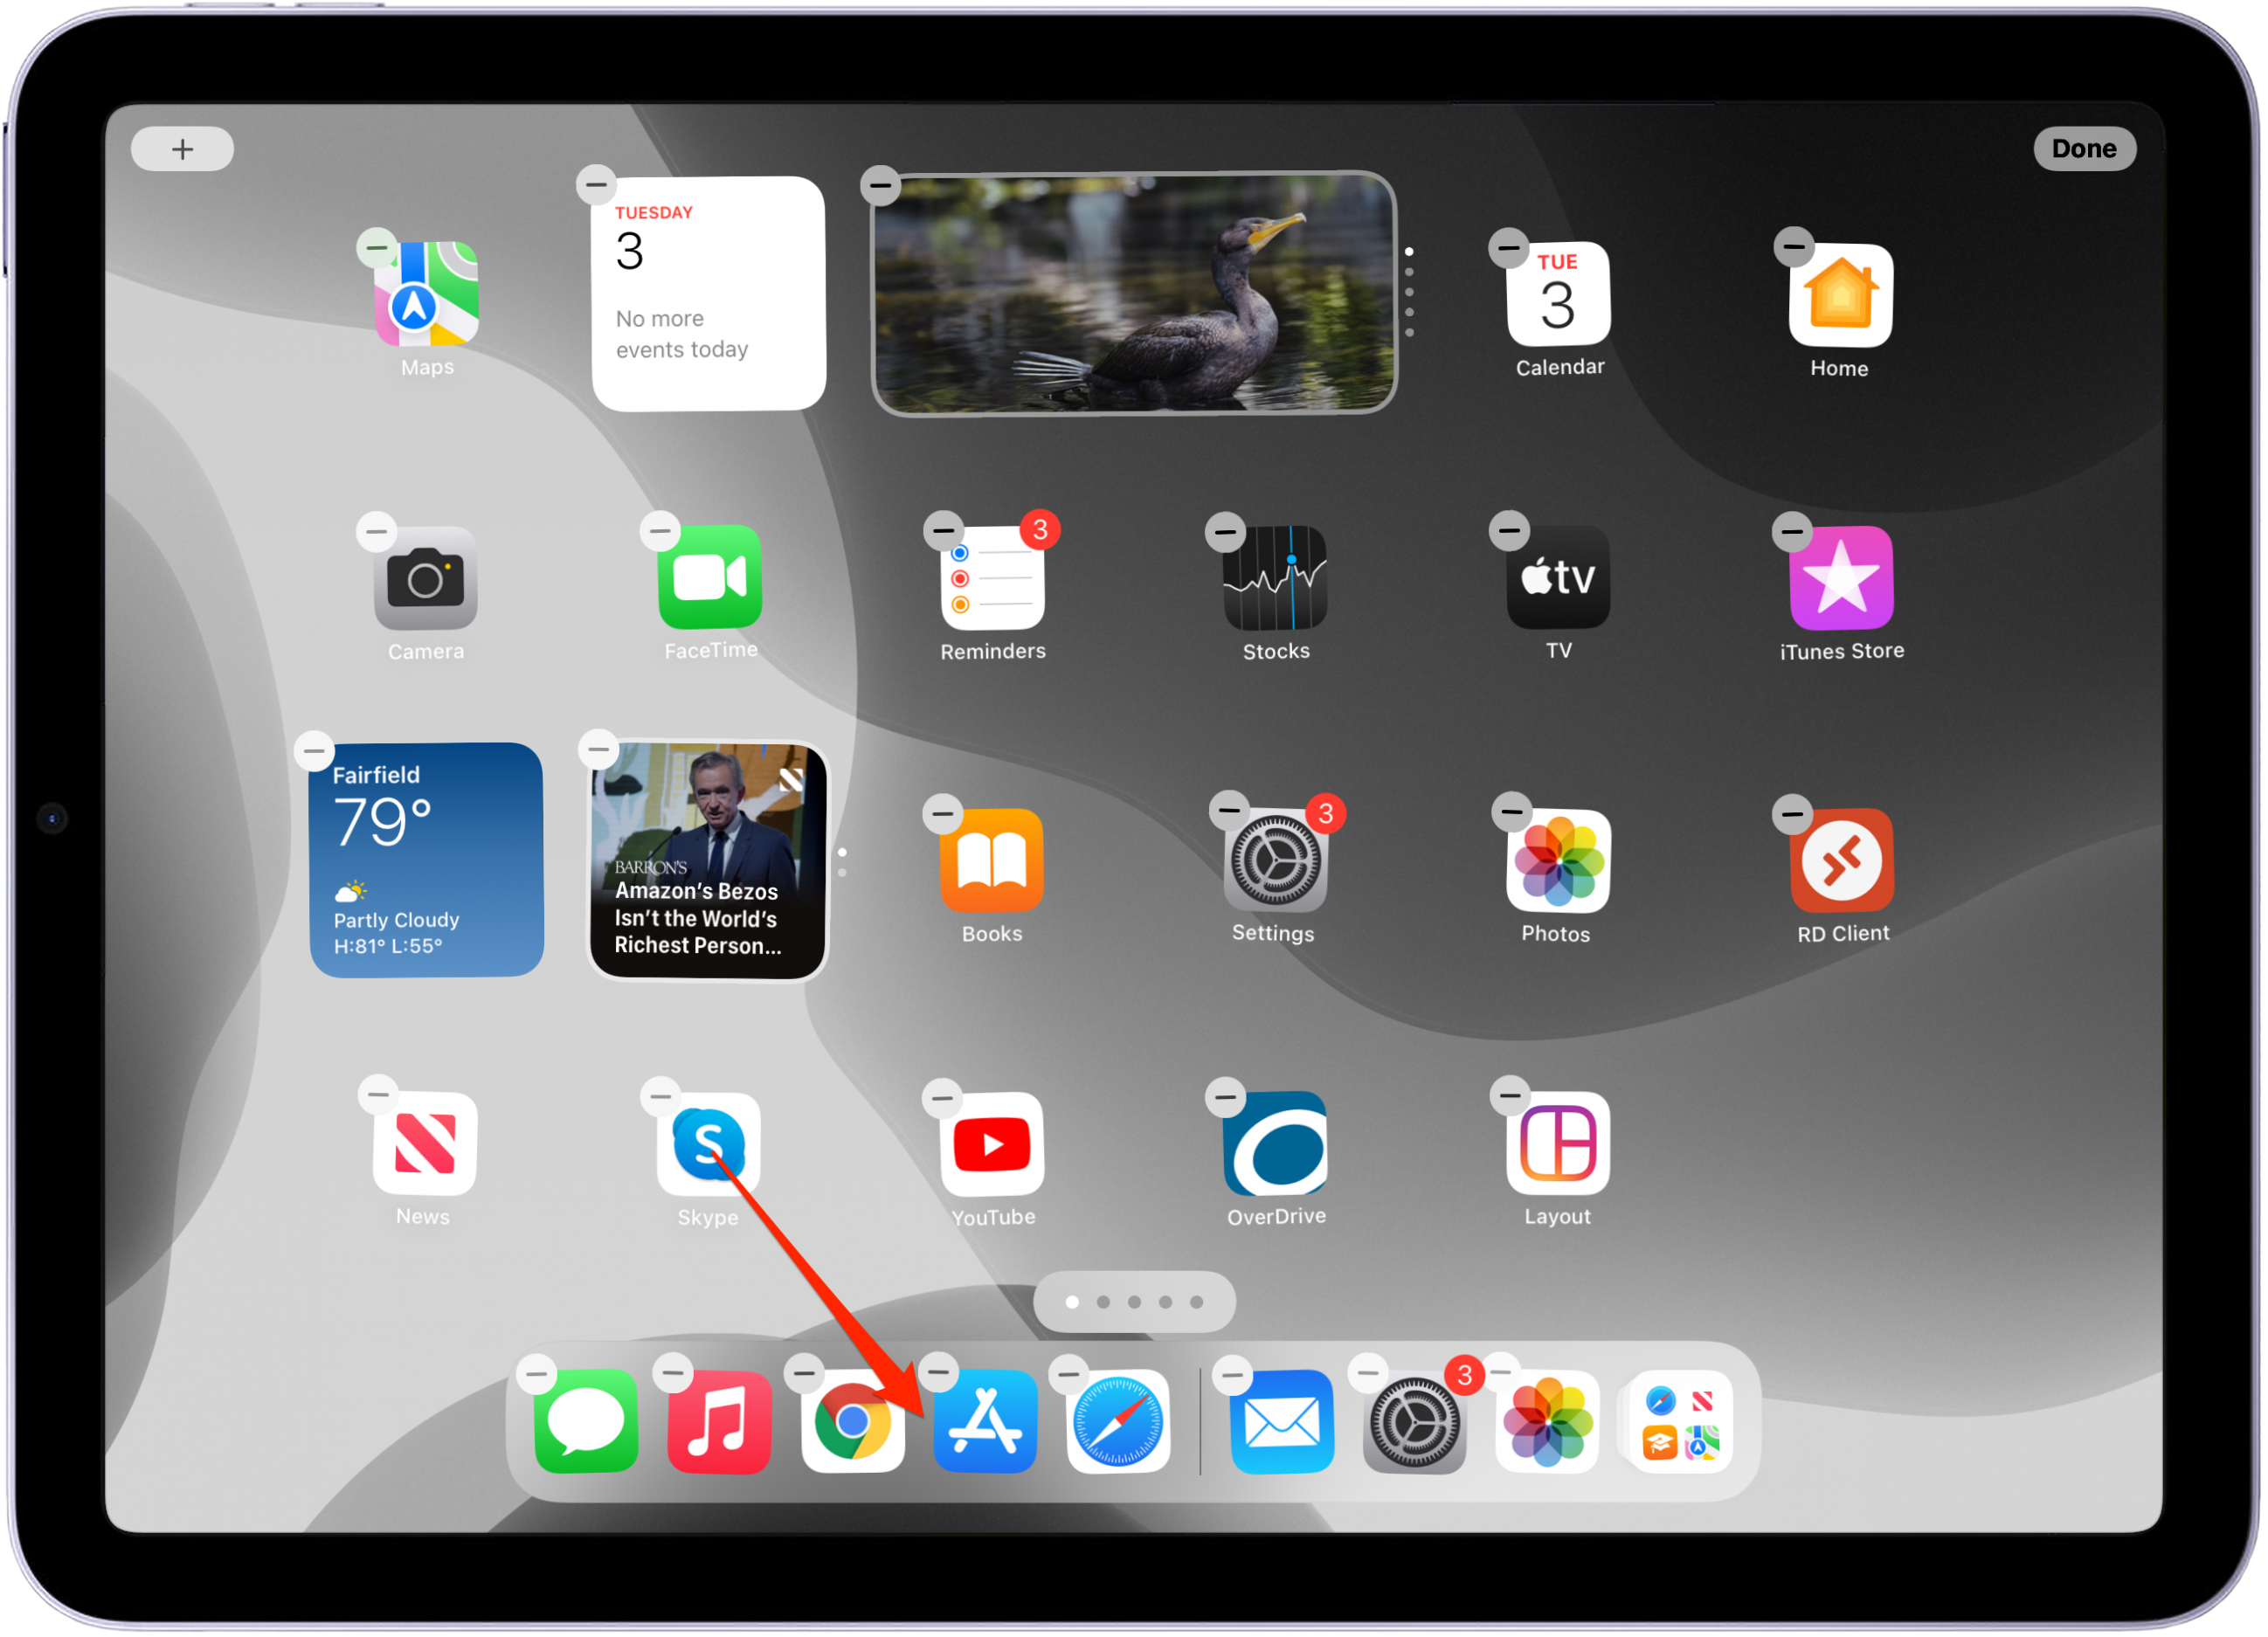
- Once your apps begin to wiggle, then tap and hold on the app you want to move, and then drag it into your Dock. To remove an app from the Dock, just enter jiggle mode again, and drag the app from the Dock onto your Home screen.

You’ll notice a section of the Dock reserved for your recently used apps (to the right of the gray divider bar). As you open new apps, they will appear at the right of your Dock. If you don’t like seeing your recently used apps though, no problem! You can disable this feature. You do this by going to Settings > Home Screen & Dock and toggling off Show Suggested and Recent Apps in Dock.
Clear History and Cookies
What’s the difference between history and cookies? Your browsing history is a list of previous Safari web pages and sites you’ve visited. Cookies are a piece of data that a website puts on your device so it can remember when you visit again. Whether you are security conscious or simply wanting to reduce clutter, we’ll walk you through how to clear your Safari history and cookies on your iPad.
- To delete your browsing history, open Settings, tap Safari, and select Clear History and Website Data.
- To remove cookies, open Settings, tap Safari, select Advanced, tap Website Data, then tap Remove all Website Data. Removing cookies will not delete your browsing history.


