Whether you’re a new iPad owner or an experienced iPad veteran, I highly recommend working through this section and customizing your device in the Settings app. Adjusting settings allows you to tailor notifications, personalize device displays, and help you to get needed information and accomplish tasks more efficiently.
Name Your iPad
If you haven’t already, I recommend naming your iPad, so it is easy to identify your device when using iCloud and other apps requiring your Apple ID (this is especially a concern if you’re managing multiple devices). To rename your iPad, open the Settings app, tap General, tap About, and select Name. Type a descriptive device name. Tap Done on your on-screen keyboard to save the name.
Set up Siri
Siri is a voice-controlled personal assistant available on Apple devices. Using Siri allows you to perform a variety of hands-free tasks by using voice commands, such as making calls or sending texts. Here’s how to set up Siri and adjust the main Siri voice settings.
- Open Settings, select Siri & Search, and tap the toggle next to Listen for “Hey Siri”. Tap the toggle again to enable the feature. A prompt will appear asking you to say Hey Siri and a few commands to help Siri better grasp your dictation. Tap Done when finished.
- If not already enabled, you can tap the toggles next to Press Top Button for Siri and Allow Siri When Locked. You can also tap Siri Voice to set a preferred Siri voice and regional accent.


Tailor Notifications
Tailoring notifications allows you to set which apps you want to receive notifications from and whether you want them to appear as banners that recede after a couple of seconds or alerts that require an action from you. If I enable notifications, I like to use banners and turn off Sounds so my iPad doesn’t become too noisy. Below, I’ll walk through some of the main ways you can tailor notifications.
-
Open Settings and tap Notifications. From here, you can tap an app to customize the notification settings. If you don’t want to receive any notifications from a specific app, you can tap the toggle next to Allow Notifications.
-
Tap on Lock Screen, the Notification Center, and Banners to allow notifications to display in these areas. Tap again to uncheck an option and block notifications from displaying in this way. You can also set Banner style as permanent or temporary (disappears after a few seconds).
-
Tap Sounds to adjust alert sounds or silence notification noises. You can also tap the toggle next to Badges to allow the red dot on apps showing messages or notifications received.


Enable Night Shift or Turn On Dark Mode
Enabling either Night Shift or Dark Mode can be easier on your eyes and help you to sleep better at night. With Night Shift mode, your iPad takes on a warmer hue, which emits less blue light. Dark Mode is the display view where app backgrounds are black and text is white (some people prefer this regardless of the time of day). Below, we’ll show you how to enable each setting and set an automatic schedule to shift into each mode in the evening.
Set Dark Mode
-
Open the Settings app and tap Display & Brightness. Tap the Dark icon to manually enable Dark Mode.
-
To automatically switch to Dark Mode in the evening, you can tap the toggle next to Automatic. Tap Options, and select with Sunset to Sunrise or Custom Schedule.


Set Night Shift
-
Open the Settings app, tap Display & Brightness, and tap Night Shift. Tap the toggle next to Scheduled and set the hours you’d like to have Night Shift mode enabled each evening.
-
If you don’t initially like the warm colors, you can adjust the Color Temperature slider so that the display is not overly orange. (The warmer the color tone, the less blue light is emitted.)


Choose Which Apps Can Track Your Location
I like to turn off location tracking for any apps that aren’t absolutely necessary. This not only protects my privacy but also helps to preserve the battery. If you have a Wi-Fi-only iPad, you don’t have a GPS antenna so your device will use Bluetooth and Wi-Fi hotspots to track your general whereabouts. Read the steps below to learn how to turn off location tracking for specific apps:
-
Open Settings, tap Privacy, and select Location Services. From here, you can see a list of your apps and view their permissions to track your location.
-
If you see an app you’d like to disable tracking for, tap it and select Never. You can also select While Using the App if you’d like your location to be tracked while the app is open.


Sign In with Your Apple ID
The next thing you’re going to want to do is to sign in with your Apple ID to all of Apple’s services. These services include iCloud, Apple Music & App Store, Notes, Reminders, Messages, Contacts, Calendar, and FaceTime. This will make it so all of these services can sync with any of your other devices logged in with your Apple ID.
If you haven’t already, you should sign into your iPad with your Apple ID. To do this, open Settings and tap Sign in to your iPad. Enter your Apple ID and password, then enter your six-digit verification code sent to your trusted device to complete the sign-in process.
NEW! iPad Accessibility Tips
You can also customize your iPad’s settings to make the iPad easier to use. Sometimes, the text on the screen is too small or in a font that is too difficult to read. Other times, you may just want to enable a cool feature to make using your iPad a little more simple. I’ve put together a list of a few of my favorite iPad accessibility tips; however, there are so many more ways to make the iPad more accessible depending on a person’s abilities and needs. These are just a few handy examples!
Adjust Display and Text Size
If you have color blindness or other vision challenges, adjusting the display and text size can make it easier to navigate your iPad.
- To do so, go to Settings > Accessibility > Display & Text Size.
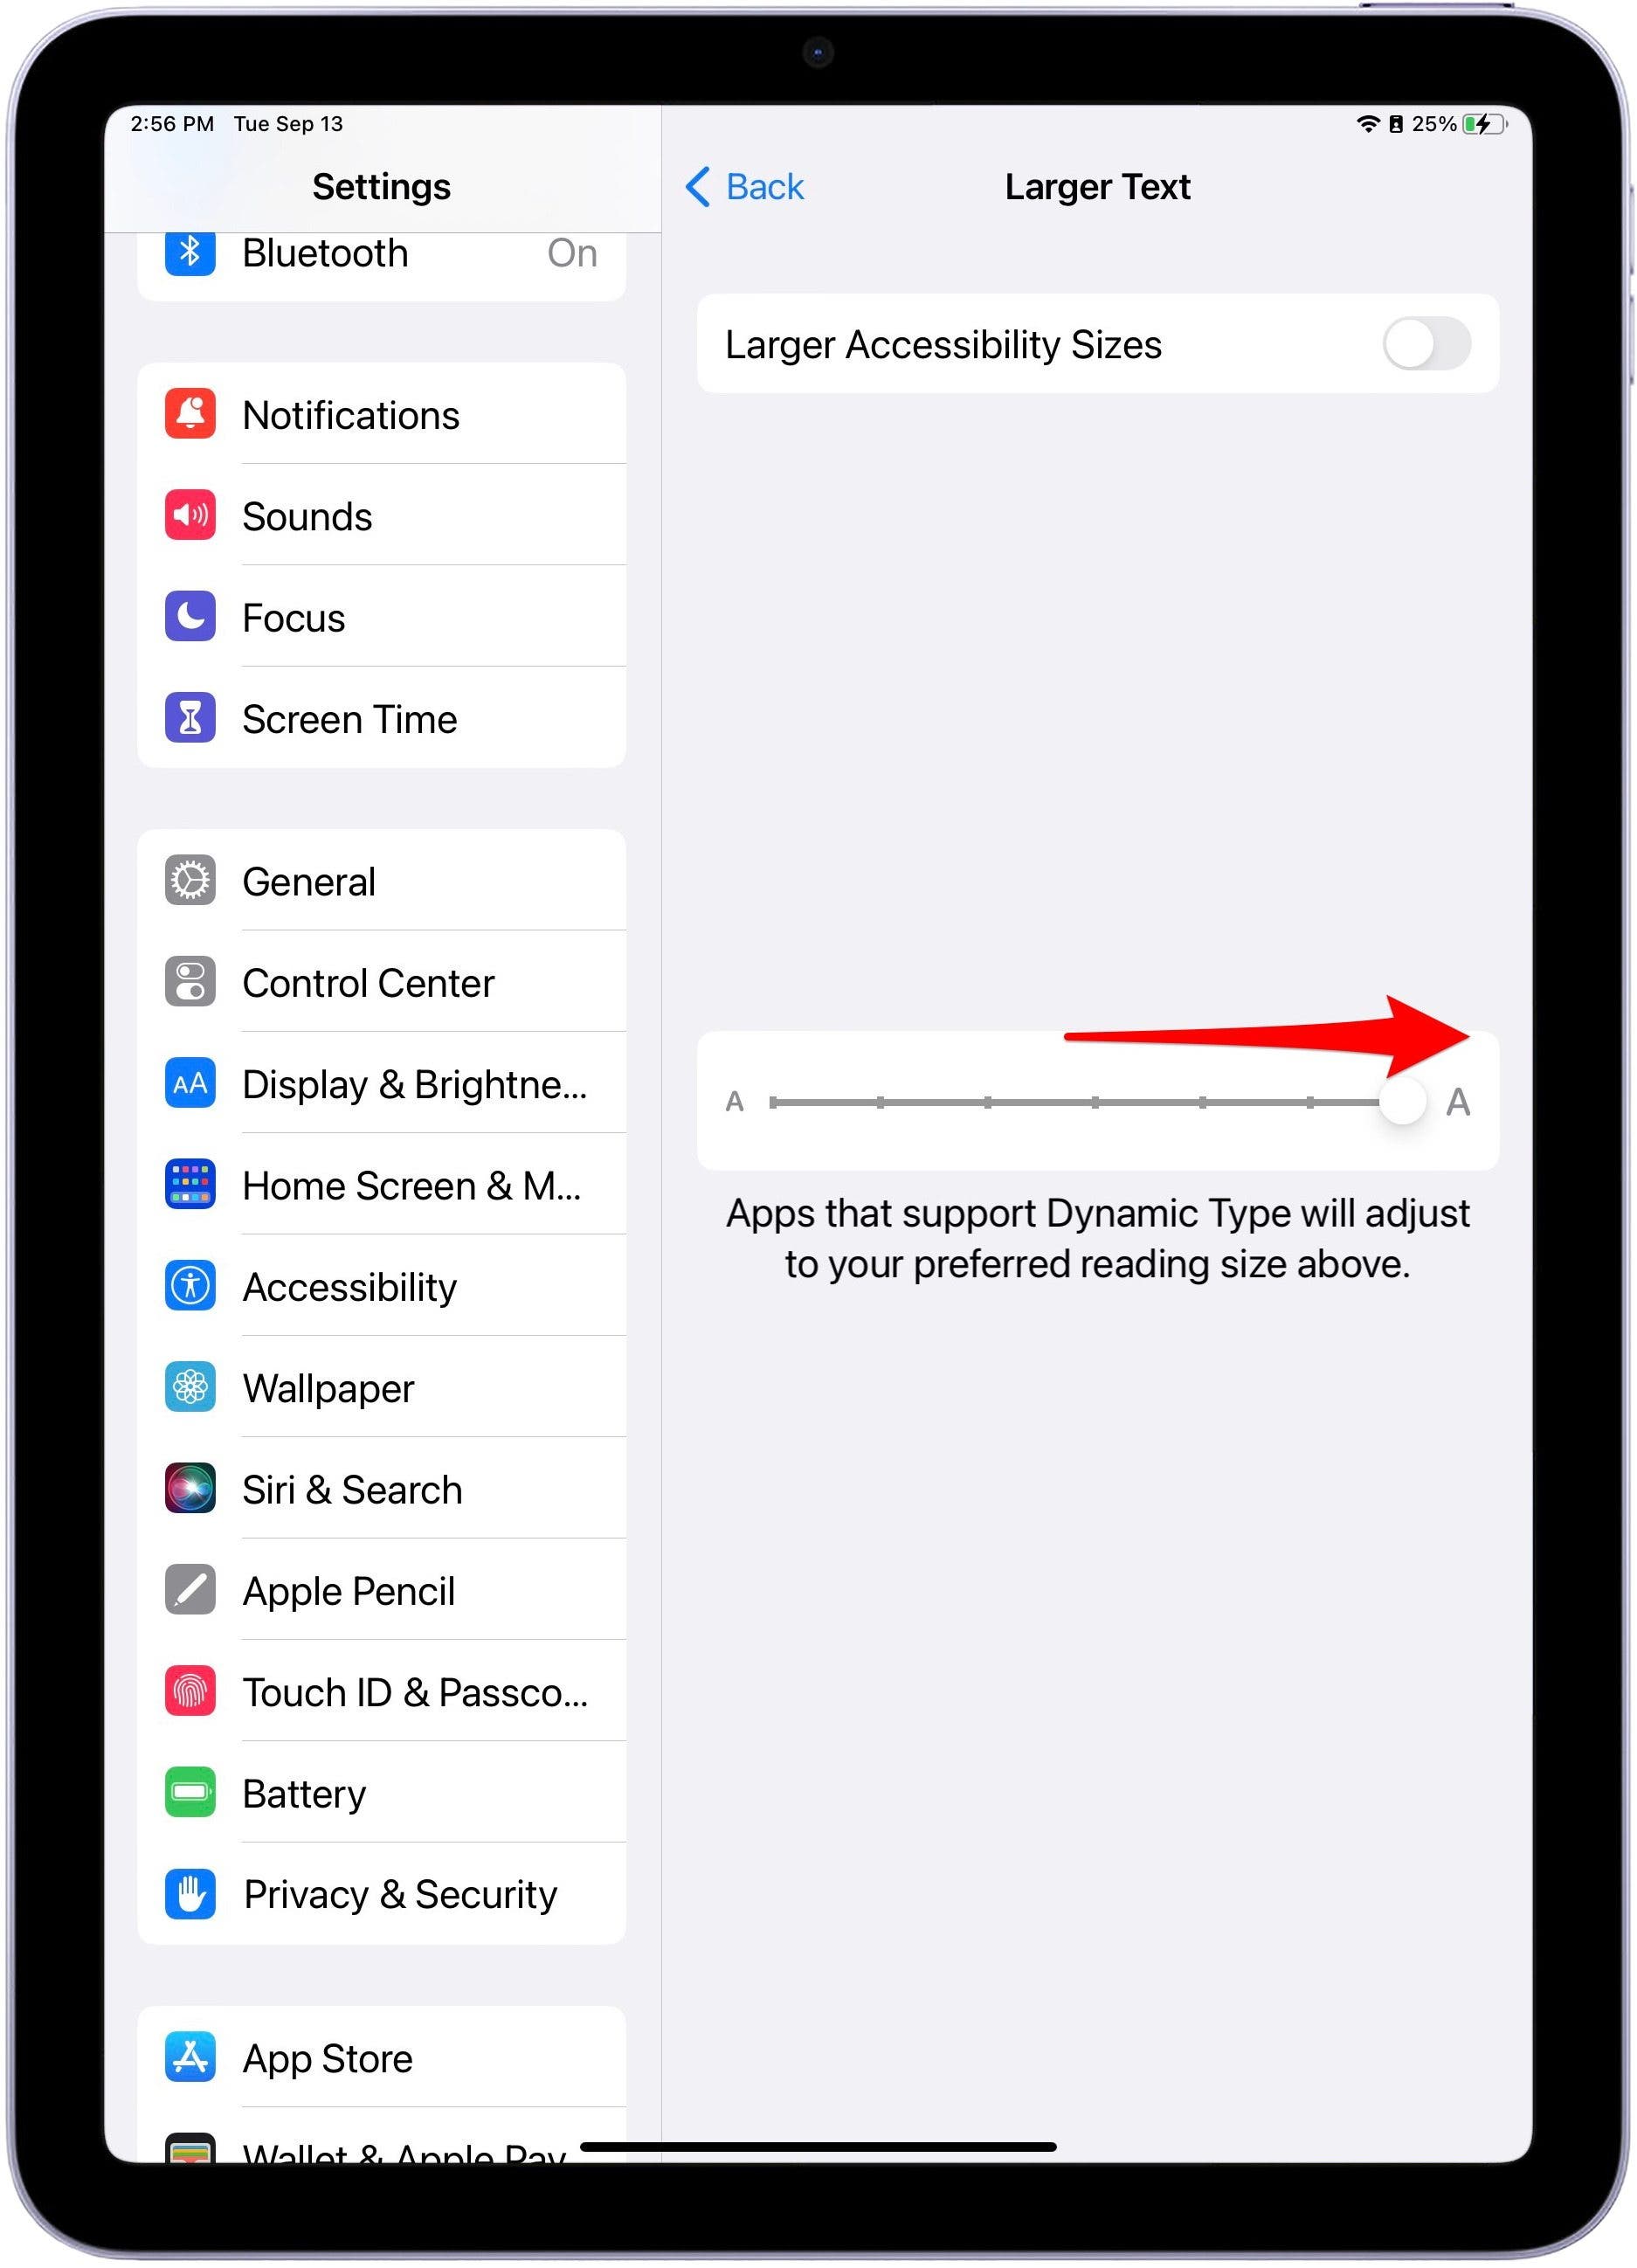
- From here, you can make a variety of customizations like Bold text, which makes all text across the iPad bold and easier to see, and Larger text, which gives you the option of dragging the slider to customize the size of your text across the iPad. And other features like Differentiate Without Color, which replaces user interface items that rely solely on color with other indicators, and Reduce Transparency, which makes backgrounds slightly less busy.


NEW! Display Zoom
A new feature in iPadOS 16 is Display Zoom, which allows users to increase the pixel density of the display so they can view more in their apps, which is especially useful when using Split View. To activate this feature, go to Settings > Display & Brightness > Display Zoom. You will see an animation demonstrating the subtle differences in display. Do note that changing your Display Zoom settings will require you to restart your iPad. 
AssistiveTouch
AssistiveTouch helps people use their iPad if they have difficulty touching the screen or pressing the buttons for a variety of reasons. With AssistiveTouch on the iPad, you can avoid performing actions and gestures that may be more difficult. When you activate Assistive Touch, a small button will appear on the screen. When you tap this button, you will be able to perform various tasks like going to Home Screen, activating Siri, accessing Control Center, taking a screenshot, and even restarting your iPad. 
To set up AssistiveTouch, go to Settings > Accessibility > Touch > AssistiveTouch. Here, you will be able to customize AssistiveTouch settings to make them even more specific to your needs. 

Touch Accommodations
If you have difficulties with fine motor control, dexterity, or hand tremors, you can adjust how the iPad responds to gestures like tap, swipe, and touch-and-hold. The iPad can be set to recognize slower or faster touches and ignore multiple touches, prevent it from waking when you touch the screen or turn off Shake to Undo if you shake the iPad unintentionally.
- To adjust the settings for taps and swipes, go to Settings > Accessibility > Touch > Touch Accommodations.
- Turn on Touch Accommodations. From here, you will have the option to adjust even more touch settings like preventing unintended swipe gestures and counting multiple touches as one.


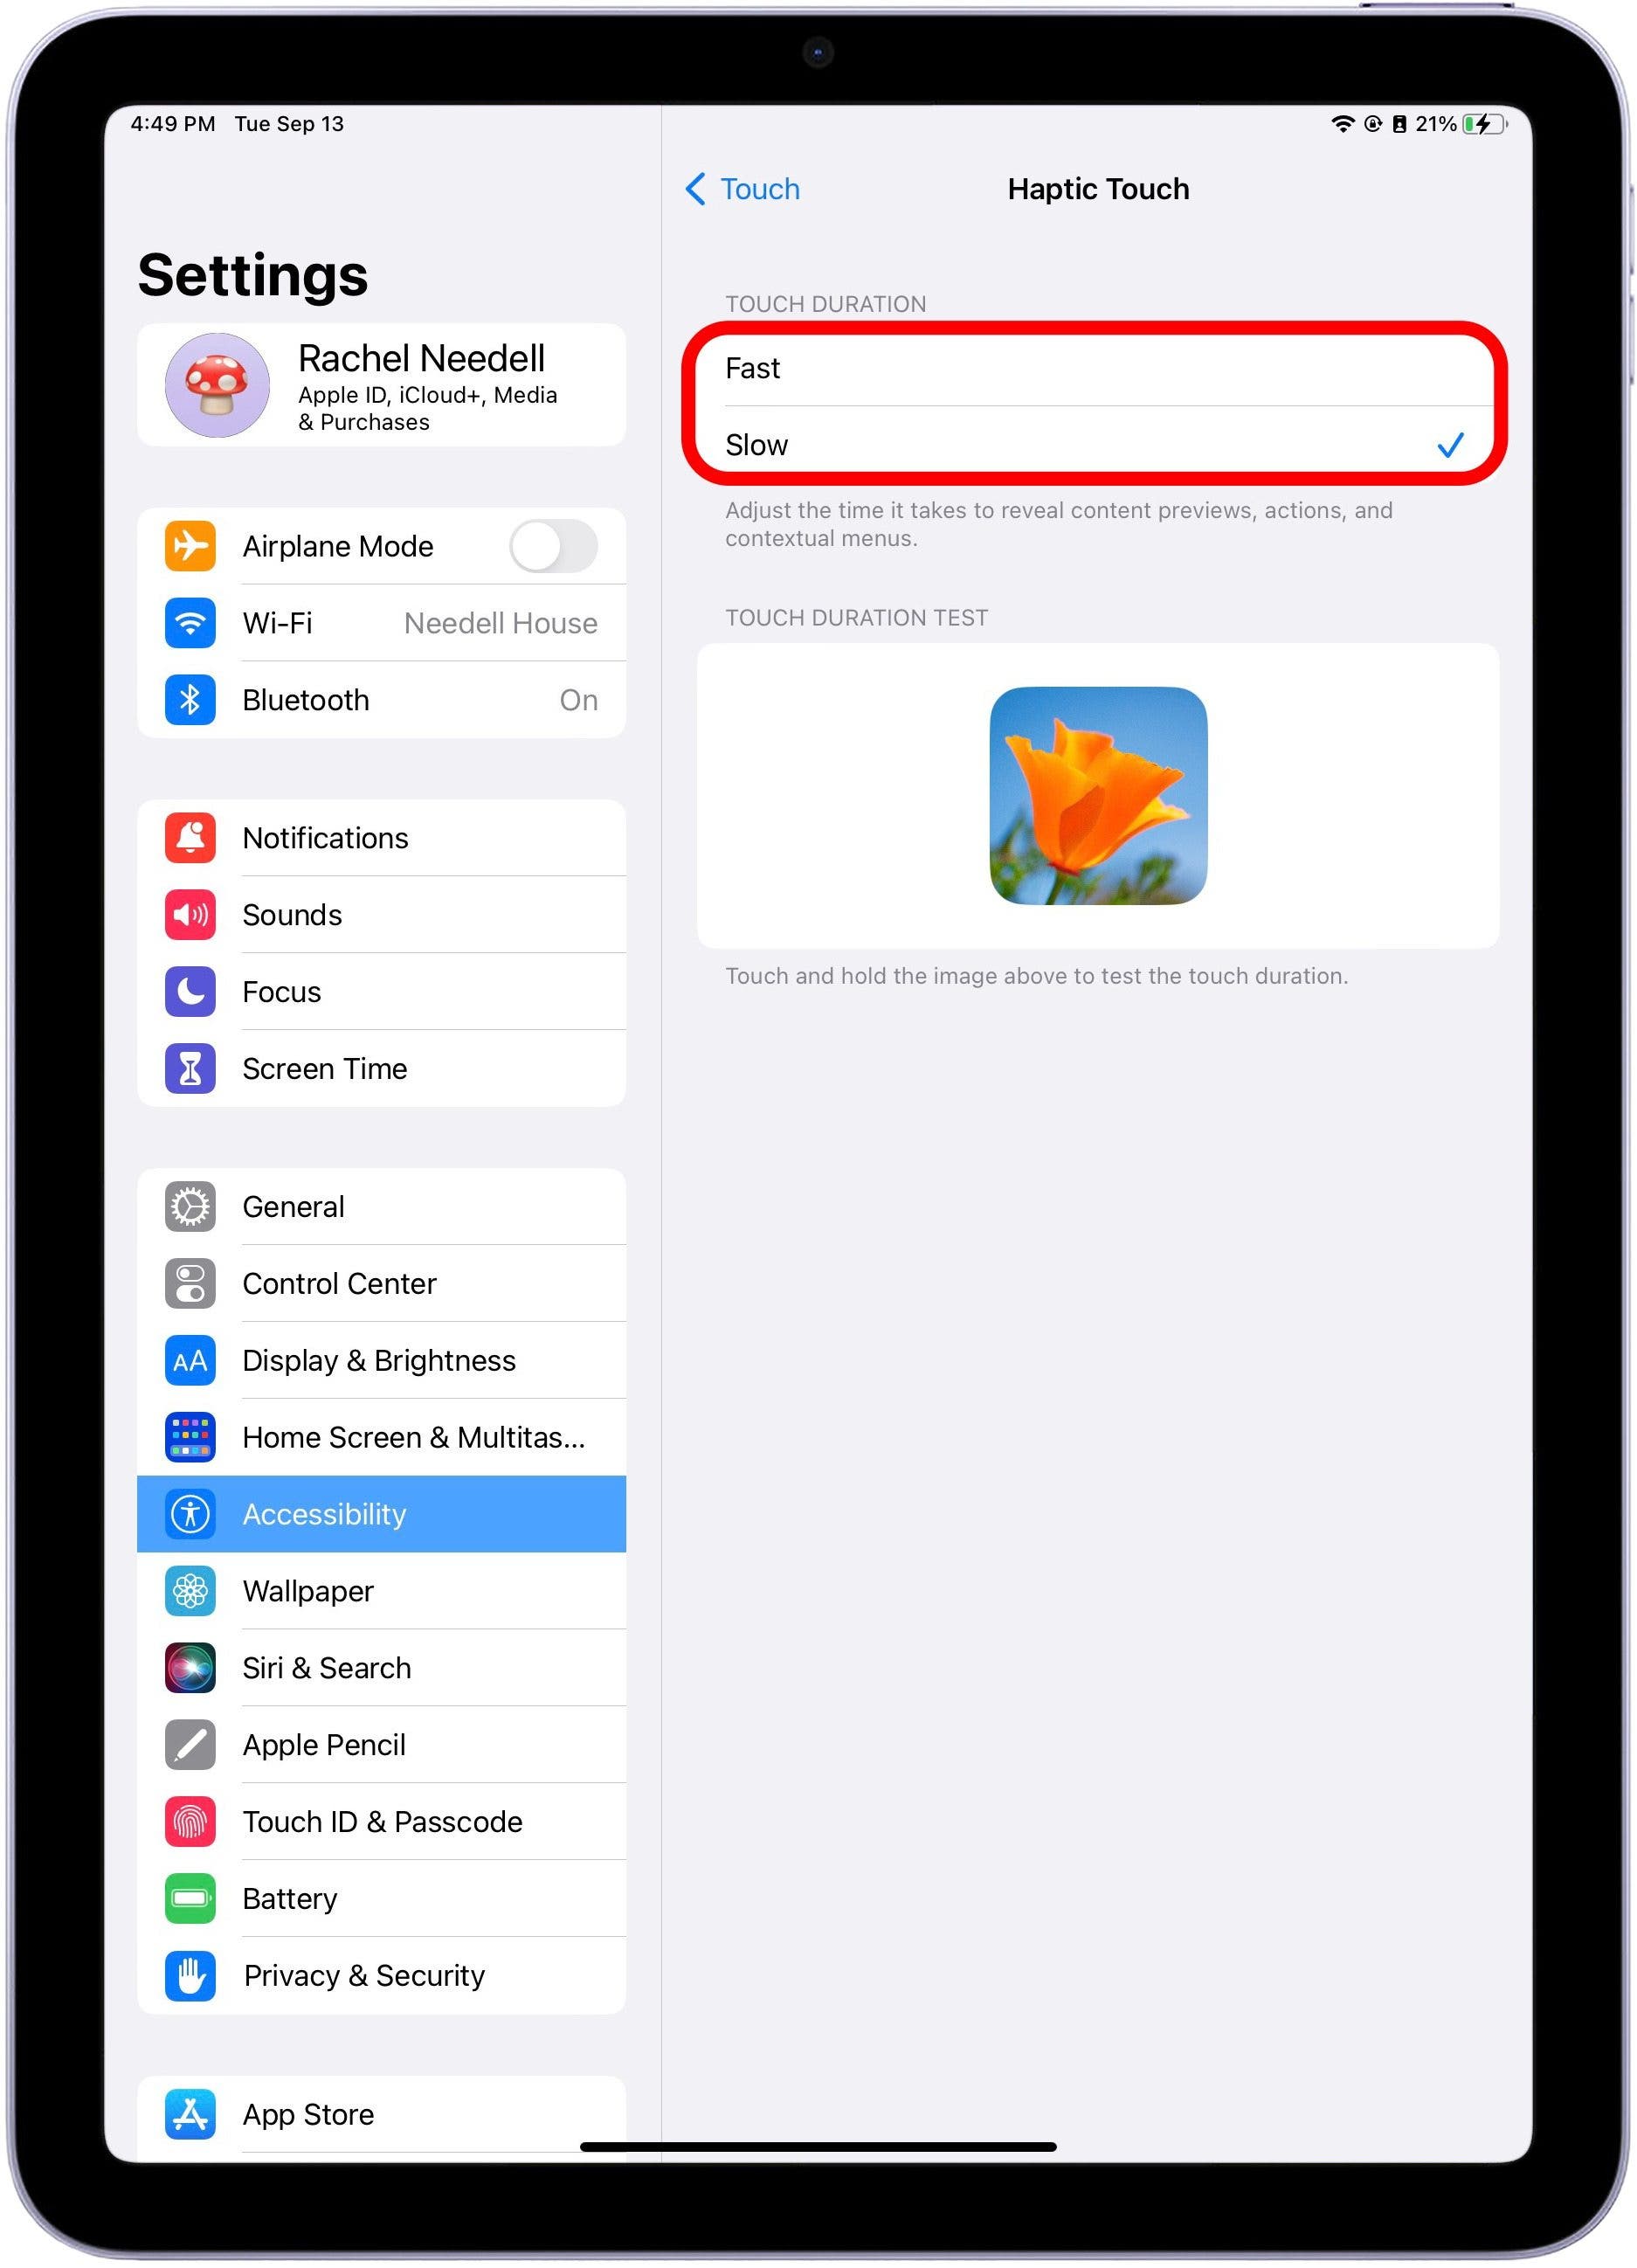
Touch-and-hold gestures reveal previews of links and action menus. To customize the way the iPad interprets this gesture,
- Go to Settings > Accessibility > Touch > Haptic Touch.
- From here, you can choose a touch duration of Fast or Slow, and you can test your new settings on the image at the bottom of the screen.


To Turn off Tap to Wake on supported models and Shake to Undo, go to Settings > Accessibility > and then choose either Shake to Undo or Tap to Wake to turn them off. 
Voice Control
Did you know you don’t even have to touch your iPad if you don’t want to? You can actually control your iPad with just your voice using spoken commands when you set up Voice Control. You will need to be connected to Wi-Fi before turning on Voice Control as the iPad will need to complete a one-time file download from Apple. But afterward, you will be able to use Voice Control on or offline. Once you have set up Voice Control, you will be able to use your voice to perform gestures, interact with screen elements, dictate and edit text, and more.
To set up Voice Control,
- Go to Settings > Accessibility > Voice Control.
- Tap Set Up Voice Control.
- Tap Continue to start the file download, and once it has downloaded, you will have access to many options. Different kinds of options that may be useful include Customize Commands which will allow you to view, edit, or update existing commands as well as add new ones.


You can also teach the Voice Control new words by tapping Vocabulary. Another useful aspect of Voice Control is the Play Sound option. It’s to have an auditory confirmation that the iPad has actually heard and is executing the verbal command it was just given.
Save Your Credit Card Information
If you’re an online shopper, I highly recommend entering your credit card information so you can make purchases hassle free. Unlike the iPhone, Apple Pay on the iPad doesn’t support in-person transactions, only purchases on websites and within apps. Most credit cards support Apple Pay, but there will still be the few that don’t, unfortunately. You can add up to eight credit cards. To add a card:
-
Open the Settings app and tap Wallet & Apple Pay. Tap Add Card to add a new credit or debit card.
-
You can either apply for an Apple card or follow the prompts to enter your debit or credit card information.


Then, when making a purchase, tap the Apple Pay icon, review your credit card and shipping details, and confirm by using Face ID (or passcode/Touch ID for older iPads).
It’s important to note that setting up Apple Pay is different from using Safari Autofill. I recommend setting both of these features up to make online payments faster, whether you’re checking out in an app using Apple Pay or shopping online using Safari. To save your credit card info to Safari, go to Settings > Safari > Autofill > Saved Credit Cards so that you can autofill checkout pages when browsing Safari.
Personalize Widgets
What are widgets? Widgets are the bigger icons that help you get information from your apps at a glance. For example, a Weather widget will show you the weather right on the home screen so that you don't need to open the app. You can add them to your iPad’s Today View or directly on the Home screen and organize them in a way that makes sense to you! They can help you save time and multitask on your iPad.
Add & Remove Widgets from Your Home Screen
Let’s start with how to add widgets to your Home screen.
-
Long press (tap and hold) the home screen background you want to add the widget to. You can add widgets to any home screen page. Tap the plus icon.
-
Select the app you want to add a widget for. Swipe between the different sizes and types of widgets. Once you see the one you want, tap Add Widget. The app will appear on the home screen.
-
You can rearrange the widgets and move them between the screens by long-pressing the background of the home screen and dragging it to a new location. Just tap Done when everything is in the right place.


Some widgets, like the Calendar widget, have further customization options that you can tailor. To access these, press and hold the widget and select Edit Widget. (If this option doesn’t appear, there are no other customization options for the widget.)
Add & Remove Widgets from Your Today View
Typically, I like to place my favorite widgets directly on my Home screen and lesser-used widgets in my Today View. Below, we’ll walk through how to personalize your Today View.
-
Swipe right on your Home screen to access the Today View. Scroll to the bottom of your widgets and tap the Edit button.
-
Tap the minus button on a widget in Today View to remove it. Tap the plus icon at the top to add a new widget.
-
Some popular apps have widgets that can be downloaded. To add a widget that is not a native Apple Widget, swipe to the bottom of your Today View in jiggle mode and tap Customize. From here, you can tap the plus icon to add widgets for your favorite apps.


Create Widget Stacks
If you like to have a lot of widgets in your Today View and/or Home screen but don’t want to take up a lot of space, adding a Smart Stack can be a great solution! A Widget Stack is a collection of widgets that rotates through the widgets in the stack and allows you to swipe up or down to switch between widget displays.
You can manually create stacks by dragging and dropping one widget on top of another in edit mode, but when you create a Smart stack widgets are automatically displayed based on your on-device Siri intelligence. You can still swipe up and down to view different widgets, but Siri will also be gauging which widget in your smart stack to display, based on factors such as time, location, and your device activity. Here’s how to create a widget stack:
-
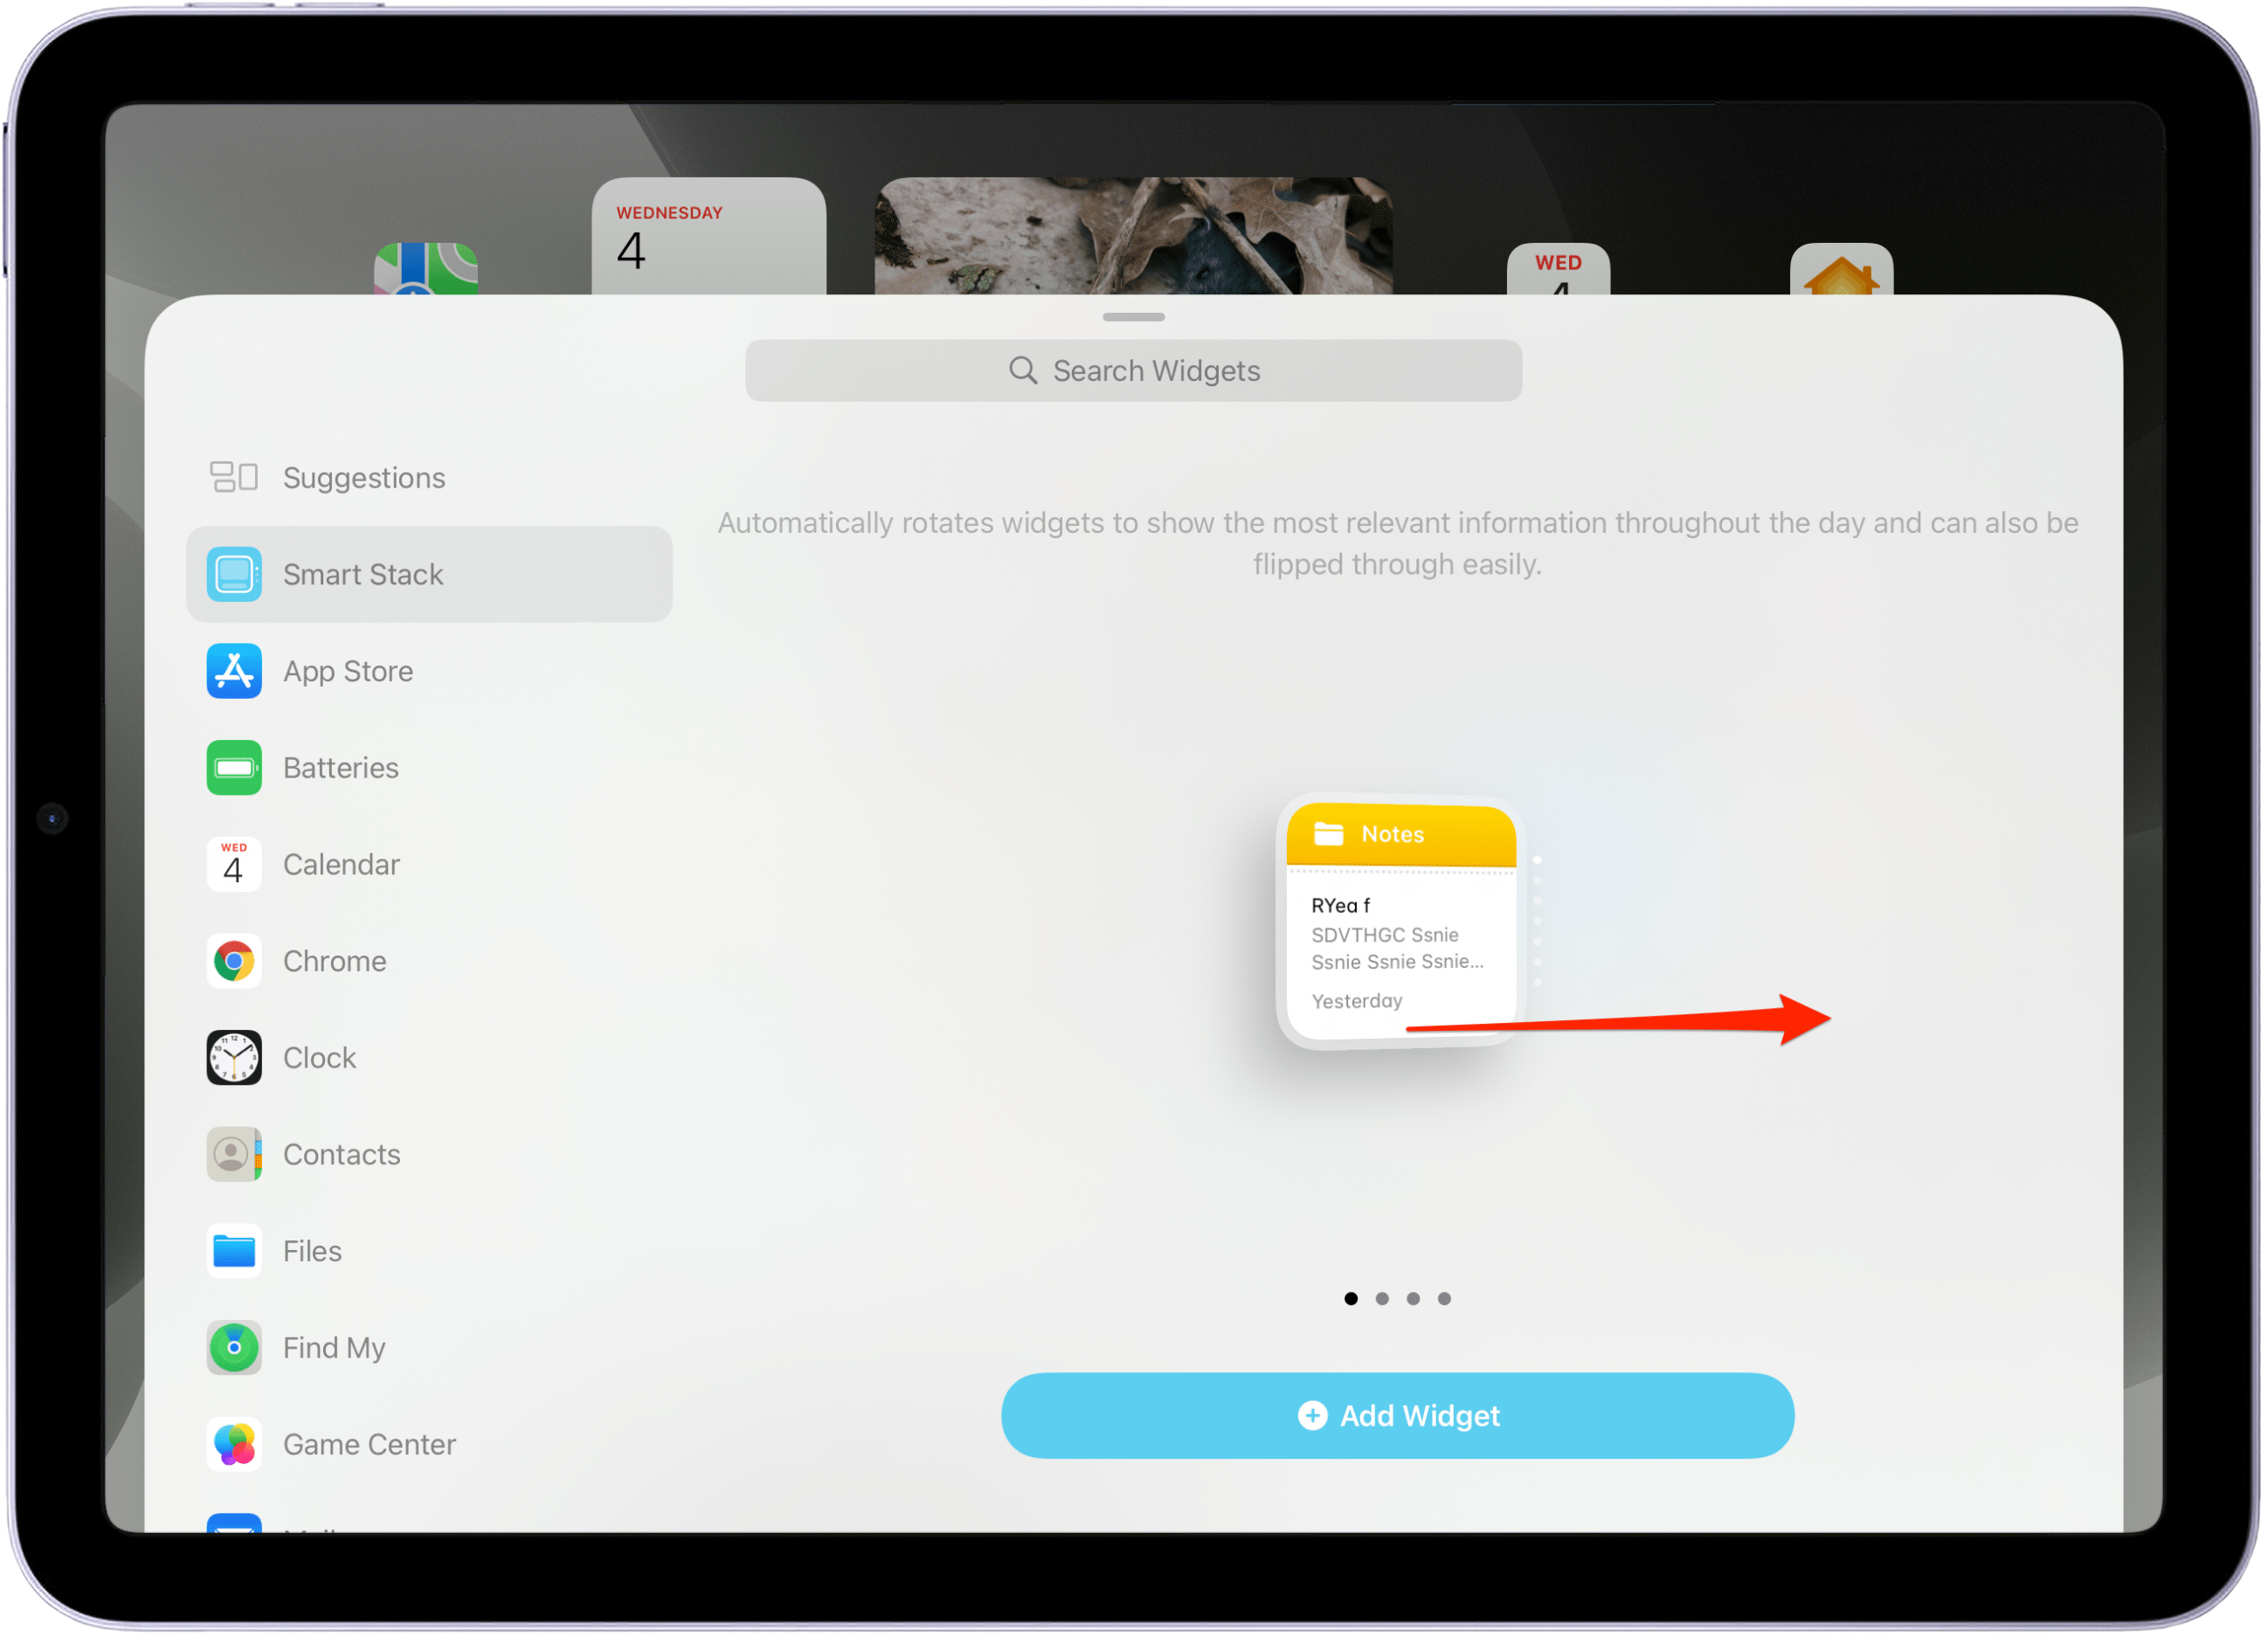
Long press on a blank part of your Home screen until it enters jiggle mode. Tap the plus icon at the top of the screen and select Smart Stack.
-
Swipe through the options to choose the size of your Smart Stack. If you have a lot on your Home screen, you might want a smaller option. If you want the widgets to be highly visible, a larger version might be right for you. When you select a size, all widgets in the stack will be that size. Tap Add Widget when you find the stack size you want.
-
Long press on your Smart Stack until a menu appears. Tap Edit Stack. To delete a widget from your Smart Stack, tap the minus button. To add a widget to the Smart Stack, tap the plus icon in the top corner.
-
To change the order in which your widgets appear, tap and drag a widget to the new place you want it. If you like to keep your Smart Stack in a specific order, tap Smart Rotate to turn it off.
-
To edit the display settings for a specific widget in a stack, swipe up or down to the widget you want to edit. Press and hold the widget and select Edit [Widget Name]. (If this option does not appear, it means the widget cannot be further customized.) Use this option to adjust settings such as the Clock widget time zone, or which location you want the Weather widget to display.


