Due to the Apple SDK constraints on developers of iPhone software, data exchanges with your phone is limited to email and local area network connectivity.
Some iPhone applications such as “Files” allow you to import and read your Word, Excel, and PDF files from your desktop computer to your phone, and move that data to the iPhone by establishing a wireless connection between the phone and desktop over a LAN.
Whenever your iPhone’s “Wi-Fi” mode is turned on in your Settings panel, the phone requests a LAN IP Address in order to communicate with other nodes on the LAN. It does this via the DHCP server built into virtually all broadband routers, and almost every software solution like Microsoft’s Internet Connection Sharing (ICS).

DHCP Servers automate the process of setting up the 'IP Schema' of your home network. When a Wi-Fi device is turned on, it seeks a DHCP server on the network and gets a 'dynamic' IP address. Each time a wireless device is turned on, it could get a different IP address depending on a bunch of other factors.
The most popular IP address schema for home networks is 192.168.x.x (often 192.168.10.x or often 192.168.1.x). Routers and other internet sharing solutions are usually positioned as the first IP address in the schema – such as 192.168.10.1.
Normally you don’t need to worry about what a computer’s IP Address is on a LAN, as the connectivity is all handled automatically for you, but when using a File Sharing application such as “Files,” it requires you to connect from your desktop to your iPhone over the LAN. To do this you need to know the network IP address of the phone.
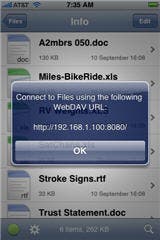
When you start the “Files” application it does advise you of the phone’s IP Address but to connect you must have set up your Windows computer (this is not an issue on Macs as Bonjour manages the connectivity and allows you to use the alias of iPhone.local:8080/) ahead of time by creating a “network connection” or by “mapping a network drive” to the iPhone’s IP address.
Unfortunately every time the iPhone reattaches to your network it may be assigned a new dynamic IP Address, which requires you to go thru this mapping process all over again.
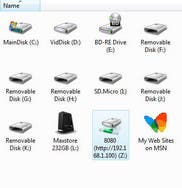
To prevent this confusion, you want to give your iPhone a nice stable Static IP Address on your network, so that it always remains the same. Then you can map it as a Network Drive (the highlighted drive in the local drives window) and keep it on your desktop for easy access.
To do this, you must Open your router's administration page and configure the built in DHCP server. Each router will be a little different and may have different capabilities.
The following example uses a LinkSys wireless router, but others will be similar.
On your Router’s Wireless Setup page you should find a button that allows you to configure the router’s DHCP Server (at the cursor in the image below)
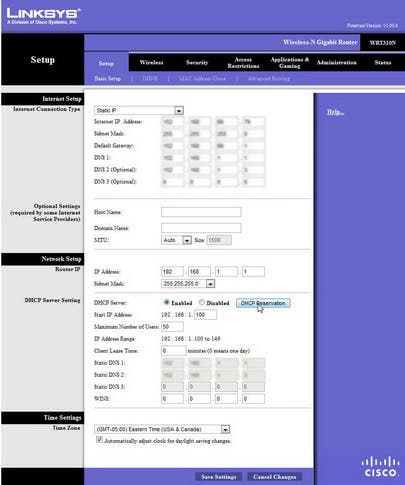
This will open up an Address configuration page that shows what devices are currently connected to your LAN (upper portion of image below).
In this example, the iPhone was automatically assigned an IP Address of 192.168.1.101 on my network. The next time it was connected it may have been a “102” or “103” etc depending on whether other computers on the network were turned on before the iPhone was.
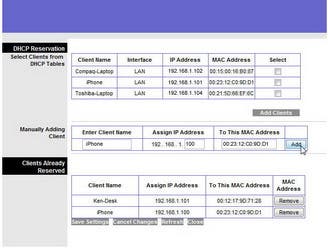
To “freeze” the phone’s IP Address we need to use the “Add Clients” feature. Enter the desired name (iPhone), an IP Address for the phone (I used 192.168.1.100 as it was nicely in my normal address range and was not currently assigned in te DHCP table above. Note in the Router Setup Page image above that my network’s Starting Address Range for DHCP assignments is at x.x.x.100, so my network devices normally fall in the 100-105 range.)
An even better approach would have been to use a static address for the iPhone that was outside the normal dynamic range. Thus x.x.x.90 or x.x.x.120 would have worked and I would not have had to worry if the address was already assigned in the dynamic reservation table.
Note when you manually assign the IP Address, you must also correlate it with the hardware MAC Address (which is built into and unique to each piece of hardware). The easiest way to get this is by having your iPhone connected to the LAN before you start working on the Router tables. The phone’s MAC Address is then available in the DHCP Reservation table (middle item) for you to use.
Enter this in the Manually Added Client table, click the “Add” button and be sure to scroll down the window and click on the “Save Settings” button that will normally be at the bottom of your Router’s configuration page.
Now turn off your iPhone’s Wi-Fi in the Settings window, then turn it back on. This should force the phone to get a new LAN connection using the new static IP Address.
You can now easily setup the iPhone as a Network Drive on your desktop computer and now conveniently move files back and forth without determining what the (possibly changed) LAN (IP) Address of the phone is every time, as exampled in the Network Drives (2nd) image of this post.


