Do you have an idea for an app but lack the programming knowledge to begin building it? In this weekly blog series, How To Unleash Your Inner App Developer, I will take you, the non-programmer, step by step through the process of creating apps for the iPhone, iPod Touch, and iPad. This is Part 1 of the blog series. Join me each week on this adventure, and you will experience how fun turning your ideas into reality can be!


So you want to be an app developer! As I mentioned in my first post, giving yourself permission to test the waters is the first step in the process. In this week's post, I'll discuss the details of how to get yourself and your computer ready to create apps.
Counting the Cost
I've written software for every major smartphone platform, and I have to say, Apple's admission price for getting into app development is hard to beat. Registering as an Apple Developer is free, and so is Xcode, the Mac software application you use to create iOS apps!
With your free admission, you can build apps for the iPhone, iPod Touch, and iPad. You can run them in the iPhone and iPad Simulators, which come with Xcode. However, if you want to run your apps on an actual iOS device, you need to pay an annual developer fee of $99. This fee helps cover Apple's cost of having App Store technicians testing the apps you submit. As you might imagine, this fee also protects Apple from a flood of submissions from those who aren't serious about app development. Fortunately, you can create apps and test them in the simulators free of charge until you're ready to test your app on an actual device
Getting the Right Mac
If you own a Mac built after August 2006, it has an Intel processor, which is required for iOS app development. If you're not sure when your Mac was built, you can see what processor you have by clicking the Apple icon in the main menu on your desktop and selecting About This Mac. In the About This Mac window, just look below the Software Update… button to see if your Mac has an Intel processor.
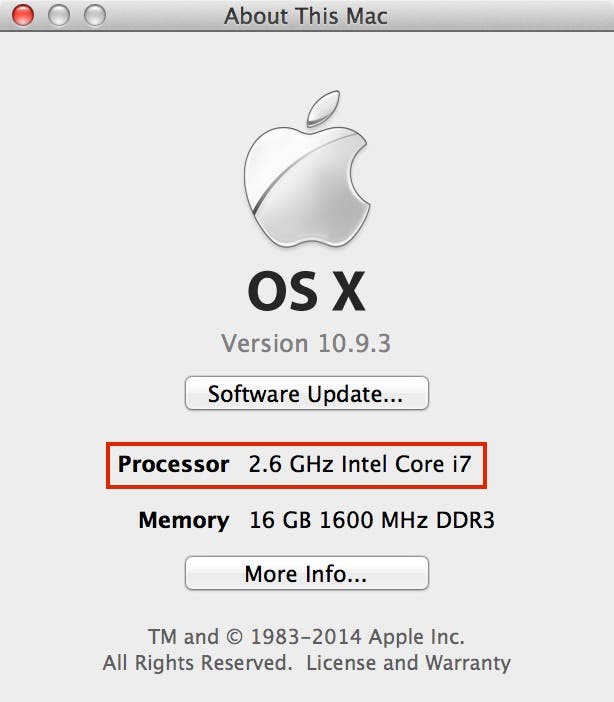 |
| Figure 1 - The About This Mac window |
You also need to make sure your Mac has the right operating system. The latest version of Xcode, version 6.3, requires OS X 10.9.3 or later. So, if you have an older version of OS X, you need to upgrade to at least OS X 10.9.3.
If you don't already own a Mac and are on a tight budget, I highly recommend checking out the Mac mini. You can get a 1.4GHz dual-core Intel Mac mini with 4GB of memory and a 500GB hard drive directly from Apple for just $499, or even a little bit cheaper from Amazon (especially if you don't have to pay sales tax). Higher processor speeds and larger memory increase the speed at which your Mac runs. The size of the hard drive indicates how much information you can store on your Mac. Although the Mac Mini doesn’t come with a keyboard or monitor, you can connect them to your existing PC or Mac keyboard and monitor.
If you have a little more money to spend, I highly recommend the MacBook Pro, which I personally use for app development.
Renting a Mac in the Cloud
If you don't own a Mac and aren't ready to commit to purchasing one, there's another great alternative — rent a Mac. Services such as MacInCloud, allow you to rent a Mac that you can access over the Internet. These Macs come pre-loaded with Xcode, so they are ready for App development!
MacInCloud has rental plans for as little as $20 per month (or $16 if you're a student) that allows you to try your hand at app development without breaking the bank. This monthly plan also includes a one-day free trial so you can kick the tires to make sure this service will work well for you. As you might imagine, you need to have plenty of bandwidth and a reliable Internet connection for this option to work well for you!
Registering as an Apple Developer
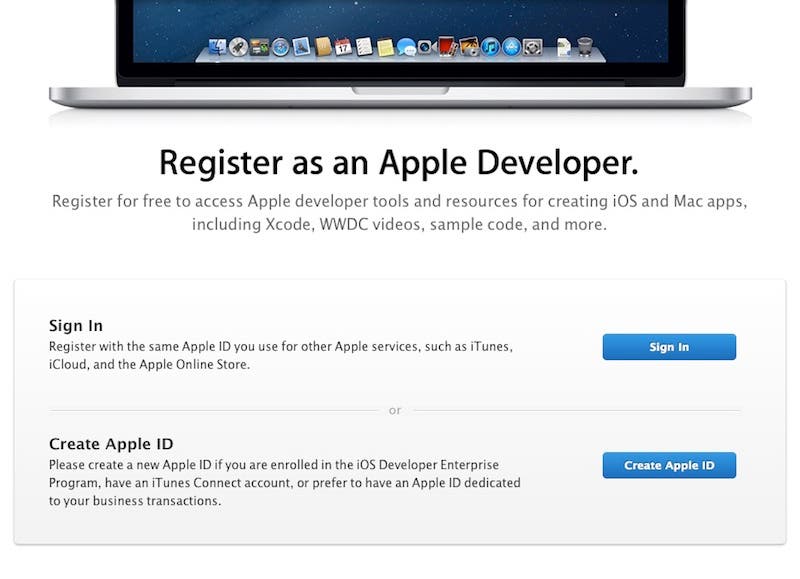
To get full access to Apple’s developer tools, forums, sample code and videos, you need to register as an Apple Developer, which you can do at this link: https://developer.apple.com/programs/register/.
When you navigate to this web page you will see options to register using an existing Apple ID, or create a new a new Apple ID.
Depending on which option you choose, you will be asked to answer several questions and then read and sign the Apple Developer Agreement.
Installing Xcode On Your Mac
Downloading and installing Xcode is very straightforward. It's a large download (2.69 GB for the latest version) so make sure you have at least 5GB of disk space and plan for a long download time. Note: You must be using Xcode 6.3 or newer to follow along with this series!
![]()
To get started, just click on the App Store icon on your Mac. When the store appears, in the upper right corner, type Xcode in the search box, press Enter and you should see Xcode in the list of results. Just click the Free button and you will be prompted to enter your Apple ID and password, after which Xcode will begin downloading.
If Xcode doesn't open automatically after installing, just click the Applications folder in the dock and click the Xcode.app icon from the list of applications.
The first time you launch Xcode, you may see a window that tells you that you need to install an additional framework or component. If this happens, just click the Install button and the installation should take just a few minutes.
Come On In, the Water's Fine!
At this point, you're ready to begin the fun of app development! In my next few posts, I'll familiarize you with Xcode and take you through the basic steps of creating your first app. I believe you will find many aspects of app development are easier than you think!
