Do you have an idea for an app but lack the programming knowledge to begin building it? In this weekly blog series, I will take you, the non-programmer, step by step through the process of creating apps for the iPhone, iPod touch, and iPad. Join me each week on this adventure, and you will experience how much fun turning your ideas into reality can be! This is Part 24 of the series. If you are just getting started, check out the beginning of the series here.
In my previous column, I talked about some of the great new changes in Xcode 5, Apple's tool for creating iOS apps. In this post, I am going to move the iAppsReview project to Xcode 5 and iOS 7 and we'll talk about some of the challenges you will encounter as you move your apps forward.

You can get the latest version of the iAppsReview project from this link. I recommend trying to follow the steps in this post on your own, but if you run into trouble, you can get the completed app at this link.
Opening the Project in Xcode
Let's open the iAppsReview project in Xcode 5 to see how the upgrade process works.
- Before opening any project in a new version of Xcode. I recommend making a backup of your project. This is as easy as opening a Finder window, selecting the project root folder (iAppsReview in this case), and pressing Command+D to make a duplicate of the folder and its contents.
- Next, launch Xcode 5 and open the iAppsReview project. After opening the project, Xcode automatically builds the project and you should see in the Activity Viewer at the top of the Xcode window that the build has succeeded (Figure 1).
| Figure 1 - The Activity Viewer should show Succeeded. |
- If the Storyboard file is NOT automatically selected when you open the project, go to the Project Navigator and click on the MainStoryboard file to select it. In either case, this displays the dialog shown in Figure 2.
 |
| Figure 2 - Xcode asks if you would like to uprade the storyboard. |
This dialog asks if you want to upgrade the storyboard to Xcode 5. Once you upgrade a storyboard to Xcode 5, you can no longer edit it in Xcode 4. Since you already made a backup of the project in step 1, you can upgrade the storyboard knowing that you can always open the backup version in Xcode 4 if necessary.
- Click the Upgrade button to upgrade the storyboard to Xcode 5. When you do this, you can see a visible change in the storyboard scenes as they are upgraded to Xcode 5 and iOS 7.
Building the Project
Now that the storyboard is upgraded to Xcode 5, let's build the project.
- Press Command+B to build the project.
- In the Activity Indicator at the top of the Xcode window, you should again see that the build succeeded.
Setting Up the iOS 7 Previewer
It's a good idea to examine all of the scenes in your app after upgrading to a new version of Xcode. When looking at each scene, I find it helpful to use Xcode 5's new iOS Previewer so I can see what the scene looks like under iOS 6 and iOS 7. To launch the iOS Previewer:
- Display the Assistant Editor by clicking the center button in the Editor button group in the Xcode toolbar.
- It's easiest to view the scenes side by side, so go to the Xcode menu and select View > Assistant Editor > Assistant Editors on Right as shown in Figure 3.
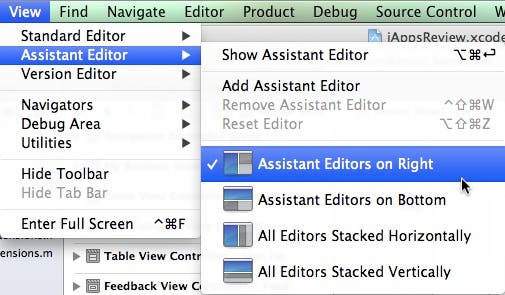 |
| Figure 3 - Displaying Assistant Editors on the right |
- Click the first segment in the Assistant Editor's jump bar (usually labeled Automatic or Manual) and select Preview (1) > MainStoryboard.storyboard (Preview) from the popup menu (Figure 4).
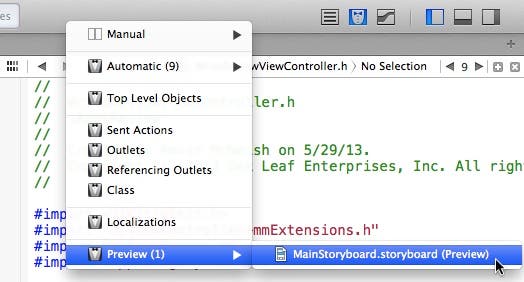 |
| Figure 4 - Launching the iOS Previewer |
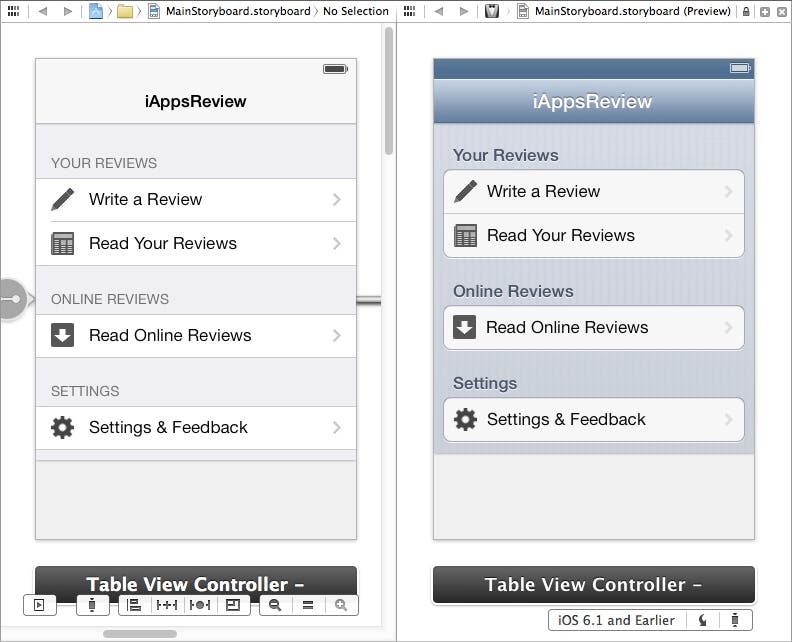
- Next, in the bottom-right corner of the iOS Previewer, select iOS 6.1 and Earlier from the toolbar. You should see the iOS 7 version of the scene on the left and the iOS 6 version of the scene on the right as shown in Figure 5.
 |
| Figure 5 - The iOS Previewer |
Now let's take a closer look at the different scenes in the iAppsReview project.
Examining the iAppsReview Scene
As you can see in Figure 5, there are some distinct differences between the iOS 6 and iOS 7 versions of the scene.
- The color scheme is different—the iOS 7 navigation bar is light gray with a black battery icon and black text while the iOS 6 navigation bar is dark gray with a white battery icon and white text.
- The iOS 7 table view background is a solid, light gray, and the iOS 6 table view background is darker gray with vertical stripes.
- The iOS 7 table view section labels are uppercased, and the iOS 6 table view section labels are mixed case.
- The iOS 7 table view cells extend the full width of the screen, and the iOS 6 table view cells extend most of the width. The full width iOS 7 cells are part of Apple's initiative to provide more room for the app's content.
There are no adjustments we need to make, so this scene is good to go!
Examining the Write Review Scene
Now let's take a look at the Write Review scene. In the storyboard, scroll to the Write Review scene and then click on the status bar at the top of the scene.
 |
| Figure 6 - The Write Review scene is shown in the iOS Previewer. |
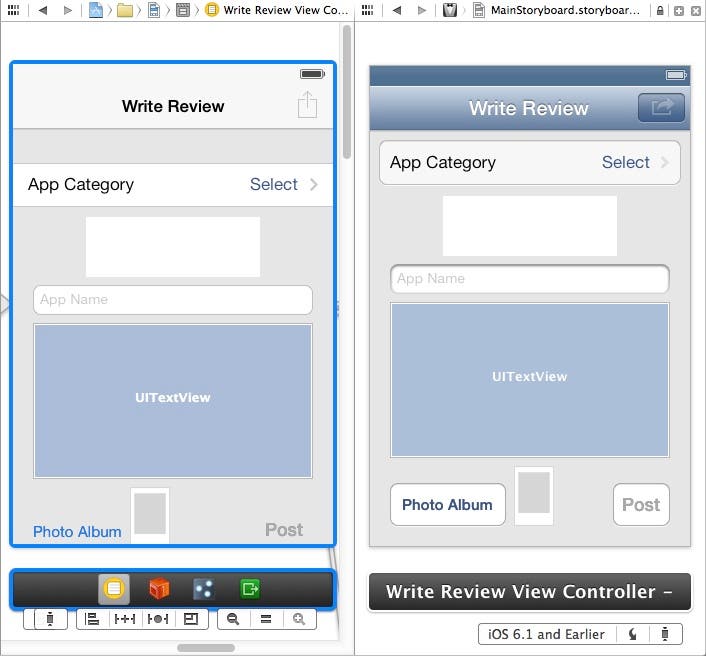
As you can see in Figure 6, in addition to the color scheme, there are some distinct differences between the iOS 6 and iOS 7 scenes.
- On the left side of the screen, the Share button in the navigation toolbar has the new iOS 7 look.
- The iOS 7 table view is partially hidden beneath the navigation bar.
- The iOS 7 buttons no longer have a border.
This is one of those situations where we shouldn't leave the iOS 7 scene "as is". We should tweak it so that it looks great in iOS 7.
Redesigning the Write Review Scene
When you move a scene to iOS 7, it's best to take a look at some of Apple's built-in apps so you can create a similar look and feel in your own app. For example, the buttons at the bottom of the Write Review scene are definitely not visually appealing. So let's check one of the built-in apps to see how Apple is presenting these new buttons.
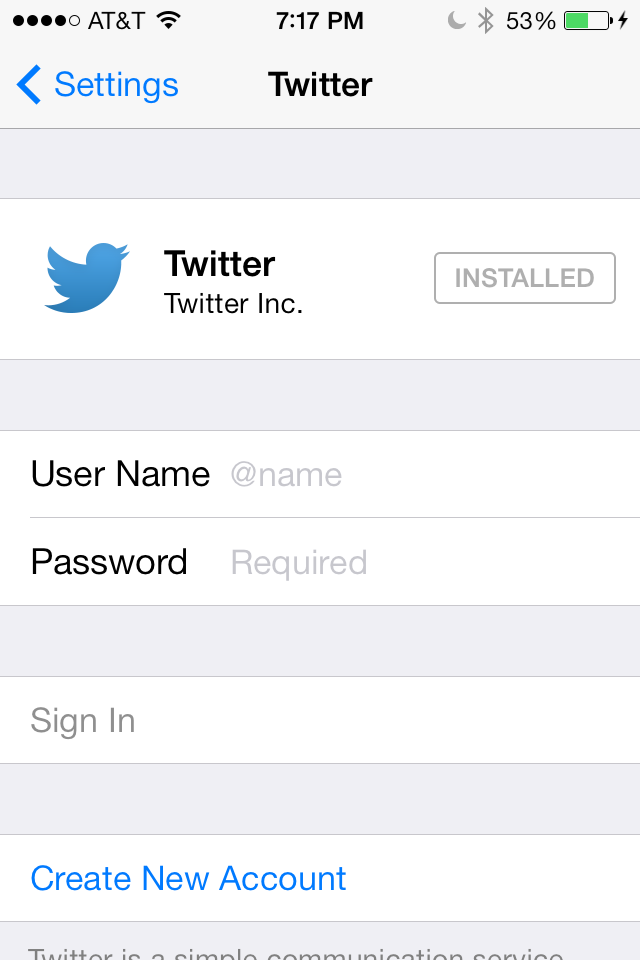
Figure 7 shows the Twitter app. Towards the bottom of the screen you can see the text Sign In and Create New Account. Although at first glance these may look like table view rows, but they are actually buttons. Notice the buttons have a white background and fill the full width of the screen.
 |
| Figure 7 - Buttons in the Twitter app |
As shown in Figure 6, the Write Review scene has two buttons—Photo Album and Post. We could change both of these buttons to look like the buttons in the Twitter app, but that would take up a lot of screen real estate. Here's what we can do instead:
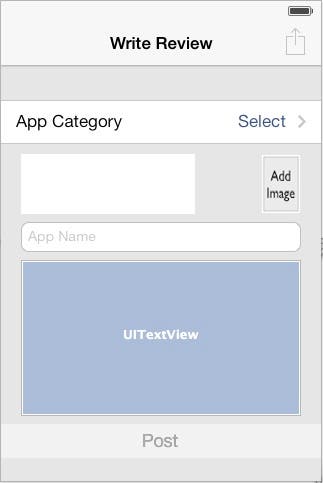
- Remove the Photo Album button.
- Change the image view at the bottom of the screen to display text that says Add Image. Users could then directly tap the image view to add a new image. We can also move the image view to the right of the five-star review control to make the best use of space.
- Change the Post button to a full-width iOS 7-style button.
When we finish with these steps, the scene will look like Figure 8.
 |
| Figure 8 - The completed Write Review scene. |
Updating the Write Review Scene
So let's begin! We'll start at the bottom of the scene.
- First, let's delete the Photo Album button. To do this, click on the button in the design surface to select it, and then press the Delete key.
- As soon as you delete the button an error icon appears to the right of the Write Review scene in the Document Outline panel as shown in Figure 9. If you don't see the Document Outline panel, you can click the rounded rectangle button at the bottom-left corner of the Interface Builder, or select Editor > Show Document Outline from the Xcode menu.
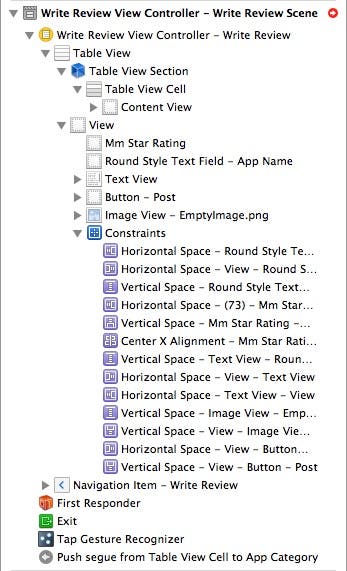 |
| Figure 9 - Warnings in the Document Outline panel |
If you expand the View > Constraints node in the Document Outline, you can see there are quite a few constraints. These constraints were carried over when Xcode converted the storyboard to Xcode 5.
- In the Document Outline pane, click on the red circle to the right of the Write Review scene. This displays the detailed constraint error information shown in Figure 10.
 |
| Figure 10 - Constraint error detail |
- At this point, we could fix this error, but since we have a lot of rearranging to do in the scene, it's best if we simply delete all constraints in the scene and then we can put the necessary constraints back into the scene later on.
To delete all constraints, click the Resolve Auto Layout Issues button at the bottom-right corner of Interface Builder (highlighted in red in Figure 11.) From the popup menu, select the Clear All Constraints in App Category View Controller (Note: you may need to select a user interface control in the scene before selecting this option due to a bug in Xcode.)
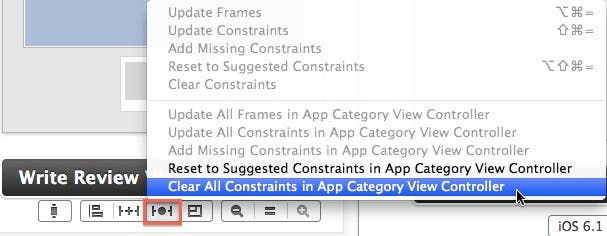 |
| Figure 11 - Clear all constraints. |
After clearing all constraints, the Document Outline panel displays the text No Auto Layout Issues.
It's important to note that when you create a new scene in Xcode 5, constraints are not automatically generated as they were in Xcode 4. This makes it much easier to lay out the user interface. Later on, you can apply constraints to the scene once the dust has settled on your UI design.
- Next, drag the image view away from the bottom of the scene and temporarily place it to the right of the white rectangle that represents the five-star review control as shown in Figure 12.
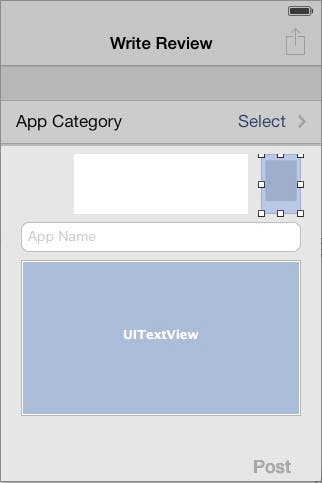 |
| Figure 12 - Move the image view. |
- Now we're going to make the Post button span the full width of the scene. To do this, drag the Post button to the bottom-left corner of the scene until the horizontal and vertical guidelines appear as shown in Figure 13 (you need to move the button all the way to the left of the scene.)
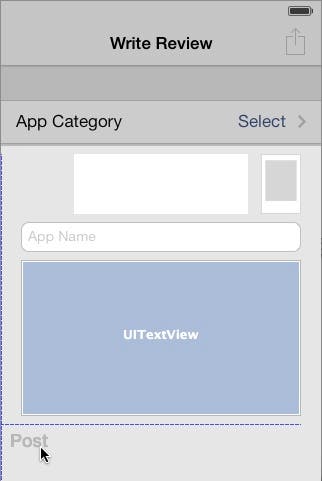 |
| Figure 13 - Move the Post button. |
- Grab the resizing handle on the right side of the Post button and drag it all the way over to the right edge of the view as shown in Figure 14.
 |
| Figure 14 - Stretch the Post button. |
- Now let's change the background of the button to white. The new iOS 7 buttons don't have a background color, but they do have a Background image property we can set.
With the Post button still selected, go the Attributes Inspector (third button from the right in the Inspector toolbar) and set the Background property to white.png as shown in Figure 15 (I have added this image file to the project specifically for this purpose.)
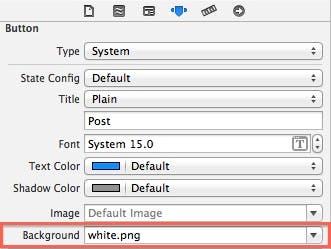 |
| Figure 15 - Set the Background color to white.png. |
If you click anywhere else in the design surface you can see that the background of the Post button is now off-white because the button is disabled. When the button is enabled at run time, the background will be white.
- Next, position the five-star control above the text field and near the left edge of the scene until you see the guide lines appear (Figure 16) and then release your mouse button.
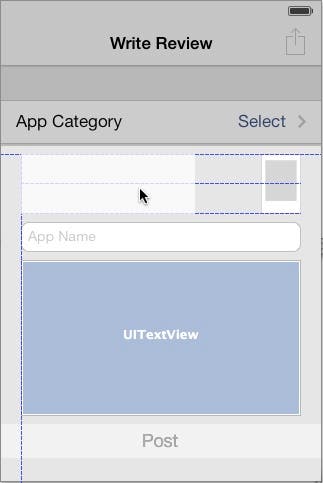 |
| Figure 16 - Position the five star control. |
- Next, center the image view control horizontally to the five-star control and the right of the scene until the guide lines appear as shown in Figure 17 and then release your mouse button.
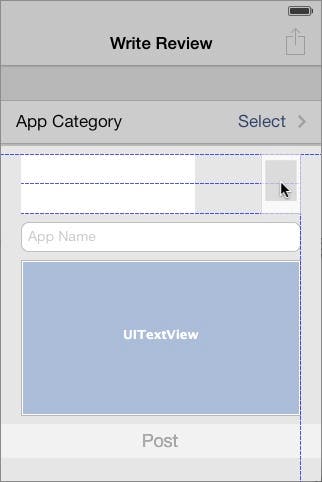 |
| Figure 17 - Position the image view. |
- Next, let's change the default image that is displayed in the image view. Click on the image view in the design surface to select it, and then go to the Attributes Inspector (the third button from the right in the Inspector toolbar.) Change the Image attribute to AddImage.png. When you do this, the image shown in Figure 18 is displayed in the image view.
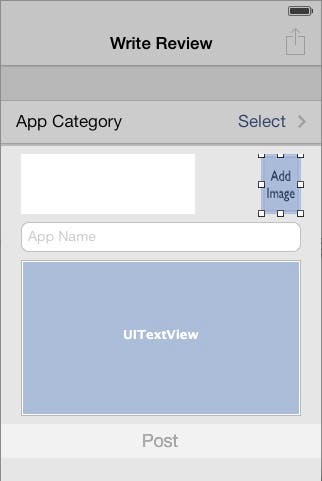 |
| Figure 18 - The new image view image. |
- For our final change, we need to trigger the accessPhotoLibrary method when a user taps the image view. By default, image views are not interactive, so we first need to change that setting.
Go to the Attributes Inspector and select the User Interaction Enabled check box (Figure 19).
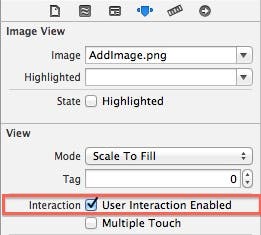 |
| Figure 19 - Select User Interaction Enabled. |
- Image views don't have an event that gets fired when you click on them. Here is where gesture recognizers come to the rescue.
Drag a Tap Gesture Recognizer from the Object Library and drop it on the image view as shown in Figure 20.
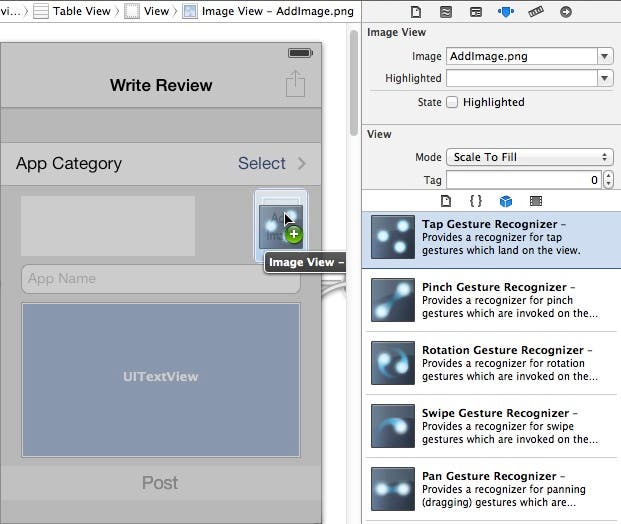 |
| Figure 20 - Add a gesture recognizer to the image view. |
This adds a second gesture recognizer to the dock below the Write Review scene. Click on the gesture recognizer on the right to select it, and then go to the Connections Inspector (the first button on the right in the Inspectors toolbar.)
In the Sent Actions section, click the connection well to the right of the selector action and drag down to the view controller icon in the scene dock as shown in Figure 21.
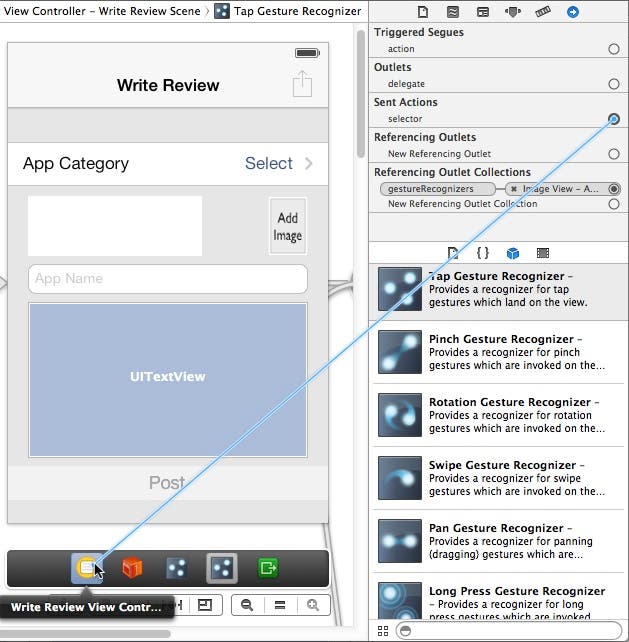 |
| Figure 21 - Connecting the gesture recognizer to a view controller method. |
Release the mouse button and you will see a popup containing a list of methods to which you can connect. Choose the accessPhotoLibrary method from the list (Figure 22).
 |
| Figure 22 - Select the accessPhotoLibrary method. |
Now you're ready to test your changes!
Testing the Write Review Scene
Let's run the app in the Simulator to see how it works at run time.
- In the Scheme control located on the left side of the Xcode toolbar, make sure you have iPhone Retina (3.5-inch) simulator selected.
- Click Xcode's Run button, and when the app appears in the Simulator, select the Write a Review option.
- Try adding and posting a new review. Click the image view to make sure the Photos scene appears, even if you don't select an image.
Changing Device Orientation
Before leaving the Simulator, let's rotate it to landscape mode to see how the scene looks. From the Simulator menu, select Hardware > Rotate Left and the scene should look like Figure 23.
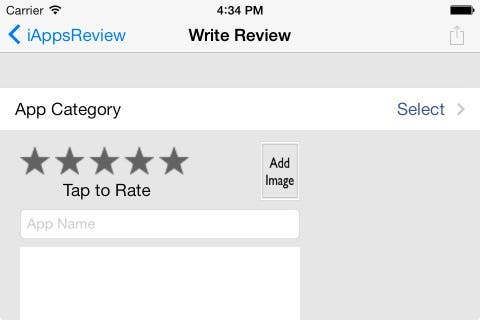 |
| Figure 23 - The Write Review scene in landscape orientation |
What happened? Earlier in this post, we removed all constraints from the Write Review scene, so there are no instructions that tell the scene how to lay out the views in landscape mode.
New Autolayout to the Rescue!
Fortunately, Apple has made vast improvements to the Auto Layout system in Xcode 5 and iOS 7. It still takes some forethought and a bit of head scratching to get more difficult layouts exactly right, but it is much easier with these updated technologies.
Conclusion
When moving your apps to iOS 7 and Xcode 5, you should stop and take a good look at your user interfaces to make sure they look great in the context of the new iOS look and feel. In my next post we'll take a close look at the new Xcode 5 Auto Layout and learn how to handle a variety of common user interface layout challenges such as the one we experienced in this post.


