The Swift programming language has a new feature called optionals that were not previously available in Objective-C. They are similar to optional types in Java and nullable types in the C# programming language.

Why Use Optionals?
You may be thinking "I can ignore optionals—it's a feature I'll never use," but I recommend that you read further. You will find that you must use optionals in Swift if you ever need a value to be nil!
Optional values in Swift allow you to be more precise in your code by letting you specify when it's OK for a particular value to be empty (and when it's not!) This helps you avoid common programming errors that occur in your app when it encounters an unexpected nil value.
Swift's optionals also also help your app's code more closely mirror the ability you already have in Core Data to indicate that a particular entity attribute is optional. As shown in Figure 1, you can specify the type of an attribute (String, in this case) as well as indicate if the value is optional.
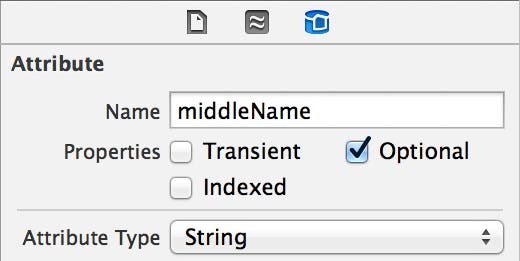 |
| Figure 1 - You can specify that a Core Data entity attribute is optional. |
Now Swift allows you to do the same with your properties and variables. Here is an equivalent optional declaration in Swift:
var middleName: String?
This declaration creates a variable named middleName of type String. The question mark (?) after the String variable type indicates that the middleName variable can contain a value that can either be a String or nil. Anyone looking at this code immediately knows that middleName can be nil. It's self-documenting!
If you don't specify an initial value for an optional constant or variable (as shown above) the value is automatically set to nil for you. If you prefer, you can explicitly set the initial value to nil:
var middleName: String? = nil
Now let's take a closer look at how nil is used in Swift.
nil in Swift
It may not be obvious at first glance, but only optionals can be nil. As stated in Apple's The Swift Programming Language book (available for free in the iBooks Store):
nil cannot be used with non-optional constants and variables. If a constant or variable in your code needs to be able to cope with the absence of a value under certain conditions, always declare it as an optional value of the appropriate type.
This means you can't do something like this, because the firstName variable is not marked with a question mark to indicate it is an optional:
var firstName: String = nil
This code produces the following compile time error:
Type 'String' does not conform to protocol 'NilLiteralConvertible'.
It's also important to note that nil in Swift is different than nil in Objective-C. In Objective-C, nil is a pointer to a non-existent object. In Swift, nil simply indicates the absence of a value—it is not a pointer. This means that you can specify optionals of any type, not just object types.
Accessing Optional Values
Unlike other programming languages, in Swift, you can't access an optional value directly. You must unwrap the optional first to access its underlying value. Take for example the following code:
var firstName: String = "Ryan"
var middleName: String? = "Michael"
var firstAndMiddleNames: String
firstAndMiddleNames = firstName + " " + middleName
The first three lines of code declare a firstName String variable, a middleName optional String variable, and a firstAndMiddleNames String variable. The next line of code concatenates (joins) the firstName and middleName variable values together with a space in between them. You may be surprised to find that this line of code generates the following compile time error:
Value of option type 'String?' not unwrapped; did you mean to use '!' or '?'?
This is one of Swift's protection mechanisms. It forces you to acknowledge that a value may possibly be nil. So, how do you unwrap an optional? There are two main ways as described in the following sections.
Using Forced Unwrapping for Optionals
As suggested by the compiler error in the previous section, one way to unwrap an optional value is to use the exclamation mark (!) after the optional to explicitly unwrap it. For example:
firstAndMiddleNames = firstName + " " + middleName!
This manually forces the value of the middleName optional to be unwrapped. However, if middleName contains a nil at run time, this will produce an EXC_BAD_INSTRUCTION run time error. So, you obviously wouldn't want to use forced unwrapping unless you are absolutely sure that the value is not nil.
Using Optional Binding to Unwrap Optionals
You can use a technique known as optional binding to test if an optional contains a value, and if so, store that value in a temporary variable or constant. To show how this works with our previous example, check out this code:
var firstName: String = "Ryan"

	var middleName: String? = "Michael"

	var firstAndMiddleNames: String


	if let middle = middleName

	{

	   firstAndMiddleNames = firstName + " "  + middle
}

	else

	{

	   firstAndMiddleNames = firstName

	}
When the if condition is checked at run time, if the middleName variable contains a String value, the condition evaluates to true, the value contained in the middleName variable is unwrapped, stored in the middle constant and the code within curly braces of the if statement is executed.
If the middleName variable contains nil, the condition evaluates to false, the optional value is not unwrapped, and the code in the curly braces of the else statement is executed.
Implicitly Unwrapped Optionals
Swift also has something called implicitly unwrapped optionals. These are optionals that do not need to be unwrapped using either forced unwrapping (!) or optional binding because they are unwrapped implicitly (automatically). They are declared using an exclamation mark (!) rather than a question mark (?).
You often see implicitly unwrapped optionals when working with Interface Builder outlets (IBOutlet properties). For example:
@IBOutlet weak var lblDescription: UILabel!
In this code, the lblDescription outlet property has an exclamation mark after it, indicating it is implicitly unwrapped. This allows you to access the property without unwrapping it.
In this example, the outlet property isn't guaranteed to contain a reference to a label but it absolutely should. If it doesn't contain a reference to a label, it means that the connection between the outlet and the label has been broken. In that case, it's OK to have a run-time error because you want to know that the connection is broken so that you can fix it!
Obviously, in cases where you're not 100 percent sure that a constant or variable contains a value you should use a regular optional instead.
Conclusion
Optionals are a great new feature of Swift that allow you to safely handle nil values in your iOS apps. I recommend reviewing this post a few times to make sure you understand the basic concepts, and then go back to Apple's The Swift Programming Language book to learn more about how optionals are used in Swift.


